European ASP.NET MVC Hosting

BLOG about Latest ASP.NET MVC Hosting and Its Technology - Dedicated to European Windows Hosting Customer

ASP.NET MVC Hosting - HostForLIFEASP.NET :: Display Image From Byte Array In C# and ASP.NET

clock February 22, 2023 06:40 by author Peter

In this tutorial, I am going to explain how to display an image from a byte array in ASP.NET MVC using C# .NET and VB.NET.

  • Open Visual Studio and create a new MVC project.
  • Once the project is loaded, right-click on the Controllers folder and add a new Controller.
  • Create an Images folder in your project and add a sample image.
  • Now, open the DemoController and add the GetImageFromByteArray action method.
  • Within the action method, place the code given below (Below, I have given the entire Controller code).

C#.NET Code
using System;
using System.Collections.Generic;
using System.Linq;
using System.Web;
using System.Web.Mvc;

namespace DemoProject.Controllers
{
    public class DemoController : Controller
    {
        // GET: Demo/GetImageFromByteArray
        public ActionResult GetImageFromByteArray()
        {
            // Get image path
            string imgPath = Server.MapPath("~/images/self-discipline.png");
            // Convert image to byte array
            byte[] byteData = System.IO.File.ReadAllBytes(imgPath);
            //Convert byte arry to base64string
            string imreBase64Data = Convert.ToBase64String(byteData);
            string imgDataURL = string.Format("data:image/png;base64,{0}", imreBase64Data);
            //Passing image data in viewbag to view
            ViewBag.ImageData = imgDataURL;
            return View();
        }
    }
}


VB.NET Code

    Imports System.Collections.Generic
    Imports System.Linq
    Imports System.Web
    Imports System.Web.Mvc

    Namespace DemoProject.Controllers
        Public Class DemoController
            Inherits Controller
            ' GET: Demo/Image
            Public Function GetImageFromByteArray() As ActionResult
                ' Get image path
                Dim imgPath As String = Server.MapPath("~/images/self-discipline.png")
                ' Convert image to byte array
                Dim byteData As Byte() = System.IO.File.ReadAllBytes(imgPath)
                'Convert byte arry to base64string
                Dim imreBase64Data As String = Convert.ToBase64String(byteData)
                Dim imgDataURL As String = String.Format("data:image/png;base64,{0}", imreBase64Data)
                'Passing image data in viewbag to view
                ViewBag.ImageData = imgDataURL
                Return View()
            End Function
        End Class
    End Namespace


Now, let me explain what is there in the code.

  • I read the image from the folder into an imgPath local variable.
  • In the second step, I converted the image into a byte array using the ReadAllBytes method.
  • And then, I converted the byte array into base 64 string format using Convert.ToBase64String method.
  • Now, I have appended data:image/png;base64 at the beginning of the base64 string so that the browser knows that the src attribute value itself contains the image data.
  • Finally, I have assigned this image data in the ViewBag and returned it to the View.

Now, add a new View to the GetImageFromByteArray action method. And add an image view. We can directly assign the image data from ViewBag to src attribute of the image tag like below.
@{
    ViewBag.Title = "Asp.Net MVC Display image from byte array";
}

<h2>Asp.Net MVC Display image from byte array</h2>
<img src="@ViewBag.ImageData">

Output
Now, if you run the program, you can see the output of how to display the image from the byte array.

Now, if you look into the source of the page, you can see the base 64 string rendered as an image.


I hope you learned how to display the image from a byte array in ASP.NET. Please post your comments and feedback below.


ASP.NET MVC Hosting - HostForLIFEASP.NET :: Perform Code First Migration in ASP.Net MVC

clock February 21, 2023 08:19 by author Peter

As you know, we can perform CRUD operations in MVC 5 with an Entity Framework Model and we also work in Paging & Searching in MVC 5. Now, suppose we want to update the database with new details in the Students, Courses and Enrollments entities, then we need to migrate our application.


In that context, you'll learn today to do the Code First Migration in the MVC application. The migration helps you to update and change the data model that you've created for the application and you don't need to re-create or drop your database. So, let's proceed with the following section.

Apply Code First Migration
The data model in the database usually changes after developing the new application. When the data model changes, it becomes out of sync with the database. We've configured our Entity Framework in the app to drop and recreate the data model automatically. When any type of change is done in the entity classes or in the DbContext class, the existing database is deleted and the new database is created that matches the model and sees it with test data.

When the application runs in production, we do not want to loose everything each time we make changes like adding a column. The Code First Migration solved this problem by enabling the code first to update the database instead of dropping or recreating.

Use the following procedure to create a sample of that.

Step 1: Please disable the Database Initializer in the Web.Config file or in the Global.asax file like as in the following:
In Web.Config File:
    <!--<contexts> 
          <context type="Vag_Infotech.DAL.CollegeDbContext, Vag_Infotech"> 
            <databaseInitializer type="Vag_Infotech.DAL.CollegeDatabaseInitializer, Vag_Infotech"></databaseInitializer> 
          </context> 
    </contexts>--> 

In Global.asax File:

    // Database.SetInitializer(new CollegeDatabaseInitializer());


Step 2:
Please change the database name in the Web.Config file like as in the following:
    <connectionStrings>  
      <add name="CollegeDbContext" connectionString="Data Source=(LocalDb)\v11.0;Initial Catalog=VInfotechNew;Integrated Security=SSPI" providerName="System.Data.SqlClient" /> 
    </connectionStrings> 


Step 3: Open the Package Manager Console and enter the following commands:
enable-migration

add-migration InitialCreate


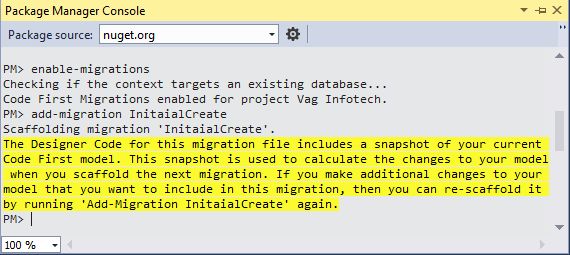
It'll create the Migration folder in your application and Configuration.cs file in it automatically.

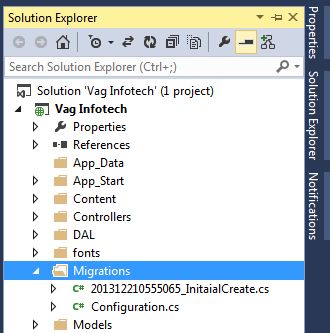
You can see the Seed() created in the file and the purpose of this method is to enable the insert or change data after Code First creates or updates the database.

Editing Seed Method
Now, we add new code for updating our data model in this method. When we do not use the migration, the data model is dropped or re-created during the execution of the application each time, but now the data is retained after database changes.

Step 1: Modify your Configuration.cs with the following code:
namespace Vag_Infotech.Migrations 

    using System; 
    using System.Collections.Generic; 
    using System.Data.Entity; 
    using System.Data.Entity.Migrations; 
    using System.Linq; 
    using Vag_Infotech.Models; 
  
    internal sealed class Configuration : DbMigrationsConfiguration<Vag_Infotech.DAL.CollegeDbContext> 
    { 
        public Configuration() 
        { 
            AutomaticMigrationsEnabled = false; 
        } 
  
        protected override void Seed(Vag_Infotech.DAL.CollegeDbContext context) 
        { 
            var New_Students = new List<Student> 
            { 
                new Student{FirstName="Alec",LastName="Michael", 
                    EnrollmentDate=DateTime.Parse("2009-07-01")}, 
                new Student{FirstName="Marie",LastName="Jane", 
                    EnrollmentDate=DateTime.Parse("2009-07-01")}, 
                new Student{FirstName="Peter",LastName="Parker", 
                    EnrollmentDate=DateTime.Parse("2009-07-05")}, 
                new Student{FirstName="Tony",LastName="Stark", 
                    EnrollmentDate=DateTime.Parse("2009-10-01")}, 
                new Student{FirstName="Steve",LastName="Rogers", 
                    EnrollmentDate=DateTime.Parse("2010-07-01")}, 
                new Student{FirstName="Natasha",LastName="Romanoff", 
                    EnrollmentDate=DateTime.Parse("2010-07-10")}, 
                new Student{FirstName="Bruce",LastName="Banner", 
                    EnrollmentDate=DateTime.Parse("2009-09-01")}, 
                new Student{FirstName="Scott",LastName="Lang", 
                    EnrollmentDate=DateTime.Parse("2009-08-05")}, 
            }; 
            New_Students.ForEach(ns => context.Students.AddOrUpdate(p => p.LastName, ns)); 
            context.SaveChanges(); 
  
            var New_Courses = new List<Course> 
            { 
                new Course{CourseID=201,Name="MCA",Credit=3,}, 
                new Course{CourseID=202,Name="M.Sc.IT",Credit=2,}, 
                new Course{CourseID=203,Name="M.Tech.CS",Credit=2,}, 
                new Course{CourseID=204,Name="M.Tech.IT",Credit=4,} 
            }; 
            New_Courses.ForEach(ns => context.Courses.AddOrUpdate(p => p.Name, ns)); 
            context.SaveChanges(); 
  
            var New_Enrollments = new List<Enrollment> 
            { 
                new Enrollment{ 
                    StudentID= New_Students.Single(ns=>ns.FirstName=="
Alec").ID, 
                    CourseID=New_Courses.Single(nc=>nc.Name=="MCA").CourseID, 
                    Grade=StudentGrade.A 
                }, 
                new Enrollment{ 
                    StudentID= New_Students.Single(ns=>ns.FirstName=="
Marie").ID, 
                    CourseID=New_Courses.Single(nc=>nc.Name=="MCA").CourseID, 
                    Grade=StudentGrade.A 
                }, 
                new Enrollment{ 
                    StudentID= New_Students.Single(ns=>ns.FirstName=="
Marie").ID, 
                    CourseID=New_Courses.Single(nc=>nc.Name=="M.Tech.IT").CourseID, 
                    Grade=StudentGrade.B 
                }, 
                new Enrollment{ 
                    StudentID= New_Students.Single(ns=>ns.FirstName=="
Peter").ID, 
                    CourseID=New_Courses.Single(nc=>nc.Name=="M.Sc.IT").CourseID, 
                    Grade=StudentGrade.A 
                }, 
                new Enrollment{ 
                    StudentID= New_Students.Single(ns=>ns.FirstName=="
Tony").ID, 
                    CourseID=New_Courses.Single(nc=>nc.Name=="MCA").CourseID, 
                    Grade=StudentGrade.A 
                }, 
                new Enrollment{ 
                    StudentID= New_Students.Single(ns=>ns.FirstName=="
Tony").ID, 
                    CourseID=New_Courses.Single(nc=>nc.Name=="M.Sc.IT").CourseID, 
                    Grade=StudentGrade.B 
                }, 
                new Enrollment{ 
                    StudentID= New_Students.Single(ns=>ns.FirstName=="
Steve").ID, 
                    CourseID=New_Courses.Single(nc=>nc.Name=="M.Tech.IT").CourseID, 
                    Grade=StudentGrade.A 
                }, 
                new Enrollment{ 
                    StudentID= New_Students.Single(ns=>ns.FirstName=="
Natasha").ID, 
                    CourseID=New_Courses.Single(nc=>nc.Name=="MCA").CourseID, 
                    Grade=StudentGrade.B 
                }, 
                new Enrollment{ 
                    StudentID= New_Students.Single(ns=>ns.FirstName=="Bruce").ID, 
                    CourseID=New_Courses.Single(nc=>nc.Name=="M.Tech.IT").CourseID, 
                    Grade=StudentGrade.B 
                }, 
                new Enrollment{ 
                    StudentID= New_Students.Single(ns=>ns.FirstName=="
Scott").ID, 
                    CourseID=New_Courses.Single(nc=>nc.Name=="MCA").CourseID, 
                    Grade=StudentGrade.A 
                }, 
                new Enrollment{ 
                    StudentID= New_Students.Single(ns=>ns.FirstName=="
Scott").ID, 
                    CourseID=New_Courses.Single(nc=>nc.Name=="M.Tech.IT").CourseID, 
                    Grade=StudentGrade.D 
                }, 
            }; 
  
            foreach (Enrollment et in New_Enrollments) 
            { 
                var NewEnrollDb = context.Enrollments.Where( 
                    ns => ns.Student.ID == et.StudentID && 
                        ns.Course.CourseID == et.CourseID).SingleOrDefault(); 
                if (NewEnrollDb == null) 
                { 
                    context.Enrollments.Add(et); 
                } 
            } 
            context.SaveChanges(); 
        } 
    } 
}


In the code above the Seed() takes the context object as an input argument and in the code the object is used to add the entities to the database. We can see how the code creates the collection for the database for each entity type and then saves it by SaveChanges() and adds it through the DbSet property. It is not necessary to call the SaveChanges() after each group of entities.

Step 2: Build the solution.

Migration Executing

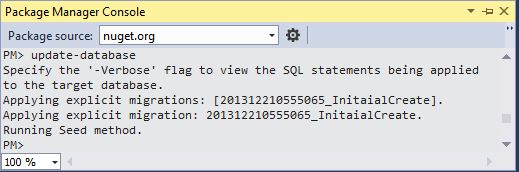
Step 1: Enter the following command in the Package Manager Console:

update-database

Step 2: Run the application and see the changes in the Students link.


ASP.NET MVC Hosting - HostForLIFEASP.NET :: Smooth Fight Between Web API And ASP.NET MVC API

clock February 14, 2023 08:59 by author Peter

Yesterday, I discussed with one of my friends and the topic was why choosing Web API for the service instead of ASP.NET MVC API. It was very interesting topic for me. At the end of the topic, what I learned, I am going to explain one by one.


Web API: It is a part of ASP.NET Framework to build and deploy the REST services on HTTP protocol and accessible to wide range of devices.

ASP.NET MVC API: When I am talking about ASP.NET MVC API, It means, it is also an API but creating with ASP.NET MVC application. I mean to say both view and data in the same project.

When you develop your web application using the MVC, many developers get confused between Web API and ASP.NET MVC. They are confused about which one will be better and how.

View and Data
As we all know Web API is used to create the fully REST service which is exposed only on HTTP protocol, so only HTTP enabled client is able to access the Web API service. Web API only returns data not view. There is not any graphical user interface to represent the data. Client can get the data and present it on their view.

But if you create the API using the ASP.NET MVC then you will be able to create view as well as return data. It means ASP.NET MVC APIs return data and represent this data on their view.

So, if you are going to create API which will be going to return only data then you need to prefer Web API otherwise it is good to go with ASP.NET MVC API.

Content Negotiation
Web API supports one of the most important features in API world and that is Content Negotiation. Web API decides and return best response format data that is acceptable by client very easily. The data format can be XML, JSON, ATOM or any other format data. But with ASP.NET MVC API, if we want the data in JSON, you need to cast your data.

Web API also supports self hosting with any ASP.NET application. So, if you think that your client application is not in ASP.NET MVC then you should always prefer to create your API in Web API.

But if you use ASP.NET MVC to create API then you cannot use self hosting feature with this application.

ASP.NET Web API
    public class EmployeeController: ApiController 
    { 
        // GET: /Api/Employees/ 
        public List < Employee > Get() 
        { 
            return EmployeeMaster.GetEmployees(); 
        } 
    } 

ASP.NET MVC API
    public class EmployeeController: Controller 
    { 
        // GET: /Employees/ 
        [HttpGet] 
        public ActionResult Index() 
        { 
            return Json(EmployeeMaster.GetEmployees(), JsonRequestBehavior.AllowGet); 
        } 
    } 

Standalone Service Layer
As we all know that ASP.NET Web API is part of ASP.NET framework. But the features of the Web API like filters, routing, model binding, etc. are totally different from ASP.NET MVC API because of ASP.NET Web API in System.Web.Http namespace but ASP.NET MVC API resides in System.Web.MVC. So, we can say that Web API is standalone and used with any other application which supports HTTP protocol.

So, Web API creates a service layer for the service. You can use HttpClient to access the Web API inside the ASP.NET MVC controller.

SoC [Separation of Concerns]
As we know APIs should be single entity over the internet for more flexibility and better accessibility. Web API separates your API from your project which contains static file and html pages. If you create your API with ASP.NET MVC API then you need to settle View, Partial View, Html helpers with APIs. So, it makes your APIs more complex as compared to Web API.

So, if you are not isolating API from your project then it is not best practice to keep the API and front end in the same project.

Performance
If you create your API using the ASP.NET MVC API then you will pay the performance issue with your API. I have seen that standalone API which is hosted on console apps are nearly 40 or more than 40% faster as compared to API which is created using ASP.NET MVC.

Web API is very light weight as compared to ASP.NET MVC API. So, using Web API increases the performance of the application when getting the data.

Authorization
If you are going to implement the authorization filters in your Web API then you just need to create only one filter for Authorization.
But when you mix MVC and Web API in the same project, then it is being tough and you need to create authorization filters for both.

Request Mapped
As you know Web API uses some HTTP verbs for CRUD operation and it is auto mapped with these verbs. But ASP.NET MVC is mapped with their action.

Which one is best choice?
So, finally as per my opinion the best thing is that Web API is a good choice when you are going to create standalone fully REST Service, but it is your project requirement to return data and represent it on View in same application. Then you should go with ASP.NET MVC API.

One more reason to choose Web API is that it provides us high performance in low cost as compared to ASP.NET MVC API.

So, finally as per my opinion ASP.NET Web API is the best instead of ASP.NET MVC API. But I suggest you need to try and see which one is better and why. You can add any other points which I left. You are most welcomed.


ASP.NET MVC Hosting - HostForLIFEASP.NET :: Getting Started With ASP.NET Core 7.0 MVC

clock February 10, 2023 07:32 by author Peter

In this article, I am going to explain Asp.Net Core 7.0 MVC, Asp.net Core MVC features. The Latest version of Asp.Net Core MVC is Asp .Net Core 7.0 MVC and how to create a simple ASP.NET Core 7.0 MVC application and run.


ASP .NET Core 7.0 MVC version was released on November 08, 2022. Visual Studio 2022 version 17.4.0 is required to develop ASP.Net Core 7.0 MVC web application. It focuses on being unified, modern, simple, and first. Asp.NET Core 7.0 MVC will be supported for only 18 months as standard-term support (STS).

Some New Features of Asp.Net Core 7.0 MVC
When using null state checking, Nullable page and view models are now supported to improve the experience.
Improvements to endpoint routing, link generation, and parameter binding.
Various improvements to the Razor compiler to improve performance.
The IParsable<TSelf>.TryParse using in MVC & API supports binding controller action parameter values.

What is Asp.Net Core MVC?
The ASP.NET Core MVC framework is a lightweight, open source, highly testable presentation framework for building web apps and APIs using the Model-View-Controller design pattern.

It is an architectural pattern that separates the representation and user interaction. It is divided into three sections Model, View, and Controller; this is called separation of concerns.

Model
It represents the real world object and provides data to the view. It is a set of classes that describes the business logic. Also defines business rules for data means how the data can be changed and manipulated.

View
The view is responsible for looking and feel. It represents the UI components like CSS, JQuery, and Html etc. It is only responsible for displaying the data that is received from the controller as the result.

Controller

The controller is responsible to take the end user request and load the appropriate “Model” and “View”.

Note

  • User interacts with the controller.
  • There is one-to-many relationship between controller and view means one controller can mapped to multiple views.
  • Controller and view can talk to each other.
  • Model and view can not talk to each other directly. They communicate to each other with the help of controller.

Prerequisites

    Install Visual Studio 2022 updated version 17.4.0
    Install .NET SDK 7.0

Connect To Visual Studio 2022 Community Edition and Create Your First Project

Step 1
First, install Visual Studio 2022 in your system.

Step 2
Go to all programs in your systems, we can see Visual Studio 2022 and Visual Studio Installer.

Step 3
Double-click on Visual Studio 2022 and it will open. It looks like the below screenshot. Opening it the first time it will take few time.


Creating Your First Project
Click on; create a new Project to create a new project.


You can see various project types there. Choose “Asp.Net Core Web App (Model-View-Controller)” project type for now.
Select Asp.Net Core Web App (Model-View-Controller), and then click Next.

Give a valid name to your project and select a path for it. Then click Next button.


Now, Select framework .NET 7.0 (Standard Term Support). You can select the Authentication Type as None. You can select Configure for HTTPS based on your need.If you need Docker in your project then Select Enable Docker.

Uncheck Do not use top-level statements.

Then click the create button.

Asp.Net Core 7.0 MVC Web application created and project structure is shown below,

Program.cs file looks like the below.

The Project.cspoj file looks like the below. Where you can see the target Framework net7.0, by default Nullanle and ImplicitUsings are enabled.


I have made some minor changes in the Index.cshtml view pages.


Now, build and Press Ctrl+F5 to run without the debugger.
If, Visual Studio displays the following dialog:

Select Yes if you trust the IIS Express SSL certificate.
If Again, The below dialog is displayed:

Select Yes if you agree to trust the development certificate.


ASP.NET MVC Hosting - HostForLIFEASP.NET :: Action Filter In MVC

clock February 2, 2023 08:27 by author Peter

Action filter in MVC provides the option to handle the scenarios when we would like to perform an operation before and after the execution of a controller action. For this purpose, we create a custom class, which inherits the FilterAttribute class and implements the IActionFilter interface. After creating the filter, we simply apply the class name as an attribute on the controller.
 

Here, the FilterAttribute class makes it possible to use the class as an attribute and IActionFilter interface contains two methods named OnActionExecuting and OnActionExecuted. The OnActionExecuting is executed before the controller method is executed and OnActionExecuted is called after the execution of the controller method. This kind of technique is quite helpful for the logging purposes. Thus, let's see how we can use this filter.
 
Let's start by adding a new class named MyActionFilter.cs. Now, derive this class from the FilterAttribute and the IActionFilter. Implement the  OnActionExecuting and OnActionExecuted methods and add your custom logic into the methods.Thus, the code will look as shown below.  
    public class MyActionFilter : FilterAttribute, IActionFilter 
    { 
        public void OnActionExecuted(ActionExecutedContext filterContext) 
        { 
            //Fires after the method is executed 
        } 
     
        public void OnActionExecuting(ActionExecutingContext filterContext) 
        { 
            //Fires before the action is executed 
        } 
    } 


Simply, apply the class as an attribute on the controller. Add debuggers on both the methods as well as the controller method.
    public class HomeController : Controller 
    { 
        [MyActionFilter] 
        public ActionResult Index() 
        { 
            return View(); 
        } 
     
        public ActionResult About() 
        { 
            ViewBag.Message = "Your application description page."; 
            return View(); 
        } 
     
        public ActionResult Contact() 
        { 
            ViewBag.Message = "Your contact page."; 
            return View(); 
        } 
    } 


Run the Application and debug step by step to see the order of execution of the methods. First, the OnActionExecuting will be executed, then the controller method and finally the OnActionExecuted method.


About HostForLIFE

HostForLIFE is European Windows Hosting Provider which focuses on Windows Platform only. We deliver on-demand hosting solutions including Shared hosting, Reseller Hosting, Cloud Hosting, Dedicated Servers, and IT as a Service for companies of all sizes.

We have offered the latest Windows 2019 Hosting, ASP.NET 5 Hosting, ASP.NET MVC 6 Hosting and SQL 2019 Hosting.


Tag cloud

Sign in