This article will give you an understanding of the what and the why of Web API and will demonstrate a CRUD operation with a simple example using Entity Framework and consuming the created service into ASP.NET MVC application.

The flow of the article
What is Web API
Why Web API
Real time example of WEBAPI
Steps to Create table, Web API Service, and MVC application to consume the service.
Create a table in SQL Server.
Create Data Access Layer in Visual Studio to access the data and perform DB operation.
Create a Web API project.
Create MVC Application to consume Web API Service. Project created in step II, III, and IV belonging to one same solution
Set Project Startup Order
Output Screens
Conclusion
Web API
Web API provides service that can be consumed by a broad range of clients like mobile, tablet, desktop, etc.
The response can be in any format, like XML, JSON (widely used), etc.
It supports MVC features, like controller, action, routing, etc.
Supports CRUD operation. CRUD stands for Create, Read, Update and Delete. It works on HTTP verbs like HttpPost to Create, HttpGet to Read, HttpPut to Update and HttpDelete to Delete.
Why Web API?
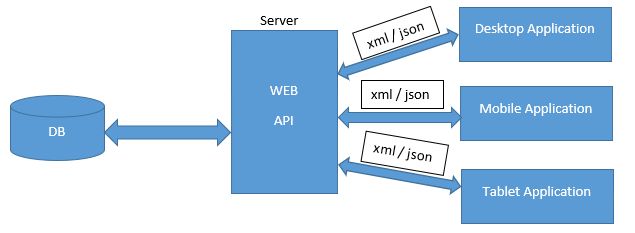
Without Web API, the server will have one application to handle the XML request and another application to handle the JSON request, i.e., for each request type, the server will have one application. But with Web API, the server can respond to any request type using a single application. Small end devices like mobile, tablet are capable of handling only the JSON data. So, the Web API has huge scope to give space in the real world.
A real-time example of WebAPI
Weather forecasting
Movie, Bus, Flight booking
There can be one service provider who offers the service and many consumers to avail this service.
Step 1 - Create a table in SQL Server
We will create a table to perform CRUD operation with Web API. The table script is given below.
CREATE TABLE [dbo].[Product](
[ProductId] [int] PRIMARY KEY IDENTITY(1,1) NOT NULL,
[ProductName] [nvarchar](100) NULL,
[Quantity] [int] NULL,
[Price] [int] NULL)
Step 2 - Create Class Library Project
New Project -> Visual C# -> Windows -> Class Library Project and name it as DataAccessLayer.
Right-click on DataAccessLayer project->Add->New Item->Data-> ADO.NET Entity Data Model and name it as ShowRoomEF.
Choose EF designer from database in next step.
Add the table created in step1 into Entity Framework.
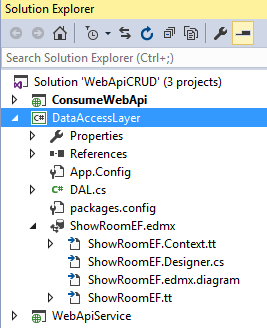
Create a class called DAL.cs in this project to access the data from DB by Web API service. The code is given below.
DAL.cs
public static class DAL
{
static ShowroomEntities DbContext;
static DAL()
{
DbContext = new ShowroomEntities();
}
public static List<Product> GetAllProducts()
{
return DbContext.Products.ToList();
}
public static Product GetProduct(int productId)
{
return DbContext.Products.Where(p => p.ProductId == productId).FirstOrDefault();
}
public static bool InsertProduct(Product productItem)
{
bool status;
try
{
DbContext.Products.Add(productItem);
DbContext.SaveChanges();
status = true;
}
catch (Exception)
{
status = false;
}
return status;
}
public static bool UpdateProduct(Product productItem)
{
bool status;
try
{
Product prodItem = DbContext.Products.Where(p => p.ProductId == productItem.ProductId).FirstOrDefault();
if (prodItem != null)
{
prodItem.ProductName = productItem.ProductName;
prodItem.Quantity = productItem.Quantity;
prodItem.Price = productItem.Price;
DbContext.SaveChanges();
}
status = true;
}
catch (Exception)
{
status = false;
}
return status;
}
public static bool DeleteProduct(int id)
{
bool status;
try
{
Product prodItem = DbContext.Products.Where(p => p.ProductId == id).FirstOrDefault();
if (prodItem != null)
{
DbContext.Products.Remove(prodItem);
DbContext.SaveChanges();
}
status = true;
}
catch (Exception)
{
status = false;
}
return status;
}
}
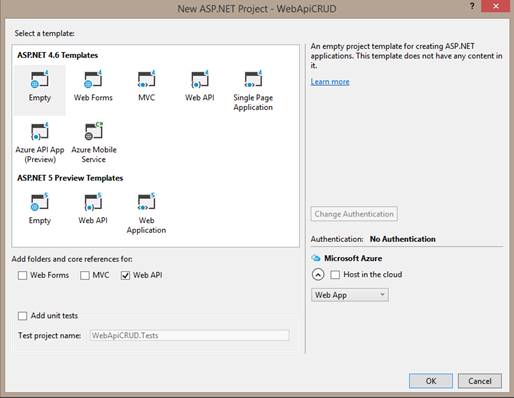
Step 3 - Create Empty Web API Project
Navigate as given
Select New Project -> Visual C# -> Web -> ASP.NET Web Application and enter your application and solution name.
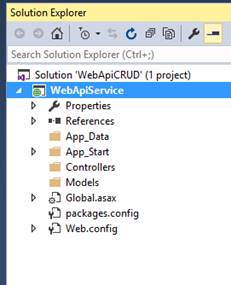
Select the empty template from options and check Web API checkbox and click OK.
The solution will be created as below.
In App_Start -> WebApiConfig.cs file make sure routeTemplate as given below because by default, the route will not have {action}.
In WebApiConfig.cs
public static void Register(HttpConfiguration config)
{
// Web API configuration and services
// Web API routes
config.MapHttpAttributeRoutes();
config.Routes.MapHttpRoute(
name: "DefaultApi",
routeTemplate: "api/{controller}/{action}/{id}",
defaults: new { id = RouteParameter.Optional }
);
}
Add Reference to DataAccessLayer project.
Add the below DLL in references.
EntityFramework
SqlServer
Net.Http
Net.Http.Formatting
Install Entity Framework from ‘NuGet Package Manager’.
Create a Model class for the product as below.
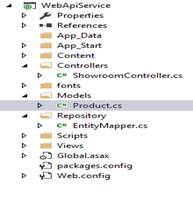
Product.cs
namespace WebApiService.Models
{
public class Product
{
public int ProductId { get; set; }
public string ProductName { get; set; }
public Nullable<int> Quantity { get; set; }
public Nullable<int> Price { get; set; }
}
}
Copy the connection string from DataAccessLayer -> web.config and paste it in WebApiService -> web.config.
<connectionStrings>
<add name="ShowroomEntities" connectionString="metadata=res://*/ShowRoomEF.csdl|res://*/ShowRoomEF.ssdl|res://*/ShowRoomEF.msl;provider=System.Data.SqlClient;provider connection string="data source=MYSYSTEM\SQLEXPRESS;initial catalog=Showroom;user id=sa;password=xxxxx;MultipleActiveResultSets=True;App=EntityFramework"" providerName="System.Data.EntityClient" />
</connectionStrings>
Add Showroom Controller and make class to inherit from ApiController.
ShowroomController.cs
Showroom Controller takes care of Inserting, Retrieving, Updating and Deleting the data in the database. Request comes to this controller from the consuming application.
public class ShowroomController: ApiController {
// GET: Showroom
[HttpGet]
public JsonResult < List < Models.Product >> GetAllProducts() {
EntityMapper < DataAccessLayer.Product, Models.Product > mapObj = new EntityMapper < DataAccessLayer.Product, Models.Product > ();
List < DataAccessLayer.Product > prodList = DAL.GetAllProducts();
List < Models.Product > products = new List < Models.Product > ();
var config = new MapperConfiguration(cfg => cfg.CreateMap < Product, Models.Product > ());
var mapper = new Mapper(config);
foreach(var item in prodList) {
products.Add(mapper.Map < Models.Product > (item));
}
return Json < List < Models.Product >> (products);
}
[HttpGet]
public JsonResult < Models.Product > GetProduct(int id) {
EntityMapper < DataAccessLayer.Product, Models.Product > mapObj = new EntityMapper < DataAccessLayer.Product, Models.Product > ();
DataAccessLayer.Product dalProduct = DAL.GetProduct(id);
Models.Product products = new Models.Product();
var config = new MapperConfiguration(cfg => cfg.CreateMap < Product, Models.Product > ());
var mapper = new Mapper(config);
products = mapper.Map < Models.Product > (dalProduct);
return Json < Models.Product > (products);
}
[HttpPost]
public bool InsertProduct(Models.Product product) {
bool status = false;
if (ModelState.IsValid) {
EntityMapper < Models.Product, DataAccessLayer.Product > mapObj = new EntityMapper < Models.Product, DataAccessLayer.Product > ();
DataAccessLayer.Product productObj = new DataAccessLayer.Product();
var config = new MapperConfiguration(cfg => cfg.CreateMap < Models.Product, Product > ());
var mapper = new Mapper(config);
productObj = mapper.Map < Product > (product);
status = DAL.InsertProduct(productObj);
}
return status;
}
[HttpPut]
public bool UpdateProduct(Models.Product product) {
EntityMapper < Models.Product, DataAccessLayer.Product > mapObj = new EntityMapper < Models.Product, DataAccessLayer.Product > ();
DataAccessLayer.Product productObj = new DataAccessLayer.Product();
var config = new MapperConfiguration(cfg => cfg.CreateMap < Models.Product, Product > ());
var mapper = new Mapper(config);
productObj = mapper.Map < Product > (product);
var status = DAL.UpdateProduct(productObj);
return status;
}
[HttpDelete]
public bool DeleteProduct(int id) {
var status = DAL.DeleteProduct(id);
return status;
}
}
Check your service
Execute your service created just now by running the below URL in the browser and change the port number accordingly.
http://localhost:52956/api/showroom/getallproducts
Service Output

Note
Attached WebApiServiceProvider.zip solution.
since solution size exceeds permitted one, have removed 'packages' folder content of 'WebApiServiceProvider' and kept in package_content_1.zip and package_content_2.zip.
Kindly don't forget to unzip package_content_1.zip and package_content_2.zip and keep their contents in 'WebApiServiceProvider\packages' folder. Also make changes to connection strings accordingly in both the solution.
Step 4 – Consuming Web Api Service In MVC Application
Create Empty MVC project as below.
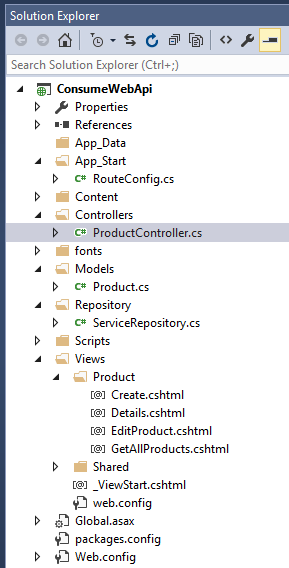
Create Product model class as created in WebApiService project.
Create ServiceRepository.cs in Repository folder to consume the web api service and create ServiceUrl as key and as a value in web.config (port number changes according to the server).
<add key="ServiceUrl" value="http://localhost:52956/"></add>
Add the below DLL in the references.
Net
Net.Http
Net.Http.Formatting
ServiceRepository.cs
Service Repository is created to act as a reusable module for requesting, posting, updating and deleting data in WebAPI. This is used by any action method in the Controller which is created in next step and avoids duplication of this code.
public class ServiceRepository
{
public HttpClient Client { get; set; }
public ServiceRepository()
{
Client = new HttpClient();
Client.BaseAddress = new Uri(ConfigurationManager.AppSettings["ServiceUrl"].ToString());
}
public HttpResponseMessage GetResponse(string url)
{
return Client.GetAsync(url).Result;
}
public HttpResponseMessage PutResponse(string url,object model)
{
return Client.PutAsJsonAsync(url, model).Result;
}
public HttpResponseMessage PostResponse(string url, object model)
{
return Client.PostAsJsonAsync(url,model).Result;
}
public HttpResponseMessage DeleteResponse(string url)
{
return Client.DeleteAsync(url).Result;
}
}
Create a Controller to handle a request for different action method and navigate to the corresponding view.
ProductController.cs
Product Controller in MVC application is created to handle the request received from the user action and to serve the response accordingly. Code for product controller is given below.
public class ProductController : Controller
{
// GET: Product
public ActionResult GetAllProducts()
{
try
{
ServiceRepository serviceObj = new ServiceRepository();
HttpResponseMessage response = serviceObj.GetResponse("api/showroom/getallproducts");
response.EnsureSuccessStatusCode();
List<Models.Product> products = response.Content.ReadAsAsync<List<Models.Product>>().Result;
ViewBag.Title = "All Products";
return View(products);
}
catch (Exception)
{
throw;
}
}
//[HttpGet]
public ActionResult EditProduct(int id)
{
ServiceRepository serviceObj = new ServiceRepository();
HttpResponseMessage response = serviceObj.GetResponse("api/showroom/GetProduct?id=" + id.ToString());
response.EnsureSuccessStatusCode();
Models.Product products = response.Content.ReadAsAsync<Models.Product>().Result;
ViewBag.Title = "All Products";
return View(products);
}
//[HttpPost]
public ActionResult Update(Models.Product product)
{
ServiceRepository serviceObj = new ServiceRepository();
HttpResponseMessage response = serviceObj.PutResponse("api/showroom/UpdateProduct", product);
response.EnsureSuccessStatusCode();
return RedirectToAction("GetAllProducts");
}
public ActionResult Details(int id)
{
ServiceRepository serviceObj = new ServiceRepository();
HttpResponseMessage response = serviceObj.GetResponse("api/showroom/GetProduct?id=" + id.ToString());
response.EnsureSuccessStatusCode();
Models.Product products = response.Content.ReadAsAsync<Models.Product>().Result;
ViewBag.Title = "All Products";
return View(products);
}
[HttpGet]
public ActionResult Create()
{
return View();
}
[HttpPost]
public ActionResult Create(Models.Product product)
{
ServiceRepository serviceObj = new ServiceRepository();
HttpResponseMessage response = serviceObj.PostResponse("api/showroom/InsertProduct", product);
response.EnsureSuccessStatusCode();
return RedirectToAction("GetAllProducts");
}
public ActionResult Delete(int id)
{
ServiceRepository serviceObj = new ServiceRepository();
HttpResponseMessage response = serviceObj.DeleteResponse("api/showroom/DeleteProduct?id=" + id.ToString());
response.EnsureSuccessStatusCode();
return RedirectToAction("GetAllProducts");
}
}
Views are created in ConsumeWebApi MVC application to consume the service.
GetAllProducts.cshtml
.cshtml represents Views (UI) and this View displays all the products available which are received from API call in the corresponding method.
@model IEnumerable<ConsumeWebApi.Models.Product>
@{
ViewBag.Title = "GetAllProducts";
}
<h2>GetAllProducts</h2>
<p>
@Html.ActionLink("Create New", "Create")
</p>
<table class="table">
<tr>
<th>
@Html.DisplayNameFor(model => model.ProductName)
</th>
<th>
@Html.DisplayNameFor(model => model.Quantity)
</th>
<th>
@Html.DisplayNameFor(model => model.Price)
</th>
<th></th>
</tr>
@foreach (var item in Model) {
<tr>
<td>
@Html.DisplayFor(modelItem => item.ProductName)
</td>
<td>
@Html.DisplayFor(modelItem => item.Quantity)
</td>
<td>
@Html.DisplayFor(modelItem => item.Price)
</td>
<td>
@Html.ActionLink("Edit", "EditProduct", new { id = item.ProductId, name= item.ProductName, quantity=item.Quantity, prod = item }) |
@Html.ActionLink("Details", "Details", new { id=item.ProductId }) |
@Html.ActionLink("Delete", "Delete", new { id=item.ProductId })
</td>
</tr>
}
</table>
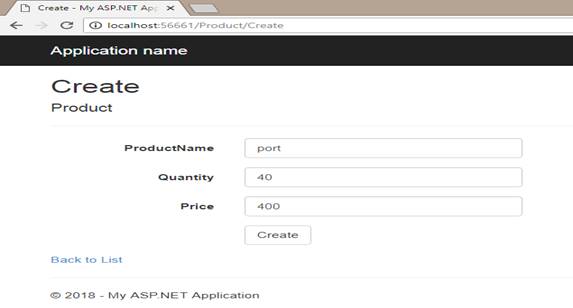
Create.cshtml
This View allows the user to create a product and insert into the database through WebAPI call which is done in corresponding action method.
@model ConsumeWebApi.Models.Product
@{
ViewBag.Title = "Create";
}
<h2>Create</h2>
@using (Html.BeginForm())
{
@Html.AntiForgeryToken()
<div class="form-horizontal">
<h4>Product</h4>
<hr />
@Html.ValidationSummary(true, "", new { @class = "text-danger" })
<div class="form-group">
@Html.LabelFor(model => model.ProductName, htmlAttributes: new { @class = "control-label col-md-2" })
<div class="col-md-10">
@Html.EditorFor(model => model.ProductName, new { htmlAttributes = new { @class = "form-control" } })
@Html.ValidationMessageFor(model => model.ProductName, "", new { @class = "text-danger" })
</div>
</div>
<div class="form-group">
@Html.LabelFor(model => model.Quantity, htmlAttributes: new { @class = "control-label col-md-2" })
<div class="col-md-10">
@Html.EditorFor(model => model.Quantity, new { htmlAttributes = new { @class = "form-control" } })
@Html.ValidationMessageFor(model => model.Quantity, "", new { @class = "text-danger" })
</div>
</div>
<div class="form-group">
@Html.LabelFor(model => model.Price, htmlAttributes: new { @class = "control-label col-md-2" })
<div class="col-md-10">
@Html.EditorFor(model => model.Price, new { htmlAttributes = new { @class = "form-control" } })
@Html.ValidationMessageFor(model => model.Price, "", new { @class = "text-danger" })
</div>
</div>
<div class="form-group">
<div class="col-md-offset-2 col-md-10">
<input type="submit" value="Create" class="btn btn-default" />
</div>
</div>
</div>
}
<div>
@Html.ActionLink("Back to List", "GetAllProducts")
</div>
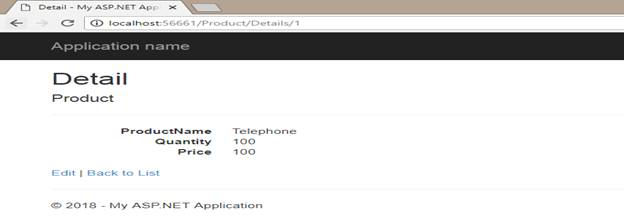
Details.cshtml
This View allows the user to see the particular product through WebAPI call which is done in the corresponding action method.
@model ConsumeWebApi.Models.Product
@{
ViewBag.Title = "Detail";
}
<h2>Detail</h2>
<div>
<h4>Product</h4>
<hr />
<dl class="dl-horizontal">
<dt>
@Html.DisplayNameFor(model => model.ProductName)
</dt>
<dd>
@Html.DisplayFor(model => model.ProductName)
</dd>
<dt>
@Html.DisplayNameFor(model => model.Quantity)
</dt>
<dd>
@Html.DisplayFor(model => model.Quantity)
</dd>
<dt>
@Html.DisplayNameFor(model => model.Price)
</dt>
<dd>
@Html.DisplayFor(model => model.Price)
</dd>
</dl>
</div>
<p>
@Html.ActionLink("Edit", "EditProduct", new { id = Model.ProductId }) |
@Html.ActionLink("Back to List", "GetAllProducts")
</p>
EditProduct.cshtml
This View allows the user to edit product and update database through WebAPI call which is done in the corresponding action method.
@model ConsumeWebApi.Models.Product
@{
ViewBag.Title = "EditProduct";
}
<h2>EditProduct</h2>
@using (Html.BeginForm("Update", "Product", FormMethod.Post))
{
@Html.AntiForgeryToken()
<div class="form-horizontal">
<h4>Product</h4>
<hr />
@Html.ValidationSummary(true, "", new { @class = "text-danger" })
@Html.HiddenFor(model => model.ProductId)
<div class="form-group">
@Html.LabelFor(model => model.ProductName, htmlAttributes: new { @class = "control-label col-md-2" })
<div class="col-md-10">
@Html.EditorFor(model => model.ProductName, new { htmlAttributes = new { @class = "form-control" } })
@Html.ValidationMessageFor(model => model.ProductName, "", new { @class = "text-danger" })
</div>
</div>
<div class="form-group">
@Html.LabelFor(model => model.Quantity, htmlAttributes: new { @class = "control-label col-md-2" })
<div class="col-md-10">
@Html.EditorFor(model => model.Quantity, new { htmlAttributes = new { @class = "form-control" } })
@Html.ValidationMessageFor(model => model.Quantity, "", new { @class = "text-danger" })
</div>
</div>
<div class="form-group">
@Html.LabelFor(model => model.Price, htmlAttributes: new { @class = "control-label col-md-2" })
<div class="col-md-10">
@Html.EditorFor(model => model.Price, new { htmlAttributes = new { @class = "form-control" } })
@Html.ValidationMessageFor(model => model.Price, "", new { @class = "text-danger" })
</div>
</div>
<div class="form-group"><div class="col-md-offset-2 col-md-10">
<input type="submit" value="Save" class="btn btn-default" />
</div>
</div>
</div>
}
<div>
@Html.ActionLink("Back to List", "GetAllProducts")
</div>
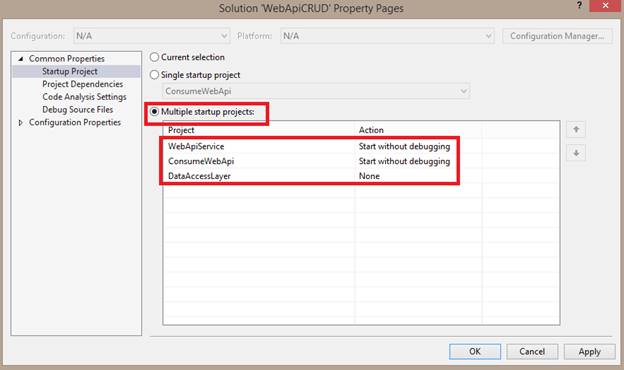
Step 5 – Set Project Startup Order
This step is necessary and has to be set up because this solution needs WebApiService application to keep running and serve the request. ConsumeWebAPI application will create a request to WebApiService and receive a response back.
So, in order to make two projects to keep up and running, this step is performed.
Whereas if WebApiService is hosted in IIS, then only one project which consumes the service can be started, i.e., MVC or postman.
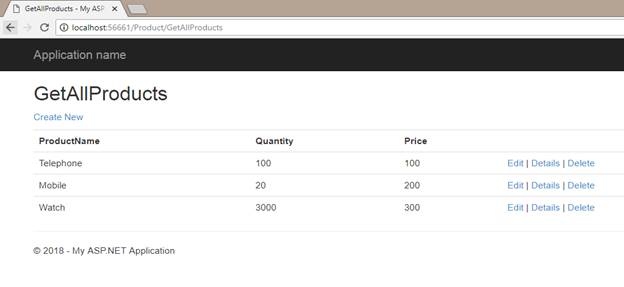
Output Screens
Get All Products View.
Create Product View.
Edit Product View.

Detailed View of a product.
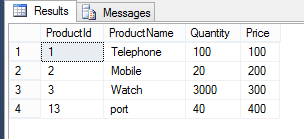
Product table data in Product table of SQL Database.
Web API can be self-hosted (service and consuming application in the same solution) as discussed in this example or it can be deployed on IIS server. JSON is the widely used request type in services as it is supported by a wide range of client devices. Enjoy creating your own service.