European ASP.NET MVC Hosting

BLOG about Latest ASP.NET MVC Hosting and Its Technology - Dedicated to European Windows Hosting Customer

ASP.NET MVC Hosting - HostForLIFEASP.NET :: OAuth Token Based Authentication In ASP.Net Identity

clock November 30, 2021 06:17 by author Peter

In this article, I will explain how to generate 'Access Token' using credentials of 'Asp.net Identity' in 'ASP.Net MVC. Create a new project in Visual Studio.

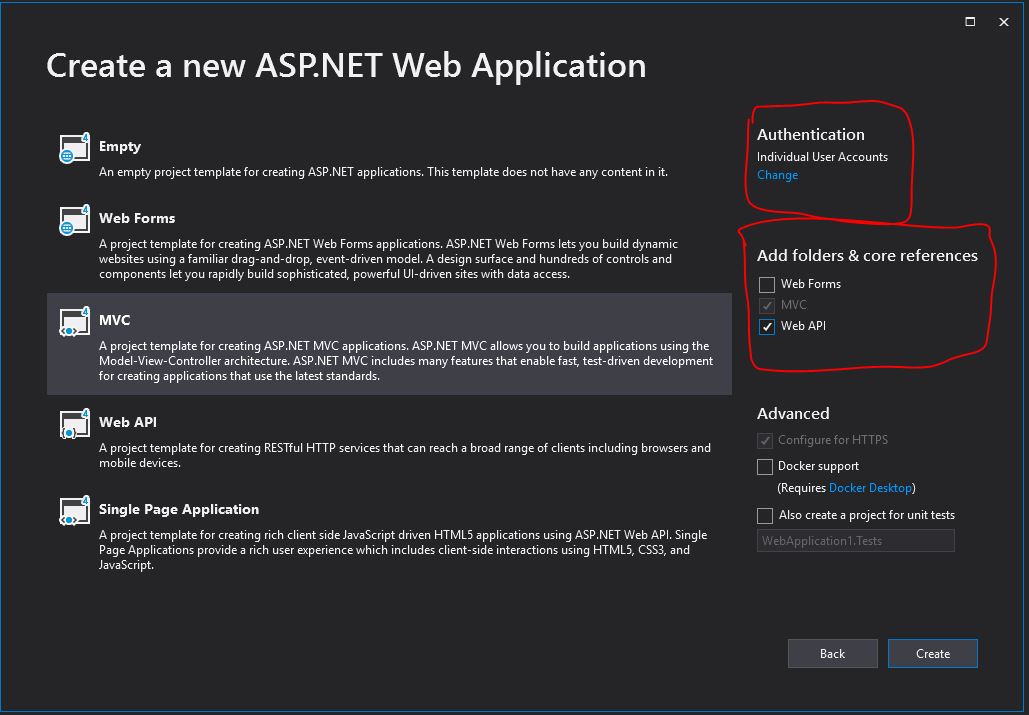
Give connection string of your database. Register an Account.

Add the following three Nuget Packages to your project.

  • Microsoft.Owin.Host.SystemWeb
  • Microsoft.Owin.Security.OAuth
  • Microsoft.Owin.Cors

Now, add TokenGenerating.cs class in the project.

using Microsoft.AspNet.Identity;
using Microsoft.AspNet.Identity.EntityFramework;
using Microsoft.Owin.Security.OAuth;
using System;
using System.Collections.Generic;
using System.Linq;
using System.Security.Claims;
using System.Security.Cryptography;
using System.Threading.Tasks;
using System.Web;

namespace SecureWebAPI.APIClasses
{
    public class TokenGenerating : OAuthAuthorizationServerProvider
    {
        public override async Task ValidateClientAuthentication(OAuthValidateClientAuthenticationContext context)
        {
            context.Validated(); //
        }

        public override async Task GrantResourceOwnerCredentials(OAuthGrantResourceOwnerCredentialsContext context)
        {
            UserManager<IdentityUser> userManager = new UserManager<IdentityUser>(new UserStore<IdentityUser>());
            var result = userManager.Find(context.UserName, context.Password);
            //UserManager<IdentityUser> userManager = new UserManager<IdentityUser>(new UserStore<IdentityUser>());
            //var result = userManager.Find(context.UserName, context.Password);
            //UserManager holds data for register user.
            //context.UserName = Email of your registered user
            //context.Password = Password of your registered user
            if (result != null)
            {
                var identity = new ClaimsIdentity(context.Options.AuthenticationType);
                context.Validated(identity);
            }
            else
            {
                context.SetError("invalid_grant", "Provided username and password is incorrect");
                return;
            }
        }
    }
}

Now add a new startup class for the token configuration file this class holds the information and setting of the token.

using Microsoft.Owin;
using Microsoft.Owin.Security.OAuth;
using Owin;
using System;
using System.Threading.Tasks;
using System.Web.Http;

[assembly: OwinStartup(typeof(SecureWebAPI.APIClasses.AuthenticationStartupClass))]

namespace SecureWebAPI.APIClasses
{
    public class AuthenticationStartupClass
    {
        public void Configuration(IAppBuilder app)
        {
            // For more information on how to configure your application, visit https://go.microsoft.com/fwlink/?LinkID=316888
            app.UseCors(Microsoft.Owin.Cors.CorsOptions.AllowAll);
            var myProvider = new APIAUTHORIZATIONSERVERPROVIDER();
            OAuthAuthorizationServerOptions options = new OAuthAuthorizationServerOptions
            {
                AllowInsecureHttp = true,
                TokenEndpointPath = new PathString("/token"),
                AccessTokenExpireTimeSpan = TimeSpan.FromDays(1),
                Provider = myProvider
            };
            app.UseOAuthAuthorizationServer(options);
            app.UseOAuthBearerAuthentication(new OAuthBearerAuthenticationOptions());
            HttpConfiguration config = new HttpConfiguration();
            WebApiConfig.Register(config);
        }
    }
}

Add new class for API Attributes

using System;
using System.Collections.Generic;
using System.Linq;
using System.Web;

namespace SecureWebAPI.APIClasses
{
    public class APIAUTHORIZEATTRIBUTE : System.Web.Http.AuthorizeAttribute
    {
        protected override void HandleUnauthorizedRequest(System.Web.Http.Controllers.HttpActionContext actionContext)
        {
            if (!HttpContext.Current.User.Identity.IsAuthenticated)
            {
                base.HandleUnauthorizedRequest(actionContext);
            }
            else
            {
                actionContext.Response = new System.Net.Http.HttpResponseMessage(System.Net.HttpStatusCode.Forbidden);
            }
        }
    }
}

Change Global.asax file of your project.

using System;
using System.Collections.Generic;
using System.Linq;
using System.Web;
using System.Web.Http;
using System.Web.Mvc;
using System.Web.Optimization;
using System.Web.Routing;

namespace SecureWebAPI
{
    public class MvcApplication : System.Web.HttpApplication
    {
        protected void Application_Start()
        {
            AreaRegistration.RegisterAllAreas();
            WebApiConfig.Register(GlobalConfiguration.Configuration);
            FilterConfig.RegisterGlobalFilters(GlobalFilters.Filters);
            RouteConfig.RegisterRoutes(RouteTable.Routes);
            BundleConfig.RegisterBundles(BundleTable.Bundles);
            GlobalConfiguration.Configuration.EnsureInitialized();
        }
    }
}

Now change your WebApiConfig.cs file routemap

Your Project > App_Start folder > WebApiConfig.cs
routeTemplate: "api/{controller}/{action}/{id}",
using System;
using System.Collections.Generic;
using System.Linq;
using System.Net;
using System.Net.Http;
using System.Web.Http;

namespace SecureWebAPI.Controllers
{
    public class UserController : ApiController
    {
        [AllowAnonymous]
        [HttpGet]
        public IHttpActionResult Get()
        {
            return Ok("Now server time is: " + DateTime.Now.ToString());
        }
        [Authorize]
        [HttpGet]
        public IHttpActionResult GetForAuthenticate()
        {
            return Ok("Hello ");
        }
        [Authorize]
        [HttpGet]
        public IHttpActionResult GetForAdmin()
        {
            return Ok("Helo User");
        }
    }
}

Add a ApiController .

using System;
using System.Collections.Generic;
using System.Linq;
using System.Net;
using System.Net.Http;
using System.Web.Http;

namespace SecureWebAPI.Controllers
{
    public class UserController : ApiController
    {
        [AllowAnonymous]
        [HttpGet]
        public IHttpActionResult Get()
        {
            return Ok("Now server time is: " + DateTime.Now.ToString());
        }
        [Authorize]
        [HttpGet]
        public IHttpActionResult GetForAuthenticate()
        {
            return Ok("Hello ");
        }
        [Authorize]
        [HttpGet]
        public IHttpActionResult GetForAdmin()
        {
            return Ok("Helo User");
        }
    }
}

Run your Project and leave it. Open Visual Studio, add a new console project. Add a new class to the console project.
class TokenInfo
{
    public string access_token { get; set; }
    public string token_type { get; set; }
    public int expires_in { get; set; }
}

Add function in Program.cs class.
public string GetAccessToken(string Email, string Password)
{
    string AccessToken = "";
    string responseFromServer = "";
    WebRequest request = WebRequest.Create("https://localhost:44370/token"); //your project url
    request.Method = "POST";
    string postData = "username=" + Email + "&password=" + Password + "&grant_type=password";
    byte[] byteArray = Encoding.UTF8.GetBytes(postData);
    request.ContentType = "application/x-www-form-urlencoded";
    request.ContentLength = byteArray.Length;
    System.IO.Stream dataStream = request.GetRequestStream();
    dataStream.Write(byteArray, 0, byteArray.Length);
    dataStream.Close();
    WebResponse response = request.GetResponse();
    Console.WriteLine(((HttpWebResponse)response).StatusDescription);
    using (dataStream = response.GetResponseStream())
    {
        System.IO.StreamReader reader = new System.IO.StreamReader(dataStream);
        responseFromServer = reader.ReadToEnd();
        Console.WriteLine(responseFromServer);
    }
    TokenInfo myDeserializedClass = Newtonsoft.Json.JsonConvert.DeserializeObject<TokenInfo>(responseFromServer);
    AccessToken = myDeserializedClass.access_token;

    response.Close();
    return AccessToken;
}

MainMethod
static void Main(string[] args)
{
    string Email = "Your Registered user Email";
    string Password = "Your Registered user Email";

    Program cls = new Program();
    string AccessToken = cls.GetAccessToken(Email, Password);

    HttpWebRequest request = (HttpWebRequest)WebRequest.Create("https://localhost:44370/api/user/GetForAuthenticate"); //Your project Local host api url
    request.AutomaticDecompression = DecompressionMethods.GZip;
    request.Method = "GET";
    request.Headers.Add("Authorization", "Bearer " + AccessToken);
    using (System.Net.WebResponse GetResponse = request.GetResponse())
    {
        using (System.IO.StreamReader streamReader = new System.IO.StreamReader(GetResponse.GetResponseStream()))
        {
            dynamic jsonResponseText = streamReader.ReadToEnd();
        }
    }
    Console.ReadLine();
}

Run console project
If Credential is authenticated then an access token will also be generated.

Keep in mind Your Asp.net MVC project should be running during access token generating.


ASP.NET MVC Hosting - HostForLIFEASP.NET :: How To Implement AutoMapper In ASP.NET Core MVC Application?

clock November 23, 2021 06:04 by author Peter

In this demo, I will show how to utilize the Automapper library efficiently. Automapper makes our lives easy with minimal steps. In a nutshell, AutoMapper is an object-object mapper. It transforms the input object of one type into an output object of another type.

Requirements
    Visual Studio 2017.
    Auto Mapper NuGet Package
    Auto Mapper Dependency Injection Package

In this example, I’ve taken two classes, Employee and EmployeeModel.
    namespace ASPNETCORE_AUTOMAPPER.Models {  
        public class Employee {  
            public int Id {  
                get;  
                set;  
            }  
            public string Name {  
                get;  
                set;  
            }  
            public string Designation {  
                get;  
                set;  
            }  
            public string City {  
                get;  
                set;  
            }  
            public string State {  
                get;  
                set;  
            }  
        }  
    }  
    namespace ASPNETCORE_AUTOMAPPER.Models {  
        public class EmployeeModel {  
            public int Id {  
                get;  
                set;  
            }  
            public string Name {  
                get;  
                set;  
            }  
            public string Designation {  
                get;  
                set;  
            }  
            public Address Address {  
                get;  
                set;  
            }  
        }  
        public class Address {  
            public string City {  
                get;  
                set;  
            }  
            public string State {  
                get;  
                set;  
            }  
        }  
    }  

We are getting Employee object from the end user and trying to assign it to EmployeeModel with each property like below, which is a tedious job and in real time scenarios, we may have plenty of properties as well as complex types. So this is an actual problem.
    [HttpPost]  
    public EmployeeModel Post([FromBody] Employee employee) {  
        EmployeeModel empmodel = new EmployeeModel();  
        empmodel.Id = employee.Id;  
        empmodel.Name = employee.Name;  
        empmodel.Designation = employee.Designation;  
        empmodel.Address = new Address() {  
            City = employee.City, State = employee.State  
        };  
        return empmodel;  
    }  


To overcome this situation, we have a library called AutoMapper.
Incorporate this library into your application by following the below steps.
Open Visual Studio and Click on File - New Project and select ASP.NET CORE WEB APPLICATION,


Click on Ok and you’ll get the below window where you have to select WebApp (MVC).


As soon as you click on the Ok button your application is ready.

Now, the actual auto mapper should take place. For that, we need to add NuGet reference to the solution. Make sure we have to add two references to solution
    Add Main AutoMapper Package to the solution,

Now, add the Auto mapper dependency Injection Package,

Now, call AddAutoMapper from StartUp.cs file as shown below,
public void ConfigureServices(IServiceCollection services) {  
            services.AddMvc();  
            services.AddAutoMapper();  
        }  


Now, create the MappingProfile.cs file under the root project and write the below snippet
 public class MappingProfile: Profile {  
            public MappingProfile() {  
                CreateMap < Employee, EmployeeModel > ()  
            }  
        }  


Here CreateMap method is used to map data between Employee and EmployeeModel.

If you observe here we called ForMember method, which is used when we have different datatypes in source and destination classes.

Employee Class should be like this,
    namespace ASPNETCORE_AUTOMAPPER.Models {  
        public class Employee {  
            public int Id {  
                get;  
                set;  
            }  
            public string Name {  
                get;  
                set;  
            }  
            public string Designation {  
                get;  
                set;  
            }  
            public string City {  
                get;  
                set;  
            }  
            public string State {  
                get;  
                set;  
            }  
        }  
    }  


EmployeeModel.cs should be like this,
    namespace ASPNETCORE_AUTOMAPPER.Models {  
        public class EmployeeModel {  
            public int Id {  
                get;  
                set;  
            }  
            public string Name {  
                get;  
                set;  
            }  
            public string Designation {  
                get;  
                set;  
            }  
            public Address Address {  
                get;  
                set;  
            }  
        }  
        public class Address {  
            public string City {  
                get;  
                set;  
            }  
            public string State {  
                get;  
                set;  
            }  
        }  
    }
 

In Employee.cs file having City and State properties but in EmployeeModel.cs we have Address type. So if we try to map these two models we may end up missing type configuration error. So to overcome that issue we have to use ForMember method which tells mapper what properties it should map for that particular Address field. So we have to tweak the MappingProfile.cs file like below:
    public class MappingProfile: Profile {  
        public MappingProfile() {  
            CreateMap < Employee, EmployeeModel > ().ForMember(dest => dest.Address, opts => opts.MapFrom(src => new Address {  
                City = src.City, State = src.State  
            }));  
        }  
    }  

So the next step is we have to hook this up from our controller;  just follow the below snippet
    namespace ASPNETCORE_AUTOMAPPER.Controllers {  
        public class EmployeeController: Controller {  
            private readonly IMapper _mapper;  
            public EmployeeController(IMapper mapper) {  
                _mapper = mapper;  
            }  
            public IActionResult Index() {  
                    return View();  
                }  
                [HttpPost]  
            public EmployeeModel Post([FromBody] Employee employee) {  
                EmployeeModel empmodel = new EmployeeModel();  
                empmodel = _mapper.Map < Employee, EmployeeModel > (employee);  
                return empmodel;  
            }  
        }  
    }
 

Here we have injected IMapper to EmployeeController and performed mapping operation between Employee and EmployeeModel

If you pass data to Employee object,  it will directly map to EmployeeModel object with the help of Mapper.

Now if you observe, EmployeeModel is filled in with all the property data with the help of Mapper. This is the actual beauty of AutoMapper.

So if you come across a requirement to map data from your DTOs to Domain object choose Automapper and it will do all your work with less code.


ASP.NET MVC Hosting - HostForLIFEASP.NET :: URL Creation Fundamentals In MVC

clock November 8, 2021 06:49 by author Peter

In this article, we are going to explore different ways of URL creation in MVC and different fundamental concepts of MVC. So let's get started with MVC fundamentals. We have two different approaches available while creating an URL in MVC framework.
    ActionLink
    Raw HTML

Action LInk in the background queries the routing engine whenever the URL associated with the given controllers ACTION. Sometimes we do have Custom URLs associated with an action, and we require to change that URL in future. For this scenario actionLink will pick up the latest URL, you don't need to make any changes.

On the other hand, if you are using raw HTML, you need to update your links when URLs changed.

As a good programmer, we should always avoid changing URLs as URLs are the public contract of your app and can be referenced by other apps, and many times users bookmark the URLs. If you change them, all these bookmarks and references will be broken.

In the end, the decision is up to the programmer's choice, no hard and fast rule here.

Again, the simplest way is using raw HTML

1: Raw HTML
Example,
<a href = "Courses/Index"> View Course</a>

2: ActionLink
Below is the example of using ActionLink for URL creation.
@HTML.ActionLink("View Courses","Index","Courses")

If the targeted action needs a parameter we can make use of an anonymous object to pass the parameter values.
@HTML.ActionLink("View Courses","Index","Courses", new {id = 1})

This will generate a link as - courses/index/1

This method doesn't generate the link for a reason, we need to pass another argument to ActionLink. This argument can be null or an anonymous object to render any additional HTML attribute.
@HTML.ActionLink("View Courses","Index","Courses", new {id = 1}, null)

We have different HTML helpers available in MVC 

Type Helper Method
ViewResult View()
PartialViewResult PartialView()
RedirectResult Redirect()
ContentResult Content()
JsonResult Json()
RedirectToRouteResult RedirectToAction()
FileResult File()
HttpNotFoundResult HttpNotFound()
EmptyResult  

Passing Data to views in MVC
We should avoid passing data using ViewData and ViewBag as these methods are fragile and need a lot of casting which makes code ugly. Instead, we can pass model or viewModel directly to view.
return View(Course);

Razor Views
@if(condition)
{
    // c# or HTML code
}


@foreach(...)
{
}


We can render a class or any attribute conditionally as follows,
@{
    var className=Model.Movies.Count >3 ? "Popular" : null;
}
<h2 class = "@className">...</h2>

Partial View

@Html.Partial("_NavBar")

Types of Routing in MVC
1: Convention based Routing

Here we can specify the routing in RouteConfig.cs file and mention the Controller, action which needs to be invoked using mapRoute method of routes collection.

2: Attribute based Routing

Here we can apply route by decorating the action method with the Route keyword followed by the path.

Authentication in MVC
Use [authorize] keyword. Apply it to action, controller or globally (in FilterConfig.cs)
Enabling Social Login in MVC

Step 1
Enable SSL: Select project, press F4, set SSL enabled to true.

Step 2
Copy SSL URL, select the project, go to properties, in the Web tab, set startup URL.

Step 3
Apply RequireSSL filter globally in FilterConfig.cs file.

Step 4
Register your app with external authentication providers to get secret key/secret. In AppStart.cs/Startup.Auth.cs, add corresponding providers and your key/secret.
Summary

In this article, we explored different ways of URL creation in MVC and different fundamental concepts of MVC. I hope you liked the article. Until Next Time - Happy Learning Cheers


About HostForLIFE

HostForLIFE is European Windows Hosting Provider which focuses on Windows Platform only. We deliver on-demand hosting solutions including Shared hosting, Reseller Hosting, Cloud Hosting, Dedicated Servers, and IT as a Service for companies of all sizes.

We have offered the latest Windows 2019 Hosting, ASP.NET 5 Hosting, ASP.NET MVC 6 Hosting and SQL 2019 Hosting.


Tag cloud

Sign in