European ASP.NET MVC Hosting

BLOG about Latest ASP.NET MVC Hosting and Its Technology - Dedicated to European Windows Hosting Customer

ASP.NET MVC Hosting - HostForLIFEASP.NET :: Stripe Payment Gateway Integration in ASP.NET MVC

clock November 14, 2023 06:11 by author Peter

There are numerous Payment Gateways on the market that provide secure and simple setup. Stripe is among them. Stripe integration consists of numerous phases. In general, there are two approaches.

  • Client Side: You may use Stripe.js to load the Stripe UI and enter credit card information to make the payment.
  • If you already have a fully functional Checkout page and everything is in place, you may utilize the library (DLL) to process the payment.

Today, we'll look at Stripe's server-side implementation.

Stripe Payment Gateway can be readily integrated if you follow each step.

Step 1: Fill out the registration form at https://dashboard.stripe.com/register with your email, name, and password.
Step 2: Use Install-Package Stripe.net to add the Stripe library to your Visual Project. Stripe.net.dll will be downloaded and included as a reference to your project.
Step 3: Add the Stripe.Infrastructure; Namespace to the Class where you wish to create the payment gateway.
Step 4: To implement, you must experiment with various classes. To make the payment, please complete each step.
Step 5: You'll need KEY - "Publishable key" - to connect to Stripe. It is available at https://dashboard.stripe.com/account/apikeys.

Step 6. Set the API key with the below function
Stripe.StripeConfiguration.SetApiKey(“pk_test_FyPZYPyqf8jU6IdG2DONgudS”);

Step 7: To generate a Token, create an Object of a Credit Card. That Token will be assigned to the Customer object at the time the Customer is created.
//Create Card Object to create Token
Stripe.CreditCardOptions card = new Stripe.CreditCardOptions();
card.Name = tParams.CardOwnerFirstName + " " + tParams.CardOwnerLastName;
card.Number = tParams.CardNumber;
card.ExpYear = tParams.ExpirationYear;
card.ExpMonth = tParams.ExpirationMonth;
card.Cvc = tParams.CVV2;
//Assign Card to Token Object and create Token
Stripe.TokenCreateOptions token = new Stripe.TokenCreateOptions();
token.Card = card;
Stripe.TokenService serviceToken = new Stripe.TokenService();
Stripe.Token newToken = serviceToken.Create(token);

Step 8: Assign TokenID to the Customer Object so that a card is created and linked to the Customer when the customer is created.
//Create Customer Object and Register it on StripeStripe.CustomerCreateOptions myCustomer = new Stripe.CustomerCreateOptions();myCustomer.Email = tParams.Buyer_Email;myCustomer.SourceToken = newToken.Id;var customerService = new Stripe.CustomerService();Stripe.Customer stripeCustomer = customerService.Create(myCustomer);

Step 9: Make a Charge Object. The charge object is the actual object that will perform the payment.

//Create Charge Object with details of Charge
var options = new Stripe.ChargeCreateOptions {
    Amount = Convert.ToInt32(tParams.Amount),
        Currency = tParams.CurrencyId == 1 ? "ILS" : "USD",
        ReceiptEmail = tParams.Buyer_Email,
        CustomerId = stripeCustomer.Id,
        Description = Convert.ToString(tParams.TransactionId), //Optional
};
//and Create Method of this object is doing the payment execution.
var service = new Stripe.ChargeService();
Stripe.Charge charge = service.Create(options); // This will do the Payment

Step ten: Charge.The status will be returned.

Step 11: Go to https://dashboard.stripe.com/test/customers and look for Created Customer.

And Payment using this link - https://dashboard.stripe.com/test/payments.


ASP.NET MVC Hosting - HostForLIFEASP.NET :: In ASP.NET MVC, Create a Simple Login Application That Makes use of Sessions

clock November 3, 2023 08:45 by author Peter

1. Create your database
Using the following script, create the UserProfile table

CREATE TABLE UserProfile
(
    UserId INT PRIMARY KEY IDENTITY(1, 1),
    UserName VARCHAR(50),
    Password VARCHAR(50),
    IsActive BIT
);

Insert user records using the following script:
INSERT INTO UserProfile (UserName, Password, IsActive)
VALUES ('Peter', 'Peter1234', 1),
       ('Scott', 'Scott1234', 1),
       ('Alex', 'Alex1234', 1);

2. Create Project
Go to File, New, then click on Project.

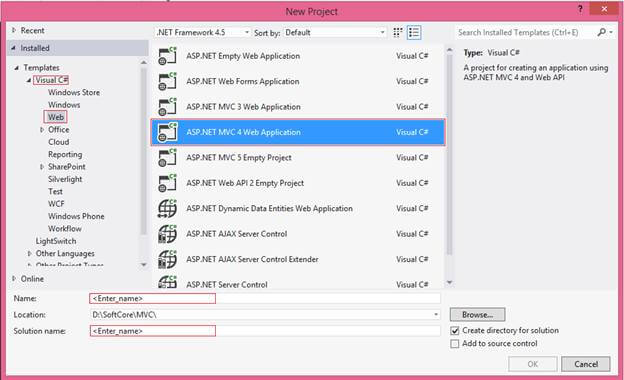
Select Visual C#, Web under Installed templates. After that, select ASP.NET MVC 4 Web Application, then mention the Application Name (MvcLoginAppDemo) and Solution Name as you wish, then click OK.
Under Project template, select a template as Basic, then view the engine as Razor. Click OK.

3. Include an Entity Data Model
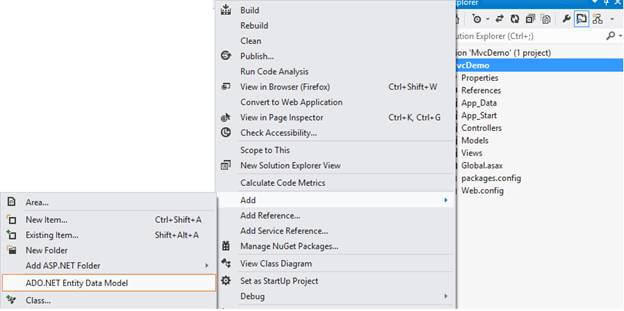
Navigate to Solution Explorer, select Project, Add, and then ADO.NET Entity Data Model.
Give it a meaningful model name, and then click on Add.

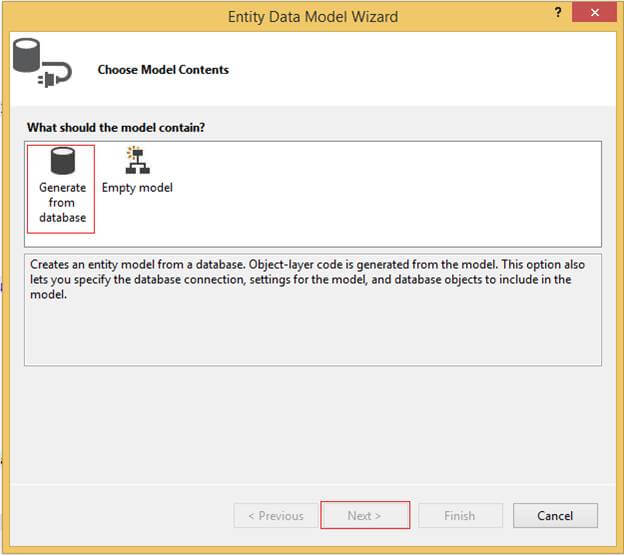
Select Generate from the database and then click on Next.
Click on New Connection.
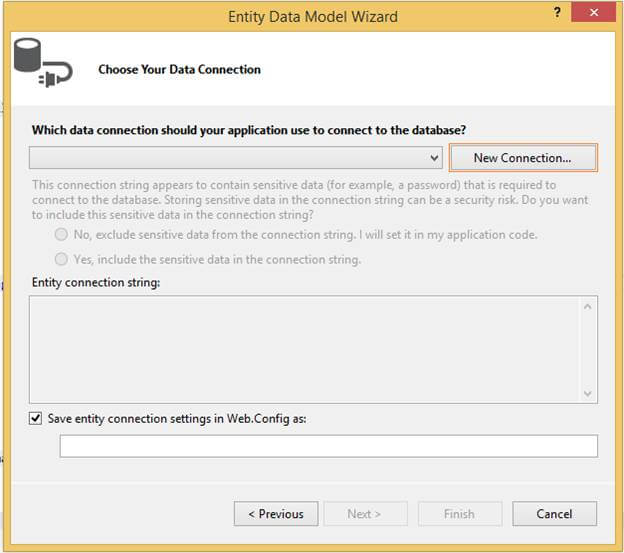
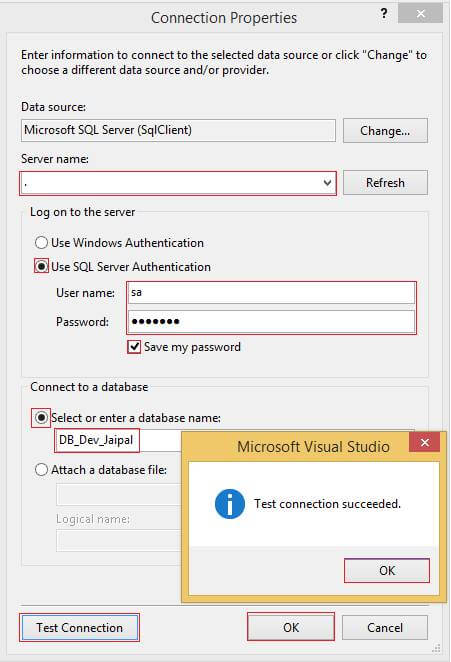
After clicking on New Connection, we have to provide the following Connection Properties in the following wizard.

Provide the Server name.

  • Select the "Use SQL Server Authentication" radio button.
  • Enter the Username and Password in the password text box.
  • Check the "Save my password" checkbox.
  • Select the "Select or enter a database name:" radio button.
  • Select the database to which you want to set the connection.
  • Click on the "Test Connection" button to ensure the connection can be established.
  • Then click OK.

Select the radio button, and yes, include the sensitive data in the connection string.
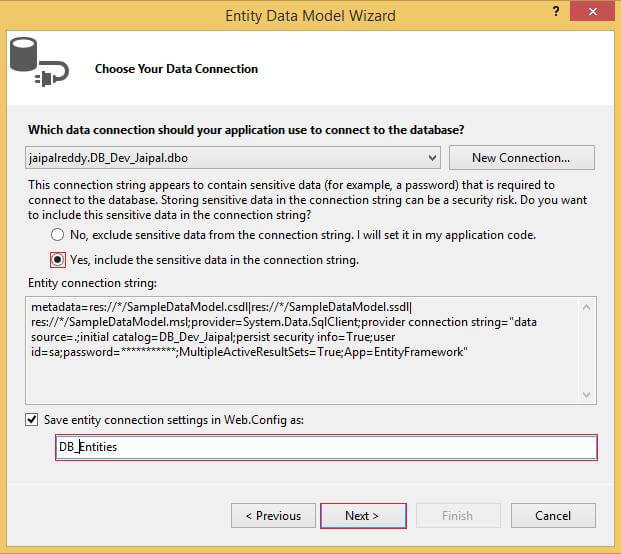
Choose your database objects, as in the following image.
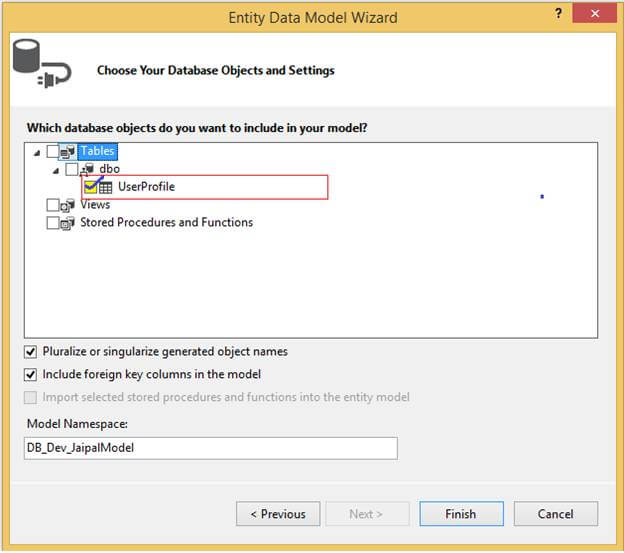
Click on Finish. At this point UserProfie entity will be created.
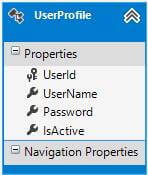
4. Add a Controller
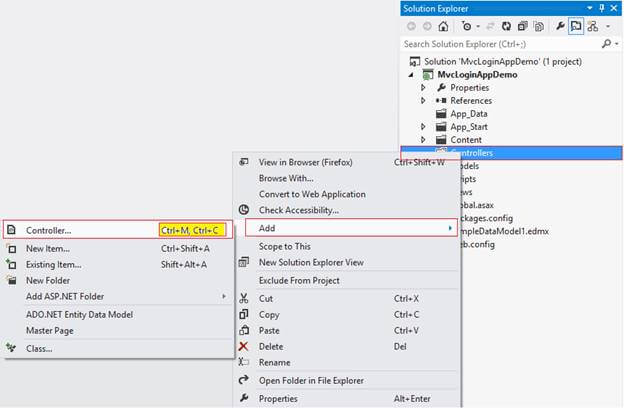
Go to Solution Explorer, right-click on the Controller folder, Add, and then click on Controller.
( Or ) Simply use shortcut key Ctrl + M, Ctrl + C,

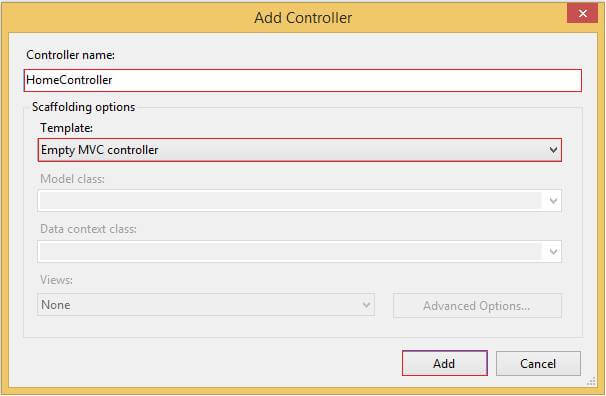
Provide the Controller Name and Scaffolding template as Empty MVC Controller. Then click on Add.
Write the following code in HomeController.
using System.Linq;
using System.Web.Mvc;

namespace MvcLoginAppDemo.Controllers
{
    public class HomeController : Controller
    {
        public ActionResult Login()
        {
            return View();
        }

        [HttpPost]
        [ValidateAntiForgeryToken]
        public ActionResult Login(UserProfile objUser)
        {
            if (ModelState.IsValid)
            {
                using (DB_Entities db = new DB_Entities())
                {
                    var obj = db.UserProfiles.Where(a => a.UserName.Equals(objUser.UserName) && a.Password.Equals(objUser.Password)).FirstOrDefault();
                    if (obj != null)
                    {
                        Session["UserID"] = obj.UserId.ToString();
                        Session["UserName"] = obj.UserName.ToString();
                        return RedirectToAction("UserDashBoard");
                    }
                }
            }
            return View(objUser);
        }

        public ActionResult UserDashBoard()
        {
            if (Session["UserID"] != null)
            {
                return View();
            }
            else
            {
                return RedirectToAction("Login");
            }
        }
    }
}


5. Create Views

Create View for Login Action Method
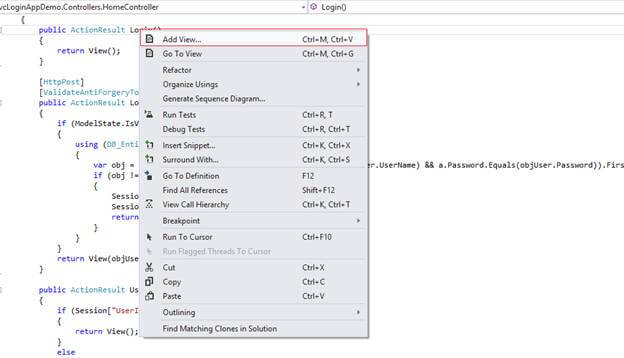
Right-click on the Login Action method, then click on Add View, as in the following picture.
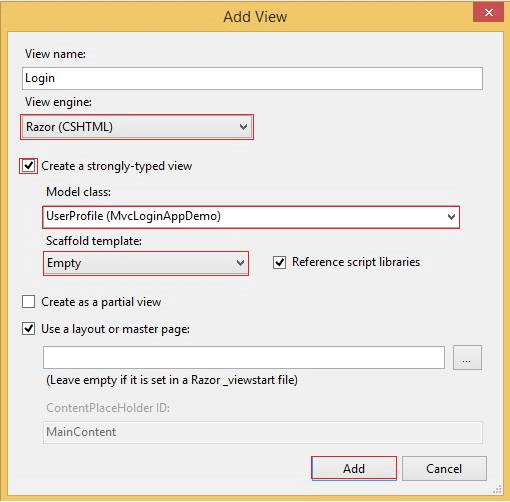
Create a Strongly Typed View

View Name must be an action method name.
Select the view engine as Razor.
Select Create a strongly typed view CheckBox.
Select Model class as UserProfile (MvcLoginAppDemo)
Select the Scaffold template as Empty
Click on Add
Write the following code in Login.cshtml (view).
@model MvcLoginAppDemo.UserProfile

@{
    ViewBag.Title = "Login";
}

@using (Html.BeginForm("Login", "Home", FormMethod.Post))
{
    <fieldset>
        <legend>Mvc Simple Login Application Demo</legend>

        @Html.AntiForgeryToken()
        @Html.ValidationSummary(true)

        @if (ViewBag.Message != null)
        {
            <p style="border: 1px solid red">
                @ViewBag.Message
            </p>
        }

        <table>
            <tr>
                <td>@Html.LabelFor(a => a.UserName)</td>
                <td>@Html.TextBoxFor(a => a.UserName)</td>
                <td>@Html.ValidationMessageFor(a => a.UserName)</td>
            </tr>
            <tr>
                <td>@Html.LabelFor(a => a.Password)</td>
                <td>@Html.PasswordFor(a => a.Password)</td>
                <td>@Html.ValidationMessageFor(a => a.Password)</td>
            </tr>
            <tr>
                <td></td>
                <td><input type="submit" value="Login" /></td>
                <td></td>
            </tr>
        </table>
    </fieldset>
}

Create View for UserDashBoard Action method same as login view. And write the following code in UserDashBoard.cshtml (View).
@{
    ViewBag.Title = "UserDashboard";
}

<fieldset>
    <legend>User Dashboard</legend>

    @if (Session["UserName"] != null)
    {
        <text>Welcome @Session["UserName"].ToString()</text>
    }
</fieldset>


6. Set as StartUp Page
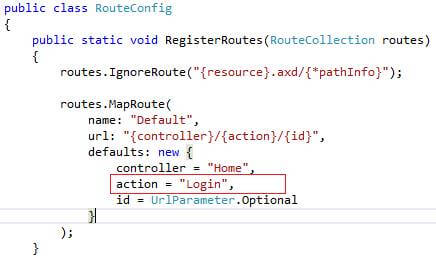
Go to Solution Explorer, Project, App_Start, then RouteConfig.cs, and change the action name from Index to Login (Login. cshtml as start-up page).
7. Run the Application

Provide the user credentials and click on OK. If you provide valid user credentials, then the user name will be displayed on your dashboard.


About HostForLIFE

HostForLIFE is European Windows Hosting Provider which focuses on Windows Platform only. We deliver on-demand hosting solutions including Shared hosting, Reseller Hosting, Cloud Hosting, Dedicated Servers, and IT as a Service for companies of all sizes.

We have offered the latest Windows 2019 Hosting, ASP.NET 5 Hosting, ASP.NET MVC 6 Hosting and SQL 2019 Hosting.


Month List

Tag cloud

Sign in