European ASP.NET MVC Hosting

BLOG about Latest ASP.NET MVC Hosting and Its Technology - Dedicated to European Windows Hosting Customer

ASP.NET MVC Hosting - HostForLIFEASP.NET :: Generate QR Code In ASP.NET Core MVC

clock January 24, 2023 10:16 by author Peter

In this article, we are going to create an ASP.Net Core MVC application that generates QR Code for different purposes like Email, Website, Bookmark Websites, SMS, WhatsApp, etc. For this, we are going to use NuGet package called QRCoder.

About QRCoder NuGet Package
QRCoder is a simple library, written in C#.NET, which enables you to create QR codes. It hasn't any dependencies on other libraries and is available as .NET Framework and .NET Core PCL version on NuGet.

QRCoder provides many types of QR Codes but in this article, I will use only the following types.

    URL
    Bookmark Website
    Send SMS
    Send WhatsApp Message
    Compose Email
    Connect To WIFI

Create ASP.Net Core MVC project.

Step 1
Open Visual Studio and click on Create New Project.

Step 2
Select ASP.NET CORE Web App (Model-View-Controller) Template as shown in the below image and click on next button.

Step 3
Configure your project by specifying the name of the project and the location where you want to save your project.

Step 4
Select the version of the .Net Core framework you want to use and click on create button.
Add New Controller

Step 1
Right Click on Controller Folder then click on Add then Controller.

Step 2
Select MVC Empty Controller. And give a name whatever you want here I gave QRCode.


Add NuGet Package
Step 1
Right click on your project and then click on Manage NuGet Packages.

Step 2
Search for QRCoder in browse tab.

Step 3
Click on the install button and it will install in your project.

Create a new Model Class
For transferring data from controller to view and view to controller we have to use model class.

Step 1

For creating a model right click on the Model folder and click on Add then class.

Step 2
Give a suitable name for your class, Here I gave QRCodeModel.

Step 3
Create required properties in your class. As you can see in the below code I have created different properties for different types of QR Codes.
public class QRCodeModel {
    public int QRCodeType {
        get;
        set;
    }
    public string QRImageURL {
        get;
        set;
    }
    //for bookmark qr code
    public string BookmarkTitle {
        get;
        set;
    }
    public string BookmarkURL {
        get;
        set;
    }
    // for email qr codes
    public string ReceiverEmailAddress {
        get;
        set;
    }
    public string EmailSubject {
        get;
        set;
    }
    public string EmailMessage {
        get;
        set;
    }
    //for sms qr codes
    public string SMSPhoneNumber {
        get;
        set;
    }
    public string SMSBody {
        get;
        set;
    }
    //for website
    public string WebsiteURL {
        get;
        set;
    }
    // for whatsapp qr message code
    public string WhatsAppNumber {
        get;
        set;
    }
    public string WhatsAppMessage {
        get;
        set;
    }
    // for wifi qr code
    public string WIFIName {
        get;
        set;
    }
    public string WIFIPassword {
        get;
        set;
    }
}


Design View

Step 1
Create an action method in your controller as you want. Here I used the index action method.

Step 2

Right-click on the action method and click on Add View to add a new view.

Step 3
Return the model from the controller which you have created. If you want to pass some extra data you can pass it. Here as you see in the below code I just created object of model and pass that model to view.
public IActionResult Index() {
    QRCodeModel model = new QRCodeModel();
    return View(model);
}


Step 4
Design your view as per your requirements.
@model QRCodeModel
@{
    ViewData["Title"] = "Generate QR Code";
}

<form asp-action="Index">

    <div class="row mt-2">
        <div class="col-lg-6 col-md-6 col-sm-12">
            <label>Select QR Code Type</label>
            <select asp-for="QRCodeType" id="QRCodeType" class="form-control" onchange="onQRCodeTypeChange()">
                <option value="1">Website</option>
                <option value="2">Bookmark URL</option>
                <option value="3">SMS</option>
                <option value="4">WhatsApp</option>
                <option value="5">Email</option>
                <option value="6">WIFI</option>
            </select>
        </div>
    </div>

    <!--  Website  -->
    <div class="row mt-2 hideDiv" id="DIV1">
        <div class="col-lg-6 col-md-6 col-sm-12">
            <label>Enter your website URL</label>
            <input autocomplete="off" type="url" asp-for="WebsiteURL" class="form-control" />
        </div>
    </div>

    <!-- Book Mark URL   -->
    <div class="row mt-2 hideDiv" id="DIV2">
        <div class="col-lg-6 col-md-6 col-sm-12">
            <label>Enter your URL</label>
            <input type="url" asp-for="BookmarkURL" class="form-control" autocomplete="off" />
        </div>
    </div>

    <!--  SMS  -->
    <div id="DIV3" class="hideDiv">
        <div class="row mt-2">
            <div class="col-lg-6 col-md-6 col-sm-12">
                <label>Enter Phone Number with country code(eg. +91)</label>
                <input type="text" asp-for="SMSPhoneNumber" class="form-control" autocomplete="off" />
            </div>
        </div>
        <div class="row mt-2">
            <div class="col-lg-6 col-md-6 col-sm-12">
                <label>Enter your Message</label>
                <textarea asp-for="SMSBody" class="form-control"></textarea>
            </div>
        </div>
    </div>

    <!--  Whats App Message  -->
    <div id="DIV4" class="hideDiv">
        <div class="row mt-2">
            <div class="col-lg-6 col-md-6 col-sm-12">
                <label>Enter WhatsApp Number with country code(eg. +91)</label>
                <input type="text" asp-for="WhatsAppNumber" class="form-control" autocomplete="off" />
            </div>
        </div>
        <div class="row mt-2">
            <div class="col-lg-6 col-md-6 col-sm-12">
                <label>Enter your Message</label>
                <textarea asp-for="WhatsAppMessage" class="form-control"></textarea>
            </div>
        </div>
    </div>

    <!--  Compose Email  -->
    <div id="DIV5" class="hideDiv">
        <div class="row mt-2">
            <div class="col-lg-6 col-md-6 col-sm-12">
                <label>Enter Receive's Email Address</label>
                <input type="text" asp-for="ReceiverEmailAddress" class="form-control" autocomplete="off" />
            </div>
        </div>
        <div class="row mt-2">
            <div class="col-lg-6 col-md-6 col-sm-12">
                <label>Enter Email Subject</label>
                <input type="text" asp-for="EmailSubject" class="form-control" autocomplete="off" />
            </div>
        </div>
        <div class="row mt-2">
            <div class="col-lg-6 col-md-6 col-sm-12">
                <label>Enter Email Message</label>
                <textarea asp-for="EmailMessage" class="form-control"></textarea>
            </div>
        </div>
    </div>

    <!--   WIFI   -->
    <div id="DIV6" class="hideDiv">
        <div class="row mt-2">
            <div class="col-lg-6 col-md-6 col-sm-12">
                <label>Enter WIFI Name</label>
                <input type="text" asp-for="WIFIName" class="form-control" autocomplete="off" />
            </div>
        </div>
        <div class="row mt-2">
            <div class="col-lg-6 col-md-6 col-sm-12">
                <label>Enter WIFI Password</label>
                <input type="text" asp-for="WIFIPassword" class="form-control" autocomplete="off" />
            </div>
        </div>
    </div>

    <div class="row mt-2">
        <div class="col-lg-6 col-md-6 col-sm-12">
            <button type="submit" class="btn btn-primary">Generate</button>
            <button type="reset" class="btn btn-secondary">Reset</button>
        </div>
    </div>

    @if (!string.IsNullOrEmpty(Model.QRImageURL))
    {
        <div class="row mt-2" id="qrCodeImage">
            <div class="col-lg-6 col-md-6 col-sm-12">
                <img height="250" width="250" src="@Model.QRImageURL" />
            </div>
        </div>
    }

</form>

@section Scripts{

    <script>
        $(document).ready(function () {
            $("#QRCodeType").trigger("change");
        });

        function onQRCodeTypeChange() {
            let qrcodeType = $("#QRCodeType").val();
            $(".hideDiv").hide();
            $("#DIV" + qrcodeType).show();
        }
    </script>
}


Code Explanation
As you can see in the above HTML code I created inputs as per my properties.

Here I add drop-down for QR Code type and based on that type I show and hide DIV of codes.
<div class="row mt-2">
  <div class="col-lg-6 col-md-6 col-sm-12">
    <label>Select QR Code Type</label>
    <select asp-for="QRCodeType" id="QRCodeType" class="form-control" onchange="onQRCodeTypeChange()">
      <option value="1">Website</option>
      <option value="2">Bookmark URL</option>
      <option value="3">SMS</option>
      <option value="4">WhatsApp</option>
      <option value="5">Email</option>
      <option value="6">WIFI</option>
    </select>
  </div>
</div>

For different types of QR Codes, I have created different div and gave an id to that div same as I gave the value in dropdown. Also gave same class name to all div.

At bottom, there are two buttons for submitting and resetting page.

Below button, there is an image that shows QR Code Image when the view return from controller after generating QR Code. Here we directly pass QR Code Image as base64 string instead of saving image and then show it on view side.
@if (!string.IsNullOrEmpty(Model.QRImageURL))
{
    <div class="row mt-2" id="qrCodeImage">
        <div class="col-lg-6 col-md-6 col-sm-12">
            <img height="250" width="250" src="@Model.QRImageURL" />
        </div>
    </div>
}


At last, there is JavaScript code in the Scripts section which contain a function called onQRCodeTypeChange which gets value of QR Code Type drop-down then hide all the divs and only show which has id same as drop down value.
function onQRCodeTypeChange() {
    let qrcodeType = $("#QRCodeType").val();
    $(".hideDiv").hide();
    $("#DIV" + qrcodeType).show();
}


On the document ready event I triggered the change event of QR Code type drop-down.
$(document).ready(function() {
    $("#QRCodeType").trigger("change");
});

Code for Generate QR Code
Create post action method in your controller to post data from form. In this method, we are going to generate QR Code as per its type.
[HttpPost]
public IActionResult Index(QRCodeModel model) {
    Payload payload = null;
    switch (model.QRCodeType) {
        case 1: // website url
            payload = new Url(model.WebsiteURL);
            break;
        case 2: // bookmark url
            payload = new Bookmark(model.BookmarkURL, model.BookmarkURL);
            break;
        case 3: // compose sms
            payload = new SMS(model.SMSPhoneNumber, model.SMSBody);
            break;
        case 4: // compose whatsapp message
            payload = new WhatsAppMessage(model.WhatsAppNumber, model.WhatsAppMessage);
            break;
        case 5: //compose email
            payload = new Mail(model.ReceiverEmailAddress, model.EmailSubject, model.EmailMessage);
            break;
        case 6: // wifi qr code
            payload = new WiFi(model.WIFIName, model.WIFIPassword, WiFi.Authentication.WPA);
            break;
    }
    QRCodeGenerator qrGenerator = new QRCodeGenerator();
    QRCodeData qrCodeData = qrGenerator.CreateQrCode(payload);
    QRCode qrCode = new QRCode(qrCodeData);
    var qrCodeAsBitmap = qrCode.GetGraphic(20);
    // use this when you want to show your logo in middle of QR Code and change color of qr code
    //Bitmap logoImage = new Bitmap(@"wwwroot/img/Virat-Kohli.jpg");
    //var qrCodeAsBitmap = qrCode.GetGraphic(20, Color.Black, Color.Red, logoImage);
    string base64String = Convert.ToBase64String(BitmapToByteArray(qrCodeAsBitmap));
    model.QRImageURL = "data:image/png;base64," + base64String;
    return View("Index", model);
}
private byte[] BitmapToByteArray(Bitmap bitmap) {
    using(MemoryStream ms = new MemoryStream()) {
        bitmap.Save(ms, ImageFormat.Png);
        return ms.ToArray();
    }
}

Step 1
Create a new object of QRCodeGenerator class.
QRCodeGenerator qrGenerator = new QRCodeGenerator();

Step 2

Call the CreateQrCode method using this object and pass payload in its constructor. Payload is an object of PayloadGenerator.Payload type. There are different payload types as per QR Code types. We will discuss different types of payload later in this article.
QRCodeData qrCodeData = qrGenerator.CreateQrCode(payload);

Step 3
Create object of QRCode type and Pass QR Data object to its constructor.
QRCode qrCode = new QRCode(qrCodeData);

Step 4
Call GetGraphic method of this QR Code object which take one integer parameter which define pixels per module.
var qrCodeAsBitmap = qrCode.GetGraphic(20);

There are also some overloaded methods using which you can change the color of QR Code and also set logo in QR Code.
// use this when you want to show your logo in middle of QR Code and change color of qr code
Bitmap logoImage = new Bitmap(@"wwwroot/img/Peter.jpg");
var qrCodeAsBitmap = qrCode.GetGraphic(20, Color.Black, Color.Red, logoImage);

Step 5
GetGraphic method return bitmap image as return type. You can save this image in your local path but here I convert this bitmap image to byte array and then convert this byte array to base64 string which I’m going to bind in QRImageURL property and pass it to the view so user can view this QR Code.
string base64String = Convert.ToBase64String(BitmapToByteArray(qrCodeAsBitmap));
model.QRImageURL = "data:image/png;base64," + base64String;

For converting bitmap to byte first convert it to memory stream and then get byte array from this stream in user define method BitmapToByteArray. As you can see in below code.
private byte[] BitmapToByteArray(Bitmap bitmap) {
    using(MemoryStream ms = new MemoryStream()) {
        bitmap.Save(ms, ImageFormat.Png);
        return ms.ToArray();
    }
}


Step 6
Return view data after generating QR Code so user can see Generated QR Code in their browser.
Followings are different payload type which is used in this article.
Payload payload = null;

URL Payload
To generate QR Code that opens URL or any Website QRCoder provider payload type of URL class.

This class takes one argument in its constructor which is URL of website.
payload = new Url(model.WebsiteURL);

Bookmark Payload
To generate QR Code for bookmark type we have to Use Bookmark payload.
Bookmark class’s constructor takes two parameters first is the URL of the website and second is the title of the bookmark.
payload = new Bookmark(model.BookmarkURL, model.BookmarkURL);

SMS Payload

To generate QR Code for composing SMS we have to pass payload of SMS type. QR Code provider SMS class for this type of payload.

SMS class’s constructor takes two parameters first is phone number to whom you want to send the SMS and the second is the message you want to send. Message parameter s optional you can only pass phone number to it.
payload = new SMS(model.SMSPhoneNumber, model.SMSBody);

WhatsApp Message Payload
To generate QR Code that send WhatsApp message we have to pass WhatsAppMessage payload. QRCoder provides WhatsAppMessage class to generate payload.
WhatsAppMessage provides two overloaded methods one only takes one parameter which is message only and second takes two parameter WhatsApp number and message both.
payload = new WhatsAppMessage(model.WhatsAppNumber, model.WhatsAppMessage);

Mail Payload
To generate QR Code which compose email we have to use MAIL payload.

Mail class’s constructor does not required any parameter. It’s all parameters are by default set to null. But here we are going to pass receiver email address, Subject, and body of mail.
payload = new Mail(model.ReceiverEmailAddress, model.EmailSubject, model.EmailMessage);

WiFi Payload
To generate QR Code which connect to WIFI we have to pass data in WIFI payload.
WiFi class’s constructor takes three required parameter wifi name, wifi password, and authentication mode (WEP, WPA, nopass). You can pass any theme but mostly WPA is used in all wifi so here I by default set it.
payload = new WiFi(model.WIFIName, model.WIFIPassword, WiFi.Authentication.WPA);


ASP.NET MVC Hosting - HostForLIFEASP.NET :: Folder Structure Of ASP.NET Core MVC 6.0 Project

clock January 20, 2023 06:25 by author Peter

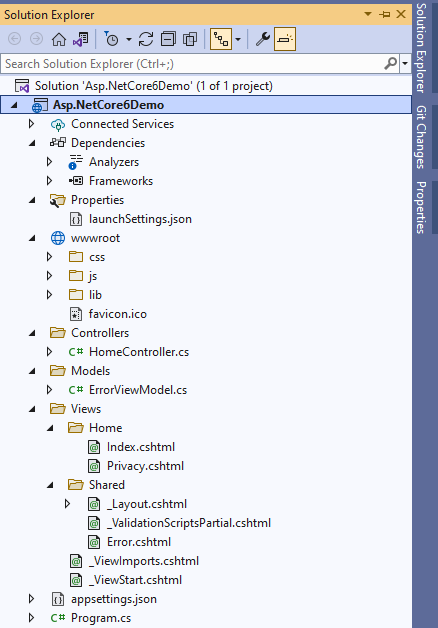
In this article, I am going to explain to you, the default folder structure of an ASP.NET Core MVC 6.0 web application and describe the purpose of each folder. In my previous article, we created an empty ASP.NET Core MVC 6.0 Project and the structure of the project as shown in the following image.

Let’s start exploring each folder and file that exists in the Project Structure for easy understanding.

Project Folder Structure Description
The details of the default project structure can be seen in the solution explorer, it displays all the projects related to a single solution.


.csproj File

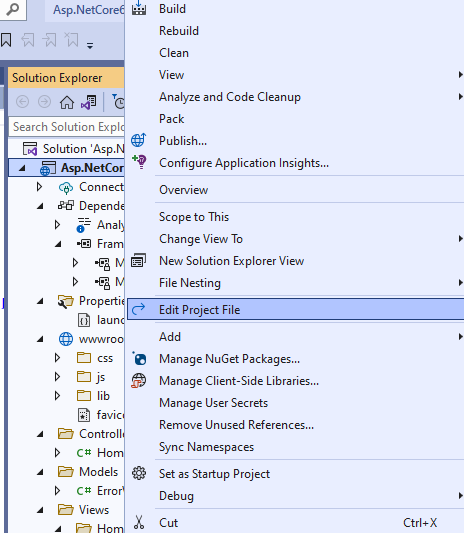
Double click on the project name in Solution Explorer to open .csproj file in the editor. Right-click on the project and then click on Edit Project File in order to edit the .csproj file. As shown in the following image.

Once clicked on Edit Project File, .csproj file will be opened in Visual Studio as shown below.

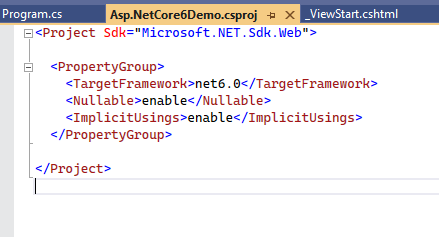
As you can see the project’s SDK is Microsoft.NET.Sdk.Web. The target framework is net6.0 indicating that we are using .NET 6. Notice the Nullable and ImplicitUsings elements.
The <Nullable> elements decide the project wide behaviour of Nullable of Nullable reference types. The value of enable indicates that the Nullable reference types are enabled for the project.

The < ImplicitUsings > element can be used to enable or disable. When < ImplicitUsings > is set to enable, certain namespaces are implicitly imported for you.
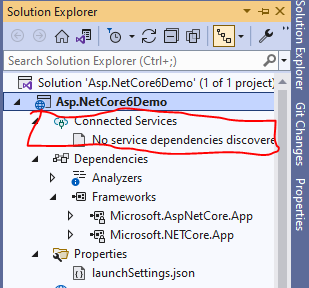
Connected Services
It contains the details about all the service references added to the project. A new service can be added here, for example, if you want to add access to Cloud Storage of Azure Storage you can add the service here. As shown in the following image.
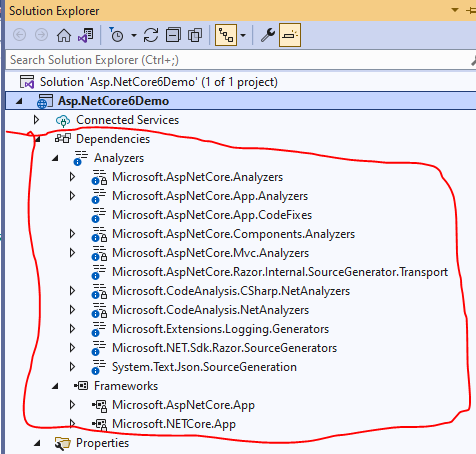
Dependencies
The Dependencies node contains all the references of the NuGet packages used in the project. Here the Frameworks node contains reference two most important dotnet core runtime and asp.net core runtime libraries. Project contains all the installed server-side NuGet packages, as shown below.
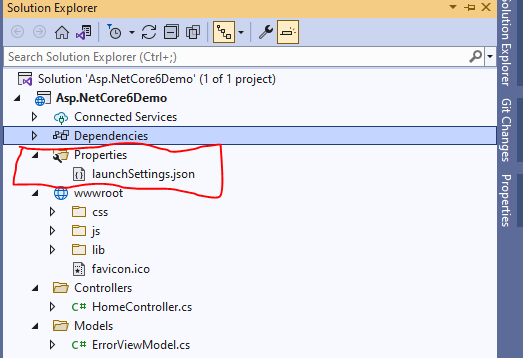

Properties
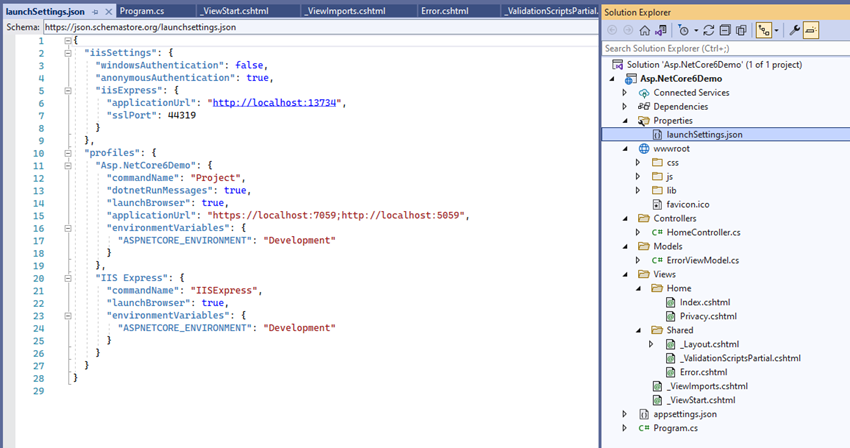
Properties folder contains a launchSettings.json file, which containing all the information required to lunch the application. Configuration details about what action to perform when the application is executed and contains details like IIS settings, application URLs, authentication, SSL port details, etc.


WWWroot
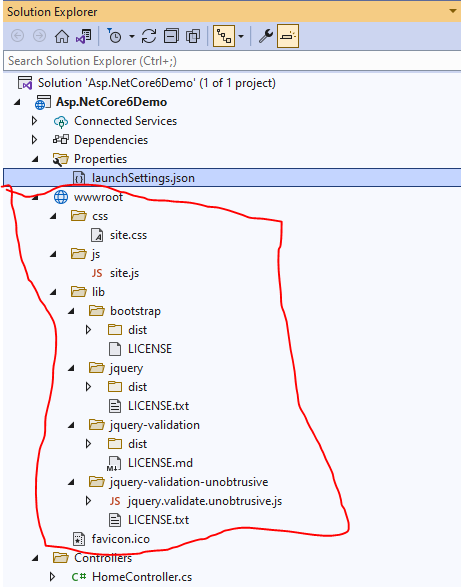
This is the webroot folder and all the static files required by the project are stored and served from here. The webroot folder contains a sub-folder to categorize the static file types, like all the Cascading Stylesheet files, are stored in the CSS folder, all the javascript files are stored in the js folder and the external libraries like bootstrap, jquery are kept in the library folder.

Generally, there should be separate folders for the different types of static files such as JavaScript, CSS, Images, library scripts, etc. in the wwwroot folder as shown below.
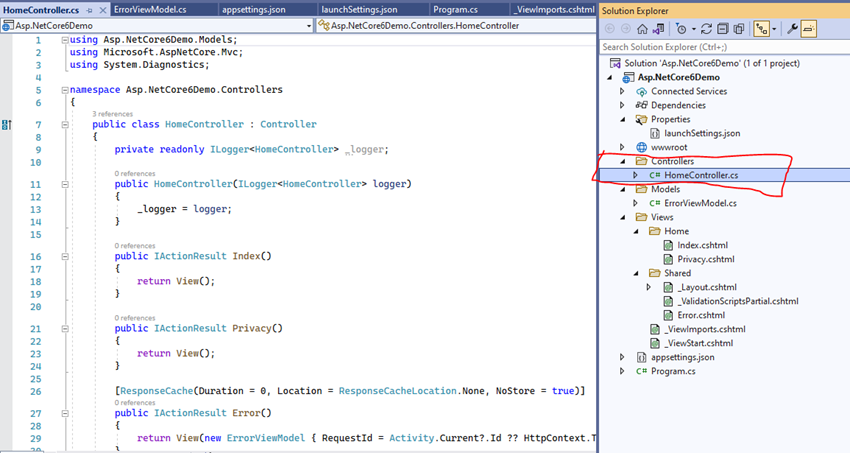
Controllers
Controller handles all the incoming requests. All the controllers needed for the project are stored here. Controllers are responsible for handling end user interaction, manipulating the model and choose a view to display the UI. Each controller class inherits a Controller class or ControllerBase class. Each controller class has “Controller” as a suffix on the class name, for example, the default “HomeController.cs” file can be found here. As shown below.

Models
A Model represents the data of the application and a ViewModel represents data that will be displayed in the UI. The models folder contains all the domain or entity classes. Please note user can add folders of his choice to create logical grouping in the project.

Views
A view represents the user interface that displays ViewModel or Model data and can provide an option to let the user modify them. Mostly a folder in name of the controller is created and all the views related to it are stored in it. Here HomeController related view Index.cshtml and Privacy.cshtml is stored in Home folder and all the shared view across the application is kept in Shared folder. Under this shared folder there are _Layout.cshtml, _ValidationScriptsPartial.cshtml and Error.cshtml view files. There are two more view files, _ViewImports.cshtml and _ViewStart.cshtml under the view folder.
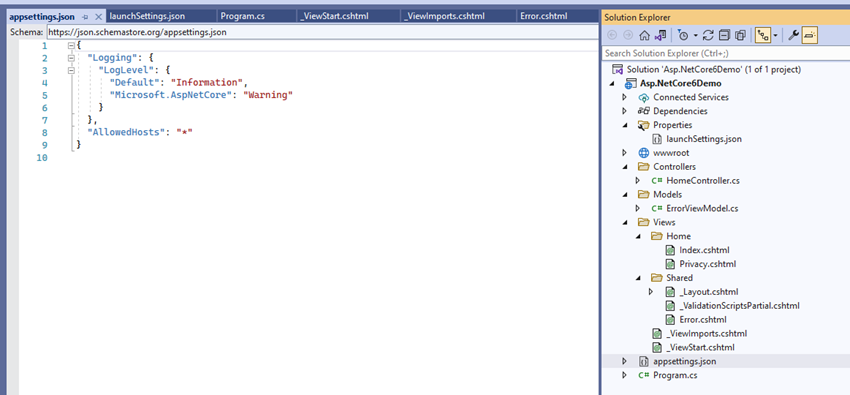
appsettings.json
This file contains the application settings, for example, configuration details like logging details, database connection details.
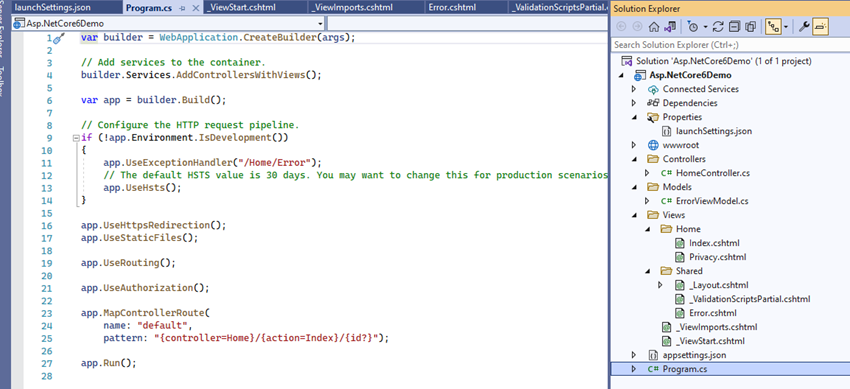

Program.CS
This class is the entry point of the web application. It builts the host and executes the run method.

I hope the article helped you to understand ASP.NET Core MVC 6.0 Project Structure.

Conclusion
In this article we explained, the folder structure of ASP.NET Core MVC 6.0 application. I hope this article is useful to understand.


ASP.NET MVC Hosting - HostForLIFEASP.NET :: ASP.NET MVC 5 With Entity Framework And MySQL

clock January 17, 2023 07:46 by author Peter

We know how to use Code First Migration in SQL Server. But in most cases, a customer will think we can use it for the open source database. So that’s the reason we pick the “MySQL” database, and we can follow the same steps we follow in the “SQL” database. In this article, we are going to explain Code First Migration in ASP.NET MVC 5 with Entity FrameWork & MySQL.

Create a Web Application using MVC 5
Click on File -> New -> Project -> Visual C# -> Web -> ASP.Net Web Application ( .Net Framework ).


Click on “OK” then click on “MVC”.
 
Install Entity Framework & MySQL Entity
Go to Visual Studio “Tools -> NuGet Package Manager -> Manage Nuget Packages for Solution” or right click on your web application then click on “Manage NuGet Packages”.
 
EntityFramework
Search EntityFramework in the “Browse” Section.

Once we installed EntityFramework & MySql Entity in our application then it will generate a SQL and MySQL Provider inside the EntityFramework Section in Web.Config.
    <entityFramework> 
        <defaultConnectionFactory type="System.Data.Entity.Infrastructure.SqlConnectionFactory, EntityFramework" /> 
        <providers> 
          <provider invariantName="System.Data.SqlClient" type="System.Data.Entity.SqlServer.SqlProviderServices, EntityFramework.SqlServer" /> 
          <provider invariantName="MySql.Data.MySqlClient" type="MySql.Data.MySqlClient.MySqlProviderServices, MySql.Data.Entity.EF6, Version=6.8.8.0, Culture=neutral, PublicKeyToken=c5687fc88969c44d"></provider></providers>   
      </entityFramework> 

Model Class
We just created a sample model class for demo purposes.
    using System; 
    using System.Collections.Generic; 
    using System.Linq; 
    using System.Web; 
      
    namespace WebAppWithMySql.Models 
    { 
        public class Student 
        { 
            public int Id { get; set; } 
      
            public string Name { get; set; } 
      
            public string Password { get; set; } 
        } 
    } 


Creation of DBContext

Create a db context class in our application. The following dbcontext will point out our connection string in WebConfig.
    using MySql.Data.Entity; 
    using System.Data.Entity; 
    using WebAppWithMySql.Models; 
      
    namespace WebAppWithMySql 
    { 
        [DbConfigurationType(typeof(MySqlEFConfiguration))] 
        public class WebAppContext : DbContext 
        { 
            public DbSet<Student> Products 
            { 
                get; 
                set; 
            } 
            public WebAppContext() 
                //Reference the name of your connection string ( WebAppCon ) 
                : base("WebAppCon") { } 
        } 
    } 


Connection String
We added the same connection string name that we added in the dbcontext class. The following connection string represents “MySql” Db.
    <connectionStrings> 
        <add name="WebAppCon" providerName="MySql.Data.MySqlClient" connectionString="server=localhost;userid=root;password=peter123;database=WebAppMySql;persistsecurityinfo=True" /> 
      </connectionStrings> 


Migration Steps

Go to Visual Studio "Tools -> NuGet Package Manager -> Package Manager Console". Then execute the following command.
    Enable-Migrations – ( We need to enable the migration, only then can we do the EF Code First Migration ).
    Add-Migration IntialDb (migration name) – ( Add a migration name and run the command ).
    Update-Database -Verbose — if it is successful then we can see this message (Running Seed method).

Once Migration is done; then, we can see that the respective files are auto-generated under the “Migrations” folder.

Output


ASP.NET MVC Hosting - HostForLIFEASP.NET :: Pass Data Across Views In .NET MVC

clock January 10, 2023 06:17 by author Peter

In previous articles, we discussed both View Variables in ASP.NET MVC and View Variables in ASP.NET Core MVC, respectively.  Although each has some distinctive points, both share a lot of common features. In this article, we will discuss something new: pass data across views. We will also summarize some common or important shared features for various vew variables.


A: Brief Summary of ViewData
We will start our discussion from ViewData, but most or all features are the same for other MVC View Variables. The ASP.NET Core also has the same features. So, we will discuss ViewData in the most, and have the last part to see the extension to other View variables.

A - 1: MVC Data Passing Techniques
This is a different approach to summarize the MVC Data Passing Techniques from Data Passing Techniques in ASP.NET Core (dotnettricks.com). We will not repeat the conclusion here, but we can go to the page to learn the different approaches or understanding.

B: Type of ViewData
We have discussed ViewData, ViewBag, TempData, Session type features. They are all the Type of Dictionary:

Where the difference between ViewBag and ViewData:


Besides ViewBag, all other View Variables need to be cast before using. We define a ViewData named "book": as type BookModel with data such as Id = 1:


When we retrieve data, we have to cast the data back to the data type. Otherwise, we will get an error message:


After casting:

C: Pass Data into _Layout.cshtml Page by ViewData
The _layout.cshtml is a shared page by other specific views. It belongs to no Controller or Action, or we can say it belongs to every Controller or Action when the related view is using _layout.cshtml. Therefore, we can pass data into Layout either from the Controller or Action view, which uses the _layout.cshtml, such as, if we have a Contact Us Action:

Or, we can define the ViewData from the Contact Us View:

Both ways will pass the data into Layout page:

Notes
1, We usually introduce the Layout into View by the code in the View as below:

2, in some cases, if we want to make the Layout page(s) dynamic, we can assign the layout to the view through Controller/Action:

3, A related important shared concept for MVC, _Viewstat.cshtml

D: Pass Data into _Layout.cshtml Page by Other View Variables
The same is true for other MVC View Variables, such as ViewBag, TempData, and absolutely Session variable:


Pass TempData to Layout:

Pass ViewData to Layout:

Pass ViewBag to Layout:

This article discussed using ASP.NET MVC ViewData to pass data into Layout View through either Controller or View.  The features are available or the same as other View Variables in ASP.NET MVC, and the same is true for ASP.NET Core MVC.


About HostForLIFE

HostForLIFE is European Windows Hosting Provider which focuses on Windows Platform only. We deliver on-demand hosting solutions including Shared hosting, Reseller Hosting, Cloud Hosting, Dedicated Servers, and IT as a Service for companies of all sizes.

We have offered the latest Windows 2019 Hosting, ASP.NET 5 Hosting, ASP.NET MVC 6 Hosting and SQL 2019 Hosting.


Tag cloud

Sign in