European ASP.NET MVC Hosting

BLOG about Latest ASP.NET MVC Hosting and Its Technology - Dedicated to European Windows Hosting Customer

ASP.NET MVC Hosting - HostForLIFEASP.NET :: Entity Framework With .Net Core MVC

clock June 23, 2021 09:20 by author Peter

This article is about Entity Framework with .Net Core MVC, Code-First approach.  Entity Framework with .Net MVC, Code-First, they have a lot of similar features.  We try to emphasize the differences. 


At the end, we will have an .Net Core MVC app that can consume a database directly through entity framework.
 
Step 1 - Create an ASP.NET Core MVC app

 We use the current version of Visual Studio 2019 16.9.3 and .NET Core 5.0 to build the app:

    Start Visual Studio and select Create a new project.
    In the Create a new project dialog, select ASP.NET Core Web App (Model-View-Controller) > Next.
    In the Configure your new project dialog, enter MvcMovie for Project name > Next.
    In the Additional Information dialog, select .NET 5.0 in the target framework dropdowns > Create

Note
    For beginners, you may reference here.
    We use the same project name as article (1), to keep it consistent.

Build and run the app, you will see the following image shows the app,

Step 2: Add a Data Model
Add a data model, an entity class, into the app, with name as Movie:
    In Solution Explorer, right click the Models folder, > Add,
    In the Add New item dialog, Select Class, Enter the class name Movie > Add.
    Add the following five properties to the Movie class:

    using System;  
      
    namespace MvcMovie.Models  
    {  
        public class Movie  
        {  
            public int ID { get; set; }  
            public string Title { get; set; }  
            public DateTime ReleaseDate { get; set; }  
            public string Genre { get; set; }  
            public decimal Price { get; set; }  
        }  
    }

Step 3: Set up DbContext
Add another class for DbContext name as MvcMovieContext (Note: the content is different from one of MVC):
    using Microsoft.EntityFrameworkCore;  
      
    namespace MvcMovie.Models  
    {  
        public partial class MovieCoreDBContext : DbContext  
        {  
            public MovieCoreDBContext()  
            { }  
            public MovieCoreDBContext(DbContextOptions<MovieCoreDBContext> options)  
                : base(options)  
            { }  
            public virtual DbSet<Movie> Movies { get; set; }  
        }  
    }


In order to use Microsoft.EntityFrameworkCore, and the related class, you need to install it from NuGet Package Manager.
 
Step 4: Set up Data Connection
Add the Connection in the appsettings.json file

    {  
      "Logging": {  
        "LogLevel": {  
          "Default": "Information",  
          "Microsoft": "Warning",  
          "Microsoft.Hosting.Lifetime": "Information"  
        }  
      },  
      
      "ConnectionStrings": {  
        "MovieCoreConnection": "Data Source=(LocalDb)\\MSSQLLocalDB;Initial Catalog=aspnet-MvcMovie;Integrated Security=SSPI;AttachDBFilename=|DataDirectory|\\Movies.mdf",  
      },  
      
      "AllowedHosts": "*"  
    }

Register the database connection context into Class starup.cs inside ConfigureServices,
    public void ConfigureServices(IServiceCollection services)  
    {  
        services.AddDbContext<MovieCoreDBContext>(options =>  
                options.UseSqlServer(Configuration.GetConnectionString("MvcCoreMovieContext")));
        ......
    }


In order to use the middleware UseSqlServer,  you need to install Microsoft.EntityFrameworkCore.SqlServer from NuGet Package Manager.
 
Note

In .Net Framework MVC, you don't actually need to add connection string, Entity Framework will create a LocalDB database in the users directory with the fully qualified name of the DbContext class. However, in .Net Core, you have to add a connection string in the appsettings.json file and have to register it in Startup file.  Otherwise, it will not work.
 
And finally, you even have to Migrate and Update database before to make the database work, see the next step.
 
Step 4.5:  Migrate and Update database (not necessary for .Net Framework MVC)
 
We add the Step 4.5 here to do the extra job. Click "Tools->NuGet Package Manager->Package Manager Console", and run the PMC command (make them in one line),
    Add-Migration -Name initialMigration -Context MvcCoreMovieContext

Run PMC command,
    update-database

Note
her stuff from the Step 5 below will be the exactly same procedure as MVC module, we will just keep it for consistence.
 
Step 5:  Create Controller to access data from entity framework
From Visual Studio IDE,
    Right-click the Controllers folder.
    Select Add > New Scaffolded Item Or Controller to open the window Add New Scaffolded Item
    In the Add New Scaffold Item dialog box, click MVC 5 Controller with views, using Entity Framework, and then click Add.;
    In the Add Controller dialog box,
        Select Movie (MvcMovie.Models) for the Model class.
        Select MovieDBContext (MvcMovie.Models) for the Data context class.
        For the Controller name enter MoviesController.
        Click Add.

If you get an error, you probably didn't build the application before starting adding the controller.) Visual Studio creates the following files and folders:

    A MoviesController.cs file in the Controllers folder.
    A Views\Movies folder.
    Create.cshtml, Delete.cshtml, Details.cshtml, Edit.cshtml, and Index.cshtml in the new Views\Movies folder

 Visual Studio automatically created the CRUD (create, read, update, and delete) action methods and views:


Note
We will not exame the code in details, if you wanted, you may go here.

Step 6: Run the App, and Test

For convenience, you can update one line code in file Views/Shared/_Layout.chtml
<body>  
<div class="navbar navbar-inverse navbar-fixed-top">  
    <div class="container">  
        <div class="navbar-header">  
            <button type="button" class="navbar-toggle" data-toggle="collapse" data-target=".navbar-collapse">  
                <span class="icon-bar"></span>  
                <span class="icon-bar"></span>  
                <span class="icon-bar"></span>  
            </button>  
            @Html.ActionLink("MVC Core Movie", "Index", "Movies", new { area = "" }, new { @class = "navbar-brand" })  
        </div>  
        <div class="navbar-collapse collapse">  
            <ul class="nav navbar-nav">  
                <li>@Html.ActionLink("Home", "Index", "Home")</li>  
                <li>@Html.ActionLink("About", "About", "Home")</li>  
                <li>@Html.ActionLink("Contact", "Contact", "Home")</li>  
            </ul>  
        </div>  
    </div>  
</div>  
......
</body>


Run the App, the final result will be:


ASP.NET MVC 6 Hosting - HostForLIFEASP.NET :: Output Caching in MVC

clock June 16, 2021 09:09 by author Peter

The main purpose of using Output Caching is to dramatically improve the performance of an ASP.NET MVC Application. It enables us to cache the content returned by any controller method so that the same content does not need to be generated each time the same controller method is invoked. Output Caching has huge advantages, such as it reduces server round trips, reduces database server round trips, reduces network traffic etc.

 
Keep the following in mind:
    Avoid caching contents that are unique per user.

    Avoid caching contents that are accessed rarely.

    Use caching for contents that are accessed frequently.

Let's take an example. My MVC application displays a list of database records on the view page so by default each time the user invokes the controller method to see records, the application loops through the entire process and executes the database query. And this can actually decrease the application performance. So, we can advantage of the "Output Caching" that avoids executing database queries each time the user invokes the controller method. Here the view page is retrieved from the cache instead of invoking the controller method and doing redundant work.
Cached Content Locations
 
In the above paragraph I said, in Output Caching the view page is retrieved from the cache, so where is the content cached/stored?
 
Please note, there is no guarantee that content will be cached for the amount of time that we specify. When memory resources become low, the cache starts evicting content automatically.
 
OutputCache label has a "Location" attribute and it is fully controllable. Its default value is "Any", however there are the following locations available; as of now, we can use any one.
 
1. Any   2. Client   3. Downstream   4. Server   5. None   6. ServerAndClient
 
With "Any", the output cache is stored on the server where the request was processed. The recommended store cache is always on the server very carefully. You will learn about some security related tips in the following "Don't use Output Cache".
 
How Output Cache Works
It is very important to understand how the "Output Cache" works. Anyone who invokes a controller method will get the same cached version of the view page. This means that the amount of work that the web server must perform to serve the view page is dramatically reduced.
 
For example, I have recorded a GIF here to show you how the same request is being made from three different clients (here three different browsers) and we are getting the same cached version (look at the time).

Okay, now let's look at the code, how I developed the one above, how to make any controller action or method cacheable. Here it is
[OutputCache(Duration = 10, VaryByParam = "name")]
 
Just add the preceding label before the controller method. The duration is in seconds, 10 seconds here. If you don't provide a "Duration" value then the default will be used, 60 seconds. I am using VaryByParam="name" and "VeryByParam" is something that makes many differences that you should care about that will be discussed later. "name" is a parameter passed by the user with the request to do database records filering.
 
Here is the complete code:
    [HttpPost]  
        [OutputCache(Duration = 10, VaryByParam = "name")]  
        public ActionResult SearchCustomer(string name = "")  
        {  
            NorthwindEntities db = new NorthwindEntities();  
            var model = from r in db.Customers  
                        where r.ContactName.Contains(name)  
                        select r;  
            if (model.Count() > 0)  
            {  
                return View(model);  
            }  
            else  
            {  
                return View();  
            }  
        }  


In the code above, I'm looking at the "name" parameter passed by the user and then, depending on the name, selecting matching records with a LINQ query and then checking if the model has the number of records greater than zero then send the model to the view else simply send the view (no model).
VaryByParam can be one of the following types:

1. VaryByParam = "none": Think of it like, we don't want to care about the form parameter or query string parameter passed by the user from the view page. If I use "none" then it will create the same cached version of the content for every user who visits the website, and the content will only change after a specified number of seconds (here 10 seconds).

Let's use [OutputCache(Duration = 10, VaryByParam = "none")] in the code above and look at the behavior.

In above GIF you can notice on second request to see list of records that contains "a" nothing happens, because it is displaying the cached data.
2. VaryByParam = "name": This property enables you to create different cached versions of the content when a form parameter or query string parameter varies. In other words if I find records matching "ce" string then a new cache will be created by replacing the older one, again if I find records matching "ab" string then a new cache will be created by replacing the last one ("ce" cached), no matter duration is elapsed or not.
 
Let's use [OutputCache(Duration = 10, VaryByParam = "name")] in code above and look at behavior.

In the above GIF note that on each new request with a different query string parameter or form parameter, a new cache is being created; look at the time it is changing. Here the use of the cache is that if I request the same thing that I requested previously then the cached version will be rendered, here it is:

In the above GIF note that nothing happens (look at the time) when I continuously request the same information, rendering the cached version.
3. VaryByParam = "*": We can use * for all parameters or a semi-colon separated list to cache various versions. This works very similar to the one above (VaryByParam="name").
    [OutputCache(Duration = 10, VaryByParam = "*")]  
    public ActionResult SearchCustomer(string name = "", string city = "")  
    {  
        NorthwindEntities db = new NorthwindEntities();  
        ...  

OR
    [OutputCache(Duration = 10, VaryByParam = "name; city")]  
    public ActionResult SearchCustomer(string name = "", string city = "")  
    {  
        NorthwindEntities db = new NorthwindEntities();  
        ...  

Both scenarios work the same, so use whichever one that makes you happy.
Check Web Page is Cache-able or not?
 
Fiddler is a great tool if you want to check whether a requested web page is cache-able or not, here is a GIF image of it.

In the above GIF you can see the GET request is not cacheable whereas the POST request is cacheable and with max-age: 10 seconds.
Don't use Output Cache
 
Here you will learn about some quick security related issues and their prevention.

Danger 1
We should always be careful while using "OutputCache", I will show you an example here. Let's look at the following controller action method and try finding security vulnerabilities.
    [OutputCache(Duration = 10, VaryByParam = "none")]  
        public ActionResult Profiles()  
        {  
            if (User.Identity.IsAuthenticated)  
            {  
                MembershipUser u = Membership.GetUser(User.Identity.Name);  
                ViewBag.welcomeNote = "Welcome back " + User.Identity.Name + ". Your last login date was " + u.LastLoginDate;  
            }  
            else  
            {  
                ViewBag.welcomeNote = "Welcome Guest";  
            }  
            return View();  
        }  


Now, I'm running the code above, see how the usernames are appearing in both (IE and Chrome) browsers, the GIF is given below. Username is also being cached and stored on the server for other users.

In the above controller action method we don't have a "VaryByCustom" or "Location" attribute with "OutputCache" to safeguard it, so by default it uses Location = OutputCacheLocation.Any that is dangerous in this case. If you are using membership in the web application then you should pay special attention. A few ways are given below, the first is more secure and recommendable.

1st Way
You can also take advantage of the VaryByCustom property in [OutputCache] by overriding HttpApplication.GetVaryByCustomString and checking HttpContext.Current.User.IsAuthenticated.

This is what I will create in the Global.asax.cs file:
    public override string GetVaryByCustomString(HttpContext context, string custom)  
    {  
        if (custom == "LoggedUserName")  
        {  
            if (context.Request.IsAuthenticated)  
            {  
                return context.User.Identity.Name;  
            }  
            return null;  
        }  
        return base.GetVaryByCustomString(context, custom);  
    }  


And then use it in the OutputCache attribute:
    [OutputCache(Duration = 10, VaryByParam = "none", VaryByCustom = "LoggedUserName")]  
    public ActionResult Profiles()  
    {  
        //...  
    }  

Now for every user logged in on the website OutputCache will create a separate version, and it works great. We can even use Duration, VaryByParam, VaryByCustom and Location attributes together to make it more productive, useful and secure.

We can also enable separate cache entries for each browser, VaryByCustom can be set to a value of "browser". This functionality is built into the caching module, and will insert separate cached versions of the page for each browser name and major version. You don't need to override HttpApplication.GetVaryByCustomString.
    [OutputCache(Duration = 10, VaryByParam = "none", VaryByCustom = "browser")]  
    public ActionResult Profiles()  
    {  
       ...  


2nd Way
See, this is less reliable but works. You should use Location = OutputCacheLocation.Client. If you don't, the login username will also be cached and stored on the server for other users and that is confusing & quite dangerous.

Here is the complete controller action method code.
    [OutputCache(Duration = 10, VaryByParam = "none", Location = OutputCacheLocation.Client)]  
    public ActionResult Profiles()  
    {  
        ...  
    }  

Note 1: POST requests are not cached on the client, in other words this will not work because it is a POST request and the caching location is on the client.
      [HttpPost]  
    [OutputCache(Duration = 10, VaryByParam = "name", Location = OutputCacheLocation.Client)]  
    public ActionResult SearchCustomer(string name = "")  
    {  
        ...  
    }  


Note 2: If you are trying to test client-side caching (like the one given above) and hitting F5 then you are losing the client cache. The way the client cache is supposed to work is that you have links on the site pointing to the Client action from some other views and when the user clicks on those links the cached version will be served.

Danger 2
If you want a more secure application then you should only enable caching for a page when the page does not require authorization. Normally, you require authorization for a page when you display personalized data in the page. Since you don't want personalized data to be shared among multiple users, don't cache pages that require authorization.
    [Authorize]  
    [OutputCache(Duration = 10, VaryByParam = "none")]  
    public ActionResult CreditCardDetails()  
    {  
        ...  
    }  


In the code above, you are combining OutputCaching and Authorize with an action method that contains your credit card information. And you know how OutputCaching stores data out of the database that is not as secure as a database. So you are broadcasting your private information to the entire world. Don't do it.

Creating Cache Profile
It is very difficult to change the rules (like Duration, VaryByParam, VaryByCustom, Location) used with "OutputCache" on each controller method when your large application has already been deployed.

So, there is an alternative to configure the OutputCache profile in the web.config file. By configuring output caching in the web configuration file, you can control it on one central location. You can create one cache profile and apply the profile to several controllers or controller actions. Also, you can modify the web configuration file without recompiling your application. Any changes to the web configuration file will be detected automatically and applied to the entire application.

In the following code you can see I have used a new attribute CacheProfile that maps to Cache10Seconds that is in web.config.
    [OutputCache(CacheProfile = "Cache10Seconds", VaryByCustom = "LoggedUserName")]  
    public ActionResult Profiles()  
    {  
       ...  

And then web.config:
    <system.web>  
      <caching>  
        <outputCacheSettings>  
            <outputCacheProfiles>  
                <add name="Cache10Seconds" duration="10" varyByParam="none"/>  
            </outputCacheProfiles>  
        </outputCacheSettings>  
      </caching>  
      ...  


Please note, I moved Duration, VaryByParam and Location (we can use it also) in web.config but not VaryByCustom and the reason is, it is used for overriding the rules.
Now, assume for any reason I want to disable caching for an entire application that has already been deployed to production, then you can simply modify the cache profiles defined in the web configuration file.
 
We can even disable it as in the following:

    <system.web>  
        <caching>  
            <outputCache enableOutputCache="false" =""/>  
            <outputCacheSettings>  
                  <outputCacheProfiles>  
                        <add name="Cache10Seconds" duration="10" varyByParam="none"/>                 
          </outputCacheProfiles>           
        </outputCacheSettings>  
      </caching>  

This approach is pretty good because rather than targeting any specific outputCacheProfile we can disable all at once, awesome.


ASP.NET MVC 6 Hosting - HostForLIFEASP.NET :: JsonResult Type in MVC

clock June 8, 2021 07:20 by author Peter

The JSON format is an open standard format. The format of data looks very easy to understand and the data objects consist of attribute-value pairs.

 
ContentEncoding: It helps to indicate the content encoding type, the default encoding for JSON is UTF-8.
ContentType: It helps to indicate the content type. The default content type for JSON is application/json; charset=utf-8.
Note: ContentType and ContentEncoding are not necessary to mention when sending the data in JSON format as the HTTP headers are having a responsibility to tell the recipient what kind of content they're dealing with.
Data: This indicates what the content data is, that means what you will send in JSON format.
JsonRequestBehavior: This property has two options. Those are AllowGet and DenyGet. The default option is DenyGet. When you send data in JSON format, using Get Request, it's necessary to specify the property as AllowGet otherwise it shows the error as “The request would be blocked since the JSON data is considered as sensitive data information”.
MaxJsonLength: This helps to get or set the maximum JSON content length that you will send. The default value for this is 2097152 characters, that is equal to 4 MB of Unicode string data. You can even increase the size based if needed, for that you will get an idea later in this article.
RecursionLimit: Indicates the constraining number of object levels to process. The default value is 100. It means you can serialize the objects that are nested to a depth of 100 objects referencing each other. In a general scenario, the default limit 100 is obviously sufficient when you deal with a JsonResult so there is no need to increase it even though you have the option to increase the limit if required.

Sample Project with Various Scenarios by using JsonResult
Create a new project with the name JsonResultDemo and choose the template as MVC as shown in the following screenshots.
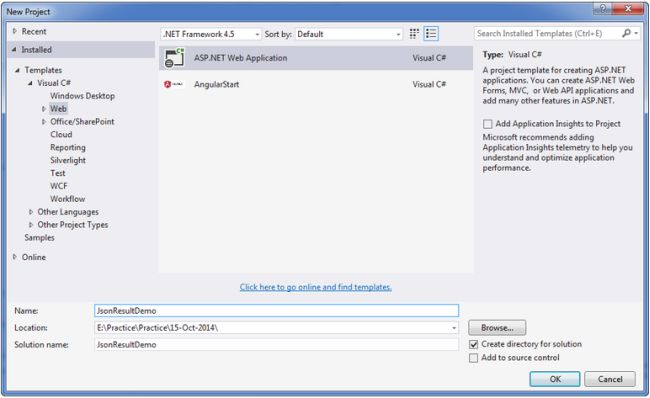
Now, click on the OK button then the displayed screen is as in the following.
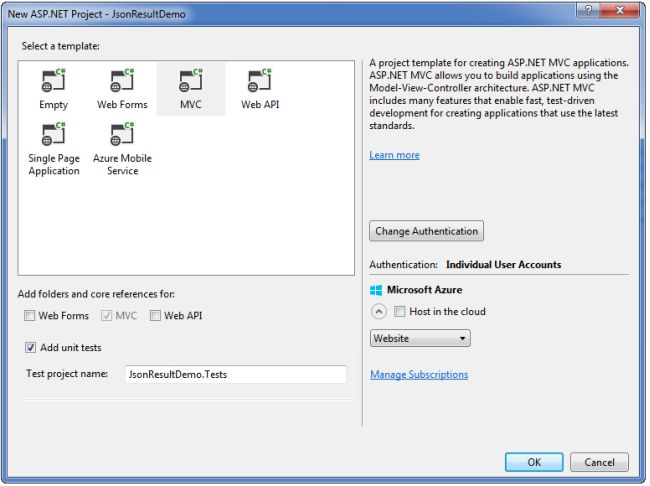
As in the preceding template, you need to select the “Add Unit Tests” option as well. So It helps to create a Unit Test project and then again click on the OK button then the project will be created and the startup application page displayed like the following.
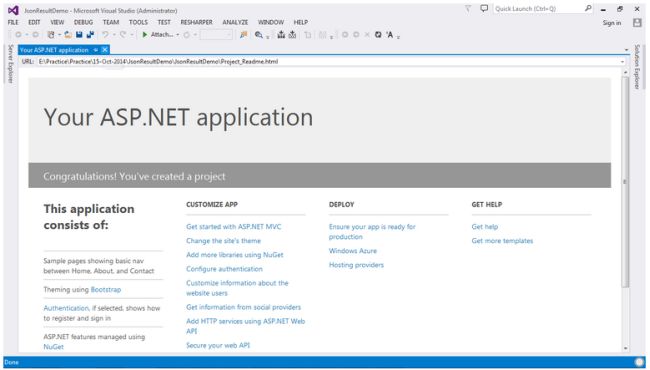
Now, add a controller and provide the name as “JsonDemoController” as in the following.

Click on the Controller and then it will open the popup window as in the following.
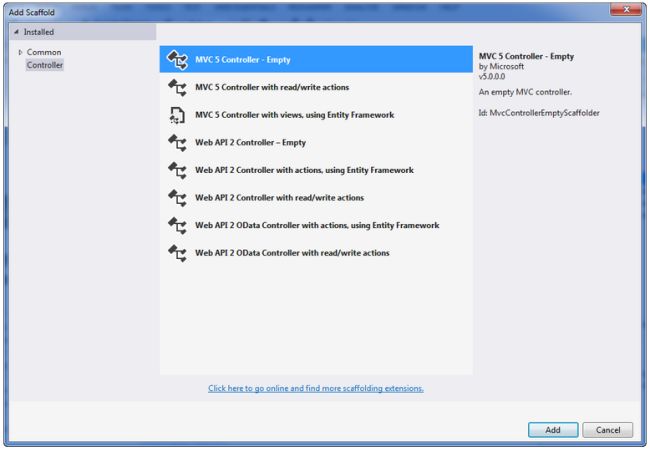
Now, click on the “Add” button and then it opens a popup to enter the name. So enter the name as “JsonDemoController” as shown in the screenshot.

After adding the controller to the project the controller page looks like the following.
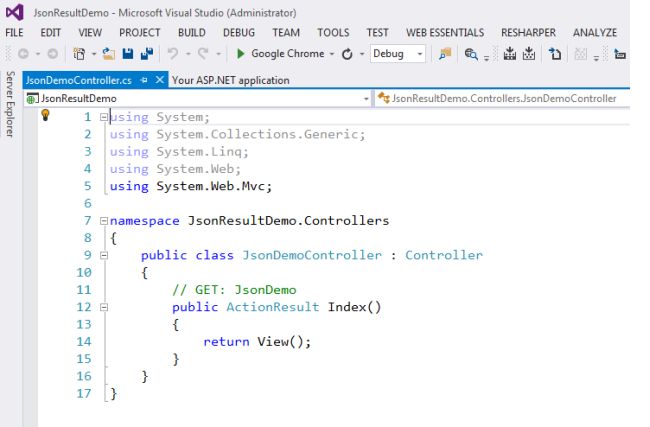
Until now, you are done with the creation of the sample project template with the addition of one controller named “JsonDemoController”.
 
Scenario 1: Send JSON Content welcome note based on user type
 
In this scenario, you will learn how to send a simple welcome note message in JSON format from the controller. Now, replace the existing code with the following code in the JsonDemoController.cs file.
    using System;  
    using System.Collections.Generic;  
    using System.Text;  
    using System.Web.Mvc;  
    using System.Web.Script.Serialization;  
    using JsonResultDemo.Models;  
      
    namespace JsonResultDemo.Controllers  
    {  
        public class JsonDemoController : Controller  
        {  
            #region ActionControllers  
      
            /// <summary>  
            /// Welcome Note Message  
            /// </summary>  
            /// <returns>In a Json Format</returns>  
            public JsonResult WelcomeNote()  
            {  
                bool isAdmin = false;  
                //TODO: Check the user if it is admin or normal user, (true-Admin, false- Normal user)  
                string output = isAdmin ? "Welcome to the Admin User" : "Welcome to the User";  
      
                return Json(output, JsonRequestBehavior.AllowGet);  
            }  
         }  
    }


Then, build the application (F6) and then hit the F5 to run an application and then navigate to the following URL http://localhost:49568/JsonDemo/WelcomeNote (It might be a chance to get a different Port Id at your end).

Then the displayed screen looks like the following.

In this scenario, you now have an idea of how to send a simple string in JSON format.
 
Scenario 2: Get the list of users in JSON Format
In this scenario, you will send a list of users in JSON format.
 
Step 1: Add a class file “UserModel.cs” like the following.
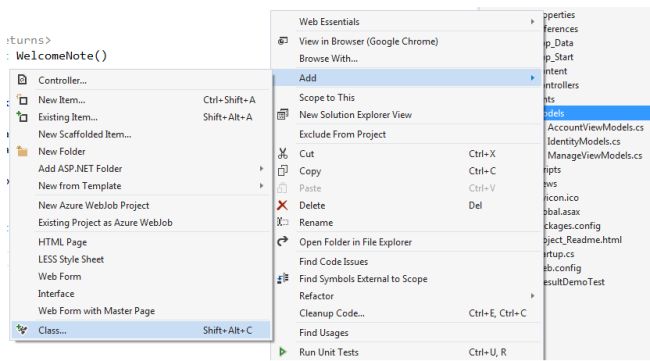
Click on “Class” and then the displayed link is as the following.
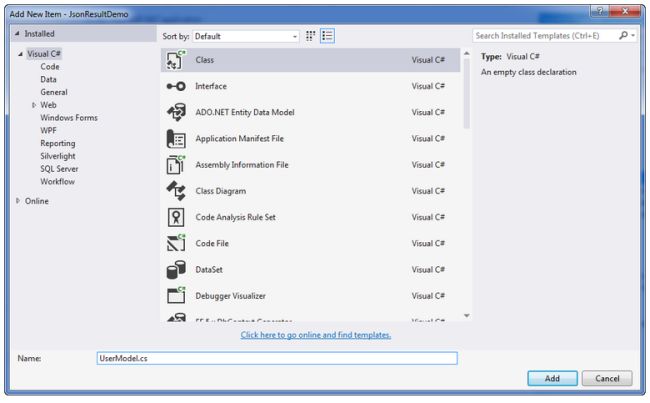
Enter the name as “UserModel.cs” and then click on the Add button.
 
Step 2: Update the code in UserMode.cs with the following code.
    using System;  
    using System.Collections.Generic;  
    using System.Linq;  
    using System.Web;  
      
    namespace JsonResultDemo.Models  
    {  
        public class UserModel  
        {  
            public int UserId { get; set; }  
            public string UserName { get; set; }  
            public string Company { get; set; }  
        }  
    }

Step 3: Add one method named GetUsers in the JsonDemoController.cs file that will return the list of sample users.
            /// <summary>  
            /// Get the Users  
            /// </summary>  
            /// <returns></returns>  
            private List<UserModel> GetUsers()  
            {  
                var usersList = new List<UserModel>  
                {  
                    new UserModel  
                    {  
                        UserId = 1,  
                        UserName = "Ram",  
                        Company = "Mindfire Solutions"  
                    },  
                    new UserModel  
                    {  
                        UserId = 1,  
                        UserName = "chand",  
                        Company = "Mindfire Solutions"  
                    },  
                    new UserModel  
                    {  
                        UserId = 1,  
                        UserName = "Abc",  
                        Company = "Abc Solutions"  
                    }  
                };  
      
                return usersList;  
            }

Step 4: Create one Action Controller method named GetUsersData with the following code in the JsonDemoController.cs file.
    /// <summary>  
            /// Get tthe Users data in Json Format  
            /// </summary>  
            /// <returns></returns>  
            public JsonResult GetUsersData()  
            {  
                var users = GetUsers();  
                return Json(users, JsonRequestBehavior.AllowGet);  
            }


Step 5: Run the application with this URL http://localhost:49568/JsonDemo/GetUsersData then the output looks like the following.
 

Scenario 3: Create JSON data at the client side and send content to the controller
 
In this scenario, you will create JSON data at the client side and then that data will be sent to the Controller action. The controller action request type is HttpPost.
 
Step 1: Create one Action controller method named Sample like the following in the JsonDemoController.cs file.

    /// <summary>  
    /// Sample View  
    /// </summary>  
    /// <returns></returns>  
    public ActionResult Sample()  
    {  
        return View();  
    }


Step 2: Create a View file named “Sample.cshtml” by right-clicking on View() in the Sample action controller method then click on “Add View” in the Sample action like the following.

By clicking on Add View it opens a popup and deselects the "Use a layout page" option. It then should look as in the following.
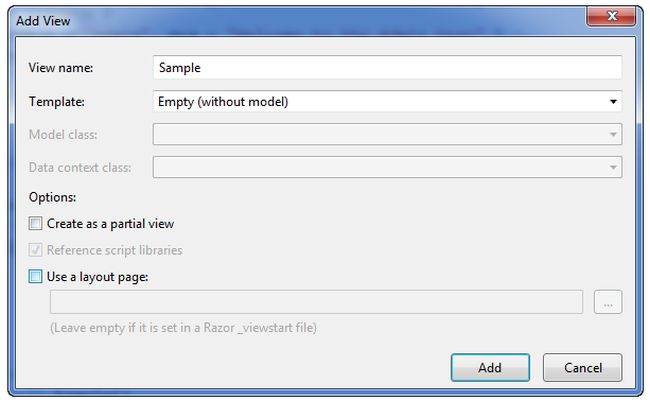
Now, click on the OK button then the sample.cshtml file will be created.
 
Step 3: Replace it with the following cshtml code in the sample.cshtml file.

    @{  
        Layout = null;  
    }  
      
    <!DOCTYPE html>  
      
    <html>  
        <head>  
            <meta name="viewport" content="width=device-width" />  
            <title>Create Sample JSON Data and send it to controller</title>  
        </head>  
        <body>  
            <div>  
                <label>Create Sample User JSON Data and send it to controller</label><br/><br />  
                <input type="button" id="btnUpdateUserDetail" value="Update User Detail" onclick="UpdateUserDetail();"/>  
            </div>  
        </body>  
    </html>  
    <script src="~/Scripts/jquery-1.10.2.min.js"></script>  
    <script lang="en" type="text/javascript">  
        function UpdateUserDetail() {  
            var usersJson = GetSampleUsersList();  
            var getReportColumnsParams = {  
                "usersJson": usersJson  
            };  
            $.ajax({  
                type: "POST",  
                traditional: true,  
                async: false,  
                cache: false,  
                url: '/JsonDemo/UpdateUsersDetail',  
                context: document.body,  
                data: getReportColumnsParams,  
                success: function (result) {  
                    alert(result);  
                },  
                error: function (xhr) {  
                    //debugger;  
                    console.log(xhr.responseText);  
                    alert("Error has occurred..");  
                }  
            });  
        }  
        function GetSampleUsersList() {  
            var userDetails = {};  
            var usersList = [];  
            for (var i = 1; i <= 3; i++) {  
                userDetails["UserId"] = i;  
                userDetails["UserName"] = "User- " + i;  
                userDetails["Company"] = "Company- " + i;  
                usersList.push(userDetails);  
            }  
            return JSON.stringify(usersList);  
        }  
    </script>


The following is a brief description of the Sample.cshtml file:
    The HTML body contains a label, about, to describe the functionality and one input button with an onclick of the UpdateUserDetail() function.

    The JavaScript part contains the jQuery reference and it contains two functions.

    GetSampleUsersList() will return the sample users in a stringified JSON format.

    UpdateUserDetail() sends the ajax request of post type for JsonDemoController with UpdateUserDetail action.

Step 4: A Create Action method named UpdateUsersDetail in the JsonDemoController as in the following and put a breakpoint in this method on the first line of code to help to trace the details.
    /// <summary>  
    /// Update the user details  
    /// </summary>  
    /// <param name="usersJson">users list in JSON Format</param>  
    /// <returns></returns>  
    [HttpPost]  
    public JsonResult UpdateUsersDetail(string usersJson)  
    {  
        var js = new JavaScriptSerializer();  
        UserModel[] user = js.Deserialize<UserModel[]>(usersJson);  
      
        //TODO: user now contains the details, you can do required operations  
        return Json("User Details are updated");  
    }


Step 5: Build and run the application (hit F5) with the URL (http://localhost:49568/JsonDemo/Sample) then the resultant screen looks like the following.

Step 6: Now, click on the “Update User Detail” button as it appears in the aforesaid screenshot. Then the resultant screen looks like the following.

Step 7: Just review the preceding image, you can identify that you are able to send the JSON data to the controller action from the client side and as well as you have deserialized the JSON data and assigned that data to the UserModel entity.
 
Scenario 4: How to handle a huge amount of JSON Data
 
In this scenario, you will get an idea of how to send a huge amount of JSON Data. Actually, in certain scenarios, you must send a huge amount of data from a controller to a view. In that case, the following example will be helpful to you.
 
Step 1: Create one method named GetUsersHugeData() as in the following. It just helps to generate sample user data.  
            /// <summary>  
            /// Get the huge list of users  
            /// </summary>  
            /// <returns></returns>  
            private List<UserModel> GetUsersHugeData()  
            {  
                var usersList = new List<UserModel>();  
                UserModel user;  
                for (int i = 1; i < 51000; i++)  
                {  
                    user = new UserModel  
                    {  
                        UserId = i,  
                        UserName = "User-"+i,  
                        Company = "Company-"+i  
                    };  
                    usersList.Add(user);  
                }  
      
                return usersList;  
            }

Step 2: Create an Action method named GetUsersHugeList() like the following in the JsonDemoController.cs file.
    /// <summary>  
    /// Get the huge list of Users  
    /// </summary>  
    /// <returns></returns>  
    public JsonResult GetUsersHugeList()  
    {  
        var users = GetUsersHugeData();  
        return Json(users, JsonRequestBehavior.AllowGet);  
    }


Step 3: Now, build and run (hit F5) the application with the URL (http://localhost:49568/JsonDemo/GetUsersHugeList) then the error screen appears like the following.
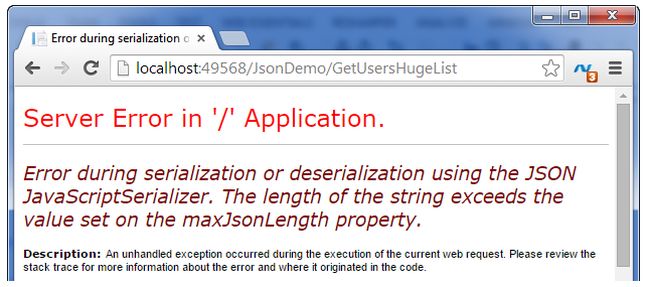
Step 4: To fix the preceding error add the following code in the JsonDemoController file. This methods helps to update the MaxJsonLength property value to Int32.MaxValue.
     /// <summary>  
    /// Override the JSON Result with Max integer JSON lenght  
    /// </summary>  
    /// <param name="data">Data</param>  
    /// <param name="contentType">Content Type</param>  
    /// <param name="contentEncoding">Content Encoding</param>  
    /// <param name="behavior">Behavior</param>  
    /// <returns>As JsonResult</returns>  
    protected override JsonResult Json(object data, string contentType,  
        Encoding contentEncoding, JsonRequestBehavior behavior)  
    {  
        return new JsonResult()  
        {  
            Data = data,  
            ContentType = contentType,  
            ContentEncoding = contentEncoding,  
            JsonRequestBehavior = behavior,  
            MaxJsonLength = Int32.MaxValue  
        };  
    }


In the same way, you can increase the RecursionLimit property value. Also if you require JsonData with a depth (nested levels) greater than 100.
 
Step 5: Now, build and run (hit F5) the application with the URL (http://localhost:49568/JsonDemo/GetUsersHugeList) and then the huge data result appears instead of an error.
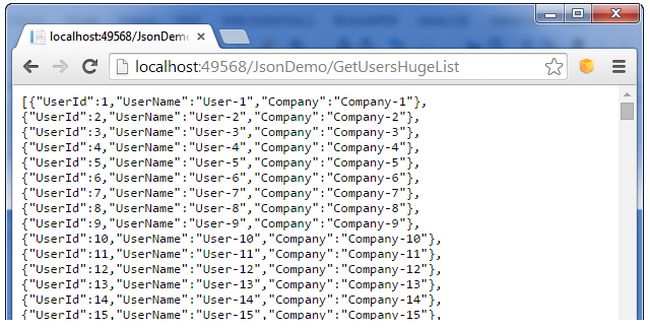
I have provided the formatted complete code for the JsonDemoController.cs file for what you have done until now in the aforesaid scenarios.
    using System;  
    using System.Collections.Generic;  
    using System.Text;  
    using System.Web.Mvc;  
    using System.Web.Script.Serialization;  
    using JsonResultDemo.Models;  
      
    namespace JsonResultDemo.Controllers  
    {  
        public class JsonDemoController : Controller  
        {  
            #region ActionControllers  
      
            /// <summary>  
            /// Welcome Note Message  
            /// </summary>  
            /// <returns>In a JSON Format</returns>  
            public JsonResult WelcomeNote()  
            {  
                bool isAdmin = false;  
                //TODO: Check the user if it is admin or normal user, (true-Admin, false- Normal user)  
                string output = isAdmin ? "Welcome to the Admin User" : "Welcome to the User";  
      
                return Json(output, JsonRequestBehavior.AllowGet);  
            }  
      
            /// <summary>  
            /// Get tthe Users data in JSON Format  
            /// </summary>  
            /// <returns></returns>  
            public JsonResult GetUsersData()  
            {  
                var users = GetUsers();  
                return Json(users, JsonRequestBehavior.AllowGet);  
            }  
      
            /// <summary>  
            /// Sample View  
            /// </summary>  
            /// <returns></returns>  
            public ActionResult Sample()  
            {  
                return View();  
            }  
      
            /// <summary>  
            /// Update the user details  
            /// </summary>  
            /// <param name="usersJson">users list in JSON Format</param>  
            /// <returns></returns>  
            [HttpPost]  
            public JsonResult UpdateUsersDetail(string usersJson)  
            {  
                var js = new JavaScriptSerializer();  
                UserModel[] user = js.Deserialize<UserModel[]>(usersJson);  
      
                //TODO: user now contains the details, you can do required operations  
                return Json("User Details are updated");  
            }  
              
            /// <summary>  
            /// Get the huge list of Users  
            /// </summary>  
            /// <returns></returns>  
            public JsonResult GetUsersHugeList()  
            {  
                var users = GetUsersHugeData();  
                return Json(users, JsonRequestBehavior.AllowGet);  
            }  
     
            #endregion  
     
     
            #region Methods  
      
            /// <summary>  
            /// Get the Users  
            /// </summary>  
            /// <returns></returns>  
            private List<UserModel> GetUsers()  
            {  
                var usersList = new List<UserModel>  
                {  
                    new UserModel  
                    {  
                        UserId = 1,  
                        UserName = "Ram",  
                        Company = "Mindfire Solutions"  
                    },  
                    new UserModel  
                    {  
                        UserId = 1,  
                        UserName = "chand",  
                        Company = "Mindfire Solutions"  
                    },  
                    new UserModel  
                    {  
                        UserId = 1,  
                        UserName = "Abc",  
                        Company = "Abc Solutions"  
                    }  
                };  
      
                return usersList;  
            }  
      
            /// <summary>  
            /// Get the huge list of users  
            /// </summary>  
            /// <returns></returns>  
            private List<UserModel> GetUsersHugeData()  
            {  
                var usersList = new List<UserModel>();  
                UserModel user;  
                for (int i = 1; i < 51000; i++)  
                {  
                    user = new UserModel  
                    {  
                        UserId = i,  
                        UserName = "User-"+i,  
                        Company = "Company-"+i  
                    };  
                    usersList.Add(user);  
                }  
      
                return usersList;  
            }  
      
            /// <summary>  
            /// Override the Json Result with Max integer JSON lenght  
            /// </summary>  
            /// <param name="data">Data</param>  
            /// <param name="contentType">Content Type</param>  
            /// <param name="contentEncoding">Content Encoding</param>  
            /// <param name="behavior">Behavior</param>  
            /// <returns>As JsonResult</returns>  
            protected override JsonResult Json(object data, string contentType,  
                Encoding contentEncoding, JsonRequestBehavior behavior)  
            {  
                return new JsonResult()  
                {  
                    Data = data,  
                    ContentType = contentType,  
                    ContentEncoding = contentEncoding,  
                    JsonRequestBehavior = behavior,  
                    MaxJsonLength = Int32.MaxValue  
                };  
            }  
     
            #endregion  
        }  
    }


You now have an idea of how to use a JsonResult type in MVC application with various scenarios. Now, it's time to test the controller action methods using the JsonDemoController.Test project.

Unit Testing the JsonResult in MVC
The main feature of MVC applications is it supports the Test Data Driven (TDD) approach. Since the Controller file is just a kind of class file, it's easy to implement the Test methods in the Test Project. Now you will learn how to test the JsonResult methods in the test project.
 
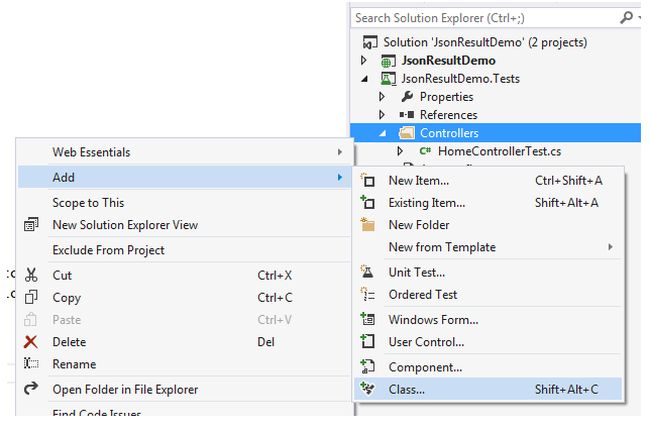
Step 1: Add a class file named “JsonDemoControllerTest.cs” to the JsonResultDemo.Tests projects like the following.


Click on “Class” to open a popup like the following and then update the name as “JsonDemoControllerTest.cs”.
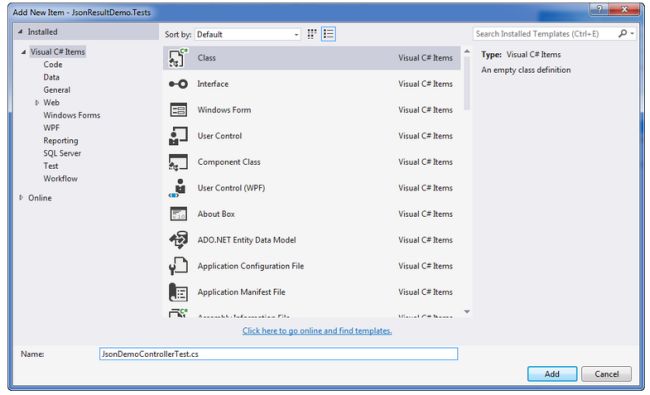
Step 2: After clicking on the “Ok” button then the screen result looks like the following.
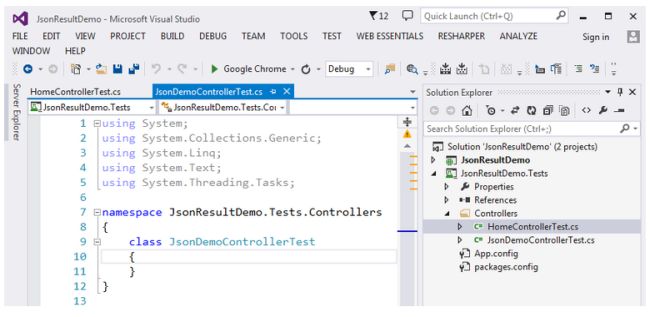
Step 3: Now, replace the existing code in the file JsonDeomControllerTest.cs with the following code.
    using System;  
    using System.Web.Mvc;  
    using Microsoft.VisualStudio.TestTools.UnitTesting;  
    using JsonResultDemo.Controllers;  
      
    namespace JsonResultDemo.Tests.Controllers  
    {  
        [TestClass]  
        public class JsonDemoControllerTest  
        {  
            [TestMethod]  
            public void WelcomeNote()  
            {  
                JsonDemoController controller = new JsonDemoController();  
      
                JsonResult result = controller.WelcomeNote();  
                string msg = Convert.ToString(result.Data);  
                // Assert  
                Assert.AreEqual("Welcome to the User", msg);  
            }  
        }  
    }


Brief Note about TestMethod of WelcomeNote()
    Create an object for JsonDemoController.

    Save the result of JsonDemoController controller method “WelcomeNote” method result in the “result” parameter of the type JsonResult.

    The string “msg” is assigned with the value from the JSON Result (result.Data).

    In this step, you are checking the expected output with the actual output using the Assert method. In a similar way, the Assert Method provides other options like AreNotEqual, AreSame, IsNotNull and so on.

Step 4: Right-click on the WelcomeNote method and click on “Run Unit Tests” then the screen result looks like the following.
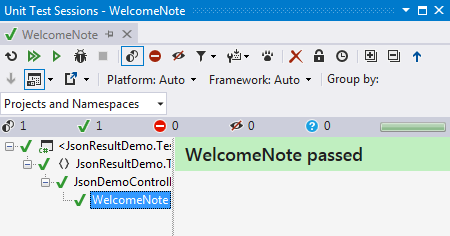
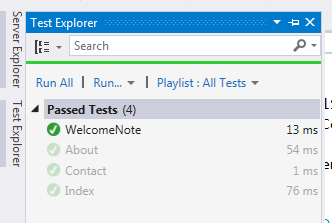
Step 5: You can also do the “Run Tests” by the clicking of (Ctrl +R, T). Then you can view the results in Test Explorer like the following.
In a similar way, you can create more test methods and it will be helpful to check the functionality in various cases since it provides correct results or not. I hope this article gives you an idea of JsonResult, JsonResult Properties, the usage of JsonResult with various scenarios and how can you test the JsonResult using the Test Project.


About HostForLIFE

HostForLIFE is European Windows Hosting Provider which focuses on Windows Platform only. We deliver on-demand hosting solutions including Shared hosting, Reseller Hosting, Cloud Hosting, Dedicated Servers, and IT as a Service for companies of all sizes.

We have offered the latest Windows 2019 Hosting, ASP.NET 5 Hosting, ASP.NET MVC 6 Hosting and SQL 2019 Hosting.


Tag cloud

Sign in