European ASP.NET MVC Hosting

BLOG about Latest ASP.NET MVC Hosting and Its Technology - Dedicated to European Windows Hosting Customer

ASP.NET MVC Hosting - HostForLIFEASP.NET :: ASP.NET ZXing.Net Implementation In ASP.NET MVC

clock July 28, 2021 07:54 by author Peter

ZXing.NET is a library that supports decoding and generating of barcodes (like QR Code, PDF 417, EAN, UPC, Aztec, Data Matrix, Codabar) within images. In this repository, I will implement it in ASP.NET MVC 5 application.

I create the following things with ZXing.NET,

Create QR Codes for any text entered by the user.
Create QR Codes Code Files for any text which the user enters. I will save these QR Code files in ‘qrr’ folder which is placed at the root of the application.
Read all the QR Code files and Decoding them.

Installation

To use the ZXing.NET library you need to install the ZXing.Net package from NuGet.

PM> Install-Package ZXing.Net

Create QR Creating QR Codes

In your controller import the following namespaces,
using System;
using System.Collections.Generic;
using System.IO;
using ZXing;
using ZXing.QrCode;
using System.Web.Mvc;
using System.Drawing;

Next, add 2 Index Action methods in your controller whose code is given below,
public ActionResult Index()
{
return View();
}

[HttpPost]
public ActionResult Index(string qrText)
{
Byte[] byteArray;
var width = 250; // width of the Qr Code   
var height = 250; // height of the Qr Code   
var margin = 0;
var qrCodeWriter = new ZXing.BarcodeWriterPixelData
{
    Format = ZXing.BarcodeFormat.QR_CODE,
    Options = new QrCodeEncodingOptions
    {
        Height = height,
        Width = width,
        Margin = margin
    }
};
var pixelData = qrCodeWriter.Write(qrText);

// creating a bitmap from the raw pixel data; if only black and white colors are used it makes no difference   
// that the pixel data ist BGRA oriented and the bitmap is initialized with RGB   
using (var bitmap = new System.Drawing.Bitmap(pixelData.Width, pixelData.Height, System.Drawing.Imaging.PixelFormat.Format32bppRgb))
{
    using (var ms = new MemoryStream())
    {
        var bitmapData = bitmap.LockBits(new System.Drawing.Rectangle(0, 0, pixelData.Width, pixelData.Height), System.Drawing.Imaging.ImageLockMode.WriteOnly, System.Drawing.Imaging.PixelFormat.Format32bppRgb);
        try
        {
            // we assume that the row stride of the bitmap is aligned to 4 byte multiplied by the width of the image   
            System.Runtime.InteropServices.Marshal.Copy(pixelData.Pixels, 0, bitmapData.Scan0, pixelData.Pixels.Length);
        }
        finally
        {
            bitmap.UnlockBits(bitmapData);
        }
        // save to stream as PNG   
        bitmap.Save(ms, System.Drawing.Imaging.ImageFormat.Png);
        byteArray = ms.ToArray();
    }
}
return View(byteArray);
}


Explanation
The [HttpPost] version of the Index Action method gets the text (for which the QR Code has to be generated) in the ‘qrText’ string variable defined in its parameter. This implementation remains the same for versions like Web Forms, Blazor and .NET Core also. I have checked this thing myself, so if you wish to implement ZXing.NET on these frameworks then the codes will remain the same.

The QR Code is generated for the text and its byte array is returned to the View where the bitmap code is displayed from this byte[] array value.

Create the Index View and add the following code to it,
@model Byte[]
@using (Html.BeginForm(null, null, FormMethod.Post))
{
<table>
    <tbody>
        <tr>
            <td>
                <label>Enter text for creating QR Code</label>
            </td>
            <td>
                <input type="text" name="qrText" />
            </td>
        </tr>
        <tr>
            <td colspan="2">
                <button>Submit</button>
            </td>
        </tr>
    </tbody>
</table>
}
@{
if (Model != null)
{
    <h3>QR Code Successfully Generated</h3>
    <img src="@String.Format("data:image/png;base64,{0}", Convert.ToBase64String(Model))" />
}
}


Explanation
The View has a form where the user enters the string in the text box. The generated QR Code is displayed as an image by the img tag as shown below,
<img src="@String.Format("data:image/png;base64,{0}", Convert.ToBase64String(Model))" />

Testing
Run your application and enter any text in the text box. On clicking the submit button the QR Code will be created and displayed. See the below video where I am generating the QR Code,

Create QR Creating QR Codes
You can also create QR Code files. These QR Code files will be stored inside the ‘qrr’ folder on the root of your application.

First, create a new folder called ‘qrr’ inside the application root folder.

Next create ‘GenerateFile()’ index methods inside the Controller, as shown below,
public ActionResult GenerateFile()
{
return View();
}

[HttpPost]
public ActionResult GenerateFile(string qrText)
{
Byte[] byteArray;
var width = 250; // width of the Qr Code   
var height = 250; // height of the Qr Code   
var margin = 0;
var qrCodeWriter = new ZXing.BarcodeWriterPixelData
{
    Format = ZXing.BarcodeFormat.QR_CODE,
    Options = new QrCodeEncodingOptions
    {
        Height = height,
        Width = width,
        Margin = margin
    }
};
var pixelData = qrCodeWriter.Write(qrText);

// creating a bitmap from the raw pixel data; if only black and white colors are used it makes no difference   
// that the pixel data ist BGRA oriented and the bitmap is initialized with RGB   
using (var bitmap = new System.Drawing.Bitmap(pixelData.Width, pixelData.Height, System.Drawing.Imaging.PixelFormat.Format32bppRgb))
{
    using (var ms = new MemoryStream())
    {
        var bitmapData = bitmap.LockBits(new System.Drawing.Rectangle(0, 0, pixelData.Width, pixelData.Height), System.Drawing.Imaging.ImageLockMode.WriteOnly, System.Drawing.Imaging.PixelFormat.Format32bppRgb);
        try
        {
            // we assume that the row stride of the bitmap is aligned to 4 byte multiplied by the width of the image   
            System.Runtime.InteropServices.Marshal.Copy(pixelData.Pixels, 0, bitmapData.Scan0, pixelData.Pixels.Length);
        }
        finally
        {
            bitmap.UnlockBits(bitmapData);
        }

        // save to folder
        string fileGuid = Guid.NewGuid().ToString().Substring(0, 4);
        bitmap.Save(Server.MapPath("~/qrr") + "/file-" + fileGuid + ".png", System.Drawing.Imaging.ImageFormat.Png);

        // save to stream as PNG   
        bitmap.Save(ms, System.Drawing.Imaging.ImageFormat.Png);
        byteArray = ms.ToArray();
    }
}
return View(byteArray);
}

The ‘GenerateFile’ action method is very much similar to the earlier Index Action method. Only one change remains, which is the saving of the QR Code file inside the ‘qrr’ folder. The below 2 code lines do this saving work,
string fileGuid = Guid.NewGuid().ToString().Substring(0, 4);
bitmap.Save(Server.MapPath("~/qrr") + "/file-" + fileGuid + ".png", System.Drawing.Imaging.ImageFormat.Png);


Also, you need to create the GenerateFile View and add the following code to it. The GenerateFile View is totally the same as the Index View,
@model Byte[]
@using (Html.BeginForm(null, null, FormMethod.Post))
{
<table>
    <tbody>
        <tr>
            <td>
                <label>Enter text for creating QR Code</label>
            </td>
            <td>
                <input type="text" name="qrText" />
            </td>
        </tr>
        <tr>
            <td colspan="2">
                <button>Submit</button>
            </td>
        </tr>
    </tbody>
</table>
}
@{
if (Model != null)
{
    <h3>QR Code Successfully Generated</h3>
    <img src="@String.Format("data:image/png;base64,{0}", Convert.ToBase64String(Model))" />
}
}

Testing
open the URL of the GenerateFile Action method and enter any value in the text box and click the ‘Submit button. You will see the QR Code gets created and saved in a .png file inside the ‘qrr’ folder.
Reading all the QR Code files and Decoding their QR Code

Now let us read all the QR Code files and decode their QR Code values.

Create ViewFile Action method in your controller whose code is given below,
public ActionResult ViewFile()
{
List<KeyValuePair<string, string>> fileData = new List<KeyValuePair<string, string>>();
KeyValuePair<string, string> data;

string[] files = Directory.GetFiles(Server.MapPath("~/qrr"));
foreach (string file in files)
{
    // create a barcode reader instance
    IBarcodeReader reader = new BarcodeReader();
    // load a bitmap
    var barcodeBitmap = (Bitmap)Image.FromFile(Server.MapPath("~/qrr") + "/" + Path.GetFileName(file));
    // detect and decode the barcode inside the bitmap
    var result = reader.Decode(barcodeBitmap);
    // do something with the result
    data = new KeyValuePair<string, string>(result.ToString(), "/qrr/" + Path.GetFileName(file));
    fileData.Add(data);
}
return View(fileData);
}


Explanation
Get all the files inside the ‘qrr’ folder by using the Directory.GetFiles() method. Then loop through each of these files using the foreach() loop and decode their QR Codes.

The decoding is done using the .Decode() method,

var result = reader.Decode(barcodeBitmap);


I have used an object of List<KeyValuePair<string, string>> type to store all the file's path and their decode values of QR Code. The object is returned to the View.

Finally, create a View called ‘ViewFile’ and add the following code to it,
@model List<KeyValuePair<string, string>>
<table>
<thead>
    <tr>
        <td>
            QR Code File
        </td>
        <td>
            QR Code File Decoded Text
        </td>
    </tr>
</thead>
<tbody>
    @foreach (KeyValuePair<string, string> k in Model)
    {
        <tr>
            <td>
                <img src="@k.Value" />
            </td>
            <td>
                @k.Key
            </td>
        </tr>
    }
</tbody>
</table>


The View takes a model of List<KeyValuePair<type and displays all the QR Code files and their decode text.

Testing
Create some QR Code files and then visit the URL of the ViewFile view. You will see the QR Code files displayed as shown by the below image,


ASP.NET MVC Hosting - HostForLIFEASP.NET :: Integrate Facebook Ads Using ASP.NET MVC

clock July 21, 2021 07:12 by author Peter

This is a sample article to integrate Facebook login using MVC and after creating a login you can fetch data from Facebook Ads accounts. So I used this to collect data for insight, reports, etc.

Step 1
You need to start with Sign in to the Facebook developer.

Step 2
Then you need to create an app. In the Facebook developer account go to the app dashboard then click on my apps and then create an app.

Step 3
When the app is created. Click on the app and go to the settings then copy the app id and app secret for future use.

Step 4
Now let's start the coding part. First, just create a simple MVC project then add a controller to it. In the Index Method, I have added the scope, App Id, redirect URL. This method will return a URL that will redirect us to the Facebook login page.
public ActionResult Index() {
dynamic parameters = new ExpandoObject();
parameters.client_id = "enter the client id here"; //app id
parameters.redirect_uri = "enter the redirect url here";
parameters.response_type = "code";
parameters.display = "popup";
//scopes
var extendedPermissions = "ads_management,ads_read,instagram_basic,business_management,email,pages_messaging,publish_to_groups,pages_manage_metadata,pages_read_user_content,leads_retrieval,pages_read_engagement,pages_manage_posts,publish_to_groups,pages_manage_ads,instagram_basic,pages_show_list,pages_manage_engagement,read_insights"; {
    parameters.scope = extendedPermissions;
}
var _fb = new FacebookClient();
var url = _fb.GetLoginUrl(parameters);
return Redirect(url.ToString());
}


Don't forget to add this redirect URL in the Facebook developer app also, go to your app then Facebook login then settings, you'll see this screen now add the URL in the redirect URL text box and save the changes.

Now we have to retrieve user profile details.
public ActionResult Login_success() {

var _fb = new FacebookClient();
List < object > oList = new List < object > ();
FacebookOAuthResult oauthResult;
if (!_fb.TryParseOAuthCallbackUrl(Request.Url, out oauthResult)) {}
if (oauthResult.IsSuccess) {
    var WebClient = new WebClient();
    Dictionary < string, object > parameters = new Dictionary < string, object > ();
    parameters.Add("client_id", "enter client id here");
    parameters.Add("redirect_uri", "enter redirect uri here");
    parameters.Add("client_secret", "enter client secret here");
    parameters.Add("code", oauthResult.Code);
    dynamic result = _fb.Get("/oauth/access_token", parameters);
    var accessToken = result.access_token;
    _fb.AccessToken = Session["AccessToken"].ToString();
    dynamic me = _fb.Get("me?fields=first_name,middle_name,last_name,id,email");
    string email = me.email;
    string firstname = me.first_name;
    string middlename = me.middle_name;
    string lastname = me.last_name;
    string name = firstname + " " + middlename + " " + lastname;
    string id = me.id;
    FbHelper db = new FbHelper();
    db.save_User_Info(id, name, email, accessToken);
    FormsAuthentication.SetAuthCookie(email, false);
} else {}
return View();
}


That's it. I have used the same user info method to save the id, name, email, and access token of the current user in my database.
public long save_User_Info(string strUserGuid, string strName, string strEmail, string accessToken) {
long nResult = 0;
try {
    SqlParameter[] sq = {
        new SqlParameter("@user_guid", strUserGuid),
        new SqlParameter("@user_name", strName),
        new SqlParameter("@user_email", strEmail),
        new SqlParameter("@user_token", accessToken)
    };
    nResult = _helper.ExecuteStoredProcedure("usp_insert_facebook_user_Information", sq);
} catch (Exception ex) {}
return nResult;
}


At first, Facebook gives us basic permission to access profiles, email, etc. To get Facebook ads details like campaign details we need to go to the app review and then permissions and features. There you will see all the permissions, you can take permissions from there for your app. And use the below API requests to retrieve campaigns.
public ActionResult CampaignData() {
string page_Token = "enter page token here";
string page_Id = "enter page id here";
string page_post_id = "enter page post id here";
string act_ad_id = "enter account act id here";
string user_Token = "enter user token here";
string ad_Set_Id = "enter ad set id here";
var WebClient = new WebClient();
string user_url = string.Format("https://graph.facebook.com/v10.0/" + ad_Set_Id + "/insights?fields=clicks%2Cspend%2Cimpressions%2Creach&access_token=" + user_Token);
string post_url = string.Format("https://graph.facebook.com/v10.0/" + page_Id + "?fields=posts%2Cads_posts&access_token=" + page_Token);
string post_like_url = string.Format("https://graph.facebook.com/v10.0/" + page_post_id + "?fields=likes%2Ccomments%2Cshares%2Creactions%2Ctargeting%2Ctarget&access_token=" + page_Token);
string page_tagret_url = string.Format("https://graph.facebook.com/v10.0/" + act_ad_id + "/adsets?fields=name%2Ctargeting&access_token=" + page_Token);
string getPostData = WebClient.DownloadString(post_url);
string getPostActivity = WebClient.DownloadString(post_like_url);
string getPageTarget = WebClient.DownloadString(page_tagret_url);
string getUserData = WebClient.DownloadString(user_url);
DataTable dtPostData = ConvertJsonToDatatableLinq(getPostData);
var userDataList = JsonConvert.DeserializeObject < FacebookJsonConversion.Root > (getUserData);
var pageActivity = JsonConvert.DeserializeObject < PostActivityJsonConversion.Root > (getPostActivity);
var pageTarget = JsonConvert.DeserializeObject < PageTargetJsonConversion.Root > (getPageTarget);
List < object > postData = new List < object > ();
postData.Add(dtPostData);
postData.Add(pageActivity);
postData.Add(pageTarget);
postData.Add(userDataList);
return View(postData);
}


ASP.NET MVC 6 Hosting - HostForLIFEASP.NET :: Exception Filters in MVC

clock July 16, 2021 08:10 by author Peter

Exceptions are part and parcel of an application. They are a boon and a ban for an application too. Isn't it? This would be controversial, for developers it helps them track minor and major defects in an application and sometimes they are frustrating when it lets users land on the Yellow screen of death each time. This would make the users mundane to the application. Thus to avoid this, developers handle the exceptions. But still sometimes there are a few unhandled exceptions.


Now what is to be done for them? MVC provides us with built-in "Exception Filters" about which we will explain here.

Let's start!
 
A Yellow screen of Death can be said is as a wardrobe malfunction of our application.
 
Get Started
Exception filters run when some of the exceptions are unhandled and thrown from an invoked action. The reason for the exception can be anything and so is the source of the exception.
 
Creating an Exception Filter
Custom Exception Filters must implement the builtin IExceptionFilter interface. The interface looks as in the following:
    public interface IExceptionFilter
    {  
       void OnException(ExceptionContext filterContext)  
    }  


Whenever an unhandled exception is encountered, the OnException method gets invoked. The parameter as we can see, ExceptionContext is derived from the ControllerContext and has a number of built-in properties that can be used to get the information about the request causing the exception. Their property's ExceptionContext passess are shown in the following table: 

Name Type Detail
Result ActionResult The result returned by the action being invoked.
Exception Exception The unhandled exceptions caused from the actions in the applications.
ExceptionHandled BOOL This is a very handy property that returns a bool value (true/false) based on if the exception is handled by any of the filters in the applicaiton or not.

The exception being thrown from the action is detailed by the Exception property and once handled (if), then the property ExceptionHandled can be toggled, so that the other filters would know if the exception has been already handled and cancel the other filter requests to handle. The problem is that if the exceptions are not handled, then the default MVC behavior shows the dreaded yellow screen of death. To the users, that makes a very impression on the users and more importantly, it exposes the application's handy and secure information to the outside world that may have hackers and then the application gets into the road to hell. Thus, the exceptions need to be dealt with very carefully. Let's show one small custom exception filter. This filter can be stored inside the Filters folder in the web project of the solution. Let's add a file/class called CustomExceptionFilter.cs.
    public class CustomExceptionFilter: FilterAttribute,  
    IExceptionFilter   
    {  
        public void OnException(ExceptionContext filterContext)   
        {  
            if (!filterContext.ExceptionHandled && filterContext.Exception is NullReferenceException)   
            {  
                filterContext.Result = new RedirectResult("customErrorPage.html");  
                filterContext.ExceptionHandled = true;  
            }  
        }  
    }  

Now let us understand what this actually does. As we can see, this implements the interface as said earlier and thus implements the method, OnException. This method has the parameter ExceptionContext, the properties of which is specified in the table. In this custom filter we have handled the most common and neglected exception "Null Reference Exception" that arises when a value returning null is not handled/checked and used in further implementations. The custom filter derives the FilterAttribute so as to be used as an Attribute over the action or the controller directly like [CustomExceptionFilter]. In this implementation above, we have used nearly all the important properties of the ExceptionContext. First, the check is used for the ExceptionHandled that returns a Boolean value if the exception has been handled or not. If not then Check for the type of exception that has arisen.
 
Since here we have used the NullReferenceException, we check for that exception. Then if the conditions are satisfied/passed we manipulate the result and return the RedirectResult (ActionResult type) and let the users land on a custom error page created in the application, to avoid the yellow dreaded screen. The use of the filter is pretty simple since this custom filter extends from the FilterAttribute. So based on the usage, this can be used as [CustomExceptionFilter] on the Controller Level or the individual Action level, whichever is relevant.
    //Over controller  
    [CustomExceptionFilter]  
    public class HomeController:Controller
    {  
       //......  
    }
    //Over the Action  
    [CustomExceptionFilter]  
    public ActionResult Index()
    {  
       //.......  
    }  


Now, let's explain the builtin HandleAttribute. This is a built-in class used in a similar way as a filter attribute in MVC applications. The most important thing is this attribute works only when the custom errors in the web.config is enabled or set to true.
 
The default mode for this element is RemoteOnly that will only work out when the application is deployed and the request is made from some other systems. Let's look at the properties of the HandleError Attribute.

    ExceptionType: This property, as the name suggests, indictes the attribute of the type of exception it needs to handle.

    View: This is the property that we need to specify to let the attribute land the end users after handling the exception.

    Master: If we have a special layout for the error page then this master can be set to that layout path. If left empty, this will take the default layout of the application for the error pages.

Thus, the following code snippet shows how to use the HandleError attribute.
    [HandleError(ExceptionType = typeof(NullReferenceException), View = "CustomErrorPage")]
    {  
       public Action Result
       {  
          //........  
          var testVal = null;  
          //Unhandled and used..  
       }
    }

Caution
While reading through the Adam Freeman, a very interesting note of caution was said for when using the HandleError attribute. In the custom error page, we would be using the HandleError Info like the Stack Trace, the exception message and so on. Since we would not like to show this to the end user, we need to put the stack trace inside a hidden field or make the HTML tag invisible because The view is not displayed to the user unless the Exception.StackTrace is included in the View.
 
Thus, we learned the creation of custom exception filters as well as the built-in filters in MVC applications. There are various ways/tools now to handle exceptions, but still we can make use of these filters to avoid detrimental effects on our applications.
 
I hope this would help developers and beginners. The concept is interesting when we use them. So start using and enjoy coding.


ASP.NET MVC 6 Hosting - HostForLIFEASP.NET :: Binding Dropdownlist With Database In MVC

clock July 8, 2021 07:36 by author Peter

This article shows how to bind a dropdownlist in various ways with a database.
I know you have seen many articles regarding dropdownlist but no one is showing binding with a database.


I saw most developers coming from webform development and not find it easy to use this HTML control. There are server controls in ASP.NET webforms that are easy to bind.

And in the same way in an Edit Form this shows how to dropdownlist selected.

I am using dapper to access the data from the database. Please do not be shocked, its an ORM and easy to use compared to Entity Framework.

But it is the same as Entity Framework. Do not worry, in the same way you can use this in Entity Framework.

Various ways to do the binding
    Using @html.DropDownList Model
    @Html.DropDownList("Mobiledropdown1", Model.MobileList)


Using @html.DropDownList with Viewbag
@Html.DropDownList("Mobiledropdown2", ViewBag.VBMobileList as SelectList)

Using @html.DropDownListFor With Model

@Html.DropDownListFor(M => M.MobileList, new SelectList(Model.MobileList,"Value", "Text"))

Using @html.DropDownList With hardcode values on View / with ViewBag.
1.​​​​ @Html.DropDownList("Mobiledropdown3", new List<SelectListItem>
     { new SelectListItem { Text = "HTC DESIRE", Value = "1", Selected=true},
       new SelectListItem { Text = "Moto G", Value = "2"},
       new SelectListItem { Text = "GO mobiles", Value = "3"}
       }, "Select Mobile")

2. @Html.DropDownList("Dr",ViewData["MyhardcodeValue"] as List<SelectListItem>)


Here is a table snapshot . I am also providing to you the table script in an attachment.
SET ANSI_NULLS ON
GO

SET QUOTED_IDENTIFIER ON
GO

SET ANSI_PADDING ON
GO

CREATE TABLE [dbo].[Mobiledata](
    [MobileID] [int] IDENTITY(1,1) NOT NULL,
    [MobileName] [varchar](50) NULL,
    [MobileIMEno] [varchar](16) NULL,
    [MobileManufactured] [varchar](50) NULL,
    [Mobileprice] [decimal](18, 0) NULL,
 CONSTRAINT [PK_Mobiledata] PRIMARY KEY CLUSTERED
(
    [MobileID] ASC
)WITH (PAD_INDEX  = OFF, STATISTICS_NORECOMPUTE  = OFF, IGNORE_DUP_KEY = OFF, ALLOW_ROW_LOCKS  = ON, ALLOW_PAGE_LOCKS  = ON) ON [PRIMARY]
) ON [PRIMARY]

GO

SET ANSI_PADDING OFF
GO

Let's start by creating the Model first.

I am adding the model with the name Mobiledata.

Adding all the fields that are present in the SQL Table and SelectList to get the data in the Collection.

[Table("Mobiledata")]
public class Mobiledata
{
    [Key]
    public int MobileID { get; set; }
    public string MobileName { get; set; }
    public string MobileIMEno { get; set; }
    public string MobileManufactured { get; set; }
    public Nullable<decimal> Mobileprice { get; set; }
    [NotMapped]
    public SelectList MobileList { get; set; }

}


For a Dapper User I am adding another class with the name MobileContext.
public class MobileContext
{
    SqlConnection con = new   SqlConnection(ConfigurationManager.ConnectionStrings["MYConnector"].ToString());
    public IEnumerable<Mobiledata> GetMobileList()
    {
        string query = "SELECT [MobileID],[MobileName]FROM [MobileDB].[dbo].[Mobiledata]";
        var result = con.Query<Mobiledata>(query);
        return result;
    }
}


This class will return an Enumerable list of MobileData.
We are complete with the Model part. I will now show you the Controller part.
I am adding the Controller with the name MobileDisplayController.
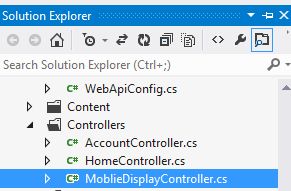
 

After adding the Controller you will see a similar view.
I have also added a Mobilecontext class; you can view it here.

MobileDisplayController.cs

using System;
using System.Collections.Generic;
using System.Linq;
using System.Web;
using System.Web.Mvc;
using BindingDropdownListandSavingIT.Models;

namespace BindingDropdownListandSavingIT.Controllers
{
    public class MoblieDisplayController : Controller
    {
        MobileContext MCon = new MobileContext();

        public ActionResult Index()
        {
            return View(MD);
        }
    }
}

After adding the Controller now the main purpose is to pass a value to the view from the Controller.

Let's pass values.

MobileContext MCon = new MobileContext();
The following is the MobileContext class for getting the Enumerable List .

Mobiledata MD = new Mobiledata();

Mobiledata is the model that I am passing to the View.
In that Model you can see MobileList that is Enumerable.

MD.MobileList = new SelectList(MCon.GetMobileList(), "MobileID", "MobileName");

Now to that MobileList I am passing SelectList with Enumerable List from MobileContext Class and also value and Text that I want to display.

First way to Binding Dropdownlist.

MobileDisplayController.cs
using System;
using System.Collections.Generic;
using System.Linq;
using System.Web;
using System.Web.Mvc;
using BindingDropdownListandSavingIT.Models;

namespace BindingDropdownListandSavingIT.Controllers
{
    public class MoblieDisplayController : Controller
    {
        MobileContext MCon = new MobileContext();

        public ActionResult Index()
        {
            Mobiledata MD = new Mobiledata();
            MD.MobileList = new SelectList(MCon.GetMobileList(), "MobileID", "MobileName"); // model binding
            return View(MD);
        }
    }
}


After passing the data now to display it in the View.

For that add a View by right-clicking inside ActionResult and select AddView and provide its name as Index.

After adding the View add a Namespace to the Model as shown below.
@model BindingDropdownListandSavingIT.Models.Mobiledata
@{
    ViewBag.Title = "ALL DROPDOWNLIST FUN AND LEARN";
}

<h2>ALL DROPDOWNLIST FUN AND LEARN</h2


<tr>
    <td>
        <div>
            @Html.Label("Normal Dropdownlist Binding")
        </div>
    </td>
    <td>
        <div class="editor-label">
            @Html.Label("Select Mobile Name")
        </div>
    </td>
    <td>
        <div class="editor-field">
            @Html.DropDownList("Mobiledropdown1", Model.MobileList, "Select Mobile")
        </div>
    </td>
</tr>


Here we can directly access the MobileList from the Model.

Now just run the application and just check it.
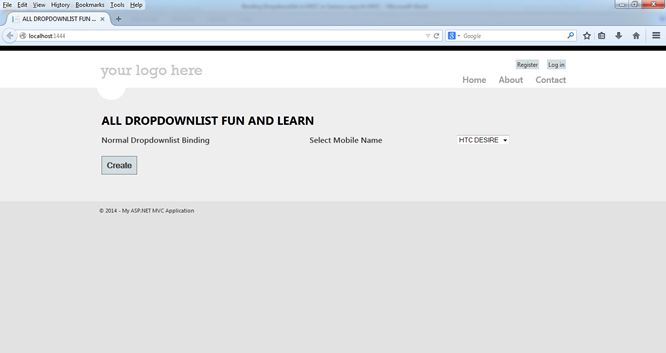
It's done.

Second way to Bind Dropdownlist
Now in the second way we just need to pass the same list to the Viewbag.

As in the first way we have passed a value to the model now in the same way we would pass a list to the Viewbag.
<tr>
    <td>
        <div>
            @Html.Label("Dropdownlist Binding Using ViewBag")
        </div>
    </td>
    <td>
        <div class="editor-label">
            @Html.Label("Select Mobile Name")
        </div>
    </td>
    <td>
        <div class="editor-field">
            @Html.DropDownList("Mobiledropdown2", ViewBag.VBMobileList as SelectList, "Select Mobile")
        </div>
    </td>
</tr>

ViewBag.VBMobileList = new SelectList(MCon.GetMobileList(), "MobileID", "MobileName");
// Viewbag


For your reference you can run and check it.

Third way to Binding Dropdownlist
In the third way everything will be the same but the binding to the DropdownlistFor is different.

Using the same model that was used for the first way to do the binding .
MD.MobileList = new SelectList(MCon.GetMobileList(), "MobileID", "MobileName");


Here is a snapshot to show how to bind.
<tr>
    <td>
        <div>
            @Html.Label("Dropdownlist Binding Using Model (Lamda Expression)")
        </div>
    </td>
    <td>
        <div class="editor-label">
            @Html.Label("Select Mobile Name")
        </div>
    </td>
    <td>
        <div class="editor-field">
            @Html.DropDownListFor(M => M.MobileID, new SelectList(Model.MobileList, "Value", "Text"), "Select Mobile")
        </div>
    </td>
</tr>

JavaScript

For binding the dropdownlist we require a LINQ expression and IEnumreable list.

As you have seen if you are creating a view directly using the scafffloding technique then you can see a LINQ lamda expression.

For example. @Html.TextboxFor(m => m.MobileName)

Fourth way to Binding Dropdownlist

In the last way we can pass hardcoded values to the dropdownlist on the View only.

1. Directly View
<tr>
    <td>
        <div>
            @Html.Label("Dropdownlist Binding on View Directly")
        </div>
    </td>
    <td>
        <div class="editor-label">
            @Html.Label("Select Mobile Name")
        </div>
    </td>
    <td>
        <div class="editor-field">
            @Html.DropDownList("Mobiledropdown3", new List<SelectListItem>
                      {
                      new SelectListItem { Text = "HTC DESIRE", Value = "1"},
                      new SelectListItem { Text = "Moto G", Value = "2"},
                      new SelectListItem { Text = "GO mobiles", Value = "3"}
                      }, "Select Mobile")
        </div>
    </td>
</tr>


2. Binding directly using ViewBag
The same List<SelectListItem> that we pass in the view directly can also be sent from the Controller and bound directly using a ViewBag.
<tr>
    <td>
        <div>
            @Html.Label("Dropdownlist Binding using SelectListitem and Viewbag")
        </div>
    </td>
    <td>
        <div class="editor-label">
            @Html.Label("Select Mobile Name")
        </div>
    </td>
    <td>
        @Html.DropDownList("Dr", ViewData["MyhardcodeVal"] as List<SelectListItem>)
    </td>
</tr>


Now we completed the binding of the Dropdownlist.

Now you may have a question of how to read the Dropdownlist values.

You can read using a FromCollection or Model.

Here you need to create a Post Method .

If you want to read all the values of the dropdownlist or any HTML control then you will get in FormCollection.

Post method from MobileDisplayController:
[HttpPost]
public ActionResult Index(FormCollection objfrm, Mobiledata objMd)
{
    string mobile1 = objfrm["Mobiledropdown1"];
    string mobile2 = objfrm["Mobiledropdown2"];
    string mobile3 = objfrm["Mobiledropdown3"];
    return View(objMd);
}


How to set a selected value of Dropdownlist on EditPage

Here I am showing how to show a selected dropdownlist value on Edit Page because this small thing will take time when you are new to this kind of technology.

Get the method of the Edit page from MobileDisplayController.

Output after editing.
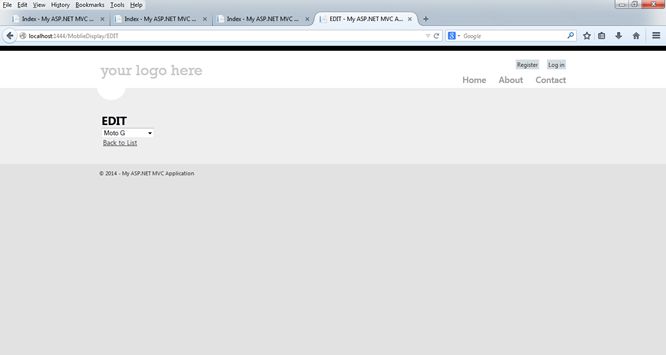
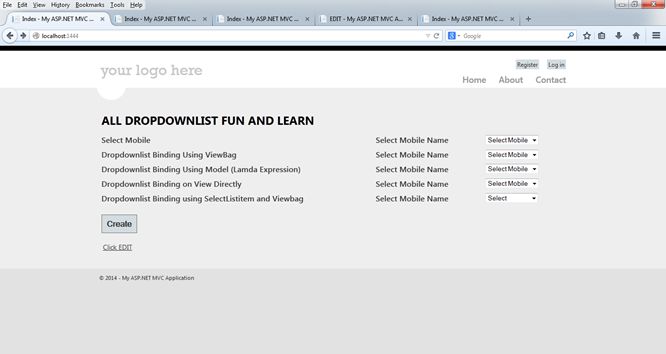
How to add a Select at the top of the selection list. Just add a String value at the end of the Dropdownlist.

<div class="editor-field">
   @Html.DropDownList("Mobiledropdown1", Model.MobileList, "Select Mobile")
</div>


About HostForLIFE

HostForLIFE is European Windows Hosting Provider which focuses on Windows Platform only. We deliver on-demand hosting solutions including Shared hosting, Reseller Hosting, Cloud Hosting, Dedicated Servers, and IT as a Service for companies of all sizes.

We have offered the latest Windows 2019 Hosting, ASP.NET 5 Hosting, ASP.NET MVC 6 Hosting and SQL 2019 Hosting.


Tag cloud

Sign in