European ASP.NET MVC Hosting

BLOG about Latest ASP.NET MVC Hosting and Its Technology - Dedicated to European Windows Hosting Customer

ASP.NET MVC Hosting - HostForLIFEASP.NET :: Upload Files In ASP.NET MVC 5

clock December 17, 2021 08:38 by author Peter

Creating MVC Application
Let us implement these in a sample Application. Open Visual Studio. Go to File->New->Project. Give a suitable name to the Application. Click OK.

Select MVC Template. Click OK.

Adding Folder
We will add a folder to store the files in the application. Here, I have added a folder in the application.

Adding Controller
Let us add a controller. Right click on the Controller. Add->Controller.


Select MVC 5 Controller -Empty. Click Add.

Give a suitable name to the controller.

Write the following code in the controller.
using System;
using System.Collections.Generic;
using System.IO;
using System.Linq;
using System.Web;
using System.Web.Mvc;
namespace FileUpload.Controllers
{
    public class UploadController: Controller
    {
        // GET: Upload
        public ActionResult Index()
        {
            return View();
        }
        [HttpGet]
        public ActionResult UploadFile()
        {
            return View();
        }
        [HttpPost]
        public ActionResult UploadFile(HttpPostedFileBase file)
        {
            try
            {
                if (file.ContentLength > 0)
                {
                    string _FileName = Path.GetFileName(file.FileName);
                    string _path = Path.Combine(Server.MapPath("~/UploadedFiles"), _FileName);
                    file.SaveAs(_path);
                }
                ViewBag.Message = "File Uploaded Successfully!!";
                return View();
            }
            catch
            {
                ViewBag.Message = "File upload failed!!";
                return View();
            }
        }
    }
}

Adding View
Right click on UploadFileActionResult. Go to Add View.


Select the empty template. Click add.


Write the following code in the View.

@{
    ViewBag.Title = "UploadFile";
}
<h2>UploadFile</h2>
@using(Html.BeginForm("UploadFile","Upload", FormMethod.Post, new { enctype="multipart/form-data"}))
{
    <div>
        @Html.TextBox("file", "", new {  type= "file"}) <br />
        <input type="submit" value="Upload" />
        @ViewBag.Message
    </div>
}

Browse the Application
Let us now run the Application and check if it is working fine or not. Browse the Application.

Click upload. I have debugged the code to verify that the file gets uploaded successfully.


The code is working as per the expectations, as it hits the success message. We should get this message on the View, as well.


We will verify the file uploaded, by opening the folder in the Application’s directory.

Hence, we have just learned how to upload the file in ASP.NET MVC. I hope this post is useful to developers.


ASP.NET MVC Hosting - HostForLIFEASP.NET :: How Dapper Has Become King ORM In C#/MVC/.NET/.CORE?

clock December 15, 2021 06:34 by author Peter

What is Dapper?
    Dapper is a popular simple object mapping tool and nothing but an Object Relational Mapping(ORM).
    If you don't want to spend hours writing code to map query results from ADO.NET data readers to instances of those objects, Dapper is very useful for that.
    It not only allows developers to map relational database tables with .NET objects but also allows them to execute SQL queries in the database. It also gives flexibility as they can use tables, stored procedures, and views directly in the databases.

Is Dapper secure?
Dapper is the easiest and most secure way to buy and store all your digital assets from the groundbreaking apps and games powered by Flow. The Metaverse is here.

Is Dapper a micro ORM?
Dapper is a Mini micro ORM or a simple object mapper framework that helps to map the native query output to a domain class or a C# class. It is a high-performance data access system built by the StackOverflow team and released as open-source.
Here you can find all SO-thread

What is the fastest ORM?

I've created one example based on the example result I can say - Dapper is faster than SQL & Entity Framework.

Extension methods
Dapper extends the IDbConnection interface with these various methods,

    Execute
    Query:
    QuerySingle:
    QuerySingleOrDefault:
    QueryFirst:
    QueryFirstOrDefault:
    QueryMultiple:

Note
Here you can find the all the method details - Dapper methods

How does a dapper become a king?
Let's create one short example. Let us have one table “Employee” namely whatever you prefer.


Employee table

Column Type
ID Int NOT NULL - PK
Name NVARCHAR (50) NULL
Dob DATE NULL
Mob_no VARCHAR (15) NULL
Salary DECIMAL (18,12) NULL
Is_Approved BIT NULL

Note
In the above table you can see we used almost all data types on a regular basis.

Let’s create a table and fill the 1 Million record in the tables.

Table scripts

CREATE TABLE [dbo].[employee] (
    [Id]          INT           IDENTITY (1, 1) NOT NULL,
    [Name]        NVARCHAR (50) NULL,
    [Dob]         DATE          NULL,
    [Mob_no]      VARCHAR (15)  NULL,
    [Salary]      DECIMAL (18,12)  NULL,
    [Is_Approved] BIT           NULL,
    CONSTRAINT [PK_employee] PRIMARY KEY CLUSTERED ([Id] ASC)
);

Using the while loop fill the 1 Million data into the table.

Declare @Name nvarchar(50)
Declare @Dob Date
Declare @Mob_no VARCHAR(15)
Declare @Salary Decimal(18,12)
Declare @Is_Approved bit
DECLARE @counter int = 1


WHILE(@counter <= 1000000)
BEGIN
    SET @Name = CONCAT('Name_',@counter);
    SET @Dob = GETDATE()+@counter;
    SET @Mob_no = CONCAT('12345678_',@counter);
    SET @Salary = (10+@counter)
    SET @Is_Approved = 1

    INSERT INTO employee([Name],[Dob],[Mob_no],[Salary],[Is_Approved]) VALUES (@Name,@Dob,@Mob_no,@Salary,@Is_Approved);
    Set @counter = @counter+1;
END

Note
All records are inserted now to check the table data size.

You can check your table size using this store procedure.

exec sp_spaceused ‘employee’

SQL

Here you can see almost 67MB of data present in the table.

Another way you can find the storage of the data using an SQL server.

Steps
    Open your SQL Server
    Navigate you're working database
    Expand your tables folder -> Right-click on your table -> Click on properties menu at the last.
    Below popup is visible

*Let’s create a sample application

//Employee Class
public partial class employee
    {
        public int Id { get; set; }
        public string Name { get; set; }
        public Nullable<System.DateTime> Dob { get; set; }
        public string Mob_no { get; set; }
        public Nullable<decimal> Salary { get; set; }
        public Nullable<bool> Is_Approved { get; set; }
    }

//Home Controller
public class HomeController: Controller
    {
        private readonly string _connectionString = "{YOUR_CONNECTION}";
        SqlConnection con;
        SqlDataAdapter da;
        DataSet ds = new DataSet();
        List<employee> emp = new List<employee>();
        private demo_databaseEntities dd = new demo_databaseEntities();

        public ActionResult SQL()
        {
            Debug.Write("\nSQL Process Start => " + DateTime.Now.ToString("HH:mm:ss.ffffff"));
            con = new SqlConnection(_connectionString);
            da = new SqlDataAdapter("select * from employee", con);
            da.Fill(ds);
            foreach (DataRow dr in ds.Tables[0].Rows)
            {
                emp.Add(new employee()
                {
                    Id = Convert.ToInt32(dr["Id"]),
                    Name = Convert.ToString(dr["Name"]),
                    Dob = Convert.ToDateTime(dr["Dob"]),
                    Mob_no = Convert.ToString(dr["Mob_no"]),
                    Salary = Convert.ToDecimal(dr["Salary"]),
                    Is_Approved = Convert.ToBoolean(dr["Is_Approved"])
                });

            }
            Debug.Write("\nSQL Process End => " + DateTime.Now.ToString("HH:mm:ss.ffffff"));
            //Some process for paging
            return Json(new { count = emp.Count(), data = emp.Take(10000)}, JsonRequestBehavior.AllowGet);
        }

        public ActionResult Dapper()
        {
            Debug.Write("\nDapper Process Start => " + DateTime.Now.ToString("HH:mm:ss.ffffff"));
            con = new SqlConnection(_connectionString);
            emp = con.Query<employee>("select * from employee").ToList();
            Debug.Write("\nDapper Process End => " + DateTime.Now.ToString("HH:mm:ss.ffffff"));
            //Some process for paging
            return Json(new { count = emp.Count(), data = emp.Take(10000) }, JsonRequestBehavior.AllowGet);
        }

        public ActionResult EntityFramework()
        {
            Debug.Write("\nEF Process Start => " + DateTime.Now.ToString("HH:mm:ss.ffffff"));
            emp = dd.employees.ToList();
            Debug.Write("\nEF Process End => " + DateTime.Now.ToString("HH:mm:ss.ffffff"));
            //Some process for paging
            return Json(new { count = emp.Count(), data = emp.Take(10000) }, JsonRequestBehavior.AllowGet);
        }
    }
*SQL


*Dapper


*Entity Framework


ASP.NET MVC Hosting - HostForLIFEASP.NET :: Creating AutoComplete TextBox In ASP.NET MVC 5

clock December 8, 2021 08:20 by author Peter

One year back I wrote the following article: Creating AutoComplete Extender using ASP.NET  which has huge response. Currently it has 32 k views. So by considering same requirement in ASP.NET MVC I decided to write same type of article using ASP.NET MVC with the help of jQuery UI library. So let us implement this requirement step by step,

Step 1 - Create an ASP.NET MVC Application.
    "Start", then "All Programs" and select "Microsoft Visual Studio 2015".
    "File", then "New" and click "Project", then select "ASP.NET Web Application Template", then provide the Project a name as you wish and click on OK.
    Choose MVC empty application option and click on OK

Step 2 - Add model class.

Right click on Model folder in the created MVC application and add class named City and right the following line of code,

City.cs
    public class City  
      {  
          public int Id { get; set; }  
          public string Name { get; set; }  
      
      }


Step 3 Add user and admin controller
Right click on Controller folder in the created MVC application and add the controller class as,

Now after selecting controller template, click on add button then the following window appears,

Specify the controller name and click on add button, Now open the HomeController.cs file and write the following code into the Home controller class to bind and create the generic list from model class as in the following,

HomeController.cs
    using System.Collections.Generic;  
    using System.Linq;  
    using System.Web.Mvc;  
    using AutoCompleteInMVCJson.Models;  
    namespace AutoCompleteInMVCJson.Controllers  
    {  
        public class HomeController : Controller  
        {  
            // GET: Home  
            [HttpGet]  
            public ActionResult Index()  
            {  
                return View();  
            }  
            [HttpPost]  
            public JsonResult Index(string Prefix)  
            {  
                //Note : you can bind same list from database  
                List<City> ObjList = new List<City>()  
                {  
      
                    new City {Id=1,Name="Latur" },  
                    new City {Id=2,Name="Mumbai" },  
                    new City {Id=3,Name="Pune" },  
                    new City {Id=4,Name="Delhi" },  
                    new City {Id=5,Name="Dehradun" },  
                    new City {Id=6,Name="Noida" },  
                    new City {Id=7,Name="New Delhi" }  
      
            };  
                //Searching records from list using LINQ query  
                var Name = (from N in ObjList  
                                where N.Name.StartsWith(Prefix)  
                              select new { N.Name});  
                return Json(Name, JsonRequestBehavior.AllowGet);  
            }  
        }  
    }

In the above code, instead of going to database for records we are creating the generic list from model class and we will fetch records from above generic list.

Step 4
Reference jQuery UI css and js library reference as there are many ways to add the reference of jQuery library into the our project. The following are some methods:

    Using NuGet package manager , you can install library and reference into the project
    Use CDN library provided by Microsoft, jQuery, Google or any other which requires active internet connection.
    Download jQuery files from jQuery official website and reference into the project.

In this example we will use jQuery CDN library.

Step 5
Create jQuery Ajax function to call controller JSON action method and invoke autocomplete function,
    $(document).ready(function () {  
           $("#Name").autocomplete({  
               source: function(request,response) {  
                   $.ajax({  
                       url: "/Home/Index",  
                       type: "POST",  
                       dataType: "json",  
                       data: { Prefix: request.term },  
                       success: function (data) {  
                           response($.map(data, function (item) {  
                               return { label: item.Name, value: item.Name};  
                           }))  
      
                       }  
                   })  
               },  
               messages: {  
                   noResults: "", results: ""  
               }  
           });  
       })


To work above function don't forget to add the reference of the following jQuery CDN library as,
    <link rel="stylesheet" href="//code.jquery.com/ui/1.11.4/themes/smoothness/jquery-ui.css">  
    <script src="//code.jquery.com/jquery-1.10.2.js"></script>  
    <script src="//code.jquery.com/ui/1.11.4/jquery-ui.js"></script>

Step 6
Add view named index and put above json function into the view. After adding code necessary files and logic the Index.cshtml will look like the following,

Index.cshtml
    @model AutoCompleteInMVCJson.Models.City  
    @{    
        ViewBag.Title = "www.hostforlife.eu";    
    }    
    <link rel="stylesheet" href="//code.jquery.com/ui/1.11.4/themes/smoothness/jquery-ui.css">    
    <script src="//code.jquery.com/jquery-1.10.2.js"></script>    
    <script src="//code.jquery.com/ui/1.11.4/jquery-ui.js"></script>    
    <script type="text/javascript">    
        $(document).ready(function () {    
            $("#Name").autocomplete({    
                source: function (request, response) {    
                    $.ajax({    
                        url: "/Home/Index",    
                        type: "POST",    
                        dataType: "json",    
                        data: { Prefix: request.term },    
                        success: function (data) {    
                            response($.map(data, function (item) {    
                                return { label: item.Name, value: item.Name};    
                            }))    
        
                        }    
                    })    
                },    
                messages: {    
                    noResults: "", results: ""    
                }    
            });    
        })    
    </script>    
    @using (Html.BeginForm())    
    {    
        @Html.AntiForgeryToken()    
        
        <div class="form-horizontal">    
        
            <hr />    
        
            <div class="form-group">    
        
                <div class="col-md-12">    
                    @Html.EditorFor(model => model.Name, new { htmlAttributes = new { @class = "form-control" } })    
        
                </div>    
            </div>    
        
        </div>    
    }    


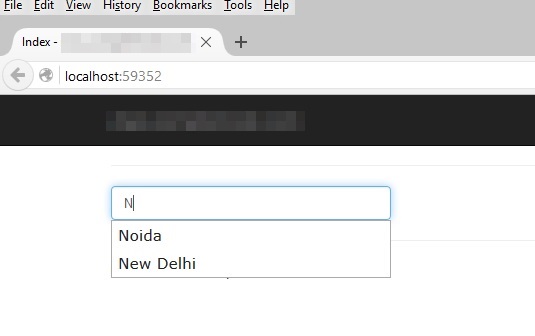
Now run the application and type any word then it will auto populate the records which exactly start with first word as in the following screenshot,

If you want to auto populate the records which contain any typed alphabet,then just change the LINQ query as contain. Now type any word it will search as follows,

From all the above examples, I hope you learned how to create the auto complete textbox using jQuery UI in ASP.NET MVC.

Note

    For the detailed code, please download the sample zip file.
    Perform changes in Web.config file as per your server location.
    You need to use the jQuery library.

For all the examples above, we learned how to use jQuery UI to create auto complete textbox in ASP.NET MVC. I hope this article is useful for all readers. If you have a suggestion then please contact me.


About HostForLIFE

HostForLIFE is European Windows Hosting Provider which focuses on Windows Platform only. We deliver on-demand hosting solutions including Shared hosting, Reseller Hosting, Cloud Hosting, Dedicated Servers, and IT as a Service for companies of all sizes.

We have offered the latest Windows 2019 Hosting, ASP.NET 5 Hosting, ASP.NET MVC 6 Hosting and SQL 2019 Hosting.


Tag cloud

Sign in