Microservice is a modern software development architecture: loosely-coupled architecture with application scope. It basically includes two parts: Client and API. Theoretically, API is a server, it could be built by any language or any platform or any device. The client is the consumer of the API Server that, in turn, could be applications of a smartphone, tablet, Windows, Mac, or any kind of browser, and could be built by any platfom and language.

ASP.NET Web API is, specifically, a Microsoft product to produce the RESTful output through HTTP for Clients. The consumer of ASP.NET Web API could be:
- Javascript client,
- Angular client,
- Node.js client,
- jQuery client,
- C# code such as Console, MVC, WebForm, Windows, and so on.
In this article, we will consider the C# client, and specifically an ASP.NET MVC client in .NET Core. If we Google it, we can find out a lot articles that describe the C# client to consume Web API (see some of the references at the end of this article). However, most of them seem quite complex, and even you could follow the steps to build a project, it is hard to follow the points to re-do one for yourself.
The contribution of this article is that I will try to make one-line code to build the MVC Client. Before the one-line code, we will use all of the knowledge and techniques we are familiar with to build the server and client framework.
This article will be divided in two parts, Part I (this article) will create a ASP.NET Core Web API (server), and also a ASP.NET Core MVC module (Client base). The later one will be used as a framework of the one-line code MVC Client. Part II will implement the one-line code Web API Client to be a Web API consumer.
A: Build ASP.NET MVC in .NET Core with Entity Framework Database First
This part will create a ASP.NET Core MVC application with Entity Framework Database first approach.
- Step 1: Create an ASP.NET Core MVC application
- Step 2: Reverse engineer Entity model from database (database first aproach for entity)
- Step 3: Scaffold Controller with View using Entity Framework
- Step 4: Run and Test app
At the end, you have an MVC app that can consume a database directly through entity framework.
Step 1: Create an ASP.NET Core MVC application
We use the current version of Visual Studio 2019 16.8 and .NET 5.0 SDK to build the app.
- Start Visual Studio and select Create a new project.
- In the Create a new project dialog, select ASP.NET Core Web Application > Next.
- In the Configure your new project dialog, enter MVCCallWebAPI for Project name.
- Select Create.
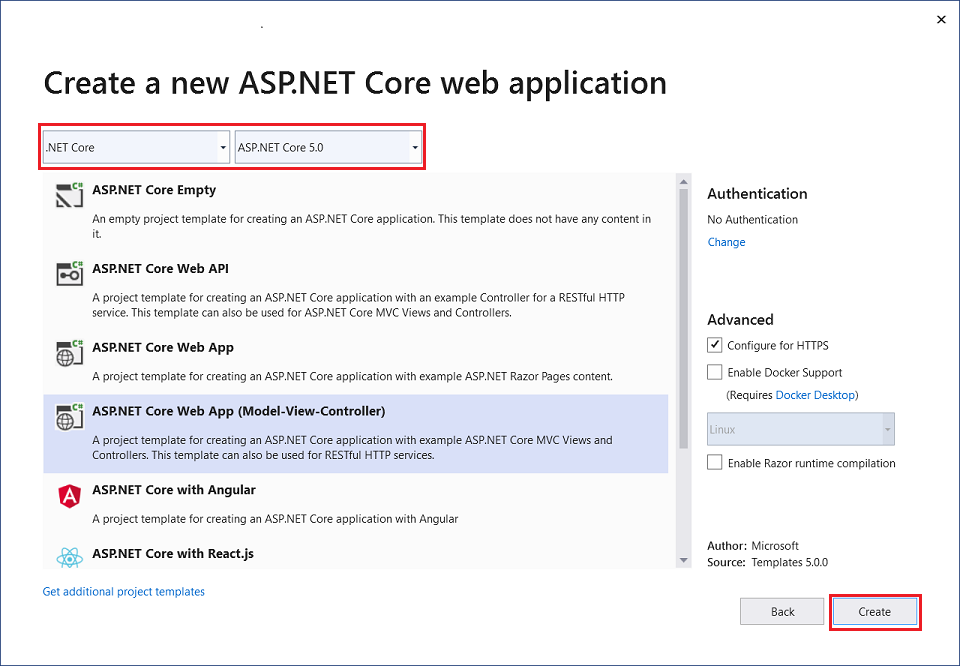
- In the Create a new ASP.NET Core web application dialog, select,
- .NET Core and ASP.NET Core 5.0 in the dropdowns.
- ASP.NET Core Web App (Model-View-Controller).
- Create
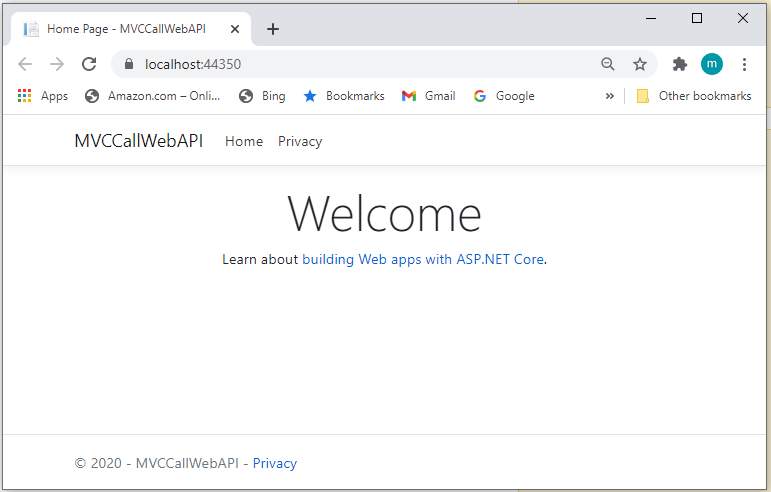
Build and run the app, you will see the following image shows the app,
Step 2: Reverse engineer Entity model from database (database first aproach for Entity)
We use a local Microsft SQL server, and the sample database pubs and its table stores as our database sample. We try to reverse engineer to get the table Stores into the project and make an entity model Store.
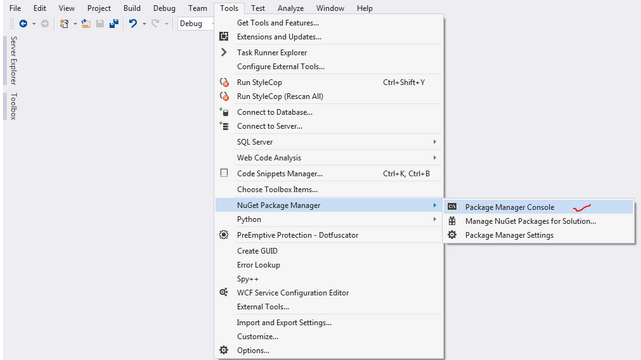
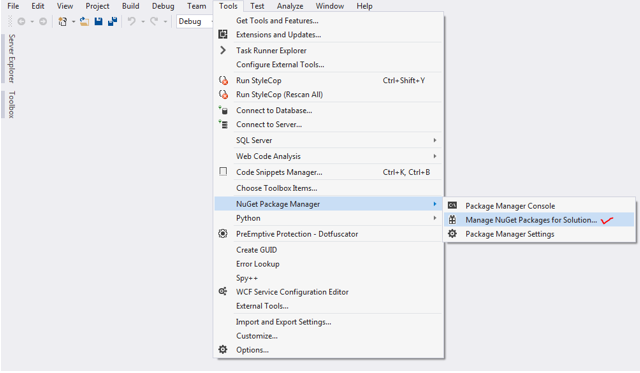
Click "Tools->NuGet Package Manager->Package Manager Console" as shown below i.e.
This is the reverse engineering command (when you run the command in PMC, you need to make it in one line),
Scaffold-DbContext "Data Source=localhost;Initial Catalog=pubs;Integrated Security=True;Connect Timeout=30;Encrypt=False;TrustServerCertificate=False;ApplicationIntent=ReadWrite;MultiSubnetFailover=False" Microsoft.EntityFrameworkCore.SqlServer
-OutputDir Models/DB
-Table dbo.stores
Run the command in the PMC,

We got error message above that Microsoft.EntityFrameworkCore.Design is required, but not installed. Click "Tools->NuGet Package Manager->Manage NuGet Packages for Solution" as shown below,
Choose and install: Microsoft.EntityFrameworkCore.Design,

Run the PMC command again,
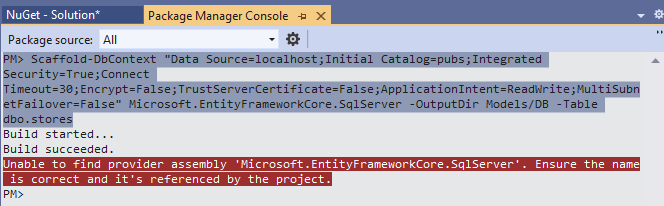
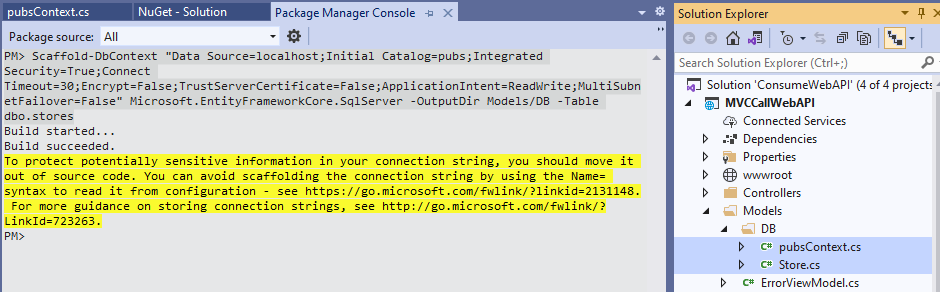
We got: Unable to find provider assembly 'Microsoft.EntityFrameworkCore.SqlServer', install it in the same way above from Manage NuGet Packages for Solution, and then reRun PMC command. This was successful and two classes are reverse engineered under Models/DB as shown below: pubsContext.cs and Store.cs
Step 3: Add Controller with View using Entity Framework
For adding controller using entity framework, we need to modify the reverse engineered classes pubsContext and Store.cs.
1. Modify the data connection
For the class pubsContext, we need to comment out the data connection part,
// protected override void OnConfiguring(DbContextOptionsBuilder optionsBuilder)
// {
// if (!optionsBuilder.IsConfigured)
// {
//#warning To protect potentially sensitive information in your connection string, you should move it out of source code. You can avoid scaffolding the connection string by using the Name= syntax to read it from configuration - see https://go.microsoft.com/fwlink/?linkid=2131148. For more guidance on storing connection strings, see http://go.microsoft.com/fwlink/?LinkId=723263.
// optionsBuilder.UseSqlServer("Data Source=localhost;Initial Catalog=pubs;Integrated Security=True;Connect Timeout=30;Encrypt=False;TrustServerCertificate=False;ApplicationIntent=ReadWrite;MultiSubnetFailover=False");
// }
// }
and move the data connection string into file appsettings.json,
{
"Logging": {
"LogLevel": {
"Default": "Information",
"Microsoft": "Warning",
"Microsoft.Hosting.Lifetime": "Information"
}
},
"ConnectionStrings": {
"DevConnection": "Data Source=localhost;Initial Catalog=pubs;Integrated Security=True;Connect Timeout=30;Encrypt=False;TrustServerCertificate=False;ApplicationIntent=ReadWrite;MultiSubnetFailover=False"
},
"AllowedHosts": "*"
}
Register the database connection context into Class starup.cs inside ConfigureServices,
public void ConfigureServices(IServiceCollection services)
{
// Register SQL database configuration context as services.
services.AddDbContext<pubsContext>(options =>
{
options.UseSqlServer(Configuration.GetConnectionString("DevConnection"));
});
services.AddControllersWithViews();
}
Otherwise, we could make a controller with view using this entity framework, and this would not work.
2. Modify the model
In class pubsContext, we can also comment out the data constrain part,
//protected override void OnModelCreating(ModelBuilder modelBuilder)
//{
// modelBuilder.HasAnnotation("Relational:Collation", "SQL_Latin1_General_CP1_CI_AS");
// modelBuilder.Entity<Store>(entity =>
// {
// entity.HasKey(e => e.StorId)
// .HasName("UPK_storeid");
// entity.ToTable("stores");
// entity.Property(e => e.StorId)
// .HasMaxLength(4)
// .IsUnicode(false)
// .HasColumnName("stor_id")
// .IsFixedLength(true);
// entity.Property(e => e.City)
// .HasMaxLength(20)
// .IsUnicode(false)
// .HasColumnName("city");
// entity.Property(e => e.State)
// .HasMaxLength(2)
// .IsUnicode(false)
// .HasColumnName("state")
// .IsFixedLength(true);
// entity.Property(e => e.StorAddress)
// .HasMaxLength(40)
// .IsUnicode(false)
// .HasColumnName("stor_address");
// entity.Property(e => e.StorName)
// .HasMaxLength(40)
// .IsUnicode(false)
// .HasColumnName("stor_name");
// entity.Property(e => e.Zip)
// .HasMaxLength(5)
// .IsUnicode(false)
// .HasColumnName("zip")
// .IsFixedLength(true);
// });
// OnModelCreatingPartial(modelBuilder);
//}
//partial void OnModelCreatingPartial(ModelBuilder modelBuilder);
but, we need to modify the data model to make the table member names exactly the same as they are in database, such as StorId into Stor_Id, and add a [Key] for primary key in database.
The class Store.cs, before,
using System.ComponentModel.DataAnnotations;
#nullable disable
namespace MVCCallWebAPI.Models.DB
{
public partial class Store
{
public string StorId { get; set; }
public string StorName { get; set; }
public string StorAddress { get; set; }
public string City { get; set; }
public string State { get; set; }
public string Zip { get; set; }
}
}
After
using System.ComponentModel.DataAnnotations;
#nullable disable
namespace MVCCallWebAPI.Models.DB
{
public partial class Store
{
[Key]
public string Stor_Id { get; set; }
public string Stor_Name { get; set; }
public string Stor_Address { get; set; }
public string City { get; set; }
public string State { get; set; }
public string Zip { get; set; }
}
}
The final class pubsContext will be,
using Microsoft.EntityFrameworkCore;
#nullable disable
namespace MVCCallWebAPI.Models.DB
{
public partial class pubsContext : DbContext
{
public pubsContext()
{
}
public pubsContext(DbContextOptions<pubsContext> options)
: base(options)
{
}
public virtual DbSet<Store> Stores { get; set; }
// protected override void OnConfiguring(DbContextOptionsBuilder optionsBuilder)
// {
// if (!optionsBuilder.IsConfigured)
// {
//#warning To protect potentially sensitive information in your connection string, you should move it out of source code. You can avoid scaffolding the connection string by using the Name= syntax to read it from configuration - see https://go.microsoft.com/fwlink/?linkid=2131148. For more guidance on storing connection strings, see http://go.microsoft.com/fwlink/?LinkId=723263.
// optionsBuilder.UseSqlServer("Data Source=localhost;Initial Catalog=pubs;Integrated Security=True;Connect Timeout=30;Encrypt=False;TrustServerCertificate=False;ApplicationIntent=ReadWrite;MultiSubnetFailover=False");
// }
// }
//protected override void OnModelCreating(ModelBuilder modelBuilder)
//{
// modelBuilder.HasAnnotation("Relational:Collation", "SQL_Latin1_General_CP1_CI_AS");
// modelBuilder.Entity<Store>(entity =>
// {
// entity.HasKey(e => e.StorId)
// .HasName("UPK_storeid");
// entity.ToTable("stores");
// entity.Property(e => e.StorId)
// .HasMaxLength(4)
// .IsUnicode(false)
// .HasColumnName("stor_id")
// .IsFixedLength(true);
// entity.Property(e => e.City)
// .HasMaxLength(20)
// .IsUnicode(false)
// .HasColumnName("city");
// entity.Property(e => e.State)
// .HasMaxLength(2)
// .IsUnicode(false)
// .HasColumnName("state")
// .IsFixedLength(true);
// entity.Property(e => e.StorAddress)
// .HasMaxLength(40)
// .IsUnicode(false)
// .HasColumnName("stor_address");
// entity.Property(e => e.StorName)
// .HasMaxLength(40)
// .IsUnicode(false)
// .HasColumnName("stor_name");
// entity.Property(e => e.Zip)
// .HasMaxLength(5)
// .IsUnicode(false)
// .HasColumnName("zip")
// .IsFixedLength(true);
// });
// OnModelCreatingPartial(modelBuilder);
//}
//partial void OnModelCreatingPartial(ModelBuilder modelBuilder);
}
}
3. Add the controller
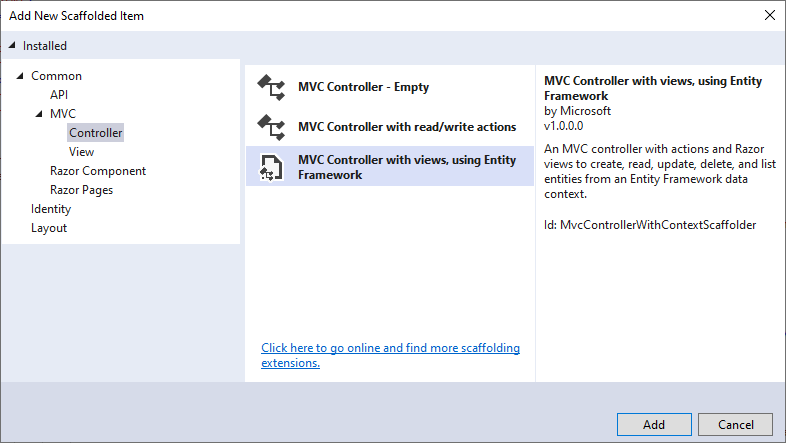
In Solution Explorer, right-click the Controllers folder > Add > New Scaffolded Item. Then, select MVC Controller with views, using Entity Framework > Add.
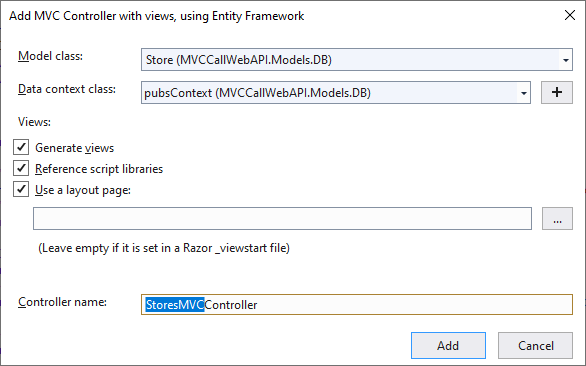
Complete the Add MVC Controller with Views, using Entity Framework dialog,
Model class - Store(MVCCallWebAPI.Models.DB)
Data context class - pubsContext (MVCCallWebAPI.Models.DB)
Views - Keep the default of each option checked
Controller name - Change the default StoresController to StoresMVCController
Select Add
Visual Studio creates,
A StroesMVC controller (Controllers/StoresMVCController.cs)
Razor view files for Create, Delete, Details, Edit, and Index pages (Views/StoresMVC/*.cshtml)
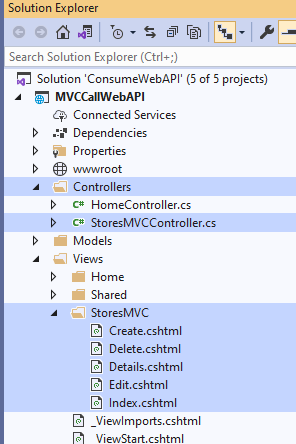
The automatic creation of these files is known as scaffolding.
Step 4. Run and Test the app
Before we run the app, modify the header of the file: Views/Shared/_layout.cshtml Views, shown below, change the controller as StoreMVC and the app name as MVC app:
<header>
<nav class="navbar navbar-expand-sm navbar-toggleable-sm navbar-light bg-white border-bottom box-shadow mb-3">
<div class="container">
<a class="navbar-brand" asp-area="" asp-controller="StroeMVC" asp-action="Index">MVC app</a>
<button class="navbar-toggler" type="button" data-toggle="collapse" data-target=".navbar-collapse" aria-controls="navbarSupportedContent"
aria-expanded="false" aria-label="Toggle navigation">
<span class="navbar-toggler-icon"></span>
</button>
<div class="navbar-collapse collapse d-sm-inline-flex justify-content-between">
<ul class="navbar-nav flex-grow-1">
<li class="nav-item">
<a class="nav-link text-dark" asp-area="" asp-controller="Home" asp-action="Index">Home</a>
</li>
<li class="nav-item">
<a class="nav-link text-dark" asp-area="" asp-controller="Home" asp-action="Privacy">Privacy</a>
</li>
</ul>
</div>
</div>
</nav>
</header>
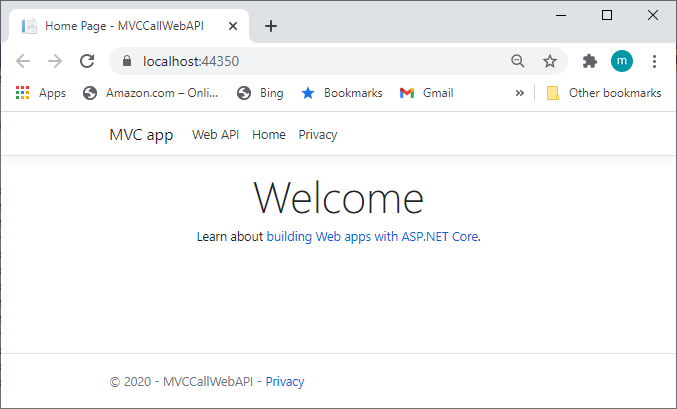
Now, we run the app,
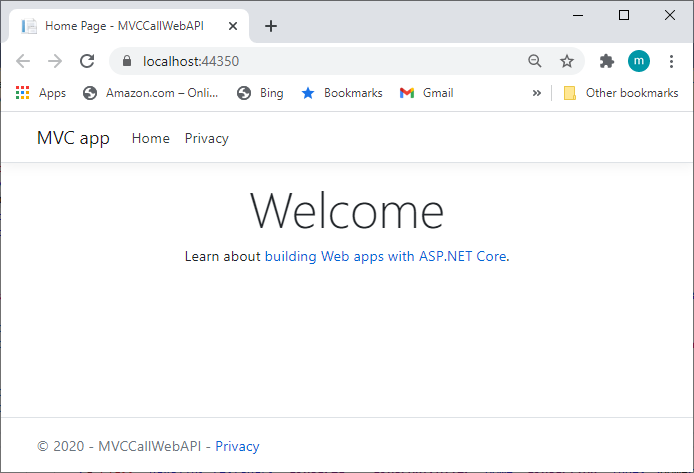
Click MVC app, we got the screen,
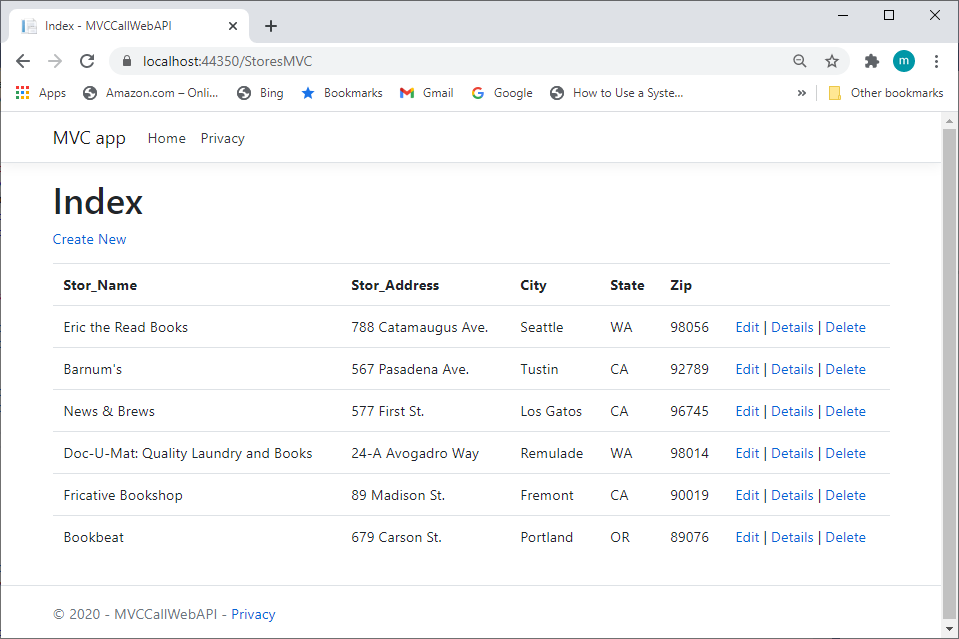
This is a MVC app that consumes the database directly through entity framework.
B: Add Web API with Entity Framework Code First
This part will add a ASP.NET Core Web API into the app with Entity Framework code first approach.
Step 1: Set up a new Database context
Step 2: Work with a database using Entity Framework code first appoach.
Step 3,:Scaffold API Controller with Action using Entity Framework
Step 4: Add Swagger client for Web API
Step 5: Run and Test app
At the end, you have an Web API built in a MVC app. The Web API is consumed by Swagger interface and can be consumed by any other interfaces, such as Postman.
Step 1: Set up a new Database Context
We make a new database context with the same model, Model/Store.cs, and different database, DB_Demo_API:
1. Create a new Database Context class, named DB_Demo_APIContext.cs,
using Microsoft.EntityFrameworkCore;
#nullable disable
namespace MVCCallWebAPI.Models.DB
{
public partial class DB_Demo_APIContext : DbContext
{
public DB_Demo_APIContext()
{
}
public DB_Demo_APIContext(DbContextOptions<DB_Demo_APIContext> options)
: base(options)
{
}
public virtual DbSet<Store> Stores { get; set; }
}
}
2. Add the new Connection in the appsettings.json file,
{
"Logging": {
"LogLevel": {
"Default": "Information",
"Microsoft": "Warning",
"Microsoft.Hosting.Lifetime": "Information"
}
},
"ConnectionStrings": {
"DevConnection": "Data Source=localhost;Initial Catalog=pubs;Integrated Security=True;Connect Timeout=30;Encrypt=False;TrustServerCertificate=False;ApplicationIntent=ReadWrite;MultiSubnetFailover=False"
},
"ConnectionStrings": {
"DB_Demo_APIConnection": "Data Source=localhost;Initial Catalog=DB_Demo_API;Integrated Security=True;Connect Timeout=30;Encrypt=False;TrustServerCertificate=False;ApplicationIntent=ReadWrite;MultiSubnetFailover=False"
},
"AllowedHosts": "*"
}
3. Register the database connection context into Class starup.cs inside ConfigureServices,
public void ConfigureServices(IServiceCollection services)
{
// Register SQL database configuration context as services.
services.AddDbContext<pubsContext>(options =>
{ options.UseSqlServer(Configuration.GetConnectionString("DevConnection"));
});
services.AddDbContext<DB_Demo_APIContext>(options =>
{
options.UseSqlServer(Configuration.GetConnectionString("DB_Demo_APIConnection"));
});
services.AddControllersWithViews();
}
Step 2: Work with a database using Entity Framework code first appoach.
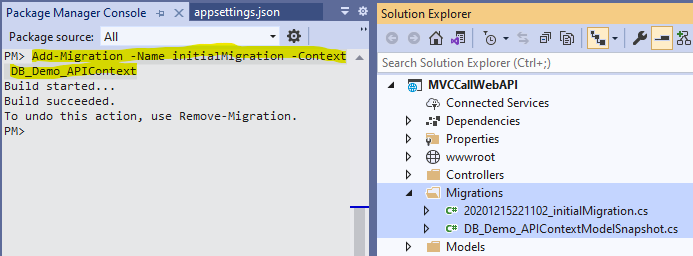
Click "Tools->NuGet Package Manager->Package Manager Console"(See A-Step 2), and run the PMC command (make them in one line),
Add-Migration
-Name initialMigration
-Context DB_Demo_APIContext
We got two migration files under Migration folder,
Run PMC command
Update-Database
-Name initialMigration
-Context DB_Demo_APIContext
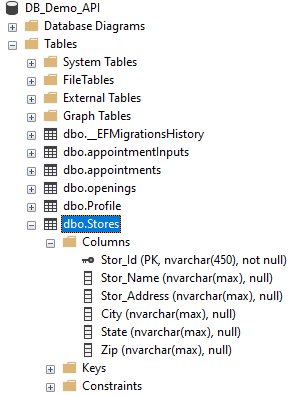
We got the database table Stores created in database DB_Demo_API
Step 3: Scaffold API Controller with Action using Entity Framework
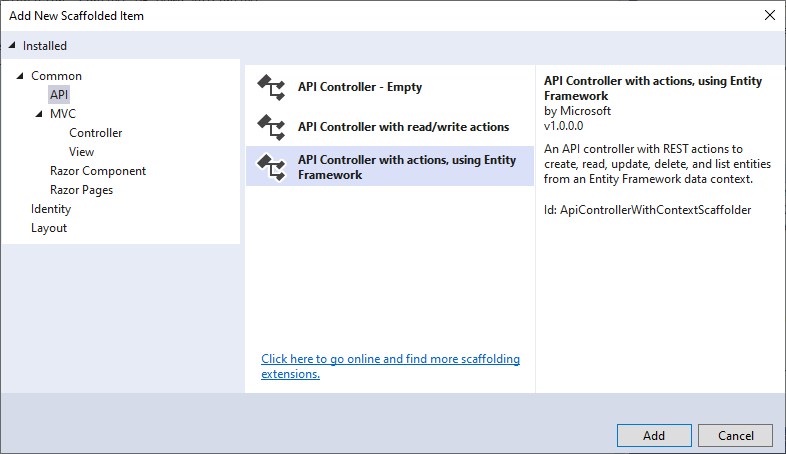
Right-click the Controllers folder.
Select Add > New Scaffolded Item.
Select API Controller with actions, using Entity Framework, and then select Add.
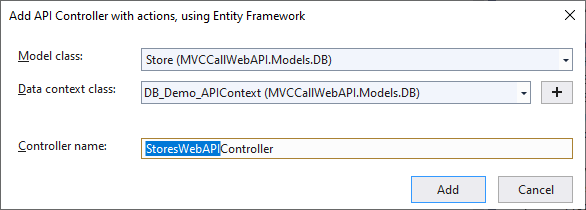
In the Add API Controller with actions, using Entity Framework dialog,
Model class -Store(MVCCallWebAPI.Models.DB)
Data context class - DB_Demo_APIContext (MVCCallWebAPI.Models.DB)
Controller name - Change the default StoresController to StoresWebAPIController
Select Add
The generated code,
Marks the class with the [ApiController] attribute. This attribute indicates that the controller responds to web API requests.
Uses DI to inject the database context (DB_Demo_APIContext) into the controller. The database context is used in each of the CRUD methods in the controller.
Step 4: Add Swagger client for Web API
Swagger (OpenAPI) is a language-agnostic specification for describing REST APIs. It allows both computers and humans to understand the capabilities of a REST API without direct access to the source code. Swagger UI offers a web-based UI that provides information about the service, using the generated OpenAPI specification.
If we created a new Web API project, the Swagger cient for Web API would be installed by default. In our current case, the Web API is created in a MVC module, so we need to install Swagger manually.
1. Install Swagger Client
Right-click the project in Solution Explorer > Manage NuGet Packages, search for Swagger
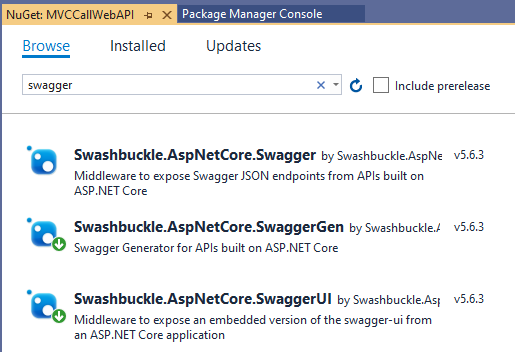
There are three main components to Swashbuckle (Swagger), we only need to install two of them: SwaggerGen and SwaggerUI, the Swagger would be included.
2. Register Swagger Client in startup.json file
Add the Swagger generator to the services collection in the Startup.ConfigureServices method,
// This method gets called by the runtime. Use this method to add services to the container.
public void ConfigureServices(IServiceCollection services)
{
// Register the Swagger generator, defining 1 or more Swagger documents
services.AddSwaggerGen(c =>
{
c.SwaggerDoc("v2", new OpenApiInfo { Title = "MVCCallWebAPI", Version = "v2" });
});
......
}
Enable the middleware for serving the generated JSON document and the Swagger UI, in the Startup.Configure method,
// This method gets called by the runtime. Use this method to configure the HTTP request pipeline.
public void Configure(IApplicationBuilder app, IWebHostEnvironment env)
{
// Enable middleware to serve generated Swagger as a JSON endpoint.
app.UseSwagger();
// Enable middleware to serve swagger-ui (HTML, JS, CSS, etc.),
// specifying the Swagger JSON endpoint.
app.UseSwaggerUI(c =>
{
c.SwaggerEndpoint("/swagger/v2/swagger.json", "MVCCallWebAPI");
});
......
}
Now, we are almost ready to run the app.
Step 5: Run and Test the app
Before we run the app, modify the header of the file: Views/Shared/_layout.cshtml Views again, shown below,
<header>
<nav class="navbar navbar-expand-sm navbar-toggleable-sm navbar-light bg-white border-bottom box-shadow mb-3">
<div class="container">
<a class="navbar-brand" asp-area="" asp-controller="StoresMVC" asp-action="Index">MVC app</a>
<button class="navbar-toggler" type="button" data-toggle="collapse" data-target=".navbar-collapse" aria-controls="navbarSupportedContent"
aria-expanded="false" aria-label="Toggle navigation">
<span class="navbar-toggler-icon"></span>
</button>
<div class="navbar-collapse collapse d-sm-inline-flex justify-content-between">
<ul class="navbar-nav flex-grow-1">
<li class="nav-item">
<a class="nav-link text-dark" asp-area="" asp-controller="Swagger" asp-action="Index">Web API</a>
</li>
<li class="nav-item">
<a class="nav-link text-dark" asp-area="" asp-controller="Home" asp-action="Index">Home</a>
</li>
<li class="nav-item">
<a class="nav-link text-dark" asp-area="" asp-controller="Home" asp-action="Privacy">Privacy</a>
</li>
</ul>
</div>
</div>
</nav>
</header>
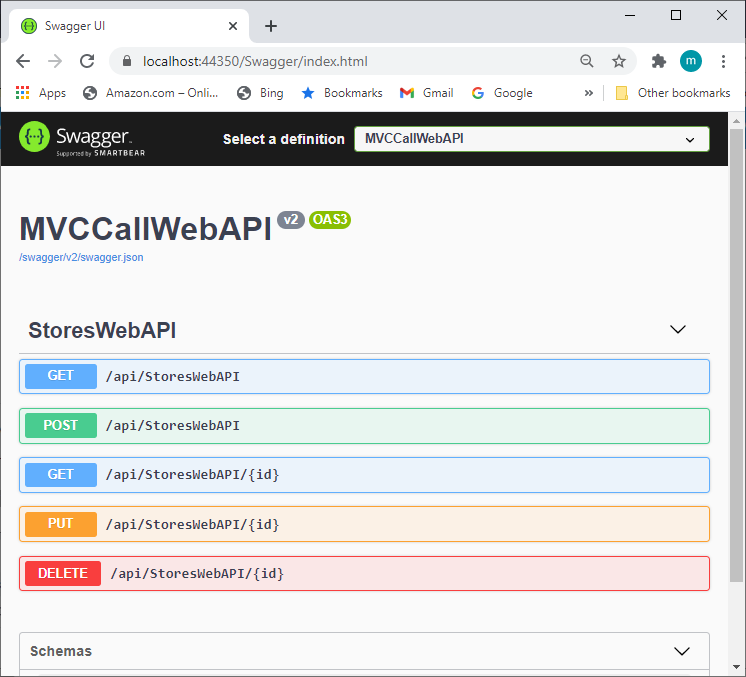
Now, we run the app,
Click Web API, we got the Swagger Client screen,