European ASP.NET MVC Hosting

BLOG about Latest ASP.NET MVC Hosting and Its Technology - Dedicated to European Windows Hosting Customer

ASP.NET MVC Hosting - HostForLIFEASP.NET :: Working With Areas In MVC

clock November 30, 2022 07:27 by author Peter

The primary purpose of areas in MVC is to separate and manage Model, View, Controller, Themes and routing registration file into separate sections. In other words, areas serve as a technique for dividing and managing a large Application into well managed smaller modules with the separate M-V-C in each module.


Why to use areas in MVC Application?
If you are building a CRM Application for a small Educational Consultancy with multiple business units such as Registration on Arrival, Information Gathering by Receptionist, Updates by Consular, Documentation Management, Interview Preparation, Billing, and Report Generation by different departments etc. Each of these units have their own logical components views, controllers and models. In this scenario, you can use ASP.NET MVC areas to physically partition the business components in the same project.

It is also possible that we can have large projects that uses MVC, then we need to split the Application into smaller units called areas that isolates the larger MVC Application into smaller functional groupings. A MVC Application can contain several MVC structures (areas).

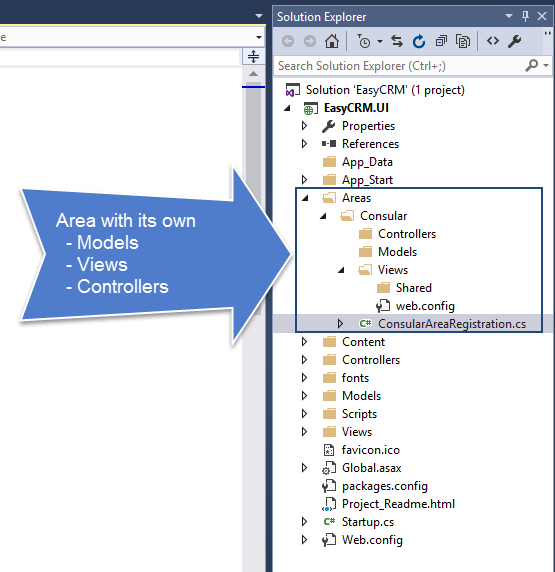
Areas are the small functional units with its own set of Model, View and Controller

    MVC Application can have any number of areas.
    Each area has its own controllers, models and views.
    Areas are put under separate folders called areas.

Today, we will be creating a new ASP.NET MVC Application and define a new area inside the project.

Creating new MVC Application


Step 1
Open Visual Studio.

Step 2
Create an ASP.NET Web Application with MVC template, as shown below.
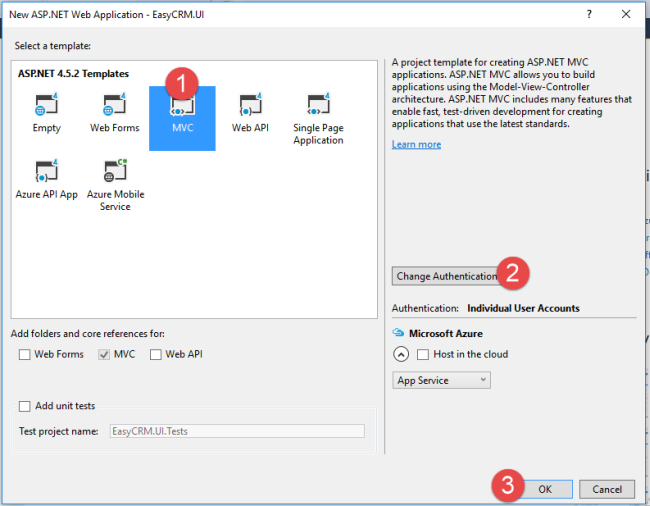
Step 3
In Solution Explorer, right-click on the project and click Add. Select areas to add an area.
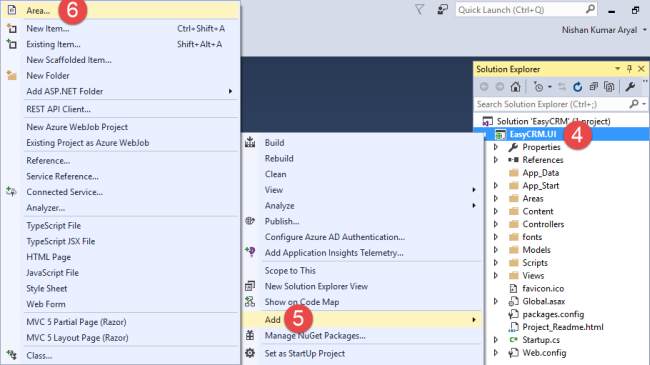
Step 4
Enter the name for the area, such as "Consular" or “SuperAdmin”.

Adding Controller for Area
Now, let’s add a controller in Area.

Step 1
Right-click on the Controller in your article area to add a controller.
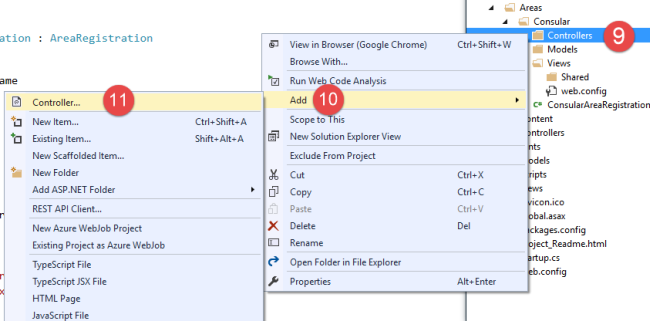
Step 2
Select "MVC 5 Empty Controller.
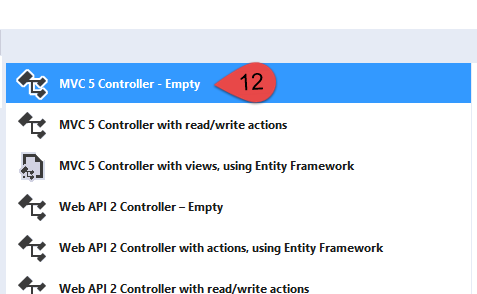

Step 3
Provide controller name as "ManageInterviewController”. Now, your Area folder should look, as shown below.
Adding Views for Area
We have successfully added a controller for our area. Now, let’s add a view for the area.

Step 1
Right-click on the "Index" method of ManageInterviewConsular Controller and click on Add View.

Step 2
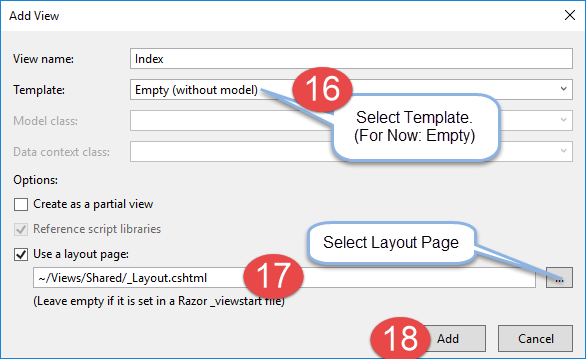
Enter the view name and select Layout page.
Step 3
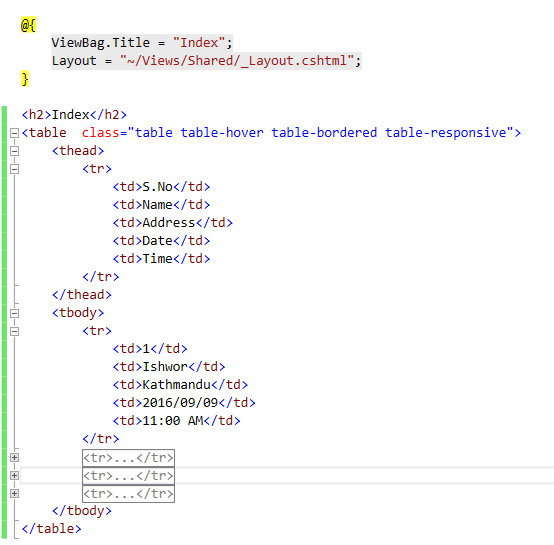
Generate some content in the View of Index method, as shown below.

Index g (table table-hover table-bordered table-responsive" >Time< /tr>Kathmandu< /tr> " "picture_x0020_6"="">
 
Area Registration
Step 1
Open the "Global.asax" file.

Step 2
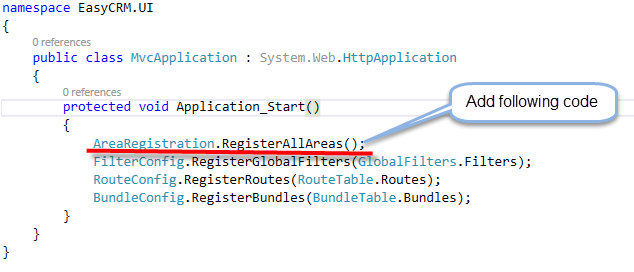
Add the code given below in your Application_Start() method.

AreaRegistration.RegisterAllAreas();

Till here, we have successfully added an area. Inside Area is the one, where we have added aController and a View for Index method.
Now, let’s add a link in Navbar of an Application to navigate to the view, which we created just now.

Step 1
Open the project view Layout file.
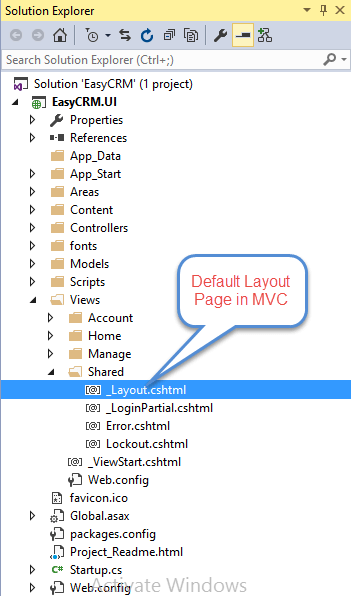
Step 2
Modify the <ul> </ul> in the layout file, as shown in the code given below.

Step 3
Debug the Application and open List Interview link, as shown below.
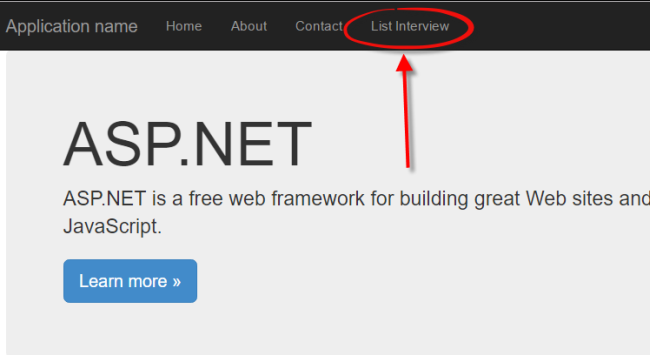
Let’s notice the URL
As highlighted, to invoke the controller of the area, we need to use

Baseurl/Areaname/Controller/{actionname}


ASP.NET MVC Hosting - HostForLIFEASP.NET :: Implement PRG Pattern in MVC Architecture

clock November 25, 2022 05:53 by author Peter

This article requires a basic understanding of MVC architecture and design pattern concepts. If you are very new to MVC then I suggest you understand MVC architecture before continue this article.


Let's talk the PRG design pattern and it's uses. PRG stands for Post Redirect Get. Fine, but why? Let's implement one small MVC application and we will see the real problem and scenario where we can use the PRG design pattern.

The problem is very common, and I am sure in your programmer and user life, you have encountered this situation. Let's consider, we have one Web form to collect user's information, very simple and clean. The user has filled in the necessary fields and hit the submit button. It is obvious it will hit some action belonging to some controller (defined in the controller) to save data in the database (or somewhere).

We are assuming that we are a good programmer (Really? Let's see. Haha..) and the data has been submitted. Now the user has hit the refresh button. Oh suck, it has called the action again? Let's see it in reality.

My Simple Model
This is kept simple intentionally because our point of discussion is different.
    namespace MVC.Models 
    { 
        public class person 
        { 
            public string _name{get;set;} 
            public string _surname { get; set; } 
            public int _age { get; set; } 
        } 
    } 


Here is my view

Which is a strong type in nature and I am targeting the “SaveData” action for the “person” controller.
    <%@ Page Language="C#" Inherits="System.Web.Mvc.ViewPage<MVC.Models.person>" %> 
    <!DOCTYPE html> 
    <html> 
    <head runat="server"> 
        <meta name="viewport" content="width=device-width" /> 
        <title>person</title> 
    </head> 
    <body> 
        <div> 
            <% using (Html.BeginForm("SavePerson","person")){ %> 
                Name : <%= Html.TextBox("_name") %> <br /> 
                Surname: <%= Html.TextBox("_surname") %> <br /> 
                Age: <%= Html.TextBox("_age") %><br /> 
                <input value="Register" type="submit" /> 
            <% } %>  
        </div> 
    </body> 
    </html> 


Now, let's see the controller implementation. In the person controller we have defined two actions, the AddNew() action will return this person view and the SavePerson() action will collect form data using a model binding technique.
    using System; 
    using System.Collections.Generic; 
    using System.Linq; 
    using System.Web; 
    using System.Web.Mvc; 
    using MVC.Models; 
    namespace MVC.Controllers 
    { 
        public class personController : Controller 
        { 
            public ActionResult AddNew() 
            { 
                return View("person"); 
            } 
            public ActionResult SavePerson([Bind] person p) 
            { 
                return Content("Data Saved"); 
            } 
        } 
    }

Now, if we hit the submit button as in the following:

Then we will see the following screen and we are seeing that the data has come as the action's parameter.

And we will get the result as in the following.

Now, let's hit the refresh button of the browser and let's see the result.


And if we press retry then it will hit the controller's action again.

Since it's hitting the same controller again, there might a great chance to save a duplicate record in the database that we don't want at all.

Then what is the solution? The PRG design pattern. How will it solve the problem? When we submit a form's data it makes a POST request to the server and we know that the POST method is harmful in the page reload operation.

So, the trick is that we will make a POST request to the server and the server will transfer the request into the GET request.

Then the result page will display by the GET request and when we make another browser refresh the next time, it will make a GET request to the server, which is not at all harmful.

Ok, we have learned the mechanism. Now let's implement it in an application. For that we need to make a small change in the controller.
    namespace MVC.Controllers 
    { 
        public class personController : Controller 
        { 
            public ActionResult AddNew() 
            { 
                return View("person"); 
            } 
            public ActionResult SavePerson([Bind] person p) 
            { 
               return RedirectToAction("PRG", "person"); 
            } 
            public ActionResult PRG() 
            { 
                return Content("Data Saved"); 
            } 
        } 
    }


We have added another action named “PRG” and from the SavePerson() action we are redirecting the context to the PRG() action using the “RedirectToAction()” method.

Now when we refresh again it will hit the “PRG()” action, not the “SavePerson()” action.

Though this type of redirection eats server resources, the business needs and security comes before performances. Happy day.


ASP.NET MVC Hosting - HostForLIFEASP.NET :: Single Sign-On Using ASP.NET MVC And ASP.NET Core

clock November 21, 2022 07:28 by author Peter

What is single sign-on (SSO)?
Users must authenticate themselves to access pages protected by a web application, and if a user accesses multiple web applications, they must be authenticated. You must log in to each application separately.

Single Sign-on using ASP.NET MVC and ASP.NET CORE
Interested in using single sign-on (SSO) for your ASP.NET MVC app? You're in the right place. There are many reasons to use SSO for custom apps owned by the same organization.

    Improved user experience.
    Reduce development time.
    Improved security.

These are all good reasons.

Another thing I like about SSO is that it allows me to update large code bases in small increments instead of all at once.

As? Suppose you want to migrate an app written in ASP.NET MVC 5 to ASP.NET Core MVC. Instead of rewriting everything at once, you can migrate one service at a time. By implementing SSO between two apps, you can effectively connect the two apps as if they were one app.

This tutorial simulates such a scenario by implementing his SSO in an MVC 5 app and a .NET Core app. Along the way, you'll also learn about the differences in how the two platforms implement authentication.

Find the ASP.NET MVC 5 App

Access an existing MVC 5 app from GitHub instead of building a project from scratch. Clone or download this project (https://github.com/oktadev/aspnet-mvc-crud-example) and open the solution in Visual Studio.

Web.config file has some app settings used by programmers to configure authentication with the Open ID Connect server provided by Okta:
<add key="okta:ClientId" value="{yourClientId}" />
<add key="okta:ClientSecret" value="{yourClientSecret}" />
<add key="okta:OktaDomain" value="https://{yourOktaDomain}" />


For this tutorial, you'll need to switch these values ​​to your own Okta instance. Sign in to your Okta domain if you already have an account, or sign up for a forever free developer account if you don't already have one.

After signing in to Okta, register your client application.

    Click Applications on the top menu.
    Click Add Application.
    Select Web and click Next.
    Enter SSO MVC 5 for Name.
    For the Grant type allowed check the Implicit (Hybrid) checkbox
    And last click on DONE

The application has been created, but we still need to add something. Select Edit and add http://localhost:8080/Account/PostLogout to the logout redirect URI list and click Save.

On the next screen, you will see a summary of your settings. Under the General Settings section, you will see the Client Credentials section. Update the SSO settings in Web.config with your client ID and client secret. Next, go to the main page of your Okta dashboard, copy the organization URL shown in the top left corner, and paste it into Okta.

OktaDomain app settings in Web.config.

At this point, you should be able to run your app and sign in and out using OpenID Connect. If you're interested, take a look at Startup.cs to see how the authentication middleware is configured.

Find the ASP.NET Core App

Now that you're using Okta to log into your MVC 5 app, adding SSO to your second app is trivial.

First, download or clone this .NET Core app from GitHub.(https://github.com/oktadeveloper/okta-aspnetcore22-crud-example) If opening in Visual Studio, change the debug target from IIS Express to LiveMusicFinder.

This will run your app through the Kestrel web server on port 5001 (for https).

Go back to your Okta admin panel and register this application.
    click on Applications at top of the menu
    Then click on Add Application
    And select Web and click Next
    Enter SSO Core MVC for the Name
    Replace Base URIs with https://localhost:5001/
    Replace Login redirect URIs with https://localhost:5001/authorization-code/callback
    Click Done

Once complete, you'll be taken to the General Settings tab of the app. In this tab, click the Edit button and add an entry to the Signout Redirect URI as https://localhost:5001/signout/callback.

Then click Save.

Copy the Client ID and Client Secret from the Client Credentials section of the next page and update your application's appsettings.json file.
"Okta": {
  "ClientId": "{yourClientId}",
  "ClientSecret": "{yourClientSecret}",
  "OktaDomain": "https://{yourOktaDomain}",
  "PostLogoutRedirectUri": "https://localhost:5001/"
},


While editing the settings, update the OktaDomain settings to match what you entered in your MVC 5 app's Web.config. Also change the PostLogoutRedirectUri to https//local host:5001/.

That's really it. When you sign in to either app, click the Sign In link in the other app to automatically sign you in without prompting for your password.

(If you're inexplicably testing this using Internet Explorer and Visual Studio's auto-launch feature, make sure you're opening her second app in a tab in her window in the first browser. . Each browser window is isolated from the others due to Visual Studio's habit of launching IE.)
How single sign-on works in ASP.NET MVC 5 and ASP.NET Core

We've seen how easy it is to enable SSO in two ASP.NET apps, but what's really going on behind the scenes to make it work?

Suppose you first navigate to App 1 and click Sign In. App 1 redirects to Okta IdP (Identity Provider) where it signs in. When you log in, a cookie from Okta's domain is set in your browser. This cookie keeps you logged into Okta. Okta then returns to App 1 with the token it uses to complete the sign-in process. At this point, her cookie is also set on the App 1 domain. Here's a diagram to explain the states:


Then open app 2 in another tab in the same browser. Click Sign In and you will be redirected back to the Okta IdP. However, this time we still have a valid cookie, so we are already logged into the IdP. So instead of showing a login screen, Okta simply redirects to App 2 with the token needed to complete the local login process. A cookie is set on the domain of app 2 and you can log in from anywhere.

Note that Single sign-out_ is not supported by Okta as of this writing. When you log out of App 1, the cookies in App 1 are deleted and a quick call is made to the Okta IdP, which deletes the cookies. However, the App 2 cookie remains and you remain signed in to App 2 until you click Sign Out or the cookie expires. The default expiration is 30 days.
Explain ASP.NET OpenID Connect Flow

As you may have noticed, when I set up the configuration for my MVC 5 app I had to check the box to enable the implicit (hybrid) grant type, but not for .NET Core apps was.

When the OpenID Connect middleware was written for his MVC 5 years ago (long time ago in the software world), the OpenID Connect hybrid flow was implemented. This flow requires the IdP to pass an authorization code and ID token to the MVC 5 app submission. When redirecting the user to your app.

When the OpenID Connect middleware was written for .NET Core, it implemented a more secure authorization code flow. In this case the IdP should only return an authorization code and the middleware should get the ID token via a backchannel request to his IdP. This means that the ID token is not exposed to browsers. Note that if you pass sensitive information in an ID token, in MVC 5 this token will be returned to your app via the browser. This is not a problem when enabling SSO for him for .NET Core apps.


ASP.NET MVC Hosting - HostForLIFEASP.NET :: Custom Error Page in ASP.NET MVC

clock November 8, 2022 09:29 by author Peter

Procedure
    First add an Error.cshtml page (View Page) to the Shared Folder if it does not already exist.
    Add or modify the Web.config file and set the Custom Error Element to On.
    Add a specific Action Controller and View for showing the HTTP Status Code.
    Add an [HandleError] attribute to the Targeted Action Method.

Note: When we are working on an internet application, by default it contains an Error.cshtml file.
Add a View Page. Right-click Solution Explorer, click View Folder, go to Shared Folder and name it Error.cshtml.


Then design the Error Page depending on your requirements, if it already exists then modify it to suit your needs.

Error.cshtml
    @model System.Web.Mvc.HandleErrorInfo  
      
    @{  
        ViewBag.Title = "Error";  
    }  
      
    <div style="background-color: #A52A2A; color: White; height: 10px;">  
    </div>  
    <div style="background-color: #F5F5DC; color: White; height: 170px;">  
        <div style=" padding:20px;">  
            <h3>  
                Application Error:</h3>  
            <h4>  
                Sorry, an error occurred while processing your request.  
            </h4>  
            <h6>@Html.ActionLink("Go Back To Home Page", "Index", "Home")</h6>  
            <br />  
            <br />  
        </div>  
    </div>  
    <div style="background-color: #A52A2A; color: White; height: 20px;">  
    </div> 


Go to Web.config file


    There are two Web.config files in an ASP.NET MVC Project.
    Go to Web.config file at the root directory.

    Go to Root Directory, Web.config, then System.Web, and click CustomError.
    Set it to On.

    Add this line.
        <customErrors mode="On">  
        </customErrors>  
    Run the application and search for anything, or Link that is not available.

As example:
    Try any Link or try to navigate to any View that is available.


    Then again try another link that is not available or modify the preceding link and watch the difference.
    This will show you your Customized Error page rather than a default page.

Step: Try to run or Browse for a View Page that is not available (A Controller whose View is not added.).
But before that, add this Attribute to the Controller.

At the Controller:
    [HandleError]  
    public ActionResult Index()  
    {  
       return View();  
    } 


Repeat Step: Try to run or Browse for a View Page that is not available (A Controller whose View is not added.).

If you add the Attributes [HandleError] to any Action Method, you will be shown your own Customized Error page written now, rather than the default Error Page.
Now add specific error pages based on the HTTP Status Code.
Such as one specific Error Page to show when the HTTP Status Code is 404.
Add a Controller to the Controller Folder and name it Error.


Add some action method to the Controller.

    Error Controller
        using System;  
        using System.Collections.Generic;  
        using System.Linq;  
        using System.Web;  
        using System.Web.Mvc;  
          
        namespace MvcApplication3.Controllers  
        {  
            public class ErrorController : Controller  
            {  
                //  
                // GET: /Error/  
          
                public ActionResult Index()  
                {  
                    return View();  
                }  
          
                public ActionResult NotFound()  
                {  
                    return View();  
                }  
            }  
        }  


Add a View Named NotFound to the Shared Folder like, as you have done earlier.
Note: We are adding this View to the Shared Folder, because Views inside Shared Folder is available to the complete application.
Right-click then select View, then go to Shared Folder and Add a View named NotFound.


And Design the View depending on your requirements.

Not Found.cshtml
    @{  
        ViewBag.Title = "NotFound";  
    }  
      
    <div style="background-color: #A52A2A; color: White; height: 10px;">  
    </div>  
    <div style="background-color: #F5F5DC; color: White; height: 170px;">  
        <div style=" padding:20px;">  
            <h3>  
                Application Error:</h3>  
            <h4>  
                Sorry, The Page, You are Looking for is not found.  
            </h4>  
            <h6>@Html.ActionLink("Go Back To Home Page", "Index", "Home")</h6>  
            <br />  
            <br />  
        </div>  
    </div>  
    <div style="background-color: #A52A2A; color: White; height: 20px;">  
    </div>  


Again go to the Root folder, then Web.config file. Go inside System.web and modify it.
    <customErrors mode="On">  
       <error statusCode="404" redirect="~/Error/NotFound"/>  
    </customErrors>  


Explanation

Now run the application, try to navigate to an unavailable View and you will see the Customized Error Page rather than the default Error Page.

Default Error Page: Example


Now, if any error occurs then the Customized Error Page will be shown.
This was all about how to display a custom error page in ASP.NET MVC.

Similarly, design all other Custom Error page depending on HTTP Status Code.

Note: The preceding information is gathered by me depending on the results of studying, experience, Internet Browsing, and Video Tutorials.


ASP.NET MVC Hosting - HostForLIFEASP.NET :: Custom SQL Server Pagination with .Net Core MVC and JQuery

clock November 2, 2022 08:27 by author Peter

The question is, why do we need SQL Pagination when we already have built-in paging functionality in Grid View or JQuery Data table.


Answer is èSometimes it's not a good habit to load all the data over the network, but instead to transfer only the data required, to improve performance. For that we have SQL paging. Pass only a Page Index and Page Size to load the required data.

To do this, I created the following Stored Procedure:
=============================================
-- Author: Nilachal Sethi
-- Create Date: Oct 31, 2022
-- Description: Get full List By Pagination
-- =============================================
CREATE PROCEDURE [dbo].[ListData]

       @PageSize as int=1000,
       @Caret as int=0,
       @Option varchar(100) = Null

AS
BEGIN

   Declare @TotalRecord int
SELECT @TotalRecord =COUNT(ID) FROM JobOrder
                     OFFSET @PageSize * (@Caret)ROWS FETCH NEXT @PageSize ROWS ONLY


              SELECT @TotalRecord AS TotalRecord,* FROM JobOrder
                     ORDER BY DateTaken DESC
                     OFFSET @PageSize * (@Caret)ROWS FETCH NEXT @PageSize ROWS ONLY
     END;

Now the Controller is:
[HttpGet]
public IActionResult GetJobOrderGrid(int? pagesize, int? caret)
{
    string responseString = "";
    var response = webApiMethodsForDBAction.GetAsyncCall(webApiUrl +"URL?Pagesize=" + pagesize + "&Caret=" + caret);
    int StatusCode = Convert.ToInt32(response.StatusCode);
    if (StatusCode == 200)
    {
        responseString = response.Content.ReadAsStringAsync().Result;

    }
    return Json(responseString);
}


Now the View is:
<div id="JobGrid">
    <input type="hidden" id="hidcurrentindexemp" value="0" />
    <input type="hidden" id="hidemppagesize" value="10" />
    <input type="hidden" id="hiddenTotalRecord" value="" />
    <div class="row">
        <div class="col-md-12 m-grid__item">

            <div id="JobDiv" class="">

            </div>
            <div class="clearfix"></div>
            <div class="pagination-content clearfix" id="qemp"></div>

        </div>
    </div>
</div>
<script src="@Url.Content(" ~/MainCustomer/js/FullCustomer.js")"></script>

<script type="text/javascript">
    $(document).ready(function () {
            GetJobOrderList();
    });
</script>


Now the JQuery is:
For making Table And Pagination
function GetJobOrderList() {
    $.ajax({
        url: '/Area/Controller/ActionName',
        type: "GET",
        data: { pagesize: $('#hidemppagesize').val(), caret: $('#hidcurrentindexemp').val() },
        dataType: "json",
        async: true,
        beforeSend: function () {
            $("#divLoading").show();
        },
        success: function (data) {

            var Job = JSON.parse(data);
            if (Job === '') {
                window.location.reload();
            }
            var JobList = Job.thisList;
            var TotalRecord = Job.thisList[0].TotalRecords;
            var job_id = Job.thisList[0].Id;
            $('#hiddenTotalRecord').val(TotalRecord);
            var grid = '';
            grid += '<div class="main-container table-responsive table-container"><table class="table table-striped table-hover table-bordered" id="JobOrderTable"><thead> <tr><th>Action</th><th>Job Title</th><th >Customer Name </th><th>Stages </th><th>Start Date</th><th>Location</th><th>End Client</th><th>#Position</th><th>Status </th></tr> </thead>';
            grid += '<tbody>';
            if (data === null) {
                grid += '<tr><td colspan="9" >No Records Found.<td></tr>';
            }
            else {
                $.each(JobList, function (d, value) {
                    grid += ' <tr><td>' + (value.JobTitle === "" ? "N/A" : value.JobTitle) + '</td><td>' + (value.CustomerName === "" ? "N/A" : value.CustomerName) + '</td><td>' + (value.JoborderStage === "" ? "N/A" : value.JoborderStage) + '</td><td>' + (value.FormattedStartDate === "" ? "N/A" : value.FormattedStartDate) + '</td><td>' + (value.Location === null ? "N/A" : value.Location) + '</td><td>' + (value.Positions === "" ? "N/A" : value.Positions) + '</td><td>' + (value.IsActive === "Active" ? "" : "") + '</td></tr>';
                });
            }
            grid += '</tbody></table>';
            Pagination($('#hiddenTotalRecord').val(), $("#hidcurrentindexemp").val(), $("#hidemppagesize").val(), "#qemp", "qemp");
            $("#JobDiv").html(grid);
            $("#divLoading").hide();
        },
        error: function (xhr, textStatus) {
            if (xhr.status === 401) { window.location.reload(); }
            else {
                    $.notify('please try again!', "error");
                $("#divLoading").hide();
            }
        }
    });
}


For Click Page Function

function Search_qemp(index) {
    $("#hidcurrentindexemp").val(index);
    GetJobOrderList();
}

Main Pagination JS:
function Pagination(totalrecord, currentindex, pagesize, div, Type) {
    currentindex = parseInt(currentindex);
    totalrecord = parseInt(totalrecord);
    pagesize = parseInt(pagesize);
    var pagestring = '';
    $(div).html("");
    var pagerlink = Math.ceil(totalrecord / pagesize);
    var lastindex = pagerlink - 1;
    if (totalrecord === 0) {
        $(div).append('<p>Displaying 0 out of 0 items </p>');
    }
    else if (totalrecord > 0) {
        if (currentindex === lastindex) {
            if (currentindex === 0) {
                $(div).append('<p>Displaying ' + 1 + ' to ' + totalrecord + ' out of ' + totalrecord + ' items </p>');
            }
            else {
                $(div).append('<p>Displaying ' + parseInt(1 + (pagesize * (currentindex - 1) + parseInt(pagesize))) + ' to ' + totalrecord + ' out of ' + totalrecord + ' items </p>')
            }
        }
        else {
            $(div).append('<p>Displaying ' + parseInt(pagesize * currentindex + 1) + ' to ' + parseInt(pagesize * currentindex + parseInt(pagesize)) + ' out of ' + totalrecord + ' items </p>')
        }
        $(div).append('');
        if (totalrecord === 0) {
            pagestring = pagestring + '<li class="paginate_button page-item"><a class="page-link number">First</a></li><li class="paginate_button page-item"><a class="page-link number">Previous</a></li>' +
                '<li class="paginate_button page-item"> No Record Found </li><li class="paginate_button page-item"><a class="page-link number">Next</a></li><li class="paginate_button page-item"><a class="page-link number">Last</a></li>';
        }
        else {
            if (currentindex === 0) {
                pagestring = pagestring + '<li class="paginate_button page-item"><a class="page-link number">First</a></li>' +
                    '<li class="paginate_button page-item"><a class="page-link number">Previous</a></li>';
            }
            else {
                pagestring = pagestring + '<li class="paginate_button page-item"><a class="page-link number" onclick="Search_' + Type + '(0);">First</a></li>' +
                    '<li class="paginate_button page-item"><a class="page-link number" onclick="Search_' + Type + '(' + parseInt(currentindex - 1) + ');">Previous</a></li>';
            }
            var counter = 0;
            var intial = 0;
            if (parseInt(currentindex) < 5) {
                intial = 0;
            }
            else {
                intial = parseInt(currentindex) - 3;
            }
            for (var i = intial; i < pagerlink; i++) {
                var j = i + 1;
                if (i === currentindex) {
                    pagestring = pagestring + '<li class="paginate_button page-item number active"> <a class="page-link number" value="' + j + '">' + j + '</a></li>';
                }
                else {
                    pagestring = pagestring + '<li class="paginate_button page-item"> <a class="page-link number" onclick="Search_' + Type + '(' + i + ');" value="' + j + '">' + j + '</a> </li>';
                }
                if (counter === 5)
                    break;
                counter++;
            }
            if (currentindex === lastindex) {
                pagestring = pagestring + '<li class="paginate_button page-item"><a class="page-link number">Next</a></li>' +
                    '<li class="paginate_button page-item"><a class="page-link number">Last</a></li>';
            }
            else {
                var nextindex = (parseInt(currentindex) + 1);
                pagestring = pagestring + '<li class="paginate_button page-item"><a class="page-link number" onclick="Search_' + Type + '(' + nextindex + ');">Next</a></li>' +
                    '<li class="paginate_button page-item"><a class="page-link number" onclick="Search_' + Type + '(' + lastindex + ');">Last</a></li>';
            }
        }
        pagestring = '<div class="pagination-right"><nav><ul class="pagination float-md-right float-lg-right">' + pagestring + '</ul></nav></div>';
        $(div).append(pagestring);
    }
}

Now run the application.
Here we go…..

If you have any problem then please let me know.


About HostForLIFE

HostForLIFE is European Windows Hosting Provider which focuses on Windows Platform only. We deliver on-demand hosting solutions including Shared hosting, Reseller Hosting, Cloud Hosting, Dedicated Servers, and IT as a Service for companies of all sizes.

We have offered the latest Windows 2019 Hosting, ASP.NET 5 Hosting, ASP.NET MVC 6 Hosting and SQL 2019 Hosting.


Month List

Tag cloud

Sign in