European ASP.NET MVC Hosting

BLOG about Latest ASP.NET MVC Hosting and Its Technology - Dedicated to European Windows Hosting Customer

ASP.NET MVC Hosting - HostForLIFEASP.NET :: How Do I Use Twilio to Send SMS in a C#.NET MVC Project?

clock February 27, 2024 06:45 by author Peter

In today's fast-paced world, where everyone uses hundreds of websites and applications every day, there are numerous in-app notifications, and all communication is critical. However, these in-app notifications will only appear when we start the app. As a result, introducing SMS capabilities into projects can greatly boost user engagement and participation. Twilio, a well-known cloud communications company, has a robust API that enables developers to easily send and receive SMS texts, among other communication functions.


This post will show you how to integrate Twilio to send SMS in a C# MVC project from scratch. So, before we get started with the project, let's register a Twilio account.

Setting up a Twilio account
To create a Twilio account, we first need to sign up, which is simple. If you already have a Twilio account, you can skip step 1 and proceed to step 2.

Step 1: Sign up for Twilio
Sign up by entering your basic information on the following link: www.twilio.com. By clicking "Continue," you will be taken to another page to validate your email address. Once the email address has been verified, you must also verify your phone number. Following that, you will be taken to another page containing a recovery code. Please copy the code and store it somewhere safe for future use.

Step 2: Login to Twilio
If you are checking in for the first time, Twilio will prompt you with a few questions. Simply answer them, and it will lead you to the dashboard/

Step 3. Get the Phone Number
Click on the "Get Phone Number" button, and you will receive the number. Before purchasing their plan, your account will be a trial account, and the number given to you will be a trial number.

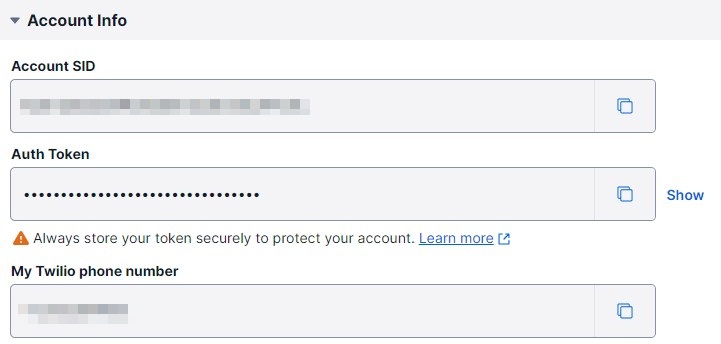
Step 4. Get SID and Auth Token
In the same screen, you will have a section named "Account Info", where you will following information -Account SID, Auth Token, and My Twilio phone number, which we will be using during development.

Step 5. Verify Phone Numbers
This step is only for trial account users. Since it is a trial account, you will need to verify the numbers, on which you want to send the SMS using your project. You can skip this step if you have purchased a Twilio SMS plan. To verify numbers follow the following steps.

  • Click on the verified phone numbers link, you will be redirected to another page.
  • Click on the "Add a new caller ID" button in the right corner. A popup will open to add the number.
  • Select the country, number, and mode through which you want to verify the number.
  • Click verify the number, you will get an OTP on the number you just entered.
  • Enter the OTP to verify the number and it will be shown in verified caller IDs.

Now that you have set up the Twilio account. Let's move to the project.

Setting up the project

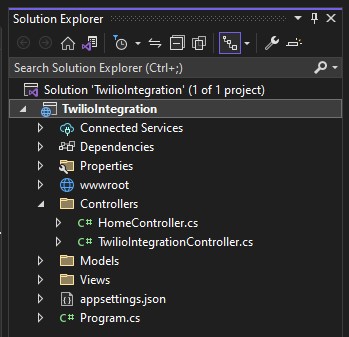
You can either create a new project or you can integrate Twilio into an existing project. Here, I have created a demo project to integrate Twilio in it and created a Controller named "TwilioIntegrationController". In this controller, I will be writing Twilio-related code. Let's move to the project.

Step 1. Install dependencies
To be able to integrate Twilio in the project, you will need some dependencies, that will help Twilio run.

  • Click on Tools.
  • Select "Nuget Package Manager".
  • Click "Manage Nuget Package for solution".
  • In the Browse section, search for Package "Twilio" and install the solution.
  • Then, search "Twilio.AspNet.Mvc" and install it too.

Now that you have installed all the necessary dependencies. Let's move to the next step.

Step 2. Code to Send SMS

In the "TwilioIntegrationController", write your code for sending SMS. Here, I am putting all my code in one file. But you should put the necessary code where it should be.
using Microsoft.AspNetCore.Mvc;
using Twilio;
using Twilio.Rest.Api.V2010.Account;

namespace TwilioIntegration.Controllers
{
public class TwilioIntegrationController : Controller
{
    [Route("send-SMS")]
    public IActionResult SendSMS()
    {
        string sId = ""; // add Account from Twilio
        string authToken = ""; //add Auth Token from Twilio
        string fromPhoneNumber = "+120*******"; //add Twilio phone number

        TwilioClient.Init(sId, authToken);
        var message = MessageResource.Create(
            body: "Hi, there!!",
            from: new Twilio.Types.PhoneNumber(fromPhoneNumber),
            to: new Twilio.Types.PhoneNumber("+9175********") //add receiver's phone number
        );
        Console.WriteLine(message.ErrorCode);
        return View(message);
    }
}
}

Code Explanation
In the above code,

  • Add 'using Microsoft.AspNetCore.Mvc;', 'using Twilio;', 'using Twilio.Rest.Api.V2010.Account;' to use Twilio API in the code.
  • Then, I have created a method named SendSMS().
  • In the method, I created three string variables - sId, authToken, and fromPhoneNumber to store Twilio account SId, Auth Token, and Twilio phone number. I have placed all three in this method, but you should store them in an appsettings file and access them from there.
  • Then initiate TwilioClient by passing your account SId and Auth Token, using this lineTwilioClient.Init(sId, authToken);.
  • In the next line "MessageResource.Create()" is a method call to create a new SMS message using the Twilio API. It indicates that we are creating a new message resource. We are passing the message body, from phone number and to phone number in it. It creates the message and sends it using the Twilio API.
  • In the next line, I have consoled the ErrorCode, if any error occurs during the sending of SMS.
Step 3: Call the aforementioned procedure
Call the method we defined previously from your code to send SMS from anywhere in your code, and Twilio will send the SMS to the account you specified earlier.

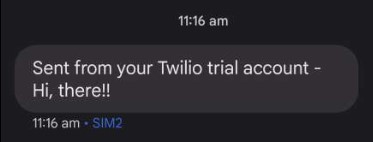
The above image shows that the message was successfully sent from the project, and the body is the same as we specified in our code. However, because we are using a trial account, Twilio automatically inserts the prefix "Sent from your Twilio trial account-" to all messages sent from your trial account. As a result, real-world projects benefit from purchasing a plan.

Conclusion
In this article, we learned how to create a Twilio account, configure it, and connect Twilio with the code in the C# MVC project. By setting up a Twilio account and using Twilio's API, developers may simply send and receive SMS messages, providing a valuable tool for increasing project functionality and user experience.

In the same way, Twilio can be integrated into other languages. The method is virtually identical. You may also use Twilio to deliver WhatsApp messages, audio messages, and other types of messaging by integrating it into your project. This connection enables developers to use Twilio's strong cloud communication infrastructure to improve their projects across many programming languages, resulting in more effective communication and user engagement.


ASP.NET MVC Hosting - HostForLIFEASP.NET :: Async Patterns in MVC Controllers: Are they Efficient or Add Unnecessary Complexity?

clock February 22, 2024 09:05 by author Peter

Previously, when I started implementing action methods within controllers, I took a standard approach that seemed to work. However, my curiosity drove me to investigate various ways, and what I discovered was a wide world of coding styles. It became clear that the way I developed my code was only one option among several. As I compared my methods to those used by other developers, I began to wonder if there were major disparities in logic, performance, or other factors.

In this post, we will delve into the complexities of MVC controller methods, investigating the influence of asynchronous design decisions and throwing light on the rationale for seemingly complex async patterns.

As you can see below.

In MVC controllers, one function gets users regularly, while another adds 'async' but not 'await.'

1. Normal action method in the controller
[HttpGet]
public IActionResult GetUsers()
{
    // Retrieve a list of all user objects synchronously.
    List<User> userList = _dbService.ReadAllUsers();
    return View(userList);
}
2) Action method contains async keyword without await keyword[HttpGet]
public async Task<IActionResult> GetUsers()
{
  //Do some work and get a list of all user-objects.
  List<User> userList = _dbService.ReadAllUsers();
  return View(userList);
}

In terms of functionality, the first and second methods will act similarly because the 'async' method does not contain the 'await' keyword. Both techniques will execute simultaneously, and the distinction is not relevant in this case. However, it's worth noting that the second function is declared as an asynchronous method (async Task<IActionResult>), although there are no asynchronous operations.

The method is declared as asynchronous (async Task<IActionResult>), but there are no actual asynchronous actions with the await keyword. The ReadAllUsers() method is called synchronously, with no asynchronous operations awaiting it.

3) The Action method contains async and await keyword
[HttpGet]
public async Task<IActionResult> GetUsers()
{
    // Do some work and get a list of all user-objects.
    List<User> userList = await _dbService.ReadAllUsersAsync();
    return View(userList);
}


When you use 'await' with an asynchronous operation, like _dbService.ReadAllUsersAsync(), the method will pause and wait for the asynchronous operation to complete. Importantly, the thread is not blocked during this waiting period, allowing other tasks or operations to proceed concurrently. However, in this specific case, where there is no additional asynchronous work to be performed while waiting for the _dbService.ReadAllLinesAsync() operation, the asynchronous version doesn't offer any noticeable advantages. Consequently, there wouldn't be a significant difference between the two methods.

Summary
All three of the approaches listed above will work the same way. Why write in such a sophisticated way? In a web application, using async and await might be useful, especially when dealing with many requests. It is regarded best practice to utilize async and await when there are true asynchronous operations to run or when they are expected to be introduced in the future.


ASP.NET MVC Hosting - HostForLIFEASP.NET :: Custom Filter In MVC Or Logging Using MVC Filter

clock February 15, 2024 08:34 by author Peter

In my MVC project, I want to build a filter that records every controller action. All I'm doing is injecting an ILogger object to log the logs into my table storage. This blog post explains how to make an action filter and how to add it to any action, controller, or global location.


Make an Action filter class:

    namespace Filter {  
        using System;  
        using Microsoft.AspNetCore.Mvc.Filters;  
        using Microsoft.AspNetCore.Routing;  
        using Core.Logging;  
        /// <summary>  
        /// This is tog every action activity  
        /// </summary>  
        /// <seealso cref="Microsoft.AspNetCore.Mvc.Filters.ActionFilterAttribute" />  
        [AttributeUsage(AttributeTargets.Class)]  
        public class LogActionFilterAttribute: ActionFilterAttribute {  
            private readonly ILogger logger;  
            /// <summary>  
            /// Initializes a new instance of the <see cref="LogActionFilterAttribute" /> class.  
            /// </summary>  
            /// <param name="logger">The logger.</param>  
            public LogActionFilterAttribute(ILogger logger) {  
                this.logger = logger;  
            }  
            /// <summary>  
            /// Called when [action executing].  
            /// </summary>  
            /// <param name="context">The filter context.</param>  
            public override void OnActionExecuting(ActionExecutingContext context) {  
                this.Log("OnActionExecuting", context.RouteData);  
                base.OnActionExecuting(context);  
            }  
            /// <summary>  
            /// Called when [action executed].  
            /// </summary>  
            /// <param name="context"></param>  
            /// <inheritdoc />  
            public override void OnActionExecuted(ActionExecutedContext context) {  
                this.Log("OnActionExecuted", context.RouteData);  
                base.OnActionExecuted(context);  
            }  
            /// <summary>  
            /// Called when [result executing].  
            /// </summary>  
            /// <param name="context">The filter context.</param>  
            public override void OnResultExecuting(ResultExecutingContext context) {  
                this.Log("OnResultExecuting", context.RouteData);  
                base.OnResultExecuting(context);  
            }  
            /// <summary>  
            /// Called when [result executed].  
            /// </summary>  
            /// <param name="context">The filter context.</param>  
            public override void OnResultExecuted(ResultExecutedContext context) {  
                this.Log("OnResultExecuted", context.RouteData);  
                base.OnResultExecuted(context);  
            }  
            /// <summary>  
            /// Logs the specified method name.  
            /// </summary>  
            /// <param name="methodName">Name of the method.</param>  
            /// <param name="routeData">The route data.</param>  
            private void Log(string methodName, RouteData routeData) {  
                var controllerName = routeData.Values["controller"];  
                var actionName = routeData.Values["action"];  
                string message = $ "MethodName :{methodName} , controller:{controllerName} , action:{actionName}";  
                this.logger.log(message);  
            }  
        }  
    }  

How to make any controller to use this action filter:

Method 1
If you want the functionality to enable for all controllers by default

In starup.cs write the below line:
services.AddMvc(options =>  

options.Filters.Add(typeof(LogActionFilterAttribute));  

});  

Method 2
If you want to use it in Controller specifically:

In starup.cs write the below line:
services.AddScoped<LogActionFilterAttribute>();    

In Action Method or controller use the below attribute:
[ServiceFilter(typeof(ExampleFilterWithDI))]  


About HostForLIFE

HostForLIFE is European Windows Hosting Provider which focuses on Windows Platform only. We deliver on-demand hosting solutions including Shared hosting, Reseller Hosting, Cloud Hosting, Dedicated Servers, and IT as a Service for companies of all sizes.

We have offered the latest Windows 2019 Hosting, ASP.NET 5 Hosting, ASP.NET MVC 6 Hosting and SQL 2019 Hosting.


Tag cloud

Sign in