European ASP.NET MVC Hosting

BLOG about Latest ASP.NET MVC Hosting and Its Technology - Dedicated to European Windows Hosting Customer

ASP.NET MVC Hosting - HostForLIFEASP.NET :: View Variables In .NET Core MVC

clock October 28, 2022 07:55 by author Peter

The previous article, View Variables in .NET MVC, planned to discuss View Variables for both .NET MVC and .NET Core MVC. However, after finishing the .NET MVC part, I realized that the article is too long if I add another part for .NET Core. Therefore, I separate that part into this new article. So, the content structure will be exactly the same as the previous one for .NET MVC.


This will be the contents of this article,
    .NET Core MVC
        Setup Environment for Code Testing
        What ViewBag, ViewData, TempData, and Session are
        How ViewBag, ViewData, TempData, and Session Work
            ViewBag and ViewData
            TempData
            Session
        Difference between .NET MVC and .NET Core MVC for View Variables
            .NET MVC TempData supported by Session by Default
            .NET Core MVC TempData supported by CookieTempDataProvider by default
            .NET Core MVC TempData supported by Session after Session Enabled

A - Setup MVC Environment for Code Testing
Step 1 - Create a .NET Core MVC ap
p
We use the current version of Visual Studio 2019 16.9.4 and .NET Framework 4.8 to build the app,

Start Visual Studio and select Create a new project.

  • In the Create a new project dialog, select ASP.NET Core Web App (Model-View-Controller) > Next.
  • In the Configure your new project dialog, enter Core MVC for Project name > Next
  • In the Additional Information dialog, select .NET 5.0 > Create

Step 2 - Add ViewBag, ViewData, TempData, and Session
In Controller, update HomeController/Index action,
public class HomeController: Controller {
    private readonly ILogger < HomeController > _logger;
    public HomeController(ILogger < HomeController > logger) {
        _logger = logger;
    }
    public IActionResult Index() {
        List < string > Student = new List < string > ();
        Student.Add("Peter");
        Student.Add("Scott");
        Student.Add("Mark");
        this.ViewData["Student"] = Student;
        this.ViewBag.Student = Student;
        this.TempData["Student"] = Student;
        //this.Session["Student"] = Student;
        return View();
    }......
}

Note
Different from .NET MVC, where the Session State is supported by default, in .NET Core MVC, the Session State is not supported by default before we add it into the app. So, at this point, before we add the Session state, the Session will not work.  We will discuss this point, especially in Section D.

In View/Homw/Index.cshtml,

@{
    ViewData["Title"] = "Home Page";
}

<div class="text-center">
    <h1 class="display-4">Welcome</h1>
    <p>Learn about <a href="https://docs.microsoft.com/aspnet/core">building Web apps with ASP.NET Core</a>.</p>
</div>

<br>
<br>

<ul>
    <b>ViewBag</b>
    @foreach (var student in ViewBag.Student)
    {
        <li>@student</li>
    }
</ul>
<ul>
    <b>ViewData</b>
    @foreach (var student in ViewData["Student"] as List<string>)
    {
        <li>@student</li>
    }

</ul>
<ul>
    <b>TempData</b>
    @foreach (var student in TempData["Student"] as List<string>)
    {
        <li>@student</li>
    }
</ul>
@*<ul>
    <b>Session</b>
    @foreach (var student in Session["Student"] as List<string>)
    {
        <li>@student</li>
    }
</ul>*@


Note
The Session Variable in the view comments out, too.

B - What ViewBag, ViewData, TempData, and Session are
ViewBag, ViewData, TempData, and Session are the options to send value from controller to view or to other action method/pages.

1. They are the properties of Controller in MVC Core
Like .NET MVC, in .NET Core MVC, ViewBag, ViewData, TempData, and Session are the properties of the Controller Class.

However, different from .NET MVC, where ViewBag, ViewData, and TempData are the properties of ControllerBase class, which is the parent of the Controller Class; while the Session is the property of Controller class. In .NET Core MVC, they are opposite. ViewBag, ViewData, TempData belong to Controller class directly,

While the Session (HttpContext) is the property of ControllerBase class,

2. Type
They are all the type of Dictionary with the string as key, except ViewBag is dynamic type:
    ViewData --- public Microsoft.AspNetCore.Mvc.ViewFeatures.ViewDataDictionary ViewData { get; set; }
    ViewBag --- public dynamic ViewBag { get; }
    TempData --- public Microsoft.AspNetCore.Mvc.ViewFeatures.ITempDataDictionary TempData { get; set; }
    Session --- public Microsoft.AspNetCore.Http.HttpContext HttpContext { get; }

Note:
ViewBag is a wrapper over ViewData and allows to store and retrieve values using object-property syntax rather than key-value syntax used by dictionary objects. It does so using the dynamic data type feature of .NET.

C - How ViewBag, ViewData, TempData, and Session Work
This part, they are similar to what they are in .NET MVC, we just repeat the conclusion and skip the analysis, and then we open another session D to discuss the difference between .NET MVC and .NET Core MVC.

1. ViewBag and ViewData
They can be used to pass data from controller to view, one way only in the same request.
The difference between ViewBag and ViewData,
    ViewData
        If passing string into ViewData then no need to typecast
        If the passing object in ViewData then you need to typecast it but before that, you need to check if it is not null
    ViewBag
        ViewBag's a dynamic type so not necessary to typecast

2. TempData
TempData is used to transfer data from view to controller, controller to view, or from one action method to another action method of the same or a different controller.

TempData stores the data temporarily and automatically removes it after retrieving a value. i.e., It can be retrieved once, and only once. Finally, we should mention,

    TempData saves into the session so on the expiration of session data loss;
    TempData removes a key value once accessed, you can still keep it for the subsequent request by calling TempData.Keep() method.
    TempData is usually used to pass error messages or something similar.

3. Session
    Session stores data into session
    The session is not similar to TempData to access but you can read as many time as you want
    The session never becomes null until or unless session timeout or session expires.
    The session is not a good practice to use. Used very frequently or store big data, it hits performance

D - Difference between .NET MVC and .NET Core MVC for View Variables
1. The cookie-based TempData provider is used by default to store TempData in cookies.
We know that in .NET MVC TempData is stored in Session state by default. This means the web application must have sessions enabled. However, in .NET Core MVC, the session state is not enabled by default. Luckily, .NET Core 2.0+ provides two TempData providers - Cookie-based and Session State-based while the cookie-based provider is used by default.

TempData providers --- MS

The cookie-based TempData provider is used by default to store TempData in cookies.

The cookie data is encrypted using IDataProtector, encoded with Base64UrlTextEncoder, then chunked. The maximum cookie size is less than 4096 bytes due to encryption and chunking. The cookie data isn't compressed because compressing encrypted data can lead to security problems such as the CRIME and BREACH attacks. For more information on the cookie-based TempData provider, see CookieTempDataProvider.

2. Configure the TempData provider[ref]
The cookie-based TempData provider is enabled by default.
To enable the session-based TempData provider, use the AddSessionStateTempDataProvider extension method. Only one call AddSessionStateTempDataProvider is required.
In Startup.cs,
public void ConfigureServices(IServiceCollection services)
{
    services.AddControllersWithViews();

    services.AddMvc()
         .AddSessionStateTempDataProvider();
    services.AddSession();
}

public void Configure(IApplicationBuilder app, IWebHostEnvironment env)
{
    ......

    app.UseSession();

    app.UseEndpoints(endpoints =>
    {
        endpoints.MapDefaultControllerRoute();
        endpoints.MapRazorPages();
    });
}


3. Verifications
.NET MVC
Run the app with F12 tools and locate the cookies option. The following figure (Firefox) shows the cookie used by TempData for storing the values. In Firefox, after the app running, type fn F12, under Storage/Cookies, Click the link, you will See: Name: ASP.NET_SessionID (if you run a different app, you probably need to right-click the link and delete all existing cookies),

Click ASP.NET_SeccionId, on the right, you will see the TampData is supported by Session (by default) for .NET MVC,


.NET Core MVC: for default TempData Provider,
Repeat the process above for the .NET Core MVC app,

TempData is supported by CookieTempDataProvider by default for .NET Core MVC,

.NET Core MVC: with Session State
Repeat the process above for the .NET Core MVC app with Session enabled,

TempData is supported by Session for .NET Core MVC after configuration to enable Session and using SessionStateTempDataProvider,


ASP.NET MVC 6 Hosting - HostForLIFE :: Creating ASP.NET MVC APP With WCF Service

clock October 18, 2022 09:37 by author Peter

Use the following to create an ASP.NET MVC APP with a WCF Service using an ADO.NET Entity Data Model:
SQL Server DB -> WCF Service (ORM) -> MVC Application -> User (Browser).

This small app works in a 4-tier architecture as in the following:
    User Tier
    MVC app Tier
    WCF Service Tier
    SQL Server Tier

Project 1: WCF Project
Step 1
Go to VS 2012 and select "File" -> "New Website" then select "WCF Service" then provide the name “WcfMvc”.

Click "OK".

Step 2
Go to the Solution Explorer then go to "WcfMvc application" then right-click on it then seelct "Add" -> "Add new item" -> "Add ADO .Net Entity data model". Then click the "Add" button then place the file in the App_code Folder.

Step 3
Then the Entity Data Model Wizard will be shown. Select "Generate data from database" then click the "Next" button .

Step 4
Choose your data connection. I’m selecting My “ran” database of SqlServer 2012.
Activate the radio button “Yes include the sensitive data in the connection string”.
Save the connection string in the config file by enabling the check box “Save entity connection setting in web.config as:“ then click the "Next" button.

Or

go to the new connection and create your connection then provide the server name then provide the authentication type then select either Windows Authentication or SQL Authentication then provide the database name then click the "Ok" button. A new connection will then be generated.

Activate the Radio Button “Yes include the sensitive data in the connection string”.

Save the connection string in the config file by enabling the check box “save entity connection setting in web.config as: “ then click the "Next" button.

Step 5
Choose which database object you want in your model.

I’m selecting the “Customer” table. The table definition is as follows:
Create table customer
Custno int constraint pk primary key,
custname varchar(30) not null,
custcity varchar(30),
custbalance money);


You can use the above table or create your own table and use it

Then provide a Model Namespace of your choice.. I’m using “ranjeet” Namespace.

Click the "Finish" button.

Please ensure that in the Solution Explorer under the App_code folder the Model.edmx file has been created.

Your entity data model is ready for use.


Step 6
Go to Solution Explorer then expand the App_code Folder then go to the Iservice.cs file.

Step 7
Delete the Getdata() and GetDataUsingDataContract() methods.

Then

I’m writing one method GetCustomer() as follows.

Step 8
Then go to the Sevice.cs file and implement the method declared in the IService.cs interface.

In the Service.cs file right-click the Iservice Interface then select "Implement Interface" -> "Implement Interface".

Delete the already present method in the Service.cs the file.

And write the following code in the “public List<customer> GetCustomer()” method.

“ranEntities1” is a class name given when the connection is created.

Step 9
Open the Service.svc file and now run the project.
A new window will open; copy the URL present in that window and paste it into any text file. This URL will be used in the next project.

Project 2: MVC Application 4
Step 1

Ensure that the WCF project is open then start another instance of VS 2012. Then go to "File" -> "New" -> "Project..." then create an ASP.NET MVC 4 Web Application. Name it “MvcWcfApplication” then click "ok" Button. Then select the Project Template “Internet Application” then click the "Ok" button.

Step 2
Create a Proxy using “Add Service Reference” by right-clicking on MvcWcfApplication in the Solution Explorer.

(Note: Proxy is a class that converts a local request into a remote request.)

A new window will open. Paste the URL that you copied from the WcfMvc project into the Address TextBox then click "Go".

In other words, a proxy class is created successfully..

(Caution: if it has been created and in the project you can’t use the ServiceReference1 namespace Pl then don’t worry; it is a VS 2012 Automation Error. To solve it go to the Solution Explorer then select ServiceReference1 then right-click on it then select "Configure Service Reference". A new window will open then in it uncheck the “Reuse types in referenced assemblies” checkbox..)

A serviceReference1 will added into your project.

Step 3
Now add a new Controller then in Solution Explorer seelct "Controller" then right-click on it then select "Add Controller" (Ctrl+m, Ctrl+c).

Name it DbController. Click the "Add" button.


Step 4
Add the following code in the DbController.cs file.

Please build the project.

Step 5
Now right-click inside the Index() Method then select "Add View" (Ctrl+m, Ctrl+v) then click on “Create a Strongly Typed View” checkbox then select the Model Class we created, in other words “customer (MvcWcfApplication.ServiceReference1)” then select "Scaffold template List"then click the "Add" button.


Step 6
Run the application.
In the browser type: http://localhost:<Port>/Db

And see the results. All the data in the customer table is shown below the using WCF Service.

If you like this then please comment below.


ASP.NET MVC Hosting - HostForLIFEASP.NET :: Generating An Excel File Through A List Of Objects In ASP.NET MVC

clock October 10, 2022 09:21 by author Peter

Today I will show you how to generate an excel file from a list of objects in C#. To do this, several plugins allow you to do this work in a global way. In this work, I will try to create a very simple and generic method to generate an excel file from a list of objects whatever their nature.


Step 1
Create a new ASP.NET MVC project.

Give a name to this project. for example "ExcelGeneratingApp".

Choose the MVC type.

Step 2

Create a class "ExcelLib.cs" in the models folder of the application.

Step 3

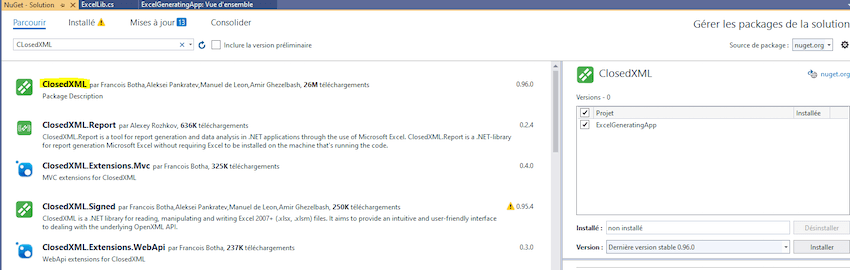
Add "ClosedXML" library from Nuget Package Manager.

Add class named "Employee.cs" for example.
using System.ComponentModel;
namespace ExcelGeneratingApp.Models
{
public class Employee
{
[DisplayName("Identity number")]
public int ID { get; set; }
[DisplayName("Full name")]
public string Name { get; set; }
[DisplayName("Age")]
public int Age { get; set; }
[DisplayName("Salary")]
public float Salary { get; set; }
[DisplayName("Department name")]
public string Department { get; set; }

}
}


​Add an "addHeader" method to "ExcelLib.cs" class. This method allows to add and style header of the table in excel file.
using ClosedXML.Excel;
using System;
using System.Collections.Generic;
using System.ComponentModel;
using System.Linq;
namespace ExcelGeneratingApp.Models
{
public class ExcelLib
{
// Default Constructor.
public ExcelLib() { }
// Method for adding Header and Title of the table containing List of object values.
public IXLWorksheet addHeader(XLWorkbook wb, List<Object> objs, string title,  string fontFamily = "Sakkal Majalla", string color = "#3498DB")
{
// Sheet initialisation.
var ws = wb.Worksheets.Add("nomDeLaListe").SetTabColor(XLColor.UaBlue);
// font choice.
ws.Style.Font.FontName = fontFamily;
ws.Style.Font.SetFontSize(13);
ws.Style.Alignment.Horizontal = XLAlignmentHorizontalValues.Center;
ws.Style.Alignment.WrapText = true;
Object obj = objs.FirstOrDefault();
// Add the model fields to the header of the excel file.
int totalOfFields = obj.GetType().GetProperties().Length; // number of fields in the object.
int numberOfFields = 0;
// Adding the title of table in excel file.
ws.Range(ws.Cell(4, 4), ws.Cell(4, totalOfFields + 3)).Merge().Value = title;
ws.Range(ws.Cell(4, 4), ws.Cell(4, totalOfFields + 3)).Merge().Style.Fill.BackgroundColor = XLColor.FromHtml(color); ;
ws.Range(ws.Cell(4, 4), ws.Cell(4, totalOfFields + 3)).Style.Alignment.Horizontal = XLAlignmentHorizontalValues.Center;
ws.Range(ws.Cell(4, 4), ws.Cell(4, totalOfFields + 3)).Style.Font.Bold = true;
ws.Range(ws.Cell(4, 4), ws.Cell(4, totalOfFields + 3)).Style.Font.FontColor = XLColor.WhiteSmoke;
ws.Range(ws.Cell(4, 4), ws.Cell(4, totalOfFields + 3)).Style.Font.FontSize = 18;
//Looping all propeties of the object.
foreach (var prop in obj.GetType().GetProperties())
{
        var displayNameAttribute = prop.GetCustomAttributes(typeof(DisplayNameAttribute), false);
        string displayName = prop.Name;
        if (displayNameAttribute.Count() != 0)
        {
            displayName = (displayNameAttribute[0] as DisplayNameAttribute).DisplayName;
        }
        numberOfFields++;
        ws.Cell(5, totalOfFields - numberOfFields + 4).Value = displayName;
        ws.Cell(5, totalOfFields - numberOfFields + 4).Style.Border.BottomBorder = XLBorderStyleValues.Thin;
        ws.Cell(5, totalOfFields - numberOfFields + 4).Style.Border.LeftBorder = XLBorderStyleValues.Thin;
        ws.Cell(5, totalOfFields - numberOfFields + 4).Style.Border.RightBorder = XLBorderStyleValues.Thin;
        ws.Cell(5, totalOfFields - numberOfFields + 4).Style.Border.TopBorder = XLBorderStyleValues.Thin;
        ws.Column(totalOfFields - numberOfFields + 4).Width = 30;
        ws.Column(totalOfFields - numberOfFields + 4).Style.Font.Bold = true;
}
ws.Range(ws.Cell(5, 4), ws.Cell(5, totalOfFields + 3)).SetAutoFilter();
return ws;
}
}
}


Then add "addBody" method to the "ExcelLib.cs" class.
This method allows to add the list of objects "objs" content to the table in excel file.
It merges the cells of the first column containing the same values.
public IXLWorksheet addBody(IXLWorksheet ws, List<Object> objs)
{
int numberOfFields = 0;
int numberOfRecords = 0;
Object obj = objs.FirstOrDefault();
int totalOfFields = obj.GetType().GetProperties().Length;
string previousValue = "";
int indexOfPreviousValue = 0;

foreach (var item in objs.ToList())
{
  numberOfFields = 0;
  Type myType = item.GetType();
  IList<PropertyInfo> props = new List<PropertyInfo>(myType.GetProperties());

  foreach (PropertyInfo prop in props)
  {
      object propValue = prop.GetValue(item, null);

      numberOfFields++;
      ws.Cell(6 + numberOfRecords, totalOfFields - numberOfFields + 4).Value = propValue;

      ws.Cell(6 + numberOfRecords, totalOfFields - numberOfFields + 4).Style.Font.Bold = true;

      ws.Cell(6 + numberOfRecords, totalOfFields - numberOfFields + 4).Style.Border.BottomBorder = XLBorderStyleValues.Thin;
      ws.Cell(6 + numberOfRecords, totalOfFields - numberOfFields + 4).Style.Border.LeftBorder = XLBorderStyleValues.Thin;
      ws.Cell(6 + numberOfRecords, totalOfFields - numberOfFields + 4).Style.Border.RightBorder = XLBorderStyleValues.Thin;
      ws.Cell(6 + numberOfRecords, totalOfFields - numberOfFields + 4).Style.Border.TopBorder = XLBorderStyleValues.Thin;

      if (numberOfFields == 1 && numberOfRecords == 0)
      {
          previousValue = propValue.ToString();
      }
      else
      {
          if (numberOfFields == 1)
          {
              if (previousValue == propValue.ToString())
              {
                  ws.Range(ws.Cell(6 + numberOfRecords - (1 + indexOfPreviousValue), totalOfFields - numberOfFields + 4), ws.Cell(6 + numberOfRecords, totalOfFields - numberOfFields + 4)).Merge().Value = propValue.ToString();

                  ws.Range(ws.Cell(6 + numberOfRecords - (1 + indexOfPreviousValue), totalOfFields - numberOfFields + 4), ws.Cell(6 + numberOfRecords, totalOfFields - numberOfFields + 4)).Merge().Style.Alignment.Horizontal = XLAlignmentHorizontalValues.Center;
                  ws.Range(ws.Cell(6 + numberOfRecords - (1 + indexOfPreviousValue), totalOfFields - numberOfFields + 4), ws.Cell(6 + numberOfRecords, totalOfFields - numberOfFields + 4)).Merge().Style.Alignment.Vertical = XLAlignmentVerticalValues.Center;
                  indexOfPreviousValue++;
              }
              else
              {
                  previousValue = propValue.ToString();
                  indexOfPreviousValue = 0;
              }
          }

      }


  }
  numberOfRecords++;
}

return ws;
}


Then add a "Generate" method for generating the excel file.
public void Generate(List<Object> objs, string title, string fontFamily = "Sakkal Majalla", string color = "#3498DB")
{
// Workbook creation.
using (XLWorkbook wb = new XLWorkbook())
{
        var ws = addHeader(wb, objs, title);
            ws = addBody(ws, objs);
            wb.SaveAs("C://TestExcelGen.xlsx");
}
}

Step 4
To test this method, we will add some code to the Home controller.
public ActionResult Index()
{
List<Employee> employees = new List<Employee>();
employees.Add(new Employee() { ID = 100 ,Name="PETER", Age=32,Salary=12000,Department="INFO"}) ;
employees.Add(new Employee() { ID = 200 ,Name="SCOTT", Age=24,Salary=10000,Department="CIVIL"}) ;
employees.Add(new Employee() { ID = 300 ,Name="ADAM", Age=20,Salary=11000,Department="INDUS"}) ;
employees.Add(new Employee() { ID = 400 ,Name="ETHAN", Age=21,Salary=9000,Department="INFO"}) ;
ExcelLib excel = new ExcelLib();

excel.Generate(employees.Cast<object>().ToList(), "List of employees");

return View();
}

The full ExcelLib.cs content:
using ClosedXML.Excel;
using System;
using System.Collections.Generic;
using System.ComponentModel;
using System.IO;
using System.Linq;
using System.Reflection;

namespace ExcelGeneratingApp.Models
{
public class ExcelLib
{
// Default Constructor.
public ExcelLib() { }
// Method for adding Header and Title of the table containing List of object values.
public IXLWorksheet addHeader(XLWorkbook wb, List<Object> objs, string title,  string fontFamily = "Sakkal Majalla", string color = "#3498DB")
{
// Sheet initialisation.
var ws = wb.Worksheets.Add("nomDeLaListe").SetTabColor(XLColor.UaBlue);
// font choice.
ws.Style.Font.FontName = fontFamily;
ws.Style.Font.SetFontSize(13);
ws.Style.Alignment.Horizontal = XLAlignmentHorizontalValues.Center;
ws.Style.Alignment.WrapText = true;
Object obj = objs.FirstOrDefault();
// Add the model fields to the header of the excel file.
int totalOfFields = obj.GetType().GetProperties().Length; // number of fields in the object.
int numberOfFields = 0;
// Adding the title of table in excel file.
ws.Range(ws.Cell(4, 4), ws.Cell(4, totalOfFields + 3)).Merge().Value = title;
ws.Range(ws.Cell(4, 4), ws.Cell(4, totalOfFields + 3)).Merge().Style.Fill.BackgroundColor = XLColor.FromHtml(color); ;
ws.Range(ws.Cell(4, 4), ws.Cell(4, totalOfFields + 3)).Style.Alignment.Horizontal = XLAlignmentHorizontalValues.Center;
ws.Range(ws.Cell(4, 4), ws.Cell(4, totalOfFields + 3)).Style.Font.Bold = true;
ws.Range(ws.Cell(4, 4), ws.Cell(4, totalOfFields + 3)).Style.Font.FontColor = XLColor.WhiteSmoke;
ws.Range(ws.Cell(4, 4), ws.Cell(4, totalOfFields + 3)).Style.Font.FontSize = 18;
//Looping all propeties of the object.
foreach (var prop in obj.GetType().GetProperties())
{
        var displayNameAttribute = prop.GetCustomAttributes(typeof(DisplayNameAttribute), false);
        string displayName = prop.Name;
        if (displayNameAttribute.Count() != 0)
        {
            displayName = (displayNameAttribute[0] as DisplayNameAttribute).DisplayName;
        }
        numberOfFields++;
        ws.Cell(5, totalOfFields - numberOfFields + 4).Value = displayName;
        ws.Cell(5, totalOfFields - numberOfFields + 4).Style.Border.BottomBorder = XLBorderStyleValues.Thin;
        ws.Cell(5, totalOfFields - numberOfFields + 4).Style.Border.LeftBorder = XLBorderStyleValues.Thin;
        ws.Cell(5, totalOfFields - numberOfFields + 4).Style.Border.RightBorder = XLBorderStyleValues.Thin;
        ws.Cell(5, totalOfFields - numberOfFields + 4).Style.Border.TopBorder = XLBorderStyleValues.Thin;
        ws.Column(totalOfFields - numberOfFields + 4).Width = 30;
        ws.Column(totalOfFields - numberOfFields + 4).Style.Font.Bold = true;
}
ws.Range(ws.Cell(5, 4), ws.Cell(5, totalOfFields + 3)).SetAutoFilter();
return ws;
}
public IXLWorksheet addBody(IXLWorksheet ws, List<Object> objs)
{
int numberOfFields = 0;
int numberOfRecords = 0;
Object obj = objs.FirstOrDefault();
int totalOfFields = obj.GetType().GetProperties().Length;
string previousValue = "";
int indexOfPreviousValue = 0;

foreach (var item in objs.ToList())
{
    numberOfFields = 0;
    Type myType = item.GetType();
    IList<PropertyInfo> props = new List<PropertyInfo>(myType.GetProperties());

    foreach (PropertyInfo prop in props)
    {
        object propValue = prop.GetValue(item, null);
        numberOfFields++;
        ws.Cell(6 + numberOfRecords, totalOfFields - numberOfFields + 4).Value = propValue;
        ws.Cell(6 + numberOfRecords, totalOfFields - numberOfFields + 4).Style.Font.Bold = true;
        ws.Cell(6 + numberOfRecords, totalOfFields - numberOfFields + 4).Style.Border.BottomBorder = XLBorderStyleValues.Thin;
        ws.Cell(6 + numberOfRecords, totalOfFields - numberOfFields + 4).Style.Border.LeftBorder = XLBorderStyleValues.Thin;
        ws.Cell(6 + numberOfRecords, totalOfFields - numberOfFields + 4).Style.Border.RightBorder = XLBorderStyleValues.Thin;
        ws.Cell(6 + numberOfRecords, totalOfFields - numberOfFields + 4).Style.Border.TopBorder = XLBorderStyleValues.Thin;

        if (numberOfFields == 1 && numberOfRecords == 0)
        {
            previousValue = propValue.ToString();
        }
        else
        {
            if (numberOfFields == 1)
            {
                if (previousValue == propValue.ToString())
                {
                    ws.Range(ws.Cell(6 + numberOfRecords - (1 + indexOfPreviousValue), totalOfFields - numberOfFields + 4), ws.Cell(6 + numberOfRecords, totalOfFields - numberOfFields + 4)).Merge().Value = propValue.ToString();

                    ws.Range(ws.Cell(6 + numberOfRecords - (1 + indexOfPreviousValue), totalOfFields - numberOfFields + 4), ws.Cell(6 + numberOfRecords, totalOfFields - numberOfFields + 4)).Merge().Style.Alignment.Horizontal = XLAlignmentHorizontalValues.Center;
                    ws.Range(ws.Cell(6 + numberOfRecords - (1 + indexOfPreviousValue), totalOfFields - numberOfFields + 4), ws.Cell(6 + numberOfRecords, totalOfFields - numberOfFields + 4)).Merge().Style.Alignment.Vertical = XLAlignmentVerticalValues.Center;
                    indexOfPreviousValue++;
                }
                else
                {
                    previousValue = propValue.ToString();
                    indexOfPreviousValue = 0;
                }
            }
        }
    }
    numberOfRecords++;
}
return ws;
}
public void Generate(List<Object> objs, string title, string fontFamily = "Sakkal Majalla", string color = "#3498DB")
{
// Workbook creation.
using (XLWorkbook wb = new XLWorkbook())
{
        var ws = addHeader(wb, objs, title);
            ws = addBody(ws, objs);
            wb.SaveAs("C://TestExcelGen.xlsx");
}
}
}
}

NB: You can download all project source code from my github page.

Conclusion
I think the procedure is very clear with snapshots. If you have found any mistake in concept, please do comment. Your comments will make me perfect in the future.
Thanks for reading.


ASP.NET MVC Hosting - HostForLIFEASP.NET :: Pagination In MVC With Jquery DataTable

clock October 6, 2022 09:09 by author Peter

All of us are beginners & all of us face the performance issue while fetching huge data from the database. One of the solutions is that we can bring a small piece of data (how much data we require to show) and we can achieve with Jquery DataTable. By default Jquery DataTable will bring all the data from Backend and Bind into the Table, but we don't want all the records at one go.


For this, we can go with Server Side Pagination with Jquery DataTable

There are many articles on Server Side Pagination on the internet, But max of them used "context.Request.Form" for getting the DataTable Properties for eg: context.Request.Form["draw"], context.Request.Form["start"]. But most of the time it gets null and we struggle for getting the values
In this article, we can achieve the Server side pagination with object with Post methods

Let's Start with the Database, For this I'm using Northwind Sample Database, you can download this database from
https://github.com/microsoft/sql-server-samples/tree/master/samples/databases/northwind-pubs

Once you added the database in the SQL you will find the Employees table with 10-15 Records, for this article I have added 576 records

Now here is the stored procedure for getting employees data


In this SP we are passing 4 parameters  
CREATE procedure [dbo].[getEmployeeList]
(
@page INT = 0,
@size INT =10,
@sort nvarchar(50) ='EmployeeId asc',
@totalrow INT  ='50'
)
AS
BEGIN
DECLARE @offset INT
DECLARE @newsize INT
DECLARE @sql NVARCHAR(MAX)

IF(@page=0)
BEGIN
SET @offset = @page
SET @newsize = @size
END
ELSE
BEGIN
SET @offset = @page+1
SET @newsize = @size-1
END
SET NOCOUNT ON
SET @sql = '
WITH OrderedSet AS
(
SELECT *, ROW_NUMBER() OVER (ORDER BY ' + @sort + ') AS ''Index''
FROM [dbo].Employees
)
SELECT * FROM OrderedSet WHERE [Index] BETWEEN ' + CONVERT(NVARCHAR(12), @offset) + ' AND ' + CONVERT(NVARCHAR(12), (@offset + @newsize))
EXECUTE (@sql)
SET @totalrow = (SELECT COUNT(*) FROM Employees)
select @totalrow
END

In MVC c# I have added Pagination.cs class like below
using System;
using System.Collections.Generic;
using System.Linq;
using System.Web;

namespace ServerSidePagination.Models
{
public class Pagination
{
public DatatablePostData data { get; set; }
}
public class DatatablePostData
{
public int draw { get; set; }
public int start { get; set; }
public int length { get; set; }
public List<Column> columns { get; set; }
public Search search { get; set; }
public List<Order> order { get; set; }
}

public class Column
{
public string data { get; set; }
public string name { get; set; }
public string searchable { get; set; }
public string orderable { get; set; }
public Search search { get; set; }
}

public class Search
{
public string value { get; set; }
public string regex { get; set; }
}

public class Order
{
public int column { get; set; }
public string dir { get; set; }
}
public class DTResponse
{
public int recordsTotal { get; set; }
public int recordsFiltered { get; set; }
public string data { get; set; }
}
}

Controller with action method for View Page (Add View page for paginationExample method)
public ActionResult paginationExample()
{
return View();
}

Controller with action method like below for getting the Employees data
[HttpPost]
public JsonResult GetEmployeeData(Pagination pagination)
{
SqlDataAdapter sqlDataAdapter = new SqlDataAdapter();
DataSet ds = new DataSet();
DTResponse DTResponse = new DTResponse();
try
{
using (SqlConnection con = new SqlConnection(connectionString))
{
    SqlCommand cmd = new SqlCommand();
    cmd.Connection = con;
    cmd.Parameters.Clear();
    cmd.CommandText = "getEmployeeList";
    cmd.Parameters.AddWithValue("@sort",
    pagination.data.columns[pagination.data.order[0].column].name == null ?
    "EmployeeId asc" : pagination.data.columns[pagination.data.order[0].column].name+" "+
        pagination.data.order[0].dir);
    cmd.Parameters.AddWithValue("@size", pagination.data.length);
    cmd.Parameters.AddWithValue("@page", pagination.data.start);
    cmd.Parameters.AddWithValue("@totalrow", pagination.data.length);
    // cmd.Parameters.AddWithValue("@P_Search", pagination.data.search.value);
    cmd.CommandType = System.Data.CommandType.StoredProcedure;
    sqlDataAdapter.SelectCommand = cmd;
    sqlDataAdapter.Fill(ds);

}
DTResponse.recordsTotal = ds.Tables[0].Rows.Count;
DTResponse.recordsFiltered = Convert.ToInt32(ds.Tables[1].Rows[0][0]);
DTResponse.data = JsonConvert.SerializeObject(ds.Tables[0]);
}
catch(Exception ex)
{

}
return Json(DTResponse, JsonRequestBehavior.AllowGet);
}

In View Side, add the Jquery Data Table References
<link href="https://cdn.datatables.net/1.12.1/css/jquery.dataTables.min.css" rel="stylesheet">
<script src="https://cdn.datatables.net/1.12.1/js/jquery.dataTables.min.js"></script>

cshtml Code
Here is the Ajax call for getting the Employees data with Server Side DataTable Properties
<h2>paginationExample</h2>
<script src="~/Scripts/jquery-3.4.1.js"></script>
<link href="https://cdn.datatables.net/1.12.1/css/jquery.dataTables.min.css" rel="stylesheet">
<script src="https://cdn.datatables.net/1.12.1/js/jquery.dataTables.min.js"></script>
<div id="tblUpdatePcInfo">

</div>
<script>
var table;
$(document).ready(function () {
GetAllEmployyesData();
})
function GetAllEmployyesData() {
var tablecontent = '<table id="tblPCInfo" class="table table-bordered table-striped display nowrap" style="width:100%"><thead><tr>\
<th>EmployeeID</th>\
<th><input type="checkbox" id="chkSelectAll" class="filled-in chk-col-success" title="Select All"/></th>\
<th class="LastName">LastName</th>\
<th>FirstName</th>\
<th>Title</th>\
<th>TitleOfCourtesy</th>\
<th>Address</th>\
<th>City</th>\
<th>PostalCode</th>\
<th>Country</th>\
<th>HomePhone</th>\
</tr></thead><tbody></tbody></table>';
$("#tblUpdatePcInfo").html(tablecontent);
table = $('#tblPCInfo').dataTable({
    clear: true,
    destroy: true,
    serverSide: true,
    pageLength: 50,
    lengthMenu: [[10, 25, 50, 100, 100000], [10, 25, 50, 100, "All"]],
    autoFill: false,
    "initComplete": function (settings, json) {
        $(this.api().table().container()).find('input').attr('autocomplete', 'off');
    },
    "ajax": {
        url: "/Home/GetEmployeeData",
        type: "POST",
        contentType: "application/json; charset=utf-8",
        data: function (d) {
            var data = { data: d };
            return JSON.stringify(data);
        },
        AutoWidth: false,
        "dataSrc": function (json) {
            var data = json;
            json.draw = data.draw;
            json.recordsTotal = data.recordsTotal;
            json.recordsFiltered = data.recordsFiltered;
            json.data = JSON.parse(data.data);
            return json.data;
        }
    },

    "columns": [
        {
            "data": "EmployeeID", "width": "10px", "orderable": false, "name": "EmployeeID"
        },
        {
            "data": "a", "width": "15px", "orderable": false, "name": "m.LicNo", "render": function (data, type, row, meta) {
                return '<div style="text-align:center;"><input type="checkbox" class="SelectedChk" id="' + row.LicNo + '" value="' + row.LicNo + '" class="filled-in chk-col-success" title="Select All"/></div>';
            },
            "searchable": false
        },
        {
            "data": "LastName", "name": "LastName", "searchable": false
        },
        { "data": "FirstName", "name": "FirstName", "searchable": false },
        { "data": "Title", "name": "Title", "searchable": false },
        { "data": "TitleOfCourtesy", "name": "TitleOfCourtesy", "searchable": false },
        { "data": "Address", "name": "Address", "searchable": false },
        { "data": "City", "name": "City", "searchable": false },
        {
            "data": "PostalCode", "name": "PostalCode", "searchable": false
        },
        { "data": "Country", "name": "Country", "searchable": false },
        { "data": "HomePhone", "name": "HomePhone", "searchable": false }
    ]
});
}
</script>


The Values of GetEmployeeData argument will be as follows

OUTPUT


About HostForLIFE

HostForLIFE is European Windows Hosting Provider which focuses on Windows Platform only. We deliver on-demand hosting solutions including Shared hosting, Reseller Hosting, Cloud Hosting, Dedicated Servers, and IT as a Service for companies of all sizes.

We have offered the latest Windows 2019 Hosting, ASP.NET 5 Hosting, ASP.NET MVC 6 Hosting and SQL 2019 Hosting.


Tag cloud

Sign in