European ASP.NET MVC Hosting

BLOG about Latest ASP.NET MVC Hosting and Its Technology - Dedicated to European Windows Hosting Customer

ASP.NET MVC 6 Hosting - HostForLIFE :: Creating ASP.NET MVC APP With WCF Service

clock October 18, 2022 09:37 by author Peter

Use the following to create an ASP.NET MVC APP with a WCF Service using an ADO.NET Entity Data Model:
SQL Server DB -> WCF Service (ORM) -> MVC Application -> User (Browser).

This small app works in a 4-tier architecture as in the following:
    User Tier
    MVC app Tier
    WCF Service Tier
    SQL Server Tier

Project 1: WCF Project
Step 1
Go to VS 2012 and select "File" -> "New Website" then select "WCF Service" then provide the name “WcfMvc”.

Click "OK".

Step 2
Go to the Solution Explorer then go to "WcfMvc application" then right-click on it then seelct "Add" -> "Add new item" -> "Add ADO .Net Entity data model". Then click the "Add" button then place the file in the App_code Folder.

Step 3
Then the Entity Data Model Wizard will be shown. Select "Generate data from database" then click the "Next" button .

Step 4
Choose your data connection. I’m selecting My “ran” database of SqlServer 2012.
Activate the radio button “Yes include the sensitive data in the connection string”.
Save the connection string in the config file by enabling the check box “Save entity connection setting in web.config as:“ then click the "Next" button.

Or

go to the new connection and create your connection then provide the server name then provide the authentication type then select either Windows Authentication or SQL Authentication then provide the database name then click the "Ok" button. A new connection will then be generated.

Activate the Radio Button “Yes include the sensitive data in the connection string”.

Save the connection string in the config file by enabling the check box “save entity connection setting in web.config as: “ then click the "Next" button.

Step 5
Choose which database object you want in your model.

I’m selecting the “Customer” table. The table definition is as follows:
Create table customer
Custno int constraint pk primary key,
custname varchar(30) not null,
custcity varchar(30),
custbalance money);


You can use the above table or create your own table and use it

Then provide a Model Namespace of your choice.. I’m using “ranjeet” Namespace.

Click the "Finish" button.

Please ensure that in the Solution Explorer under the App_code folder the Model.edmx file has been created.

Your entity data model is ready for use.


Step 6
Go to Solution Explorer then expand the App_code Folder then go to the Iservice.cs file.

Step 7
Delete the Getdata() and GetDataUsingDataContract() methods.

Then

I’m writing one method GetCustomer() as follows.

Step 8
Then go to the Sevice.cs file and implement the method declared in the IService.cs interface.

In the Service.cs file right-click the Iservice Interface then select "Implement Interface" -> "Implement Interface".

Delete the already present method in the Service.cs the file.

And write the following code in the “public List<customer> GetCustomer()” method.

“ranEntities1” is a class name given when the connection is created.

Step 9
Open the Service.svc file and now run the project.
A new window will open; copy the URL present in that window and paste it into any text file. This URL will be used in the next project.

Project 2: MVC Application 4
Step 1

Ensure that the WCF project is open then start another instance of VS 2012. Then go to "File" -> "New" -> "Project..." then create an ASP.NET MVC 4 Web Application. Name it “MvcWcfApplication” then click "ok" Button. Then select the Project Template “Internet Application” then click the "Ok" button.

Step 2
Create a Proxy using “Add Service Reference” by right-clicking on MvcWcfApplication in the Solution Explorer.

(Note: Proxy is a class that converts a local request into a remote request.)

A new window will open. Paste the URL that you copied from the WcfMvc project into the Address TextBox then click "Go".

In other words, a proxy class is created successfully..

(Caution: if it has been created and in the project you can’t use the ServiceReference1 namespace Pl then don’t worry; it is a VS 2012 Automation Error. To solve it go to the Solution Explorer then select ServiceReference1 then right-click on it then select "Configure Service Reference". A new window will open then in it uncheck the “Reuse types in referenced assemblies” checkbox..)

A serviceReference1 will added into your project.

Step 3
Now add a new Controller then in Solution Explorer seelct "Controller" then right-click on it then select "Add Controller" (Ctrl+m, Ctrl+c).

Name it DbController. Click the "Add" button.


Step 4
Add the following code in the DbController.cs file.

Please build the project.

Step 5
Now right-click inside the Index() Method then select "Add View" (Ctrl+m, Ctrl+v) then click on “Create a Strongly Typed View” checkbox then select the Model Class we created, in other words “customer (MvcWcfApplication.ServiceReference1)” then select "Scaffold template List"then click the "Add" button.


Step 6
Run the application.
In the browser type: http://localhost:<Port>/Db

And see the results. All the data in the customer table is shown below the using WCF Service.

If you like this then please comment below.


ASP.NET MVC 6 Hosting - HostForLIFEASP.NET :: How To Create ASP.NET Core MVC Application?

clock April 26, 2021 07:06 by author Peter

In this article, we will learn how to create an ASP.NET Core MVC web application step by step. Prior to creating the application, let's know about the ASP.NET Core.

What is ASP.NET Core?
ASP.NET Core is an open source cross platform framework for developing and building web, cloud, IoT applications.
 
Why should we use ASP.NET Core?

  • ASP.NET is an open-source platform that runs on Microsoft .NET Core Framework.
  • We can build and run the ASP.NET core application on a cross platform environment such as Windows, MacOs, Linux etc.
  • We can build modern apps such as Cloud, IoT, Web apps, mobile backend etc. and those can be easily enabled to run over the cloud platform.
  • We can host applications on any modern platform such as docker, AKS, or any environment.
  • Saves the efforts of the developer by built-in features such as dependency injection, you can enable docker, containerization, swagger support in just one click.


Now let's start creating an ASP.NET Core MVC web application.
 
Step 1 - Open Visual Studio
Open Visual Studio ( I am using 2019)
Once the Visual Studio Opens, Then click on Continue Without Code as shown in the following image

Then from Visual Studio Menu, click on File => New Project, as shown in the following image

Click on the New Project, then the following window appears as shown in step 2.
 
Step 2 - Choose Project Template
You will see the two project templates,

  • ASP.NET Core Web App: This project template creates the web application with Razor pages without Model, View, Controller.
  • ASP.NET Core Web App (Model-View-Controller): This project template creates the web application with Model, View, Controller (MVC).


Choose the ASP.NET Core Web App(Model-View-Controller) Template as shown in the following image.

After choosing the project template click on Next.
 
Step 3 - Define Project Name and Location
In the project configuration window you will see the following options,
Project Name
Define any name for your project as per your choice.

Location

Choose the location to save the project files on your hard drive of the machine. I have chosen the Project/VS folder of the E drive of the machine, and obviously it's different on your computer.

Solution Name
Solution name is auto-defined based on the project name, but you can change the name based on your own choice.

Additionally, there is a checkbox, if you have checked it, then the solution file (.sln) and project files will be saved in the same folder. Now Choose the minimum details for ease of understanding as shown in the following image.


After defining the required details, click on the Next.
 
Step 4 - Choose the Target Framework
Choose the target framework .NET 5 which is the latest or you can choose based on your requirement, skip the other details for ease of understanding as shown in the following image.

After providing the required details, click the create button. It will create the ASP.NET Core MVC web application as shown in step 5.
 
Step 5 - Understanding ASP.NET Core MVC Folder Structure
The following is the default folder structure of the ASP.NET Core ASP.NET MVC application.

Let's understand preceding project folder structure in brief.
 
The wwwroot folder
The wwwroot is the default root folder for storing the static files related to the project and those files can be accessed programmatically with a relative path.
 
Controller Folder
The controller folder contains the controller classes where the operation related code written.
 
Model Folder
The Models Folder contains the domain or entity classes. Models can be written anywhere in the solution such as in separate class library or folder etc.
 
Views Folder
The Views folder holds the razor pages which are responsible for showing and getting the data from the users.
 
The appsettings.json File
The appsettings.json folder contains the configuration and secret details of the application.
 
Program.cs File

The Program.cs is the starting point of the application which will create the host for an application to run the application.
 
Startup.cs File
The Startup.cs file allows to configure the behaviour of the application such as defining the routes, dependency injection etc.
 
Step 6 - Run the ASP.NET Core MVC Application
You can run the application with default contents or let open the Index.cshtml file and put some contents there. Now press F5 on the keyboard or use the run option from Visual Studio to run the application in the browser.


ASP.NET MVC 6 Hosting - HostForLIFEASP.NET :: Create Simple Web API In ASP.NET MVC

clock March 26, 2021 08:32 by author Peter

This article explains how to access data from a view to the controller's action method. The action method is a simple C# method that can be parameterized or without a parameter in the controller. We use two types of methods to handle our browser request; one is HTTP GET and another is HTTP POST. When we call an action method by a request's URL by the browser then the HTTP GET method will be called but when a request is from a button click event then the HTTP POST method will be called. So in this article, I am going to explaining how to access view input field data in the controller's action method when a HTTP POST request is called.

 
To understand how to access view input field data in the controller's action method (POST), we create a "Calculate Simple Interest" application. This application gets Principle, Rate and Time as user input and generates simple interest. So let's proceed with the application.
 
Create an action method in the CalculateSimpleInterest controller (CalculateSimpleInterestController.cs) that renders the view on the UI.
    public ActionResult SimpleInterest()  
    {  
        return View();  
    }  

Create a view to get user input from the UI, so the code is:
    <h2>Calculate Simple Interest</h2>  
    <fieldset>  
            <legend>Calculate Simple Interest</legend>  
        @using (Ajax.BeginForm("CalculateSimpleInterestResult","CalculateSimpleInterest",  
                                new AjaxOptions { UpdateTargetId = "divInterestDeatils" }))  
        {  
            <div id="divInterestDeatils"></div>  
            <ol>  
                <li>  
                    @Html.Label("Amount")  
                    @Html.TextBox("txtAmount")  
                </li>  
                <li>  
                    @Html.Label("Rate")  
                    @Html.TextBox("txtRate")  
                </li>  
                <li>  
                    @Html.Label("Year")  
                    @Html.TextBox("txtYear")  
                </li>  
            </ol>  
        <button>Calculate</button>  
        }     
    </fieldset>  


So now the screen is ready to get input and it shows it as:


Figure 1.1 Input screens to calculate simple interest

I will now explain the four ways to get the view's data in the controller action. These are:
    Using Traditional approach
    Using the FormCollection Object
    Using the Parameters
    Strongly type model binding to view

Using Traditional Approach
In the traditional approach we use the request object of the HttpRequestBase class. The request object has view input field values in name/value pairs. When we create a submit button then the request type POST is created and calls the POST method.

Figure 1.2 Requested Data

We have four data, those are in Name-Value pairs. So we can access these data in a POST method by passing the Name as an indexer in the Request and get values. Our POST method means the controller action that handles the POST request type is [HttpPost].
    [HttpPost]  
    public ActionResult CalculateSimpleInterestResult()  
    {  
        decimal principle = Convert.ToDecimal(Request["txtAmount"].ToString());  
        decimal rate = Convert.ToDecimal(Request["txtRate"].ToString());  
        int time = Convert.ToInt32(Request["txtYear"].ToString());  
       
        decimal simpleInteresrt = (principle*time*rate)/100;  
       
        StringBuilder sbInterest = new StringBuilder();  
        sbInterest.Append("<b>Amount :</b> " + principle+"<br/>");  
        sbInterest.Append("<b>Rate :</b> " + rate + "<br/>");  
        sbInterest.Append("<b>Time(year) :</b> " + time + "<br/>");  
        sbInterest.Append("<b>Interest :</b> " + simpleInteresrt);  
        return Content(sbInterest.ToString());  
    }  


When it executes, we get simple interest as the result as in the following:

Figure 1.3 Output screen after getting response

Using the FormCollection Object
We can also get post requested data by the FormCollection object. The FormCollection object also has requested data in the name/value collection as the Request object. To get data from the FormCollection object we need to pass it is as a parameter and it has all the input field data submitted on the form.
    [HttpPost]  
      
    public ActionResult CalculateSimpleInterestResult(FormCollection form)  
    {  
        decimal principle = Convert.ToDecimal(form["txtAmount"].ToString());  
        decimal rate = Convert.ToDecimal(form["txtRate"].ToString());  
        int time = Convert.ToInt32(form["txtYear"].ToString());  
       
        decimal simpleInteresrt = (principle*time*rate)/100;  
       
        StringBuilder sbInterest = new StringBuilder();  
        sbInterest.Append("<b>Amount :</b> " + principle+"<br/>");  
        sbInterest.Append("<b>Rate :</b> " + rate + "<br/>");  
        sbInterest.Append("<b>Time(year) :</b> " + time + "<br/>");  
        sbInterest.Append("<b>Interest :</b> " + simpleInteresrt);  
        return Content(sbInterest.ToString());  
    }


It also gives the same output as Figure 1.3 shows.
 
Using the Parameters

We can pass all input field names as a parameter to the post action method. The input field name and parameter name should be the same. These parameters have input field values that were entered by the user. So we can access view input field values from these parameters. The input field takes a string value from the user so the parameter should be a string type. There is no need to define a parameter in any specific sequence.
    [HttpPost]  
    public ActionResult CalculateSimpleInterestResult(string txtAmount, string txtRate, string txtYear)  
    {  
        decimal principle = Convert.ToDecimal(txtAmount);  
        decimal rate = Convert.ToDecimal(txtRate);  
        int time = Convert.ToInt32(txtYear);  
       
        decimal simpleInteresrt = (principle*time*rate)/100;  
       
        StringBuilder sbInterest = new StringBuilder();  
        sbInterest.Append("<b>Amount :</b> " + principle+"<br/>");  
        sbInterest.Append("<b>Rate :</b> " + rate + "<br/>");  
        sbInterest.Append("<b>Time(year) :</b> " + time + "<br/>");  
        sbInterest.Append("<b>Interest :</b> " + simpleInteresrt);  
        return Content(sbInterest.ToString());  
    }  


It also gives the same output as Figure 1.3 shows.
 
In all three approaches above we are parsing the string to a non-string type. If any of the parsing attempts fail then the entire action will fail. We are converting each value to avoid an exception but it also increases the amount of code. So we look at the fourth approach that would reduce the amount of code.
 
Strongly type model binding to view
 
We bind a model to the view; that is called strongly type model binding.
 
Step 1
Create a Model for Simple Interest
    namespace CalculateSimpleInterest.Models  
    {  
        public class SimpleInterestModel  
        {  
            public decimal Amount { get; set; }  
            public decimal Rate { get; set; }  
            public int Year { get; set; }  
        }  
    }  


Step 2
Create an action method that render a view on the UI
 
We are passing an empty model to be bound to the view.
    public ActionResult SimpleInterest()  
    {  
        SimpleInterestModel model = new SimpleInterestModel();  
        return View(model);  
    }  


Step 3
Create a strongly typed view that has the same screen as in Figure 1.1
    @model CalculateSimpleInterest.Models.SimpleInterestModel  
       
    @{  
        ViewBag.Title = "SimpleInterest";  
    }  
       
    <h2>Calulate Simple Interest</h2>  
       
    @using (Ajax.BeginForm("CalculateSimpleInterestResult","CalculateSimpleInterest",  
                                new AjaxOptions { UpdateTargetId = "divInterestDeatils" }))  
        {  
             
        <fieldset>  
            <legend>Calulate Simple Interest</legend>  
            <div id="divInterestDeatils"></div>  
       
            <div class="editor-label">  
                @Html.LabelFor(model => model.Amount)  
            </div>  
            <div class="editor-field">  
                @Html.EditorFor(model => model.Amount)            
            </div>  
       
            <div class="editor-label">  
                @Html.LabelFor(model => model.Rate)  
            </div>  
            <div class="editor-field">  
                @Html.EditorFor(model => model.Rate)            
            </div>  
       
            <div class="editor-label">  
                @Html.LabelFor(model => model.Year)  
            </div>  
            <div class="editor-field">  
                @Html.EditorFor(model => model.Year)             
            </div>  
            <p>  
                <input type="submit" value="Calculate" />  
            </p>  
        </fieldset>  
    }  
       
    @section Scripts {  
        @Scripts.Render("~/bundles/jqueryval")  
    }  

Step 4
Create an action method that handles the POST request and processes the data
 
In the action method we pass a model as the parameter. That model has UI input field data. Here we do not need to parse and do not need to write extra code.
    [HttpPost]  
    public ActionResult CalculateSimpleInterestResult(SimpleInterestModel model)  
    {  
        decimal simpleInteresrt = (model.Amount*model.Year*model.Rate)/100;  
        StringBuilder sbInterest = new StringBuilder();  
        sbInterest.Append("<b>Amount :</b> " + model.Amount+"<br/>");  
        sbInterest.Append("<b>Rate :</b> " + model.Rate + "<br/>");  
        sbInterest.Append("<b>Time(year) :</b> " + model.Year + "<br/>");  
        sbInterest.Append("<b>Interest :</b> " + simpleInteresrt);  
        return Content(sbInterest.ToString());  
    }  

It also gives the same output as Figure 1.3 shows.


ASP.NET MVC 6 Hosting - HostForLIFEASP.NET :: Understanding Separation Of Concern in ASP.NET MVC

clock February 22, 2021 06:01 by author Peter

What is Separation of Concern?
Wikipedia says “In computer science, separation of concerns (SoC) is a design principle for separating a computer program into distinct sections, such that each section addresses a separate concern. A concern is a set of information that affects the code of a computer program.”

As said concern is a set of information, in our application concern is known as modules or a set of responsibility, we use this principle to separate application module to manage scalable applications.

You can also think of separation the same as how we use layers in our application as follows:


However we can implement different tiers for databases as well.

The above architecture can be followed in any web or native (desktop) application, in order to use separation of concern.

How separation of concern in ASP.NET

A couple of years ago, Microsoft came up with ASP.NET MVC which is a superset of ASP.NET (now ASP.NET web form). Since before ASP.NET MVC there was Spring (JAVA), Ruby on Rail frameworks and may be others has already implemented MVC architecture.

ASP.NET MVC adds SoC for web (http) and separate Model (business), View(User Interface) and Controller (Processing data to view or vice versa), it gives responsibility to Model, View, Controller as follows :


You may have seen the above diagram in many articles. Herethe model is responsible to handle business logic, don’t get it confused with ViewModel as ViewModel are simple classes in ASP.NET MVC to bind strongly typed views.

Flexibility and its violation of SoC in ASP.NET MVC
As a ASP.NET MVC developer I feel it’s quite flexible to work with MVC as it’s a framework with extensibility as we can implement our own principles if required.

MVC framework uses loose coupling (another form of SoC) for every concern (modules). It’s recommended to use Model for business logic, controller for processing incoming requests and views to display information to end user.

But the actual problem is due to flexibility of ASP.NET MVC and it’s easy to violate these principles.

Examples of violation of MVC principle:

    Using ViewBag or ViewData for passing data from controller to view:
        // contoller  
        public ActionResult Index()   
        {  
                ViewBag.EmployeeData = getEmplyees(x => x.DOB > DateTime.Now);  
            }  
            // view  
        foreach(var employee in ViewBag.EmployeeData)  
        {  
            // using data  
        }  

    Above line of code doesn’t restrict developer, but it violates principle to use ViewModel to display data in view.

    Using business logic in controller:
        Public ActionResult Save(Employee model)  
        {  
            If(ModelState.IsValid)   
            {  
                _dbContext.Employees.Add(model)  
            }  
            Return RedirectToAction(“Success”);  
        }  

    Using above code, its violation of SRP because controller is having database logic to save information.

    Using business logic in view:
        @if(user.Role == ”Admin”)  
        {  
            //  
        }  
        Else   
        {  
            //  
        }  

    Using this we are using business logic in view which is only responsible to display information.

Apart from these, there area lot of code snippets you can find in your ASP.NET MVC project as well as online communities.

Recommendations

Where to put business logic:
It’s recommended to use a Service layer to implement business logic in your application as follows:
    public class EmployeeService   
    {  
        IRepository _employeeRepository;  
        public EmployeeService(IRepository employeeRepository)   
        {  
            this._employeeRepository = employeeRepository;  
        }  
        public IEnumeratble < Employee > GetEmplyee(int id)   
        {  
            return _employeeRepository.FindBy(x => x.ID == id).FirstOrDefault();  
        }…………..  
    }  


Repository pattern is a well known pattern for data access, here is a sample:
    public class Repository < T > : IRepository < T > where T: class   
    {  
        private DbContext Context;  
      
        public Repository(DbContext ctx)   
        {  
            Context = ctx;  
        }  
      
        public virtual IQueryable < T > GetAll()   
        {  
            IQueryable < T > query = Context.Set < T > ().AsQueryable();  
            return query;  
        }  
        public IQueryable < T > FindBy(System.Linq.Expressions.Expression < Func < T, bool >> predicate)   
        {  
            IQueryable < T > query = Context.Set < T > ().Where(predicate);  
            return query;  
        }
      
    }  


Repository can be wrapped with a unit of work to save final changes all together. Here is sample unit of work interface which can be implemented for convenience, however it’s not required.
    public interface IUnitOfWork  
    {  
        IRepository < TEntity > GetRepository < TEntity > () where TEntity: class;  
        void Save();  
    }  


And finally we can inject (using DI) service in controller to use business objects.
    public class EmployeeContoller   
    {  
        IService _employeeService;  
        Public EmployeeContoller(IService employeeService)   
        {  
            _employeeService = employeeService;  
        }…………  
    }  

I hope readers will avoidthe  above mentioned mistakes while working with ASP.NET MVC to deliver scalable applications.


ASP.NET MVC 6 Hosting - HostForLIFEASP.NET :: View Without Controller Action in MVC

clock February 19, 2021 12:18 by author Peter

In this quick article you will learn how a view can be rendered without its native Controller Action method.

Why do we need this?
Let's look at the following image.


In the image above, you can see that for each view we have a matching controller action. Each of these actions contains a single line of code. In fact, each of these actions contains exactly the same line of code. And this is completely unnecessary. Imagine what you will do when you have hundreds or thousands of views. Will you create hundreds or thousands of controller actions? Of course not, then how can we fix it?

In the MVC Framework, the controller class includes a method, HandleUnknownAction(), that executes whenever we attempt to invoke an action (or when we request a view that has no matching action method) on a controller that does not exist.


Now we are taking advantage of the HandleUnknownAction() method to render views even when a corresponding controller method does not exist.

In the image above you can see we don't have Post5.cshtml, so when I tried to access the Post5.cshtml view, it shows the following error.


To fix this issue, we can use a simple try-catch block and redirect the user on a PageNotFound view; here's how.


ASP.NET MVC 6 Hosting - HostForLIFE :: Upload Large Files To MVC / WebAPI Using Partitioning

clock February 8, 2021 09:26 by author Peter

Sending large files to an MVC/Web-API Server can be problematic. This article is about an alternative. The approach used is to break a large file up into small chunks, upload them, then merge them back together on the Server via file transfer by partitioning. The article shows how to send files to an MVC Server from both a webpage using JavaScript, and a Web-form httpClient, and can be implemented using either MVC or Web API.

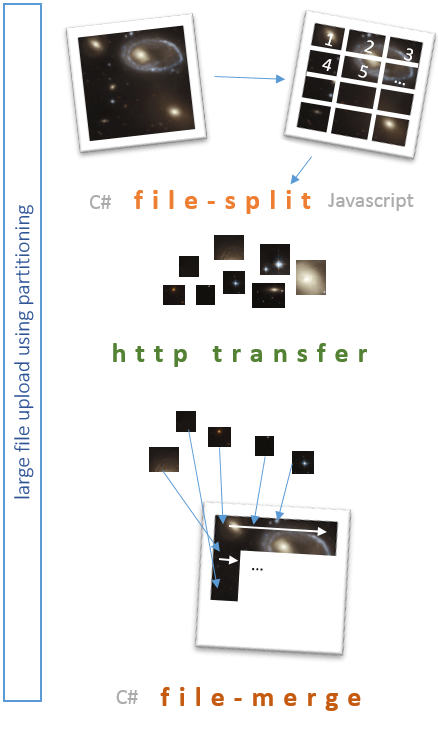
In my experience, the larger the file you need to upload to a website/API, the bigger the potential problems you encounter. Even when you put the right settings in place, adjust your web.config, make certain you use the right multiplier for maxRequestLength and maxAllowedContentLength and of course don't forget about executionTimeout (eek!), things can still go wrong. Connections can fail when the file is *almost* transferred, servers unexpectedly (Murphy's law) run out of space, etc., the list goes on. The diagram below demonstrates the basic concept discussed in this article.

Background
The concept for this solution is very simple. The attached code works (I have it started in production), and can be improved by you in many ways. For example, for the purposes of this article the original large file is broken into app. 1mb chunks, and uploaded to the server sequentially, one chunk at a time. This could, for example, be made more efficient by threading, and sending chunks in parallel. It could also be made more robust by adding fault tolerance, auto-resume into a rest-api architecture etc. I leave you to implement these features yourself if you need them.

The code consists of two parts - the initial file-split/partitioning into chunks, and the final merge of the chunks back into the original file. I will demonstrate the file-split using both C# in a web-form, and JavaScript, and the file-merge using C# server-side.

File split
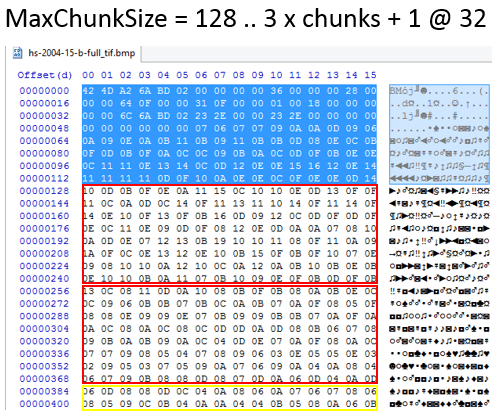
The concept of splitting a file is very basic. We transverse the file in a binary stream, from position zero, up to the last byte in the file, copying out chunks of binary data along the way and transferring these. Generally we set an arbitrary (or carefully thought out!) chunk size to extract, and use this as the amount of data to take at a time. Anything left over at the end is the final chunk.

In the example below, a chunk size of 128b is set. For the file shown, this gives us 3 x 128b chunks, and 1 x 32b. In this example there are four file chunks resulting from the split and to transfer to the server.

C# File Split
The accompanying demo "WinFileUpload" is a simple Windows forms application. Its sole function is to demonstrate splitting a sample large file (50 MB) in C#, and using a HTTPClient to post the file to a web-server (in this case, an MVC Server).

For this C# example, I have a class called Utils  that takes some input variables such as maximum file chunk size, temporary folder location, and the name of the file to split. To split the file into chunks, we call the method "SplitFile". SplitFile works its way through the input file and breaks it into separate file chunks. We then upload each file chunk it using "UploadFile".
Utils ut = new Utils();  
ut.FileName = "hs-2004-15-b-full_tif.bmp"; // hard coded for demo  
ut.TempFolder = Path.Combine(CurrentFolder, "Temp");  
ut.MaxFileSizeMB = 1;  
ut.SplitFile();  

foreach (string File in ut.FileParts)  
{  
UploadFile(File);  
}  
MessageBox.Show("Upload complete!");  


The file upload method takes an input file-name, and uses a HTTPClient to upload the file. Note the fact that we are sending MultiPartFormData to carry the payload.
public bool UploadFile(string FileName)  
{  
bool rslt = false;  
using (var client = new HttpClient())  
{  
using (var content = new MultipartFormDataContent())  
{  
 var fileContent = new   ByteArrayContent(System.IO.File.ReadAllBytes(FileName));  
 fileContent.Headers.ContentDisposition = new  
     ContentDispositionHeaderValue("attachment")  
       {  
        FileName = Path.GetFileName(FileName)  
       };  
 content.Add(fileContent);  

var requestUri = "http://localhost:8170/Home/UploadFile/";  
    try  
    {  
        var result = client.PostAsync(requestUri, content).Result;  
        rslt = true;  
    }  
    catch (Exception ex)  
    {  
        // log error  
        rslt = false;  
    }  
}  
}  
return rslt;  
}  


So, that's the supporting code out of the way. One of the critical things to be aware of next is the file naming convention that is being used. It consists of the original file-name, plus a code-parsable tail "_part." that will be used server-side to merge the different file chunks back into a single contiguous file again. This is simply the convention I put together - you can change it to your own requirements, just be sure you are consistent with it.

The convention for this example is,
Name = original name + ".part_N.X" (N = file part number, X = total files).

Here is an example of a picture file split into three parts.
MyPictureFile.jpg.part_1.3
MyPictureFile.jpg.part_2.3
MyPictureFile.jpg.part_3.3

It doesn't matter what order the file chunks are sent to the Server. The important thing is that some convention, like the above is used, so that the Server knows (a) what file part it is dealing with and (b) when all parts have been received and can be merged back into one large original file again.

Next, here is the meat of the C# code that scans the file, creating multiple chunk files ready to transfer.
public bool SplitFile()  
{  
bool rslt = false;  
string BaseFileName = Path.GetFileName(FileName);  
// set the size of file chunk we are going to split into  
int BufferChunkSize = MaxFileSizeMB * (1024 * 1024);  
// set a buffer size and an array to store the buffer data as we read it  
const int READBUFFER_SIZE = 1024;  
byte[] FSBuffer = new byte[READBUFFER_SIZE];  
// open the file to read it into chunks  
using (FileStream FS = new FileStream(FileName, FileMode.Open, FileAccess.Read, FileShare.Read))  
{  
// calculate the number of files that will be created  
int TotalFileParts = 0;  
if (FS.Length < BufferChunkSize)  
{  
    TotalFileParts = 1;  
}  
else  
{  
    float PreciseFileParts = ((float)FS.Length / (float)BufferChunkSize);  
    TotalFileParts = (int)Math.Ceiling(PreciseFileParts);  
}  

int FilePartCount = 0;  
// scan through the file, and each time we get enough data to fill a chunk, write out that file  
while (FS.Position < FS.Length)  
{  
    string FilePartName = String.Format("{0}.part_{1}.{2}",  
    BaseFileName, (FilePartCount + 1).ToString(), TotalFileParts.ToString());  
    FilePartName = Path.Combine(TempFolder, FilePartName);  
    FileParts.Add(FilePartName);  
    using (FileStream FilePart = new FileStream(FilePartName, FileMode.Create))  
    {  
        int bytesRemaining = BufferChunkSize;  
        int bytesRead = 0;  
        while (bytesRemaining > 0 && (bytesRead = FS.Read(FSBuffer, 0,  
         Math.Min(bytesRemaining, READBUFFER_SIZE))) > 0)  
        {  
            FilePart.Write(FSBuffer, 0, bytesRead);  
            bytesRemaining -= bytesRead;  
        }  
    }  
  // file written, loop for next chunk  
  FilePartCount++;  
}  

}  
return rslt;  
}  


That's it for the C# client-side - we will see the result and how to handle things server-side later in the article. Next, let's look at how to do the same thing in Javascript, from a web-browser.
JavaScript File Split

NB - The JavaScript code, and the C# Merge code are contained in the attached demo file "MVCServer"

In our browser, we have an input control of type "file", and a button to call a method that initiates the file-split and data transfer.
<input type="file" id="uploadFile" name="file" />  <a class="btn btn-primary" href="#" id="btnUpload">Upload file</a>  

On document ready, we bind to the click event of the button to call the main method.
$(document).ready(function () {  
$('#btnUpload').click(function () {  
UploadFile($('#uploadFile')[0].files);  
}  
)  
});  


Our UploadFile method does the work of splitting the file into chunks, and as in our C# example, passing the chunks off to another method for transfer. The main difference here is that in C#, we created individual files, in our JavaScript example, we are taking the chunks from an array instead.  
function UploadFile(TargetFile)  
{  
// create array to store the buffer chunks  
var FileChunk = [];  
// the file object itself that we will work with  
var file = TargetFile[0];  
// set up other initial vars  
var MaxFileSizeMB = 1;  
var BufferChunkSize = MaxFileSizeMB * (1024 * 1024);  
var ReadBuffer_Size = 1024;  
var FileStreamPos = 0;  
// set the initial chunk length  
var EndPos = BufferChunkSize;  
var Size = file.size;  

// add to the FileChunk array until we get to the end of the file  
while (FileStreamPos < Size)  
{  
// "slice" the file from the starting position/offset, to  the required length  
FileChunk.push(file.slice(FileStreamPos, EndPos));  
FileStreamPos = EndPos; // jump by the amount read  
EndPos = FileStreamPos + BufferChunkSize; // set next chunk length  
}  
// get total number of "files" we will be sending  
var TotalParts = FileChunk.length;  
var PartCount = 0;  
// loop through, pulling the first item from the array each time and sending it  
while (chunk = FileChunk.shift())  
{  
PartCount++;  
// file name convention  
var FilePartName = file.name + ".part_" + PartCount + "." + TotalParts;  
// send the file  
UploadFileChunk(chunk, FilePartName);  
}  
}  


The UploadFileChunk takes the part of the file handed by the previous method, and posts it to the Server in a similar manner to the C# example.
function UploadFileChunk(Chunk, FileName)  
{  
var FD = new FormData();  
FD.append('file', Chunk, FileName);  
$.ajax({  
type: "POST",  
url: 'http://localhost:8170/Home/UploadFile/',  
contentType: false,  
processData: false,  
data: FD  
});  
}  


File merge
NB - The JavaScript code, and the C# Merge code are contained in the attached demo file "MVCServer"

Over on the Server, be that MVC or Web-API, we receive the individual file chunks and need to merge them back together again into the original file.

The first thing we do is put a standard POST handler in place to receive the file chunks being posted up to the Server. This code takes the input stream, and saves it to a temp folder using the file-name created by the client (C# or JavaScript). Once the file is saved, the code then calls the "MergeFile" method which checks if it has enough file chunks available yet to merge the file together. Note that this is simply the method I have used for this article. You may decide to handle the merge trigger differently, for example, running a job on a timer every few minutes, passing off to another process, etc. It should be changed depending on your own required implementation.

[HttpPost]  
public HttpResponseMessage UploadFile()  
{  
foreach (string file in Request.Files)  
{  
var FileDataContent = Request.Files[file];  
if (FileDataContent != null && FileDataContent.ContentLength > 0)  
{  
    // take the input stream, and save it to a temp folder using  
    // the original file.part name posted  
    var stream = FileDataContent.InputStream;  
    var fileName = Path.GetFileName(FileDataContent.FileName);  
    var UploadPath = Server.MapPath("~/App_Data/uploads");  
    Directory.CreateDirectory(UploadPath);  
    string path = Path.Combine(UploadPath, fileName);  
    try  
    {  
        if (System.IO.File.Exists(path))  
            System.IO.File.Delete(path);  
        using (var fileStream = System.IO.File.Create(path))  
        {  
            stream.CopyTo(fileStream);  
        }  
        // Once the file part is saved, see if we have enough to merge it  
        Shared.Utils UT = new Shared.Utils();  
        UT.MergeFile(path);  
    }  
    catch (IOException ex)  
    {  
       // handle  
    }  
}  
}  
return new HttpResponseMessage()  
{  
StatusCode = System.Net.HttpStatusCode.OK,  
Content = new StringContent("File uploaded.")  
};  
}  


Each time we call the MergeFile method, it first checks to see if we have all of the file chunk parts required to merge the original file back together again. It determines this by parsing the file-names. If all files are present, the method sorts them into the correct order, and then appends one to another until the original file that was split, is back together again.
/// <summary>  
/// original name + ".part_N.X" (N = file part number, X = total files)  
/// Objective = enumerate files in folder, look for all matching parts of  
/// split file. If found, merge and return true.  
/// </summary>  
/// <param name="FileName"></param>  
/// <returns></returns>  
public bool MergeFile(string FileName)  
{  
bool rslt = false;  
// parse out the different tokens from the filename according to the convention  
string partToken = ".part_";  
string baseFileName = FileName.Substring(0, FileName.IndexOf(partToken));  
string trailingTokens = FileName.Substring(FileName.IndexOf(partToken) + partToken.Length);  
int FileIndex = 0;  
int FileCount = 0;  
int.TryParse(trailingTokens.Substring(0, trailingTokens.IndexOf(".")), out FileIndex);  
int.TryParse(trailingTokens.Substring(trailingTokens.IndexOf(".") + 1), out FileCount);  
// get a list of all file parts in the temp folder  
string Searchpattern = Path.GetFileName(baseFileName) + partToken + "*";  
string[] FilesList = Directory.GetFiles(Path.GetDirectoryName(FileName), Searchpattern);  
//  merge .. improvement would be to confirm individual parts are there / correctly in  
// sequence, a security check would also be important  
// only proceed if we have received all the file chunks  
if (FilesList.Count() == FileCount)  
{  
// use a singleton to stop overlapping processes  
if (!MergeFileManager.Instance.InUse(baseFileName))  
{  
    MergeFileManager.Instance.AddFile(baseFileName);  
    if (File.Exists(baseFileName))  
        File.Delete(baseFileName);  
    // add each file located to a list so we can get them into  
    // the correct order for rebuilding the file  
    List<SortedFile> MergeList = new List<SortedFile>();  
    foreach (string File in FilesList)  
    {  
        SortedFile sFile = new SortedFile();  
        sFile.FileName = File;  
        baseFileName = File.Substring(0, File.IndexOf(partToken));  
        trailingTokens = File.Substring(File.IndexOf(partToken) + partToken.Length);  
        int.TryParse(trailingTokens.  
           Substring(0, trailingTokens.IndexOf(".")), out FileIndex);  
        sFile.FileOrder = FileIndex;  
        MergeList.Add(sFile);  
    }  
    // sort by the file-part number to ensure we merge back in the correct order  
    var MergeOrder = MergeList.OrderBy(s => s.FileOrder).ToList();  
    using (FileStream FS = new FileStream(baseFileName, FileMode.Create))  
    {  
        // merge each file chunk back into one contiguous file stream  
        foreach (var chunk in MergeOrder)  
        {  
            try  
            {  
                using (FileStream fileChunk =  
                   new FileStream(chunk.FileName, FileMode.Open))  
                {  
                    fileChunk.CopyTo(FS);  
                }  
            }  
            catch (IOException ex)  
            {  
                // handle  
            }  
        }  
    }  
    rslt = true;  
    // unlock the file from singleton  
    MergeFileManager.Instance.RemoveFile(baseFileName);  
}  
}  
return rslt;  
}  


Using the file split on the client-side, and file-merge on the server-side, we now have a very workable solution for uploading large files in a more secure manner than simply sending up in one large block of data.


ASP.NET MVC 6 Hosting - HostForLIFEASP.NET :: HTTP Error 404.0 0 Not Found in MVC

clock January 29, 2021 08:32 by author Peter

The Resource you are looking for has been removed, had its name changed, or is temporarily unavailable.
I saw this error today while working on a MVC Web Project, this is a common error we get while running websites and performing any CRUD (Create, Read, Update, Delete) operation. The Stackoverflow forum is full of such queries so I decided to describe the fix here. You might not find it useful for your case but I think the majority of requests can be satisfied.

 
Let me show you an error page image here:


Look at the URL in the above image. The URL is requesting a view/page to edit the record but unfortunately the page is not found. Actually the page/view is already there but the problem is, we are not supplying the correct ID or say index to edit.
In other words we need an URL something like http://localhost:25349/demo/Edit/1 to edit the first record and http://localhost:25349/demo/Edit/2 to edit the second record. Yet in the preceding image we are not supplying the ID.
 
Let's fix it. Open the "Index" view of the "demo" controller and look at the existing code:


Oh! there is a comment instead of the ID parameter, so once you change it, such as in the following:
    <td>  
        @Html.ActionLink("Edit", "Edit", new { id=item.SM_UID }) |  
        @Html.ActionLink("Details", "Details", new { id=item.SM_UID }) |  
        @Html.ActionLink("Delete", "Delete", new { id=item.SM_UID })  
    </td>  


Your application will work fine.


ASP.NET MVC 6 Hosting - HostForLIFEASP.NET :: ActionResult In ASP.NET Core MVC

clock January 20, 2021 08:56 by author Peter
This article is an  overview of the use of ActionResult in ASP.Net Core MVC. ASP.NET Core MVC has different types of Action Results. Each action result returns a different format of the output. As a programmer, we need to use different action results to get the expected output. 

What is Action Method in ASP.NET Core MVC?
Actions are the methods in controller class which are responsible for returning the view or Json data. Action will mainly have return type “ActionResult” and it will be invoked from method InvokeAction called by controller. All the public methods inside a controller which respond to the URL are known as Action Methods. When creating an Action Method we must follow these rules. I have divided all the action methods into the following categories:

  1. ActionResult
  2. RedirectActionResult
  3. FileResult
  4. Security

Miscellaneous Action Results

Action Method
Description
IActionResult
Defines a contract that represents the result of an action method.
ActionResult
A default implementation of IActionResult.
ContentResult
Represents a text result.
EmptyResult
Represents an ActionResult that when executed will do nothing.
JsonResult
An action result which formats the given object as JSON.
PartialViewResult
Represents an ActionResult that renders a partial view to the response.
ViewResult
Represents an ActionResult that renders a view to the response.
ViewComponentResult
An IActionResult which renders a view component to the response.

ActionResult
The IActionResult return type is appropriate when multiple ActionResult return types are possible in an action. IActionResult and ActionResult work as a container for other action results, in that IActionResult is an interface and ActionResult is an abstract class that other action results inherit from.

public IActionResult Index()  
{  
      return View();  

ActionResult
ActionResult is the base class of all the result type action method.

public ActionResult About()  
{  
     return View();  

ContentResult
ContentResult represents a text result. The default return type of a ContentResult is string, but it’s not limited to string. We can return any type of response by specifying a MIME type, in the code.

public ContentResult ContentResult()  
{  
      return Content("I am ContentResult");  
}  

EmptyResult
EmptyResult represents an ActionResult that when executed will do nothing. We can use it when we want to return empty result.

public EmptyResult EmptyResult() 
  
      return new EmptyResult();  

JsonResult
JsonResult formats the given object as JSON. JsonResult is use to return JSON-formatted data, it returns JSON regardless of what format is requested through Accept header. There is no content negotiation when we use JsonResult.
public JsonResult JsonResult()  
{  
      var name = "Farhan Ahmed";  
      return Json(new { data=name});  
}  

PartialViewResult
PartialViewResult represents an ActionResult that renders a partial view to the response. PartialViews are essential when it comes to loading a part of page through AJAX, they return raw rendered HTML.


public PartialViewResult PartialViewResult()  
{  
      return PartialView("_PartialView");  
}  

ViewResult
ViewResult represents an ActionResult that renders a view to the response. It is used to render a view to response, we use it when we want to render a simple .cshtml view.

public ViewResult ViewResult()  
{  
      return View("About","Home");  
}  

ViewComponentResult
ViewComponentResult is an IActionResult which renders a view component to the response. We use view component by calling Component.InvokeAsync in the view. We can use it to return HTML form a view component. If we want to reuse our business logic or refresh the HTML parts of the page that are loaded with view component we can do that using view component.

public ViewComponent ViewComponent()  
{  
       return ViewComponent();  

Action results from previous version of ASP.NET MVC that are either renamed or deleted.
  • JavaScriptResult - This action result does not exist anymore we can use ContentResult.
  • FilePathResult - We can use VirtualFileResult or PhysicalFileResult instead of FilePathResult
  • HttpNotFoundResult - We can use NotFoundResult instead HttpNotFoundResult
  • HttpStatusCodeResult - We can use StatusCodeResult instead HttpStatusCodeResult
  • HttpUnauthorizedResult - We can use UnauthorizedResult instead HttpUnauthorizedResult


ASP.NET MVC 6 Hosting - HostForLIFEASP.NET :: Redirect Action Result in ASP.NET Core MVC

clock January 15, 2021 08:56 by author Peter

This article overviews redirect action results in ASP.NET Core MVC. We will lean all redirect action results step by step with examples.

There are four types of redirect action results in ASP.Net Core MVC. Each one can either return normal redirect or permanent. The return method related to the permanent one is suffixed with the Permanent keyword. You can also return these results with their Permanent property set to true. These action results are:
    RedirectResult
    RedirectToActionResult
    RedirectToRouteResult
    LocalRedirectResult

RedirectResult
RedirectResult is an ActionResult that returns a Found (302), Moved Permanently (301), Temporary Redirect (307), or Permanent Redirect (308) response with a Location header to the supplied URL. It will redirect us to the provided URL, it doesn’t matter if the URL is relative or absolute.
    public RedirectResult MyProfile()  
    {  
       return Redirect("https://www.c-sharpcorner.com/members/farhan-ahmed24");  
    }  
      
    public RedirectResult Profile()  
    {  
       return RedirectPermanent("https://www.c-sharpcorner.com/members/farhan-ahmed24");  
    }  


If we call the RedirectPermanent method, it redirect us permanently. Also as I explained in previous section we don’t need to use these methods to redirect permanently or temporarily, we can just new up an instance of RedirectResult with its Permanent property set to true or false and return that instead.
    return new RedirectResult("/") { Permanent = true};  

RedirectToActionResult

RedirectToActionResult is an ActionResult that returns a Found (302), Moved Permanently (301), Temporary Redirect (307), or Permanent Redirect (308) response with a Location header. It targets a controller action, taking in action name, controller name, and route value.
    public RedirectToActionResult EmployeeList()  
    {  
        return RedirectToAction("Index", "Employees");  
    }  


RedirectToRouteResult
RedirectToRouteResult is an ActionResult that returns a Found (302), Moved Permanently (301), Temporary Redirect (307), or Permanent Redirect (308) response with a Location header. Targets a registered route. It should be used when we want to redirect to a route. It takes a route name, route value and redirect us to that route with the route values provided.
    public RedirectToRouteResult DepartmentList()  
    {  
        return RedirectToRoute(new { action = "Index", controller = "Departments", area="" });  
    }  


LocalRedirectResult

LocalRedirectResult is an ActionResult that returns a Found (302), Moved Permanently (301), Temporary Redirect (307), or Permanent Redirect (308) response with a Location header to the supplied local URL. We should use LocalRedirectResult if we want to make sure that the redirects occur in some context that are local to our site. This action result type takes a string for URL needed for redirect, and a bool flag to tell it if it’s permanent. Under the hood, it checks the URL with the Url.IsLocalUrl("URL") method to see if it’s local. If it redirects us to the address, but if it wasn’t, it will throw an InvalidOperationException. You cannot pass a local URL with an absolute address like this, http://localhost:52513/Home/Index, you’ll get an exception. That’s because the IsLocalUrl method considers a URL like this to not be local, so you must always pass a relative URL in.
    public LocalRedirectResult LocalRedirect()  
    {  
        return LocalRedirect("/Home/Index");  
    }  

    public LocalRedirectResult LocalRedirectActionResult()  
            {  
                var IsHomeIndexLocal = Url.IsLocalUrl("/Home/Index");  
                var isRootLocal = Url.IsLocalUrl("/");  
      
                var isAbsoluteUrlLocal = Url.IsLocalUrl("http://localhost: 52513/Home/Index");  
                return LocalRedirect("/Home/Index");  
            }  

Step 1
Open Visual Studio 2019 and select the ASP.NET Core Web Application template and click Next.
 
Step 2
Name the project FileResultActionsCoreMvc_Demo and click Create.
 
Step 3
Select Web Application (Model-View-Controller), and then select Create. Visual Studio used the default template for the MVC project you just created.
 
Step 4
In Solution Explorer, right-click the wwwroot folder. Select Add > New Folder. Name the folder Files. Add some files to work with them.
 
Complete controller code
    using System;  
    using System.Collections.Generic;  
    using System.Diagnostics;  
    using System.Linq;  
    using System.Threading.Tasks;  
    using Microsoft.AspNetCore.Mvc;  
    using Microsoft.Extensions.Logging;  
    using RedirectResultActionsCoreMvc_Demo.Models;  
      
    namespace RedirectResultActionsCoreMvc_Demo.Controllers  
    {  
        public class HomeController : Controller  
        {  
            public IActionResult Index()  
            {  
                return View();  
            }  
      
            public RedirectResult MyProfile()  
            {  
                return Redirect("https://www.c-sharpcorner.com/members/farhan-ahmed24");  
            }  
            public RedirectResult Profile()  
            {  
                return RedirectPermanent("https://www.c-sharpcorner.com/members/farhan-ahmed24");  
            }  
      
            public RedirectToActionResult EmployeeList()  
            {  
                return RedirectToAction("Index", "Employees");  
            }  
      
            public RedirectToRouteResult DepartmentList()  
            {  
                return RedirectToRoute(new { action = "Index", controller = "Departments", area="" });  
            }  
      
            public LocalRedirectResult LocalRedirect()  
            {  
                return LocalRedirect("/Home/Index");  
            }  
        }  
    }  


Step 5
Open Index view which is in the views folder under the Home folder. Add the below code in Index view.
 
Index View
    @{  
        ViewData["Title"] = "Home Page";  
    }  
      
    <h3 class="text-uppercase">RedirectResult Action in core mvc</h3>  
    <ul class="list-group list-group-horizontal">  
        <li class="list-group-item"><a asp-action="MyProfile" asp-controller="Home" target="_blank">Redirect Result</a></li>  
        <li class="list-group-item"><a asp-action="EmployeeList" asp-controller="Home" target="_blank">RedirectToActionResult</a></li>  
        <li class="list-group-item"><a asp-action="DepartmentList" asp-controller="Home" target="_blank">RedirectToRouteResult</a></li>  
        <li class="list-group-item"><a asp-action="LocalRedirect" asp-controller="Home" target="_blank">LocalRedirectResultt</a></li>  
    </ul>  

Step 6

Build and run your Project, ctrl+F5


ASP.NET MVC 6 Hosting - HostForLIFE.eu :: Learn About Filters In ASP.NET MVC

clock December 30, 2020 12:17 by author Peter

As part of this article, we will learn about ASP.Net MVC filters, their different types and we will create a custom log Action Filter using Visual Studio. So without wasting any time let's start.

What are ASP.Net MVC filters
In an ASP.Net MVC Web application, we have action methods defined in controllers that call from different views. For example, when the user clicks on some button on the view, a request goes to the designated controller and then the corresponding action method. Within this flow, sometimes we want to perform logic either before an action method is called or after an action method runs.
 
To fulfill the above condition ASP.Net MVC provides us filters. Filters are the custom classes that provide us with an option to add pre-action and post-action behavior to controller action methods.
 
ASP.NET MVC framework supports four different types of filters:

  • Authorization filters
  • Action filters
  • Result filters
  • Exception filters

Note
They are executed in the order listed above.
 
Authorization filters
In ASP.NET MVC web application by default, all the action methods of all the controllers can be accessible for all the users (for both authenticated and anonymous users both). For this, if we want to restrict some action methods from anonymous users or we want to allow the action methods only to an authenticated user, then you need to use the Authorization Filter in MVC.
 
The Authorization Filter provides two built-in attributes such as Authorize and AllowAnonymous. We can decorate our action methods with the Authorize attribute which allows access to the only authenticated user and we can use AllowAnonymous attribute to allow some action method to all users.
 
We can also create custom Authorization filters for this we have to implement IAuthenticationFilter interface and have overrides its OnAuthentication() and OnAuthenticationChallenge(). We are going deep into it.
 
Action filters
In the ASP.NET MVC web application, action filters are used to perform some logic before and after action methods. The output cache is one of the built-in action filters which we can use in our action methods.
    [OutputCache(Duration=100)]
    public ActionResult Index()
    {
       return View();
    }

We can also create a custom action filter either by implementing IActionFilter interface and FilterAttribute class or by deriving the ActionFilterAttribute abstract class. As part of this article, I am covering creating a custom action filter using the ActionFilterAttribute abstract class.
 
ActionFilterAttribute includes the following method to override it:
    void OnActionExecuted(ActionExecutedContext filterContext)
    void OnActionExecuting(ActionExecutingContext filterContext)
    void OnResultExecuted(ResultExecutedContext filterContext)
    void OnResultExecuting(ResultExecutingContext filterContext)

We will see this in detail below.
 
Result filters
 
In an ASP.NET MVC web application, result filters are used to perform some logic before and after a view result is executed. For example, we might want to modify a view result right before the view is rendered.
 
Exception filters
 
In the ASP.NET MVC web application, we can use an exception filter to handle errors raised by either our controller actions or controller action results. We also can use exception filters to log errors.
 
Creating a Log Action Filter
Open Visual Studio and create a new ASP.NET Web Application

Choose Empty, select “MVC” and then click the OK button.

Add a ‘Filters’ folder and create a new class LogActionFilter.cs under it:
    using System.Diagnostics;  
    using System.Web.Mvc;  
    using System.Web.Routing;  
      
    namespace FiltersMVC.Filters  
    {  
        public class LogActionFilter : ActionFilterAttribute  
      
        {  
            public override void OnActionExecuting(ActionExecutingContext filterContext)  
            {  
                Log("OnActionExecuting", filterContext.RouteData);  
            }  
      
            public override void OnActionExecuted(ActionExecutedContext filterContext)  
            {  
                Log("OnActionExecuted", filterContext.RouteData);  
            }  
      
            public override void OnResultExecuting(ResultExecutingContext filterContext)  
            {  
                Log("OnResultExecuting", filterContext.RouteData);  
            }  
      
            public override void OnResultExecuted(ResultExecutedContext filterContext)  
            {  
                Log("OnResultExecuted", filterContext.RouteData);  
            }  
      
      
            private void Log(string methodName, RouteData routeData)  
            {  
                var controllerName = routeData.Values["controller"];  
                var actionName = routeData.Values["action"];  
                var message = $"{methodName} controller:{controllerName} action:{actionName}";  
                Debug.WriteLine(message, "Action Filter Log");  
            }  
        }  
    }  


We overrides OnActionExecuting(), OnActionExecuted(), OnResultExecuting(), and OnResultExecuted() methods all are calling the Log() method. The name of the method and the current route data is passed to the Log() method. The Log() method writes a message to the Visual Studio Output window.
 
Now, add HomeController.cs under the Controllers folder.
    using FiltersMVC.Filters;  
    using System.Web.Mvc;  
      
    namespace FiltersMVC.Controllers  
    {  
        [LogActionFilter]  
        public class HomeController : Controller  
        {  
            // GET: Home  
            public ActionResult Index()  
            {  
                return View();  
            }  
        }  
    }  

After adding the above files our folder structure will look like this:


Now run the application, we can see the results in the “Output” window.


About HostForLIFE

HostForLIFE is European Windows Hosting Provider which focuses on Windows Platform only. We deliver on-demand hosting solutions including Shared hosting, Reseller Hosting, Cloud Hosting, Dedicated Servers, and IT as a Service for companies of all sizes.

We have offered the latest Windows 2019 Hosting, ASP.NET 5 Hosting, ASP.NET MVC 6 Hosting and SQL 2019 Hosting.


Tag cloud

Sign in