European ASP.NET MVC Hosting

BLOG about Latest ASP.NET MVC Hosting and Its Technology - Dedicated to European Windows Hosting Customer

ASP.NET MVC Hosting - HostForLIFEASP.NET :: Attribute Routing in ASP.Net MVC 5.0

clock January 28, 2022 06:27 by author Peter

Routing is a pattern matching process that monitors the requests and determines what to do with each request. In other words we can say Routing is a mechanism for mapping requests within our MVC application.

When a MVC application starts the first time, the Application_Start () event of global.asax is called. This event registers all routes in the route table using the RouteCollection.MapRoute method.

Example
    routes.MapRoute(  
        "Default", // Route name  
        "{controller}/{action}/{id}", // URL with parameters  
        new { controller = "Home", action = "about", id = UrlParameter.Optional } // Parameter defaults  
    );


MVC 5 supports a new type of routing called “Attribute Routing”. As the name suggests, Attribute Routing enables us to define routing on top of the controller action method.

Enabling Attribute Routing
To enable Attribute Routing, we need to call the MapMvcAttributeRoutes method of the route collection class during configuration.
    public class RouteConfig  
    {  
        public static void RegisterRoutes(RouteCollection routes)  
        {  
            routes.IgnoreRoute("{resource}.axd/{*pathInfo}");  
            routes.MapMvcAttributeRoutes();  
        }  
    }


We can also add a customized route within the same method. In this way we can combine Attribute Routing and convention-based routing.
    public class RouteConfig  
    {  
        public static void RegisterRoutes(RouteCollection routes)  
        {  
            routes.IgnoreRoute("{resource}.axd/{*pathInfo}");  
            routes.MapMvcAttributeRoutes();   
            routes.MapRoute(  
                   "Default", // Route name  
                    "{controller}/{action}/{id}", // URL with parameters  
                    new { controller = "Home", action = "about", id = UrlParameter.Optional } // Parameter defaults  
               );  
        }  
    }


Attribute Routing Example
A route attribute is defined on top of an action method. The following is the example of a Route Attribute in which routing is defined where the action method is defined.

In the following example, I am defining the route attribute on top of the action method
    public class HomeController : Controller  
    {  
        //URL: /Mvctest  
        [Route(“Mvctest”)]  
        public ActionResult Index()  
            ViewBag.Message = "Welcome to ASP.NET MVC!";  
            return View();  
    }}   

Attribute Routing with Optional Parameter
We can also define an optional parameter in the URL pattern by defining a question mark (“?") to the route parameter. We can also define the default value by using parameter=value.
    public class HomeController : Controller  
    {  
      
      // Optional URI Parameter  
      // URL: /Mvctest/  
      // URL: /Mvctest/0023654  
      
        [Route(“Mvctest /{ customerName ?}”)]  
        public ActionResult OtherTest(string customerName)  
            ViewBag.Message = "Welcome to ASP.NET MVC!";  
            return View();  
        }  
      
       // Optional URI Parameter with default value  
      // URL: /Mvctest/  
      // URL: /Mvctest/0023654  
      
       [Route(“Mvctest /{ customerName =0036952}”)]  
       public ActionResult OtherTest(string customerName)  
        {  
            ViewBag.Message = "Welcome to ASP.NET MVC!";  
            return View();  
        }  
    }


Route Prefixes
We can also set a common prefix for the entire controller (all action methods within the controller) using the “RoutePrefix” attribute.

Example
    [RoutePrefix(“Mvctest”)]  
    public class HomeController : Controller  
    {  
        // URL: /Mvctest/  
        [Route]  
        public ActionResult Index()  
        {  
            ViewBag.Message = "Welcome to ASP.NET MVC!";  
            return View();  
        }  
      
      // Optional URI Parameter  
      // URL: /Mvctest/  
      // URL: /Mvctest/0023654  
        [Route(“{ customerName }”)]  
        public ActionResult OtherTest(string customerName)  
        {  
            ViewBag.Message = "Welcome to ASP.NET MVC!";  
            return View();  
        }  
    }


When we use a tide (~) sign with the Route attribute, it will override the route prefix.

Example
    [RoutePrefix(“Mvctest”)]  
    public class HomeController : Controller  
    {  
        // URL: /NewMvctest/  
        [Route(“~/NewMVCTest”)]  
        public ActionResult Index()  
        {  
            ViewBag.Message = "Welcome to ASP.NET MVC!";  
            return View();  
        }  
    }


Defining Default Route using Route Attribute
We can also define a Route attribute on top of the controller, to capture the default action method as the parameter.

Example
    [RoutePrefix(“Mvctest”)]  
    [Route(“action=index”)]  
    public class HomeController : Controller  
    {  
        // URL: /Mvctest/  
        public ActionResult Index()  
        {  
            ViewBag.Message = "Welcome to ASP.NET MVC!";  
            return View();  
        }   
      
        // URL: /Mvctest/NewMethod  
        public ActionResult NewMethod()  
        {  
            ViewBag.Message = "Welcome to ASP.NET MVC!";  
            return View();  
        }  
    }

Defining Route name
We can also define a name of the route to allow easy URI generation.

Example
    [Route(“Mvctest”,  Name = "myTestURL")]  
    public ActionResult Index()  
    {  
            ViewBag.Message = "Welcome to ASP.NET MVC!";  
            return View();  
    }


We can generate URI using Url.RouteUrl method.
    <a href="@Url.RouteUrl("mainmenu")">Test URI</a>  

Defining Area
We can define the "Area" name from the controller that belongs to the using RouteArea attribute. If we define the “RouteArea” attribute on top of the controller, we can remove the AreaRegistration class from global.asax.
    [RouteArea(“Test”)]  
    [RoutePrefix(“Mvctest”)]  
    [Route(“action=index”)]  
      
    public class HomeController : Controller  
    {  
        // URL: /Test/Mvctest/  
        public ActionResult Index()  
        {  
            ViewBag.Message = "Welcome to ASP.NET MVC!";  
            return View();  
        }  
    }


Attribute Routing gives us more control over the URIs in our MVC web application. The earlier way of routing (convention-based routing) is fully supported by this version of MVC. We can also use both type of routing in the same project.

    Attribute Routing with Optional Parameter


ASP.NET MVC Hosting - HostForLIFEASP.NET :: Read Data From Excel File And Insert Into Database In ASP.NET MVC

clock January 18, 2022 08:01 by author Peter

I will show you how to connect to a Microsoft Excel workbook using the OLEDB.NET data provider, extract data and then insert it into the database table.

To begin with, we will create an ExcelToDatabase in Home Controller which returns a View. This method will return a View from where we have to upload the excel file. Now we will create another method ExcelToDatabase.  Now if we make a get request then ExcelToDatabase will be called and for post request, ExcelToDatabase will be called. The following is the code to read excel files.
using System;
using System.Collections.Generic;
using System.Linq;
using System.Web;
using System.Web.Mvc;
using System.Data;
using System.Data.OleDb;
using System.IO;

namespace ExcelReadData
{
    public class HomeController : Controller
    {
        // GET: ClonePanel
        public ActionResult ExcelToDatabase()
        {
            return View();
        }

        [HttpPost]
        public ActionResult ExcelToDatabase()
        {
            bool result = false;
            ViewBag.data = null;

            if (Request.Files["FileUpload1"].ContentLength > 0)
            {
                string extension = System.IO.Path.GetExtension(Request.Files["FileUpload1"].FileName).ToLower();
                string query = null;
                string connString = "";

                string[] validFileTypes = { ".xls", ".xlsx" };

                string path1 = string.Format("{0}/{1}", Server.MapPath("~/Content/Uploads"), Request.Files["FileUpload1"].FileName);
                if (!Directory.Exists(path1))
                {
                    Directory.CreateDirectory(Server.MapPath("~/Content/Uploads"));
                }
                if (validFileTypes.Contains(extension))
                {
                    if (System.IO.File.Exists(path1))
                    { System.IO.File.Delete(path1); }
                    Request.Files["FileUpload1"].SaveAs(path1);

                    //Connection String to Excel Workbook
                    if (extension.Trim() == ".xls")
                    {
                        connString = "Provider=Microsoft.Jet.OLEDB.4.0;Data Source=" + path1 + ";Extended Properties=\"Excel 8.0;HDR=Yes;IMEX=2\"";
                        result = Service.ImportExceltoDatabase(path1, connString, userId);
                    }
                    else if (extension.Trim() == ".xlsx")
                    {
                        connString = "Provider=Microsoft.ACE.OLEDB.12.0;Data Source=" + path1 + ";Extended Properties=\"Excel 12.0;HDR=Yes;IMEX=2\"";
                        result = Service.ImportExceltoDatabase(path1, connString,userId);
                    }
                }
                else
                {
                    ViewBag.Error = "Please Upload Files in .xls, .xlsx or .csv format";
                }
            }
            if (result)
            {
                ViewBag.data = "Data Import Successfully from excel to database.";
            }
            else
            {
                ViewBag.data = "there is some issue while importing the Data.";
            }
            return View();
        }
    }
}


Here I have created a class Service that contains 1 method ConvertXSLXtoDataTable. The following is the code for the service class.
using System;
using System.Collections.Generic;
using System.ComponentModel;
using System.Linq;
using System.Text;
using System.Threading.Tasks;
using System.Data.OleDb;
using System.Data;

namespace ExcelReadData
{
    public class Service : IDisposable
    {
        #region **Private Variables**

        private TestDatabaseEntities _dbContext;

        #region **Constructor**

        public ImportExceltoDatabase()
        {
            _dbContext = new TestDatabaseEntities();
        }
        #endregion

        public bool ImportExceltoDatabase(string strFilePath, string connString)
        {
            bool result = false;
            OleDbConnection oledbConn = new OleDbConnection(connString);
            DataTable dt = new DataTable();
            try
            {
                oledbConn.Open();
                using (OleDbCommand cmd = new OleDbCommand("SELECT * FROM [Sheet1$]", oledbConn))
                {
                    OleDbDataAdapter oleda = new OleDbDataAdapter();
                    oleda.SelectCommand = cmd;
                    DataSet ds = new DataSet();
                    oleda.Fill(ds);

                    dt = ds.Tables[0];

                    if (dt.Rows.Count > 0)
                    {
                        table tblObj = new table();
                        foreach (DataRow row in dt.Rows)
                        {
                            tblObj.Name = row["Name"].ToString();
                            tblObj.Name = row["Address"].ToString();
                            tblObj.Salary = (int)row["Salary"];
                            tblObj.Age = (int)row["Age"];
                        }
                    }
                }
            }
            catch(Exception ex)
            {
                result = false;
            }
            finally
            {
                oledbConn.Close();
            }
            return result;
        }
    }
}


Now we have to create a view that contains file upload control and a button. When a request for ExcelToDatabase of Home Controller is made, it will show file upload control with button control. When the user selects a file and presses the button it will make a post request to Home Controller and the ExcelToDatabase method will be called. The following is the Razor View for both requests.
@using (Html.BeginForm("ImportExcel", "ExcelToDB", FormMethod.Post, new { enctype = "multipart/form-data" }))
{
    <table>
        <tr><td>Excel file</td><td><input type="file" id="FileUpload1" name="FileUpload1" /></td></tr>
        <tr><td></td><td><input type="submit" id="Submit" name="Submit" value="Submit" /></td></tr>
        <tr><td></td><td><lable>@(viewbag.data)</lable></td></tr>
    </table>
}


ASP.NET MVC Hosting - HostForLIFEASP.NET :: Removing or Customizing View Engines in MVC

clock January 14, 2022 07:48 by author Peter

In this article, you will learn how to remove or customize View Engines not being used by an application.
If you are not using any view engine like ASPX View Engine, it is better to remove it to improve the performance, it is one of the many MVC performance tuning tips.
 
You might be wondering how it will improve the performance. Let's prove it by creating a new action method in a Home Controller, don't add a view for this action method now.
    public ActionResult Foo()  
    {  
         return View();  
    }   

Now, run the application and try navigating to "http://localhost:1212/Home/Foo". Here is what I received:

In the image above you can see how the MVC runtime is looking for an ASPX View Engine first and then the other view engines, which is still a default behavior.

You can control it from the Global.asax file by taking advantage of ViewEngines.Engines.Clear().

    protected void Application_Start()  
    {  
           ViewEngines.Engines.Clear();  
           ViewEngines.Engines.Add(new RazorViewEngine());  
           AreaRegistration.RegisterAllAreas();  
           WebApiConfig.Register(GlobalConfiguration.Configuration);  
           FilterConfig.RegisterGlobalFilters(GlobalFilters.Filters);  
           RouteConfig.RegisterRoutes(RouteTable.Routes);  
           BundleConfig.RegisterBundles(BundleTable.Bundles);  
           AuthConfig.RegisterAuth();  
     }


I highlighted the newly added code above. Now, run the application; you will see the following:


You will see that the MVC runtime successfully removed the ASPX View Engine but it is still looking for VBHTML Views.

You can also control it by customizing Razor View Engine to use only C# languages, by making some changes here:
    ViewEngines.Engines.Add(new RazorViewEngine());  

I highlighted the portion of code. This is actually calling the RazorViewEngine. RazorViewEngine() method internally that has support for both languages (C# and VB) by default. So, we need to override the default functionality by adding a class by the name "CustomRazorViewEngine" that inherits RazorViewEngine. The best place to add this class file is in the App_Start folder.
    using System;  
    using System.Collections.Generic;  
    using System.Linq;  
    using System.Web;  
    using System.Web.Mvc;  
    namespace MvcApplication1.App_Start  
    {  
        public class CustomRazorViewEngine : RazorViewEngine  
        {  
            public CustomRazorViewEngine()  
            {  
                base.AreaViewLocationFormats = new string[] {  
                    "~/Areas/{2}/Views/{1}/{0}.cshtml",  
                    "~/Areas/{2}/Views/Shared/{0}.cshtml"  
                };  
                base.AreaMasterLocationFormats = new string[] {  
                    "~/Areas/{2}/Views/{1}/{0}.cshtml",  
                    "~/Areas/{2}/Views/Shared/{0}.cshtml"  
                };  
                base.AreaPartialViewLocationFormats = new string[] {  
                    "~/Areas/{2}/Views/{1}/{0}.cshtml",  
                    "~/Areas/{2}/Views/Shared/{0}.cshtml"  
                };  
                base.ViewLocationFormats = new string[] {  
                    "~/Views/{1}/{0}.cshtml",  
                    "~/Views/Shared/{0}.cshtml"  
                };  
                base.PartialViewLocationFormats = new string[] {  
                    "~/Views/{1}/{0}.cshtml",  
                    "~/Views/Shared/{0}.cshtml"  
                };  
                base.MasterLocationFormats = new string[] {  
                    "~/Views/{1}/{0}.cshtml",  
                    "~/Views/Shared/{0}.cshtml"  
                };  
            }  
        }  
    }

Remember to use the System.Web.Mvc namespace. Now, in the Global.asax file add the following code:
    protected void Application_Start()  
    {  
        ViewEngines.Engines.Clear();  
        //ViewEngines.Engines.Add(new RazorViewEngine());  
        ViewEngines.Engines.Add(new CustomRazorViewEngine());  
        AreaRegistration.RegisterAllAreas();  
        WebApiConfig.Register(GlobalConfiguration.Configuration);  
        FilterConfig.RegisterGlobalFilters(GlobalFilters.Filters);  
        RouteConfig.RegisterRoutes(RouteTable.Routes);  
        BundleConfig.RegisterBundles(BundleTable.Bundles);  
        AuthConfig.RegisterAuth();  
    }


Remember to use the MvcApplication1.App_Start namespace to bring the class file created above into the Global.asax scope. Now, run the application, you will see the following output:


ASP.NET MVC Hosting - HostForLIFEASP.NET :: MVC 4 WEB API .NET 4.5

clock January 5, 2022 08:52 by author Peter

We can expose a Web API from ASP.NET MVC4. It is a new feature from Microsoft. Clients can get data from a Web API in any format such as JSON, XML, JSONP, HTML and etc.

Now in this article, I am going to explain how to create a new Web API application and how to get data in various formats such as I mentioned above.
 
Purpose
HTTP is not just for serving up web pages. It is also a powerful platform for building APIs that expose services and data. HTTP is simple, flexible, and ubiquitous. Almost any platform that you can think of has an HTTP library, so HTTP services can reach a broad range of clients, including browsers, mobile devices, and traditional desktop applications.
 
The ASP.NET Web API is a framework for building web APIs on top of the .NET Framework. In this tutorial, you will use the ASP.NET Web API to create a web API that returns a list of products.
 
The following are the steps to create a new Web API application in Visual Studio 2011.
 
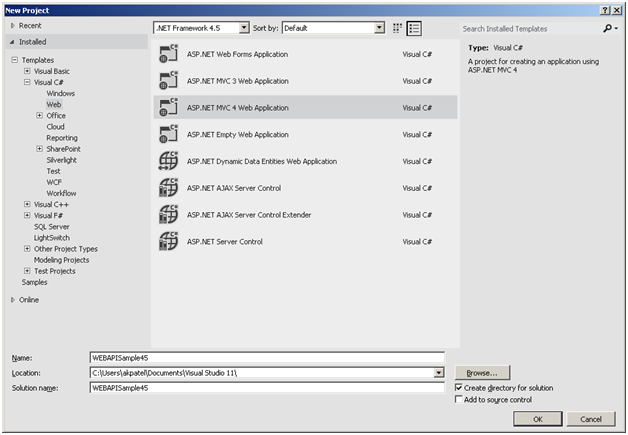
Step 1: We will create a new project and the project type will be MVC4. See the following image:

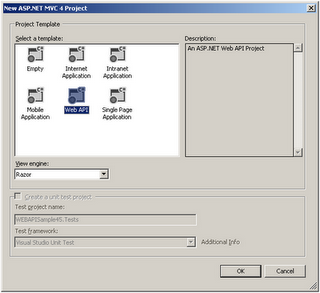
Step 2: Now we will select a Web API template from the Project template Dialog window.

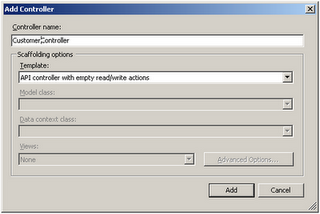
Step 3: Now we will create a Customer controller inside the Controller folder and will select an API controller with read/write actions.


Step 4: Now we will add an Entity Data Model for our Database where we have a Customer Table. You can see it in the attached Source code.
Step 5: It's time to modify our CustomerController to fetch and save data. See the code below.

    using System;  
    using System.Collections.Generic;  
    using System.Linq;  
    using System.Net.Http;  
    using System.Web.Http;  
    using WEBAPISample45.Models;  
      
    namespace WEBAPISample45.Controllers {  
            public class CustomerController: ApiController {  
                private CompanyDBEntities context = new CompanyDBEntities();  
                // GET /api/customer  
                public IEnumerable < CustomerModel > Get() {  
                    IEnumerable < CustomerModel > list = null;  
                    list = (from c in context.Customers select new CustomerModel { Id = c.Id, Name = c.Name, Salary = (long) c.Salary }  
                        .AsEnumerable < CustomerModel > ();  
                        return list;  
                    }  
                    // GET /api/customer/5  
                    public CustomerModel Get(int id) {  
                        return (from c in context.Customers where c.Id == id select new CustomerModel {  
                            Id = c.Id,  
                                Name = c.Name,  
                                Salary = (long) c.Salary  
                        }).FirstOrDefault < CustomerModel > ();  
                    }  
                    // POST /api/customer  
                    public void Post(CustomerModel customer) {  
                        context.AddToCustomers(new Customer {  
                            Id = customer.Id, Name = customer.Name, Salary =  
                                customer.Salary  
                        });  
                        context.SaveChanges(System.Data.Objects.SaveOptions.AcceptAllChangesAfterSave);  
                    }  

                    // PUT /api/customer/5  
                    public void Put(int id, CustomerModel customer) {  
                        var cust = context.Customers.First(c => c.Id == id);  
                        cust.Name = customer.Name;  
                        cust.Salary = customer.Salary;  
                        context.SaveChanges();  
                    }  
                    // DELETE /api/customer/5  
                    public void Delete(int id) {  
                        var cust = context.Customers.First(c => c.Id == id);  
                        context.Customers.DeleteObject(cust);  
                        context.SaveChanges();  
                    }  
                }  
            }

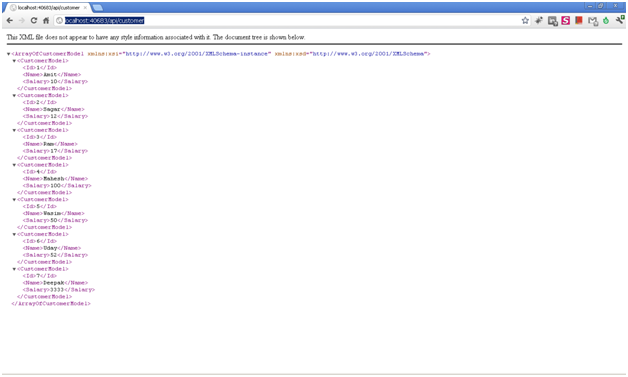
Step 7: Now we will run our application and see the output of the web API. Applications will run on the local server http://localhost:40683/ and you have to add the api/customer to the URL. So now your URL will be http://localhost:40683/api/customer. 


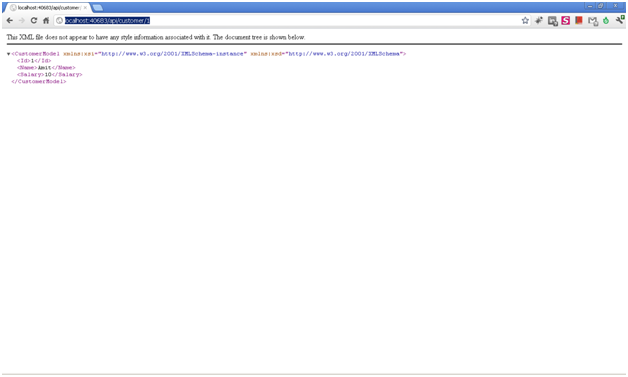
If you want to access a customer by id then you can use http://localhost:40683/api/customer/1 as the URL.

Now I am going to discuss a very important thing here. In the Web API, whatever format we use to send a request is the format of the returned response.
In the following JavaScript code, we are requesting data in JSON format. So the response will be returned in the JSON format. I will explain via Fiddler.

    <script type="text/javascript">  
        $(document).ready(function () {  
            $.ajax({  
      
                type: "GET",  
                url: "api/customer/1",  
                dataType: "json",  
                success: function (data) {  
                         alert(data);  
                }  
            });  
        });  
    </script>

XML
    <script type="text/javascript">  
        $(document).ready(function () {  
            $.ajax({  
      
                type: "GET",  
                url: "api/customer/1",  
                dataType: "xml",  
                success: function (data) {  
                         alert(data);  
                }  
            });  
        });  
    </script>


HTML

    <script type="text/javascript">  
        $(document).ready(function () {  
            $.ajax({  
      
                type: "GET",  
                url: "api/customer/1",  
                dataType: "html",  
                success: function (data) {  
                         alert(data);  
                }  
            });  
        });  
    </script>


If you see the above jQuery code we are only changing the DataType and we are not changing anything inside the Web API.
 
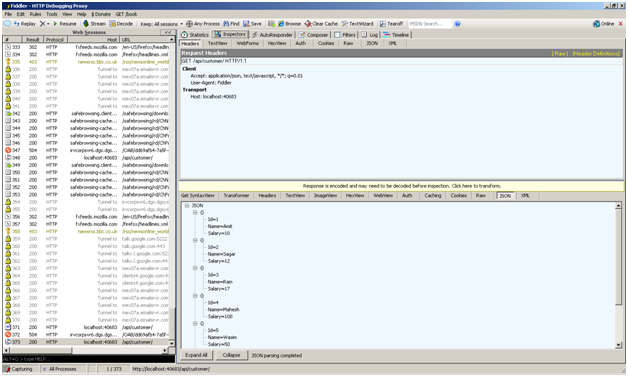
Now we will open Fiddler and see how we can get data in various formats.
 
Open Fiddler and go to the Composer tab. See the following screen:

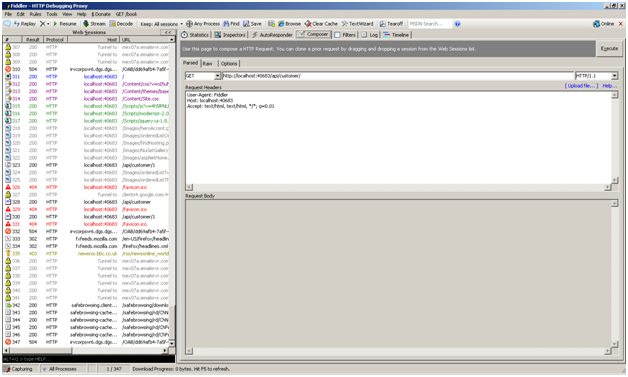
In the above image, you will see the "Accept: text/html, text/html, */*; q=0.01" when we execute the query it will return a response in HTML format.

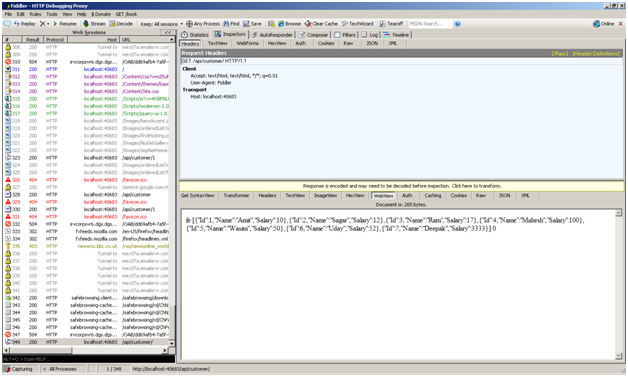
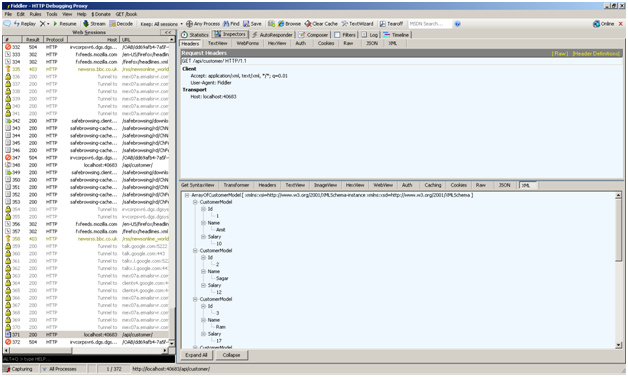
Now we will change the datatype to XML "Accept: application/xml, text/xml, */*; q=0.01" and will see the output in XML format.

Now we will change the datatype to JSON "Accept: application/json, text/javascript, */*; q=0.01"

And the output is in JSON format:


About HostForLIFE

HostForLIFE is European Windows Hosting Provider which focuses on Windows Platform only. We deliver on-demand hosting solutions including Shared hosting, Reseller Hosting, Cloud Hosting, Dedicated Servers, and IT as a Service for companies of all sizes.

We have offered the latest Windows 2019 Hosting, ASP.NET 5 Hosting, ASP.NET MVC 6 Hosting and SQL 2019 Hosting.


Tag cloud

Sign in