European ASP.NET MVC Hosting

BLOG about Latest ASP.NET MVC Hosting and Its Technology - Dedicated to European Windows Hosting Customer

ASP.NET MVC Hosting - HostForLIFEASP.NET :: MVC Crud Using Generic Repository And jQuery

clock June 28, 2023 10:46 by author Peter

It’s good idea to stay on the same page while performing create, update, and delete operations. There are many ways to do it such as making them partial views, using Bootstrap’s model popup, loading partial views, using AJAX etc. However, In this post, we will learn how to do it, using jQuery, Generic Repository Pattern, and Entity Framework code first migration.


Repository Pattern
Repository mediates between the domain and the data mapping layers, using a collection-like interface to access the domain objects.

Getting started,

Step 1 Create MVC Application
Open Visual Studio to create a new project, followed by selecting ASP.NET Web Application and name mvc_crud and click OK. In the templatesSelectMvc template and keep the authentication off.

Step 2
Install Entity Framework and fluent validation through NuGet Package.

Step 3 Add Model Class
Now, add new class under models and name it as employee class.
    namespacemvc_CRUD.Models {  
        publicclassEmployee {  
            publicint Id {  
                get;  
                set;  
            }  
            publicstring Phone {  
                get;  
                set;  
            }  
            publicstringFirstName {  
                get;  
                set;  
            }  
            publicstringLastName {  
                get;  
                set;  
            }  
            publicstring Email {  
                get;  
                set;  
            }  
            publicDepartmentDepartment {  
                get;  
                set;  
            }  
            publicGenderGender {  
                get;  
                set;  
            }  
            publicboolIsActive {  
                get;  
                set;  
            }  
        }  
    }  
    publicenumDepartment {  
        Sales,  
        Management,  
        Security  
    }  
    publicenumGender {  
        Male,  
        Female  
    }  

Step 4 Create validation class
Create new folder validation. Afterwards, right click on validation folder and add new class, name it EmployeeValidation.
    publicclassEmployeeValidation AbstractValidator < Employee > {  
        publicEmployeeValidation() {  
            RuleFor(e => e.FirstName).NotEmpty().Length(0, 8);  
            RuleFor(e => e.LastName).NotEmpty().Length(0, 8);  
            RuleFor(e => e.Phone).Length(10).WithMessage("Enter valid number");  
            RuleFor(s => s.Email).NotEmpty().WithMessage("Email address is required").EmailAddress().WithMessage("A valid email is required");  
        }  
    }  


Step 5 Create DbContext class
Now, let’s create a new folder, DAL. Afterwards, add new class, which is derived from DbContext and name it EmployeeContext.
    publicclassEmployeeContext DbContext {  
        publicEmployeeContext()  
        base("EmployeeDB") {}  
        publicDbSet < Employee > Empoyees {  
            get;  
            set;  
        }  
    }  

Step 6 Create Repository Interface class
Now, let’s add a new generic interface, IRepositoryunder abstract folder .
    publicinterfaceIRepository < T > whereT class {  
        IEnumerable < T > GetAll();  
        TFindBy(object id);  
        void Add(Tobj);  
        void Update(Tobj);  
        void Delete(object id);  
        void Save();  
    }  

Step 7 Create Repository Base class

Now, we are going to add an abstract class RepositoryBase, which has virtual implementation on IRepositary interface. For every other Repository, we will add later, which will inherit this abstract class by overriding the virtual methods.
    publicabstractclassRepositoryBase < T > whereT class {  
        protectedEmployeeContext _context;  
        protectedDbSet < T > dbSet;  
        publicRepositoryBase() {  
            this._context = newEmployeeContext();  
            dbSet = _context.Set < T > ();  
        }  
        publicRepositoryBase(EmployeeContext _dataContext) {  
            this._context = _dataContext;  
            dbSet = _dataContext.Set < T > ();  
        }  
        publicvirtualIEnumerable < T > GetAll() {  
            returndbSet.ToList();  
        }  
        publicTFindBy(object id) {  
            returndbSet.Find(id);  
        }  
        publicvirtualvoid Add(Tobj) {  
            dbSet.Add(obj);  
        }  
        publicvirtualvoid Update(Tobj) {  
            dbSet.Attach(obj);  
            _context.Entry(obj).State = EntityState.Modified;  
        }  
        publicvirtualvoid Delete(object id) {  
            T existing = dbSet.Find(id);  
            dbSet.Remove(existing);  
        }  
        publicvirtualvoid Save() {  
            _context.SaveChanges();  
        }  
    }  


Step 8 Create Repository class
Now, let’s create a new folder repository. Afterwards, add new class EmployeeRepository class, which will inherit from Abstract but with a generic repository base andIEmployeeRepository interface.
    namespacemvc_CRUD.Repository {  
        publicclassEmployeeRepository RepositoryBase < Employee > , IEmployeeRepository {}  
        publicinterfaceIEmployeeRepository IRepository < Employee > {}  
    }  

Step 9 Add connection string
Now, add the connection string in web.config file.
    <connectionStrings>  
        <addname="EmployeeDB" connectionString="Data Source=.\SQLEXPRESS;InitialCatalog=EmployeeDB;Integrated Security=True;MultipleActiveResultSets=true" providerName="System.Data.SqlClient" /> </connectionStrings>  


Step 10
In the packet manager console, run the commands given below.
enable-migrations

add-migration "initial-migration"

update-database -verbose

Step 11 Add Controller class
Now, let’s EditHomeController and add the code given below.
    publicclassHomeController Controller {  
        publicreadonlyIEmployeeRepository _employeeRepository;  
        publicHomeController(IEmployeeRepository _employeeRepository) {  
            this._employeeRepository = _employeeRepository;  
        }  
        publicActionResult Index() {  
            varemp = _employeeRepository.GetAll();  
            return View(emp);  
        }  
        publicActionResult Create() {  
                return View();  
            }  
            [HttpPost]  
        publicActionResult Create(Employeeobj) {  
                EmployeeValidationval = newEmployeeValidation();  
                ValidationResult model = val.Validate(obj);  
                if (model.IsValid) {  
                    _employeeRepository.Add(obj);  
                    _employeeRepository.Save();  
                } else {  
                    foreach(ValidationFailure _error inmodel.Errors) {  
                        ModelState.AddModelError(_error.PropertyName, _error.ErrorMessage);  
                    }  
                }  
                return View(obj);  
            }  
            // GET Employees/Edit/5  
        publicActionResult Update(int id) {  
                varemp = _employeeRepository.FindBy(id);  
                return View(emp);  
            }  
            [HttpPost]  
            [ValidateAntiForgeryToken]  
        publicActionResult Update(Employeeemp) {  
                if (ModelState.IsValid) {  
                    _employeeRepository.Update(emp);  
                    _employeeRepository.Save();  
                    returnRedirectToAction("Index");  
                }  
                return View(emp);  
            }  
            // GET Employees/Delete/5  
        publicActionResult Delete(int id) {  
                varemp = _employeeRepository.FindBy(id);  
                return View(emp);  
            }  
            [HttpPost, ActionName("Delete")]  
            [ValidateAntiForgeryToken]  
        publicActionResultDeleteConfirmed(int id) {  
            _employeeRepository.Delete(id);  
            _employeeRepository.Save();  
            returnRedirectToAction("Index");  
        }  
    }  

Step 12 Add Dependency Container
Before we generate views, let’s add a Dependency container. Install UnityMvc5 through NuGet Package and edit the unityConfig class in the App_Start folder.
    publicstaticclassUnityConfig {  
        publicstaticvoidRegisterComponents() {  
            var container = newUnityContainer();  
            // register all your components with the container here  
            // it is NOT necessary to register your controllers  
            // e.g. container.RegisterType<ITestService, TestService>();  
            container.RegisterType < IEmployeeRepository, EmployeeRepository > ();  
            DependencyResolver.SetResolver(newUnityDependencyResolver(container));  
        }  
    }  


Register in the global.asax file
    UnityConfig.RegisterComponents();  

Step 13 Add Index view
Now, let’s add Index view. Right click inside the action method and then click add view, followed by selecting the create strongly-typed view.

We will use the index to load the other pages, using jQuery but before it, lets get jqueryreveal. Here, we need the jqueryreveal.js and reveal.css files to render in the layout. Afterwards, add the create, update, and delete views.
    @model IEnumerable<mvc_CRUD.Models.Employee>  
    @{  
        ViewBag.Title = "Index";  
    }  
    <div id="main_div" class="panel panel-primary">  <div class="panel-heading">Employee List</div>  
        <div class="panel-body">  
            <div class="col-md-6"><a href="#" data-reveal-id="Create" class="CreateBtn"><i class="glyphicon glyphicon-file">Add</i></a><br />         </div>  
            <div class="table table-responsive">  
                <table class="table table-striped table-condensed flip-content">  
                    <thead class="flip-content">  
                        <tr>  
                            <th>Phone</th>  
                            <th>First name</th>  
                            <th>Last name</th>  
                            <th>Email</th>  
                            <th>Department</th>  
                            <th>Gender</th>  
                            <th>Is Active</th>  
                            <th></th>  
                        </tr>  
                    </thead>  
                    <tbody>  
                        @foreach (var item in Model)  
                        {  
                           <tr>  
                                <td> @Html.DisplayFor(modelItem => item.Phone) </td>  
                                <td> @Html.DisplayFor(modelItem => item.FirstName) </td>  
                                <td> @Html.DisplayFor(modelItem => item.LastName) </td>  
                                <td> @Html.DisplayFor(modelItem => item.Email)</td>  
                                <td>@Html.DisplayFor(modelItem => item.Department) </td>  
                                <td> @Html.DisplayFor(modelItem => item.Gender) </td>  
                                <td> @Html.DisplayFor(modelItem => item.IsActive)</td>  
                             <td>  
                          <a href="#" id="@item.Id" data-reveal-id="Update" class="UpdateBtn"><i class="glyphicon glyphicon-edit"></i</a>  
                          <a href="#" id="@item.Id" data-reveal-id="Delete" class="DeleteBtn"><i class="glyphicon glyphicon-remove"></i></a>  
                            </td>  
                         </tr>  
                        }  
                    </tbody>  
                </table>  
            </div>  
        </div>  
    </div>  
    <div id="Update" class="reveal-modal"></div>  
    <div id="Delete" class="reveal-modal"></div>  
    <a href="#" id="Create" class="reveal-modal"></a>  


Add the following  jQuery in the script section at the bottom of the index view to load other views.
    @section Scripts{  
        <script type="text/javascript">  
            $(document).ready(function () {  
                $('.UpdateBtn').click(function () {  
                    var url = '@Url.Action("Update","Home")';  
                    url = url + "?Id=" + this.id;  
                    $('#Update').load(url);  
                });  
            });  
        </script>  
        <script type="text/javascript">  
            $(document).ready(function () {  
                $('.DeleteBtn').click(function () {  
                    var url = '@Url.Action("Delete","Home")';  
                    url = url + "?Id=" + this.id;  
                    $('#Delete').load(url);  
                });  
            });  
        </script>  
        <script type="text/javascript">  
            $(document).ready(function () {  
                $('.CreateBtn').click(function () {  
                    var url = '@Url.Action("Create","Home")';  
                    $('#Create').load(url);  
                });  
            });  
        </script>  
    }  


Step 14
Now, run the application.

Update view

Delete view

Thank you so much for your reading. I hope the article is useful for all the readers. If you have any complaint or suggestion about the code or the article, please let me know. Don't forget to leave your opinion in the comments section bellow. 


ASP.NET MVC Hosting - HostForLIFEASP.NET :: DataTables Grid Integration with ASP.NET MVC

clock June 22, 2023 09:11 by author Peter

What exactly is DataTables?
DataTables is a jQuery Javascript library plug-in. It is a highly flexible tool that adds advanced interaction controls to any HTML table. It is founded on the principles of progressive enhancement.


Let's begin with the database section.
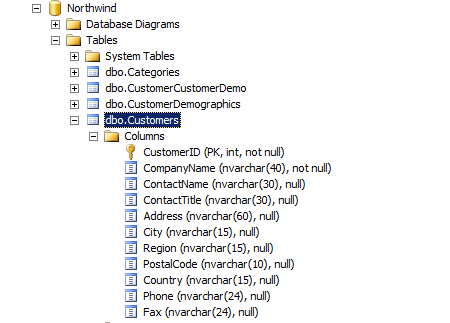
Database Part

I've created a database called "Northwind" that contains a "Customers" entity.

Next, we are going to create an ASP.NET MVC5 Web application.

Creating ASP.NET MVC5 Web Application
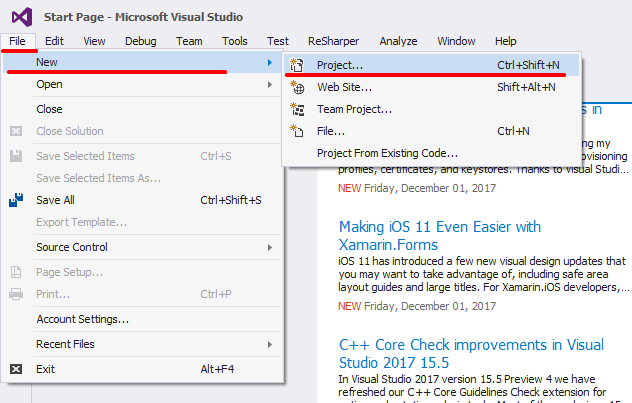
Open New Visual Studio 2015 IDE.


After opening IDE just, next we are going to create MVC project for doing that just click File - inside that New - Project.

After choosing a project, a new dialog will pop up with the name “New Project”. In that, we are going to choose Visual C# Project Templates - Web - ASP.NET Web Application. Then, we are going to name the project as “DemoDatatables”.

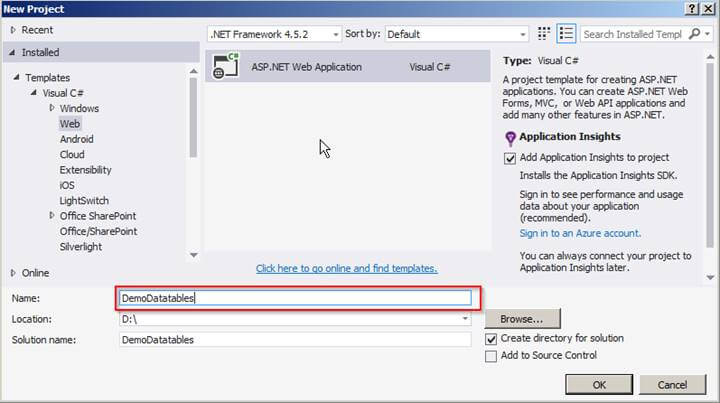
After naming the project we are going click on OK button to create a project.
A new dialog will pop up for choosing templates for Creating “ASP.NET Web Application;” in that template, we are going to Create MVC application. That's why we are going to choose “MVC template” and next click on OK button to create a project.

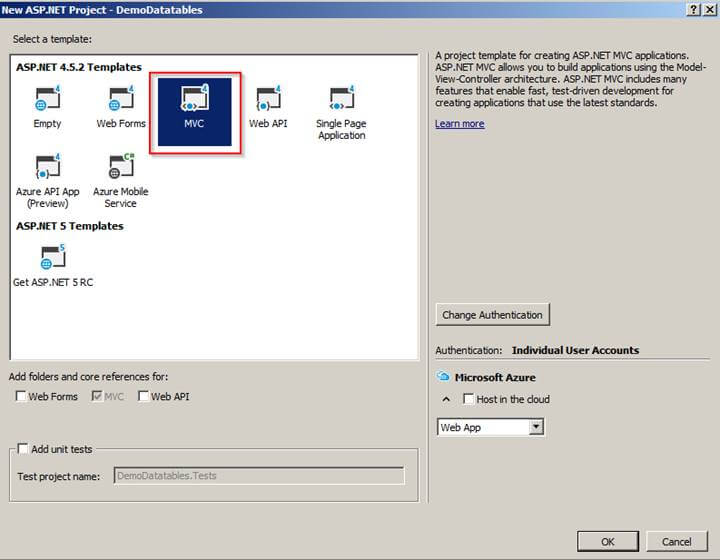
After clicking on OK button it will start to create a project.
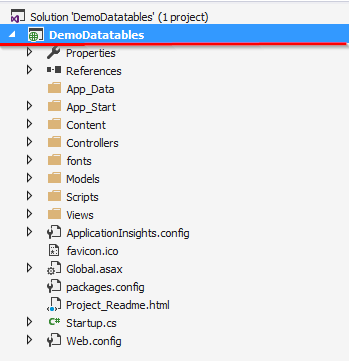
Project Structure

After creating project next, we are going to create Model.

Creating Customer Model
We are going to add Customer Model to the Models folder.

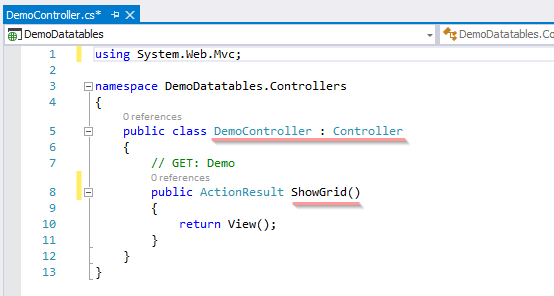
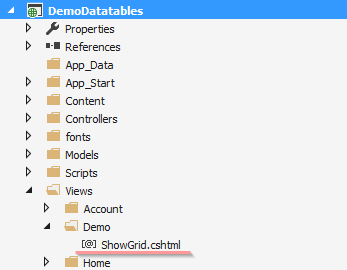
After adding Action Method now let add View with name “ShowGrid”.


Adding DataTables Grid Scripts and Css on ShowGrid View

In first step we are going to add Script and Css reference.
    <script src="//ajax.googleapis.com/ajax/libs/jquery/1.11.1/jquery.min.js"></script>  
    <link href="~/Content/bootstrap.css" rel="stylesheet" />  
      
    <link href="https://cdn.datatables.net/1.10.15/css/dataTables.bootstrap.min.css" rel="stylesheet" />  
    <link href="https://cdn.datatables.net/responsive/2.1.1/css/responsive.bootstrap.min.css" rel="stylesheet" />  
      
    <script src="https://cdn.datatables.net/1.10.15/js/jquery.dataTables.min.js"></script>  
    <script src="https://cdn.datatables.net/1.10.15/js/dataTables.bootstrap4.min.js "></script>  

After adding Script and CSS reference next we are going to add DataTables Markup.

Adding DataTables Markup
It is simple Html Table in that we are going to add columns headers (“<th>”) with all the columns names which we want to display on the grid.

After adding Markup next, we are going to add DataTables function to Create DataTables.

    <div class="container">  
            <br />  
            <div style="width:90%; margin:0 auto;">  
                <table id="demoGrid" class="table table-striped table-bordered dt-responsive nowrap" width="100%" cellspacing="0">  
                    <thead>  
                  <tr>  
                    <th>CustomerID</th>  
                    <th>CompanyName</th>      
                    <th>ContactName</th>  
                    <th>ContactTitle</th>  
                    <th>City</th>  
                    <th>PostalCode</th>  
                    <th>Country</th>  
                    <th>Phone</th>  
                    <th>Edit</th>  
                    <th>Delete</th>  
                </tr>  
                    </thead>  
                </table>  
            </div>  
        </div>  


Adding DataTables Function to create DataTables
Code Snippet
    <script>  
      
        $('#demoGrid').dataTable({  
        });  
    </script>  

DataTables Options

  • Processing - Enable or disable the display of a 'processing' indicator when the table is being processed (e.g. a sort).
  • server Side - Server-side processing - where filtering, paging, and sorting calculations are all performed by a server.
  • Filter - this option is used for enabling and disabling of search box
  • orderMulti - When ordering is enabled (ordering), by default DataTables allows users to sort multiple columns by shift-clicking upon the header cell for each column. Although this can be quite useful for users, it can also increase the complexity of the order, potentiality increasing the processing time of ordering the data. Therefore, this option is provided to allow this shift-click multiple column abilities
  • Ajax - Ajax request is made to get data to DataTables.
  • columnDefs - Set column definition initialisation properties.
  • Columns - Set column specific initialisation properties.


After completing with an understanding of options or properties next we are going to set it.

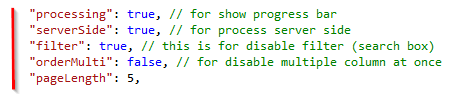
We are going to set “processing” option to true to display processing bar, after that, we are going to set the “serverSide” option to true because we are going to do paging and filtering at serverSide.

Next options after “serverSide” option are “filter.” We are going to use the search box; that's why we have set this property to true, “orderMulti” is also set to false because we do not want to sort multiple columns at once.

DataTables Options snapshot
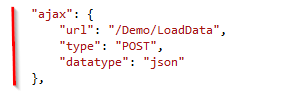
Ajax Option
And the main option is Ajax which we are going to use for calling an Action Method for getting data to bind DataTables Grid the data is in Json format. For that we are going to pass URL: -"/Demo/LoadData”, this request is Post request. And data type we are going to set as Json.

We are going to call LoadData Action Method which is under Demo Controller which I will explain in upcoming steps.
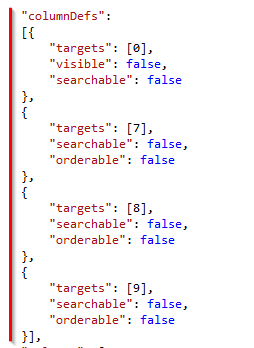
columnDefs Option
After setting Ajax we have a “columnDefs” option which I have used for hiding Primary key of the table (“CustomerID”) and which should also be not searchable.
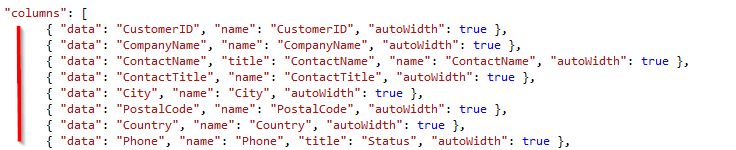
columns Option
Finally, the second to last option is columns which are used for initialization of DataTables grid. Add that property which you need to render on the grid, which must be defined in this columns option.

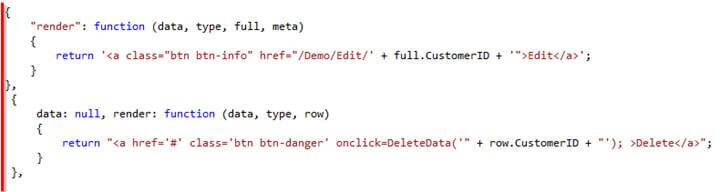
Finally, on click of the delete button, we can call a custom function to delete data as I have created “DeleteData” function.
Complete code Snippet of ShowGrid View
    @{  
        Layout = null;  
    }  
      
    <!DOCTYPE html>  
    <html>  
    <head>  
        <meta name="viewport" content="width=device-width" />  
        <title>ShowGrid</title>  
        <script src="//ajax.googleapis.com/ajax/libs/jquery/1.11.1/jquery.min.js"></script>  
        <link href="~/Content/bootstrap.css" rel="stylesheet" />  
      
        <link href="https://cdn.datatables.net/1.10.15/css/dataTables.bootstrap.min.css" rel="stylesheet" />  
        <link href="https://cdn.datatables.net/responsive/2.1.1/css/responsive.bootstrap.min.css" rel="stylesheet" />  
      
        <script src="https://cdn.datatables.net/1.10.15/js/jquery.dataTables.min.js"></script>  
        <script src="https://cdn.datatables.net/1.10.15/js/dataTables.bootstrap4.min.js "></script>  
      
        <script>  
            $(document).ready(function () {  
                $("#demoGrid").DataTable({  
      
                    "processing": true, // for show progress bar  
                    "serverSide": true, // for process server side  
                    "filter": true, // this is for disable filter (search box)  
                    "orderMulti": false, // for disable multiple column at once  
                    "pageLength": 5,  
      
                    "ajax": {  
                        "url": "/Demo/LoadData",  
                        "type": "POST",  
                        "datatype": "json"  
                    },  
      
                    "columnDefs":  
                    [{  
                        "targets": [0],  
                        "visible": false,  
                        "searchable": false  
                    },  
                    {  
                        "targets": [7],  
                        "searchable": false,  
                        "orderable": false  
                    },  
                    {  
                        "targets": [8],  
                        "searchable": false,  
                        "orderable": false  
                    },  
                    {  
                        "targets": [9],  
                        "searchable": false,  
                        "orderable": false  
                    }],  
      
                    "columns": [  
                          { "data": "CustomerID", "name": "CustomerID", "autoWidth": true },  
                          { "data": "CompanyName", "name": "CompanyName", "autoWidth": true },  
                          { "data": "ContactName", "title": "ContactName", "name": "ContactName", "autoWidth": true },  
                          { "data": "ContactTitle", "name": "ContactTitle", "autoWidth": true },  
                          { "data": "City", "name": "City", "autoWidth": true },  
                          { "data": "PostalCode", "name": "PostalCode", "autoWidth": true },  
                          { "data": "Country", "name": "Country", "autoWidth": true },  
                          { "data": "Phone", "name": "Phone", "title": "Status", "autoWidth": true },  
                          {  
                              "render": function (data, type, full, meta)  
                              { return '<a class="btn btn-info" href="/Demo/Edit/' + full.CustomerID + '">Edit</a>'; }  
                          },  
                           {  
                               data: null, render: function (data, type, row) {  
                                   return "<a href='#' class='btn btn-danger' onclick=DeleteData('" + row.CustomerID + "'); >Delete</a>";  
                               }  
                           },  
      
                    ]  
      
                });  
            });  
        </script>  
      
    </head>  
    <body>  
        <div class="container">  
            <br />  
            <div style="width:90%; margin:0 auto;">  
                <table id="demoGrid" class="table table-striped table-bordered dt-responsive nowrap" width="100%" cellspacing="0">  
                    <thead>  
                        <tr>  
                            <th>CustomerID</th>  
                            <th>CompanyName</th>  
                            <th>ContactName</th>  
                            <th>ContactTitle</th>  
                            <th>City</th>  
                            <th>PostalCode</th>  
                            <th>Country</th>  
                            <th>Phone</th>  
                            <th>Edit</th>  
                            <th>Delete</th>  
                        </tr>  
                    </thead>  
                </table>  
            </div>  
        </div>  
    </body>  
    </html>  

After completing with initialization of DataTables grid next we are going to create LoadData Action Method.

Adding LoadData Action Method to Demo Controller
Here we are going to Add Action Method with name LoadData. In this action method, we are going to get all Customer records from the database to display and on the basis of the parameter we are going sort data, and do paging with data.

We are doing paging and filtering of data on the server side; that why we are using IQueryable which will execute queries with filters on the server side.

Render buttons in Columns
At last, we need to render button in the grid for editing data and deleting data.


    @{  
        Layout = null;  
    }  
      
    <!DOCTYPE html>  
    <html>  
    <head>  
        <meta name="viewport" content="width=device-width" />  
        <title>ShowGrid</title>  
        <script src="//ajax.googleapis.com/ajax/libs/jquery/1.11.1/jquery.min.js"></script>  
        <link href="~/Content/bootstrap.css" rel="stylesheet" />  
      
        <link href="https://cdn.datatables.net/1.10.15/css/dataTables.bootstrap.min.css" rel="stylesheet" />  
        <link href="https://cdn.datatables.net/responsive/2.1.1/css/responsive.bootstrap.min.css" rel="stylesheet" />  
      
        <script src="https://cdn.datatables.net/1.10.15/js/jquery.dataTables.min.js"></script>  
        <script src="https://cdn.datatables.net/1.10.15/js/dataTables.bootstrap4.min.js "></script>  
      
        <script>  
            $(document).ready(function () {  
                $("#demoGrid").DataTable({  
      
                    "processing": true, // for show progress bar  
                    "serverSide": true, // for process server side  
                    "filter": true, // this is for disable filter (search box)  
                    "orderMulti": false, // for disable multiple column at once  
                    "pageLength": 5,  
      
                    "ajax": {  
                        "url": "/Demo/LoadData",  
                        "type": "POST",  
                        "datatype": "json"  
                    },  
      
                    "columnDefs":  
                    [{  
                        "targets": [0],  
                        "visible": false,  
                        "searchable": false  
                    },  
                    {  
                        "targets": [7],  
                        "searchable": false,  
                        "orderable": false  
                    },  
                    {  
                        "targets": [8],  
                        "searchable": false,  
                        "orderable": false  
                    },  
                    {  
                        "targets": [9],  
                        "searchable": false,  
                        "orderable": false  
                    }],  
      
                    "columns": [  
                          { "data": "CustomerID", "name": "CustomerID", "autoWidth": true },  
                          { "data": "CompanyName", "name": "CompanyName", "autoWidth": true },  
                          { "data": "ContactName", "title": "ContactName", "name": "ContactName", "autoWidth": true },  
                          { "data": "ContactTitle", "name": "ContactTitle", "autoWidth": true },  
                          { "data": "City", "name": "City", "autoWidth": true },  
                          { "data": "PostalCode", "name": "PostalCode", "autoWidth": true },  
                          { "data": "Country", "name": "Country", "autoWidth": true },  
                          { "data": "Phone", "name": "Phone", "title": "Status", "autoWidth": true },  
                          {  
                              "render": function (data, type, full, meta)  
                              { return '<a class="btn btn-info" href="/Demo/Edit/' + full.CustomerID + '">Edit</a>'; }  
                          },  
                           {  
                               data: null, render: function (data, type, row) {  
                                   return "<a href='#' class='btn btn-danger' onclick=DeleteData('" + row.CustomerID + "'); >Delete</a>";  
                               }  
                           },  
      
                    ]  
      
                });  
            });  
        </script>  
      
    </head>  
    <body>  
        <div class="container">  
            <br />  
            <div style="width:90%; margin:0 auto;">  
                <table id="demoGrid" class="table table-striped table-bordered dt-responsive nowrap" width="100%" cellspacing="0">  
                    <thead>  
                        <tr>  
                            <th>CustomerID</th>  
                            <th>CompanyName</th>  
                            <th>ContactName</th>  
                            <th>ContactTitle</th>  
                            <th>City</th>  
                            <th>PostalCode</th>  
                            <th>Country</th>  
                            <th>Phone</th>  
                            <th>Edit</th>  
                            <th>Delete</th>  
                        </tr>  
                    </thead>  
                </table>  
            </div>  
        </div>  
    </body>  
    </html>  

After completing with initialization of DataTables grid next we are going to create LoadData Action Method.

Adding LoadData Action Method to Demo Controller
Here we are going to Add Action Method with name LoadData. In this action method, we are going to get all Customer records from the database to display and on the basis of the parameter we are going sort data, and do paging with data.

We are doing paging and filtering of data on the server side; that why we are using IQueryable which will execute queries with filters on the server side.

For using OrderBy in the query we need to install System.Linq.Dynamic package from NuGet packages.

Snapshot while adding System.Linq.Dynamic package from NuGet packages

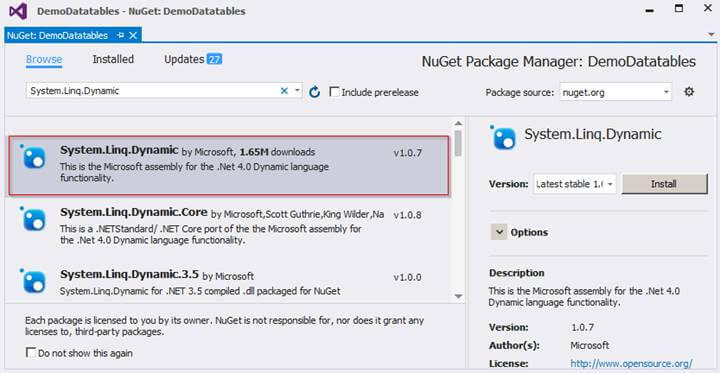
After adding the package, next, we see the complete code snippet and how to get data and do paging and filtering with it.

Complete code Snippet of LoadData Action Method
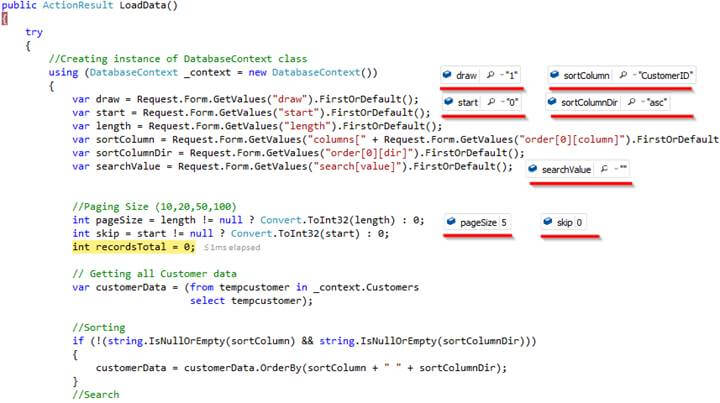
All processes are step by step with comments; so it's easy to understand.

All Request.Form.GetValues parameters value will get populated when AJAX post method gets called on a load of if you do paging or sorting and search.
Code Snippet
    public ActionResult LoadData()  
    {  
        try  
        {  
            var draw = Request.Form.GetValues("draw").FirstOrDefault();  
            var start = Request.Form.GetValues("start").FirstOrDefault();  
            var length = Request.Form.GetValues("length").FirstOrDefault();  
            var sortColumn = Request.Form.GetValues("columns[" + Request.Form.GetValues("order[0][column]").FirstOrDefault() + "][name]").FirstOrDefault();  
            var sortColumnDir = Request.Form.GetValues("order[0][dir]").FirstOrDefault();  
            var searchValue = Request.Form.GetValues("search[value]").FirstOrDefault();  
      
      
            //Paging Size (10,20,50,100)    
            int pageSize = length != null ? Convert.ToInt32(length) : 0;  
            int skip = start != null ? Convert.ToInt32(start) : 0;  
            int recordsTotal = 0;  
      
            // Getting all Customer data    
            var customerData = (from tempcustomer in _context.Customers  
                                select tempcustomer);  
      
            //Sorting    
            if (!(string.IsNullOrEmpty(sortColumn) && string.IsNullOrEmpty(sortColumnDir)))  
            {  
                customerData = customerData.OrderBy(sortColumn + " " + sortColumnDir);  
            }  
            //Search    
            if (!string.IsNullOrEmpty(searchValue))  
            {  
                customerData = customerData.Where(m => m.CompanyName == searchValue);  
            }  
      
            //total number of rows count     
            recordsTotal = customerData.Count();  
            //Paging     
            var data = customerData.Skip(skip).Take(pageSize).ToList();  
            //Returning Json Data    
            return Json(new { draw = draw, recordsFiltered = recordsTotal, recordsTotal = recordsTotal, data = data });  
      
        }  
        catch (Exception)  
        {  
            throw;  
        }  
      
    }  


Complete code Snippet of DemoController
    using DemoDatatables.Models;  
    using System;  
    using System.Linq;  
    using System.Web.Mvc;  
    using System.Linq.Dynamic;  
    using System.Data.Entity;  
      
    namespace DemoDatatables.Controllers  
    {  
        public class DemoController : Controller  
        {  
            // GET: Demo  
            public ActionResult ShowGrid()  
            {  
                return View();  
            }  
      
            public ActionResult LoadData()  
            {  
                try  
                {  
                    //Creating instance of DatabaseContext class  
                    using (DatabaseContext _context = new DatabaseContext())  
                    {  
                        var draw = Request.Form.GetValues("draw").FirstOrDefault();  
                        var start = Request.Form.GetValues("start").FirstOrDefault();  
                        var length = Request.Form.GetValues("length").FirstOrDefault();  
                        var sortColumn = Request.Form.GetValues("columns[" + Request.Form.GetValues("order[0][column]").FirstOrDefault() + "][name]").FirstOrDefault();  
                        var sortColumnDir = Request.Form.GetValues("order[0][dir]").FirstOrDefault();  
                        var searchValue = Request.Form.GetValues("search[value]").FirstOrDefault();  
      
      
                        //Paging Size (10,20,50,100)    
                        int pageSize = length != null ? Convert.ToInt32(length) : 0;  
                        int skip = start != null ? Convert.ToInt32(start) : 0;  
                        int recordsTotal = 0;  
      
                        // Getting all Customer data    
                        var customerData = (from tempcustomer in _context.Customers  
                                            select tempcustomer);  
      
                        //Sorting    
                        if (!(string.IsNullOrEmpty(sortColumn) && string.IsNullOrEmpty(sortColumnDir)))  
                        {  
                            customerData = customerData.OrderBy(sortColumn + " " + sortColumnDir);  
                        }  
                        //Search    
                        if (!string.IsNullOrEmpty(searchValue))  
                        {  
                            customerData = customerData.Where(m => m.CompanyName == searchValue);  
                        }  
      
                        //total number of rows count     
                        recordsTotal = customerData.Count();  
                        //Paging     
                        var data = customerData.Skip(skip).Take(pageSize).ToList();  
                        //Returning Json Data    
                        return Json(new { draw = draw, recordsFiltered = recordsTotal, recordsTotal = recordsTotal, data = data });  
                    }  
                }  
                catch (Exception)  
                {  
                    throw;  
                }  
      
            }  
         
        }  
    }  

Save the entire Source code and run the application.

Run Application
To access the application, enter URL - http://localhost:#####/demo/showgrid .

“#####” is localhost port number.

Real-time Debugging Snapshot
In this section, you can see what values are populated when post method gets called.

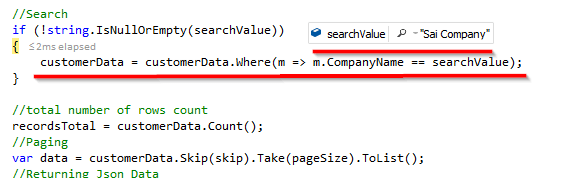
Search with DataTables grid
In this section we have implemented a search for only Companyname column, if you want to add another column just use or condition (“||”) with it.


Adding more columns to search

Debugging View of Search

After completing with search Implementation next we are going to work on Edit Button of DataTables Grid.

Edit Event in DataTables grid
In this section first we are going add Edit Action Method in Demo Controller which will handle edit request and it will take Customer ID as input from which we are going to get details of that customer.

Code Snippet of Edit Action Method
    [HttpGet]  
    public ActionResult Edit(int? ID)  
    {     
        try  
        {  
            using (DatabaseContext _context = new DatabaseContext())  
            {  
                var Customer = (from customer in _context.Customers  
                                where customer.CustomerID == ID  
                                select customer).FirstOrDefault();  
      
                return View(Customer);  
            }  
        }  
        catch (Exception)  
        {  
            throw;  
        }     
    }  


After having a look on Edit action method next let’s see how to render Edit link (button).

Below is syntax for rendering Edit button

Finally, you can see Edit View.

After completing with Edit part next we are going to have a look at delete part.

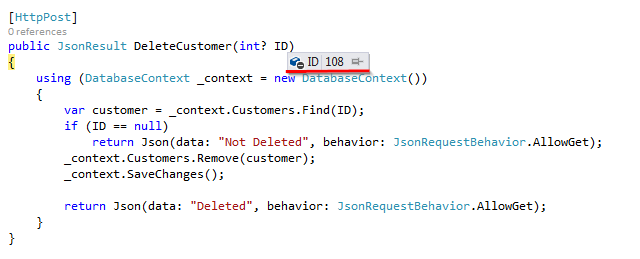
Delete Event in DataTables grid
In this section first we are going add DeleteCustomer Action Method in DemoController which will handle delete request and it will take Customer ID (“ID”) as input from which we are going to delete customer data.

Code Snippet of DeleteCustomer
    [HttpPost]  
    public JsonResult DeleteCustomer(int? ID)  
    {  
        using (DatabaseContext _context = new DatabaseContext())  
        {  
            var customer = _context.Customers.Find(ID);  
            if (ID == null)  
                return Json(data: "Not Deleted", behavior: JsonRequestBehavior.AllowGet);  
            _context.Customers.Remove(customer);  
            _context.SaveChanges();  
      
            return Json(data: "Deleted", behavior: JsonRequestBehavior.AllowGet);  
        }  
    }  


After having a look on DeleteCustomer action method next let’s see how to render delete link (button).

Below is syntax for rendering Delete button

Now you can see that we are generating simple href button and on that button, we have added an onclick event to call DeleteData function which we have not created yet, so  let’s create DeleteData function.

Code Snippet
In this part when user clicks on Delete button DeleteData function will get called and first thing it will show is confirmation alert ("Are you sure you want to delete ...?") if you click on ok (confirm) button then it will call Delete function. This function takes CustomerID as input, next we are generating URL of DeleteCustomer Action Method and passing it as ajax post request and along with it we are passing Customer ID as parameter.

If data is deleted, then we are going to get “Deleted” as a response from Deletecustomer Action Method, finally, we show alert to the user and reload grid.
    <script>  
      
        function DeleteData(CustomerID) {  
            if (confirm("Are you sure you want to delete ...?")) {  
                Delete(CustomerID);  
            }  
            else {  
                return false;  
            }  
        }  
      
      
        function Delete(CustomerID) {  
            var url = '@Url.Content("~/")' + "Demo/DeleteCustomer";  
            $.post(url, { ID: CustomerID }, function (data) {  
                if (data == "Deleted") {  
                    alert("Delete Customer !");  
                    oTable = $('#demoGrid').DataTable();  
                    oTable.draw();  
                }  
                else {  
                    alert("Something Went Wrong!");  
                }  
            });  
        }  
    </script>  

Debugging View while deleting customer

Finally, we have learned how to use jQuery DataTables Grid with ASP.NET CORE MVC. I hope you enjoyed the article.


ASP.NET MVC Hosting - HostForLIFEASP.NET :: Action Filter In MVC

clock June 16, 2023 07:32 by author Peter

Action filter in MVC allows us to manage situations in which we wish to perform an operation prior to and following the execution of a controller action. We create a custom class that inherits the FilterAttribute class and implements the IActionFilter interface for this purpose. After creating the filter, we merely assign the class name to the controller as an attribute.

In this case, the FilterAttribute class allows the class to be used as an attribute, and the IActionFilter interface contains two methods titled OnActionExecuting and OnActionExecuted. OnActionExecuting is executed before the controller method, while OnActionExecuted is summoned after the controller method has been executed. This technique is extremely useful for archiving purposes. So let's examine how we can utilize this filter.
 
Let's begin by adding the MyActionFilter.cs class. Derive this class now from the FilterAttribute and the IActionFilter interfaces. Incorporate your custom logic within the OnActionExecuting and OnActionExecuted methods.Consequently, the code will appear as shown below. 

    public class MyActionFilter : FilterAttribute, IActionFilter  
    {  
        public void OnActionExecuted(ActionExecutedContext filterContext)  
        {  
            //Fires after the method is executed  
        }  
      
        public void OnActionExecuting(ActionExecutingContext filterContext)  
        {  
            //Fires before the action is executed  
        }  
    }  


Simply, apply the class as an attribute on the controller. Add debuggers on both the methods as well as the controller method.
    public class HomeController : Controller  
    {  
        [MyActionFilter]  
        public ActionResult Index()  
        {  
            return View();  
        }  
      
        public ActionResult About()  
        {  
            ViewBag.Message = "Your application description page.";  
            return View();  
        }  
      
        public ActionResult Contact()  
        {  
            ViewBag.Message = "Your contact page.";  
            return View();  
        }  
    }  


Run the Application and debug step by step to see the order of execution of the methods. First, the OnActionExecuting will be executed, then the controller method and finally the OnActionExecuted method.

I hope you enjoyed reading it. Happy coding.


ASP.NET MVC Hosting - HostForLIFEASP.NET :: Performance Check With MiniProfiler In ASP.NET MVC

clock June 7, 2023 10:05 by author Peter

MiniProfiler is an open source profiling library that monitors a.NET application's performance. It is extremely lightweight and quick. Using this, we can readily identify an application performance issue. It was created by members of the Stack Overflow Team.

Why is MiniProfiler advantageous?
Developing a high-performance application is not a simple endeavor. Our application becomes too slow due to complex logic, mapping entities, multiple libraries, substantial quantities of HTML, CSS, and JS code, Database logic, connectivity, and server response time, etc. And it becomes exceedingly difficult to pinpoint the precise causes of our application's slowness.

MiniProfiler is an excellent instrument for determining how much time each application component requires to process. Using MiniProfiler, we can readily determine how much time our database logic and server response take, among other things.  MiniProfiler essentially enables us to determine who is slowing down our application so that we can optimize that component and make the application quicker.

MiniProfiler configuration with Asp.Net MVC application
Create an application in ASP.NET MVC 4, right-click the project, and select "Manage NuGet Packages.." to install MiniProfiler for the ASP.NET MVC application. As shown in the screenshot below, we have conducted a search for MiniProfiler.MVC and will install the second result, "MiniProfiler.MVC4". MiniProfiler was designed for ASP.NET MVC 4+ websites, as stated in MiniProfiler's product description. Therefore, let's install this by selecting "Install" in the right pane.

After MiniProfiler installation, we will find two references inside the Project Reference section - “MiniProfiler” and “MiniProfiler.Mvc”. Now, it's time to configure when MiniProfiler will start profiling to the application. So, make the following entries inside the Global.asax file.
    using StackExchange.Profiling;  
    using System.Web.Mvc;  
    using System.Web.Optimization;  
    using System.Web.Routing;  
      
    namespace MiniProfilerTest  
    {  
        public class MvcApplication : System.Web.HttpApplication  
        {  
            protected void Application_Start()  
            {  
                AreaRegistration.RegisterAllAreas();  
                FilterConfig.RegisterGlobalFilters(GlobalFilters.Filters);  
                RouteConfig.RegisterRoutes(RouteTable.Routes);  
                BundleConfig.RegisterBundles(BundleTable.Bundles);  
            }  
            protected void Application_BeginRequest()  
            {  
                if (Request.IsLocal)  
                {  
                    //MiniProfiler will start at the begining of the request.  
                    MiniProfiler.Start();  
                }  
            }  
      
            protected void Application_EndRequest()  
            {  
                //MiniProfiler will stop at the begining of the request.  
                MiniProfiler.Stop();  
            }  
        }  
    }  

As we have configured with the above code, MiniProfiler should start profiling once a new request gets the process; and stop profiling at the end of the request.

Now, move to the View and configure MiniProfiler so that the profiling data will get inside the HTML portion at the top left corner. To do that, we have to add “@MiniProfiler.RenderIncludes()” code with Layout page. We have chosen layout page because we would like to profile each request that is using this layout page.
    @using StackExchange.Profiling  
      
    <!DOCTYPE html>  
    <html>  
    <head>  
        <meta charset="utf-8" />  
        <meta name="viewport" content="width=device-width, initial-scale=1.0">  
        <title>@ViewBag.Title - My ASP.NET Application</title>  
        @Styles.Render("~/Content/css")  
        @Scripts.Render("~/bundles/modernizr")     
    </head>  
    <body>  
        <div class="navbar navbar-inverse navbar-fixed-top">  
            <div class="container">  
                <div class="navbar-header">  
                    <button type="button" class="navbar-toggle" data-toggle="collapse" data-target=".navbar-collapse">  
                        <span class="icon-bar"></span>  
                        <span class="icon-bar"></span>  
                        <span class="icon-bar"></span>  
                    </button>  
                    @Html.ActionLink("Application name", "Index", "Home", new { area = "" }, new { @class = "navbar-brand" })  
                </div>  
                <div class="navbar-collapse collapse">  
                    <ul class="nav navbar-nav">  
                        <li>@Html.ActionLink("Home", "Index", "Home")</li>  
                        <li>@Html.ActionLink("About", "About", "Home")</li>  
                        <li>@Html.ActionLink("Contact", "Contact", "Home")</li>  
                    </ul>  
                </div>  
            </div>  
        </div>  
        <div class="container body-content">  
            @RenderBody()  
            <hr />  
            <footer>  
                <p>© @DateTime.Now.Year - My ASP.NET Application</p>  
            </footer>  
        </div>  
        @Scripts.Render("~/bundles/jquery")  
        @Scripts.Render("~/bundles/bootstrap")  
        @RenderSection("scripts", required: false)  
      
        @MiniProfiler.RenderIncludes()  
    </body>  
    </html>  


DO NOT DO
Don’t install “MiniProfiler” and then “MiniProfiler.Mvc4” or “MiniProfiler.Mvc3” one by one with ASP.NET MVC application. It will create an issue with the MVC application; the MiniProfiler will not work and you will get the following issue.

“localhost:port/mini-profiler-resources/results”  Not Found [404].

WHAT TO DO
Always install a specific version when working with ASP.NET MVC application. For example, if working with ASP.NET MVC 4, then choose “MiniProfiler.Mvc4” from NuGet and install it or if working with ASP.NET MVC 3, then choose “MiniProfiler.Mvc3” from NuGet and install it.

If you get an error after running the application with MiniProfiler.Mvc4 or MiniProfiler.Mvc3, which states “/mini-profiler-resources/includes.js 404 not found”, then simply add the following line of code in Web.Config inside Web Server section.
        <system.webServer>  
            <handlers>  
              <add name="MiniProfiler" path="mini-profiler-resources/*"  
                       verb="*" type="System.Web.Routing.UrlRoutingModule"  
                       resourceType="Unspecified" preCondition="integratedMode" />  
            </handlers>     
        </system.webServer>  


Finally, we have done all the installation and settings to configure MiniProfiler with ASP.NET MVC application. Now, we can run the application. To run, press F5 and the application will be populated as follows with MiniProfiler Data at the top left corner of the application. The output will be like in the below image. Here, we can see clearly how much time each event has taken to process.

If we view the “page source”, we will find the following scripting code which is auto generated and added with the View to display the profiling data.
<script async type="text/javascript" id="mini-profiler" src="/mini-profiler-resources/includes.js?v=sudYtmATCtlvvgsiJ+ijDWT8sy88Fx31VI8aPQ/CYM8=" data-version="sudYtmATCtlvvgsiJ+ijDWT8sy88Fx31VI8aPQ/CYM8=" data-path="/mini-profiler-resources/" data-current-id="bd11c448-99dd-4c44-a49a-e248cc52bb83" data-ids="bd11c448-99dd-4c44-a49a-e248cc52bb83" data-position="left" data-trivial="false" data-children="false" data-max-traces="15" data-controls="false" data-authorized="true" data-toggle-shortcut="Alt+P" data-start-hidden="false" data-trivial-milliseconds="2"></script>  

Now, let us move on to  see how MiniProfiler works with actual data. To complete this demonstration, we are going to create some dummy blog post data in one step and in the next step  we are going to modify the actual username.

Note
I am creating dummy data inside the controller itself. Instead of this, we can get actual data from API.

We can define our own steps to see which process takes how much time. So, basically, STEPs in MiniProfiler are used to see the performance of each process, like getting data from the server, updating data on the server or posting data in Database etc.  Here I am going to create a list for Blog Posts and define it inside one STEP.  Another STEP will be defined to update the Username for Blog Post as in the below code shown.

So, first, let's create a model class for a blog post which has a few properties to define the blog data. Just create a class inside the Model folder with the name “BlogPost”.
    using System;  
    using System.Collections.Generic;  
    using System.Linq;  
    using System.Web;  
      
    namespace MiniProfilerTest.Models  
    {  
        public class BlogPost  
        {  
            public int PostId { get; set; }  
            public string Title { get; set; }  
            public string Category { get; set; }  
            public string Content { get; set; }  
            public string UserName { get; set; }  
        }  
    }  

Now, move to the home controller and define steps. The first step will be defined to“Get Blog Post Data”. Here, we are creating dummy details for the blog post to show on View but instead of this, we can also get the actual data from our services or APIs. With the next step “Update User Info”, we are modifying the username based on a certain condition. Once the Model is defined, it will be passed to View to render the data on the View in a tabular format.
    using MiniProfilerTest.Models;  
    using StackExchange.Profiling;  
    using System;  
    using System.Collections.Generic;  
    using System.Linq;  
    using System.Web;  
    using System.Web.Mvc;  
      
    namespace MiniProfilerTest.Controllers  
    {  
        public class HomeController : Controller  
        {  
            public ActionResult Index()  
            {  
                var miniProfiler = MiniProfiler.Current;  
                List<BlogPost> post = new List<BlogPost>();  
      
                //Suppose getting blog post data form API call.  
                using (miniProfiler.Step("Get Blog Post Data", ProfileLevel.Info))  
                {  
                    post.Add(new BlogPost() { PostId = 1, Title = "Blog Post Title 1", Category = "Category 1", Content = "Content for Blog Post 1" });  
                    post.Add(new BlogPost() { PostId = 2, Title = "Blog Post Title 2", Category = "Category 2", Content = "Content for Blog Post 2" });  
                    post.Add(new BlogPost() { PostId = 3, Title = "Blog Post Title 3", Category = "Category 1", Content = "Content for Blog Post 3" });  
                    post.Add(new BlogPost() { PostId = 4, Title = "Blog Post Title 4", Category = "Category 2", Content = "Content for Blog Post 4" });  
                    post.Add(new BlogPost() { PostId = 5, Title = "Blog Post Title 5", Category = "Category 1", Content = "Content for Blog Post 5" });  
                }  
      
                using (miniProfiler.Step("Update User Info", ProfileLevel.Info))  
                {  
                    //Suppose updating user name form API call update here.  
                    foreach (var item in post)  
                    {  
                        if (item.PostId < 3)  
                        {  
                            item.UserName = "Peter";  
                        }  
                        else  
                        {  
                            item.UserName = "Admin";  
                        }  
                    }  
                }  
      
                return View(post);  
            }  
      
            public ActionResult About()  
            {  
                ViewBag.Message = "Your application description page.";  
      
                return View();  
            }  
      
            public ActionResult Contact()  
            {  
                ViewBag.Message = "Your contact page.";  
      
                return View();  
            }  
        }  
      
    }  

It's time to render the data on Index.cshtml View. So, make iteration on Model data and fill in the table as below.
    @model IEnumerable<MiniProfilerTest.Models.BlogPost>  
      
    @{  
        ViewBag.Title = "Home Page";  
    }  
      
    <div class="pull-right" style="width:600px;">  
        <h3>MiniProfiler Test Data</h3>  
        <table style="border:3px solid #808080;">  
            <tr>  
                <th>ID</th>  
                <th>Title</th>  
                <th>Category</th>  
                <th>Content</th>  
                <th>User</th>  
            </tr>  
            @foreach (var post in Model)  
            {  
                <tr style="border:1px solid #808080">  
                    <td>@post.PostId</td>  
                    <td>@post.Title</td>  
                    <td>@post.Category</td>  
                    <td>@post.Content</td>  
                    <td>@post.UserName</td>  
                </tr>  
            }  
        </table>  
      
    </div>  


Now, we have set up the steps, let's run the application to see what happens. If we run the application, we will see the output as following where we can see the actual data in Table format along with profiling data created by MiniProfiler.

We can clearly see the STEPs [Blue Circled with Image] which we have defined at the time of creating dummy data “Get Blog Post Data” and “Update User Info”. Here, we can see how much time this application has taken to “Get Blog Post Data” and how much time is consumed to “Update User Info”.

So, based on this profiling report, we can modify our logic so that our application will get, post, update, or delete the data in minimal time.

Conclusion
Thus, we saw how to implement MiniProfiler with ASP.NET MVC application and how it can help us to know the actual time taken by each process. I hope this post will help you. Please put your feedback using comments which help me to improve myself for the next post. If you have any doubts, please ask; and if you like this post, please share it with your friends.


About HostForLIFE

HostForLIFE is European Windows Hosting Provider which focuses on Windows Platform only. We deliver on-demand hosting solutions including Shared hosting, Reseller Hosting, Cloud Hosting, Dedicated Servers, and IT as a Service for companies of all sizes.

We have offered the latest Windows 2019 Hosting, ASP.NET 5 Hosting, ASP.NET MVC 6 Hosting and SQL 2019 Hosting.


Tag cloud

Sign in