European ASP.NET MVC Hosting

BLOG about Latest ASP.NET MVC Hosting and Its Technology - Dedicated to European Windows Hosting Customer

ASP.NET MVC Hosting - HostForLIFEASP.NET :: Two-Factor Authentication Using Google Authenticator in Asp.Net MVC

clock December 19, 2022 07:35 by author Peter

In this article, I'll explain how to create an ASP.NET MVC web application with two-factor authentication using Google Authenticator to decrease the possibility of account takeovers and boost user and account security.


As it authenticates users using two possible authentication factors, two-factor authentication is a wonderful technique to help secure user accounts.

In this article, we are not taking user id and password from database but using static data. Here we only learn about Two-Factor Authentication using Google Authenticator.
Two-Factor Authentication using Google Authenticator in Asp.Net MVC

Step 1
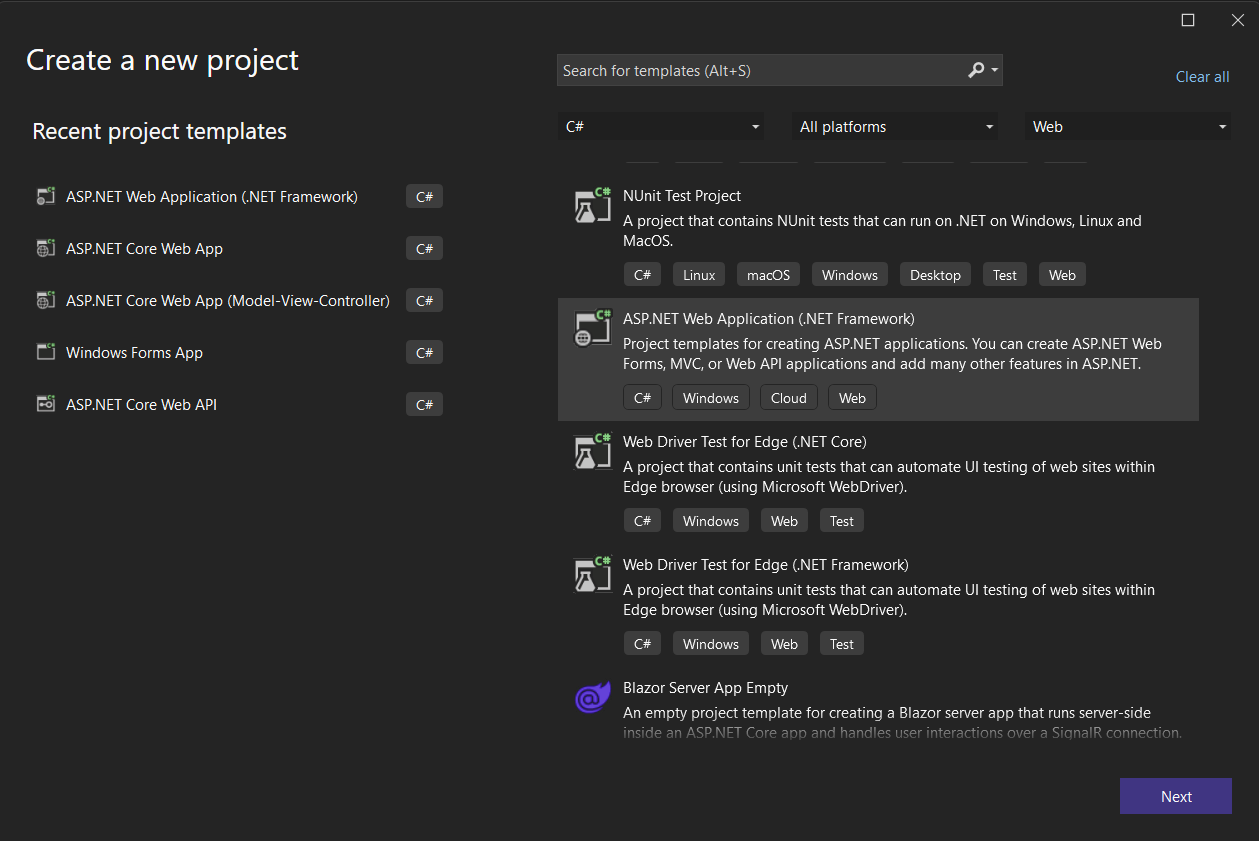
Create a new project in Visual Studio, select an ASP.NET Web Application (.Net Framework), and press the Next button.
Step 2
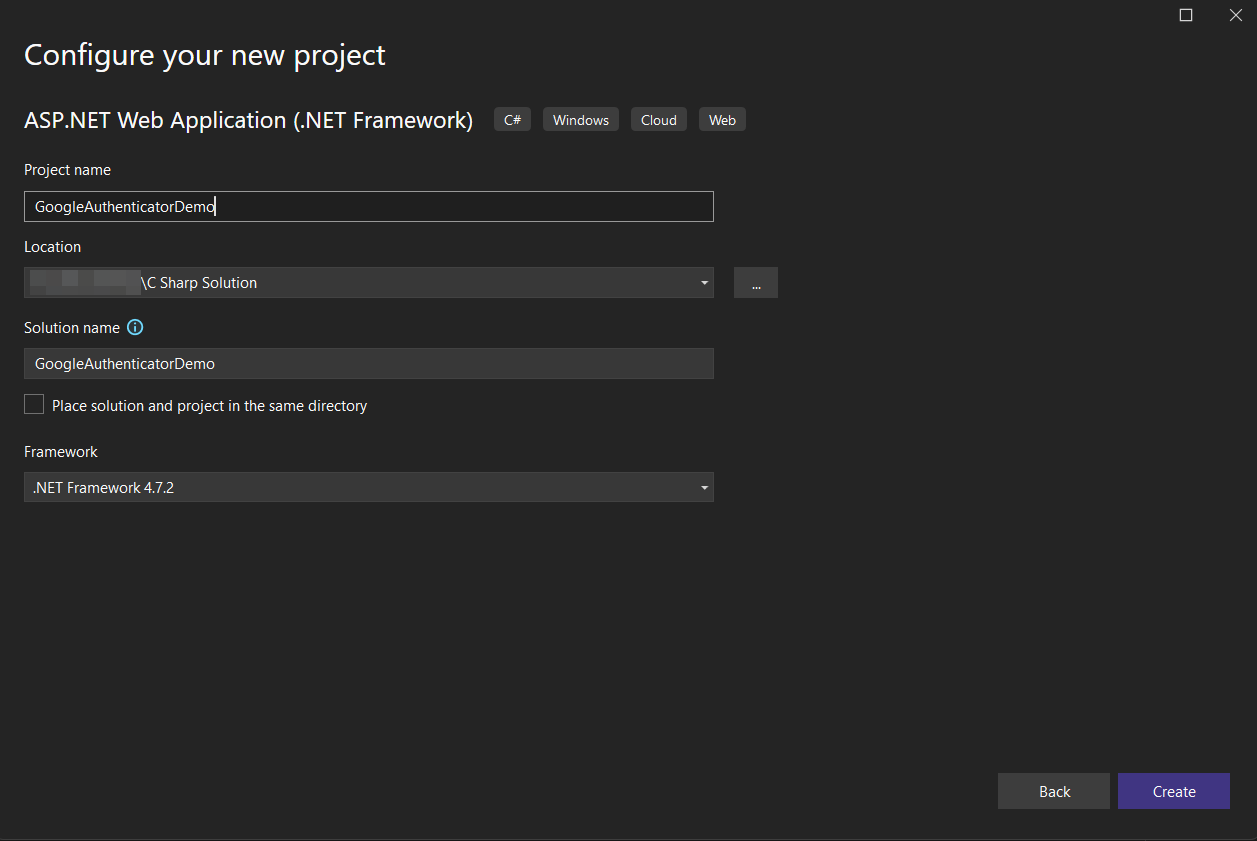
Give the project a name, select the save location folder, and click on the Create button.

Step 3
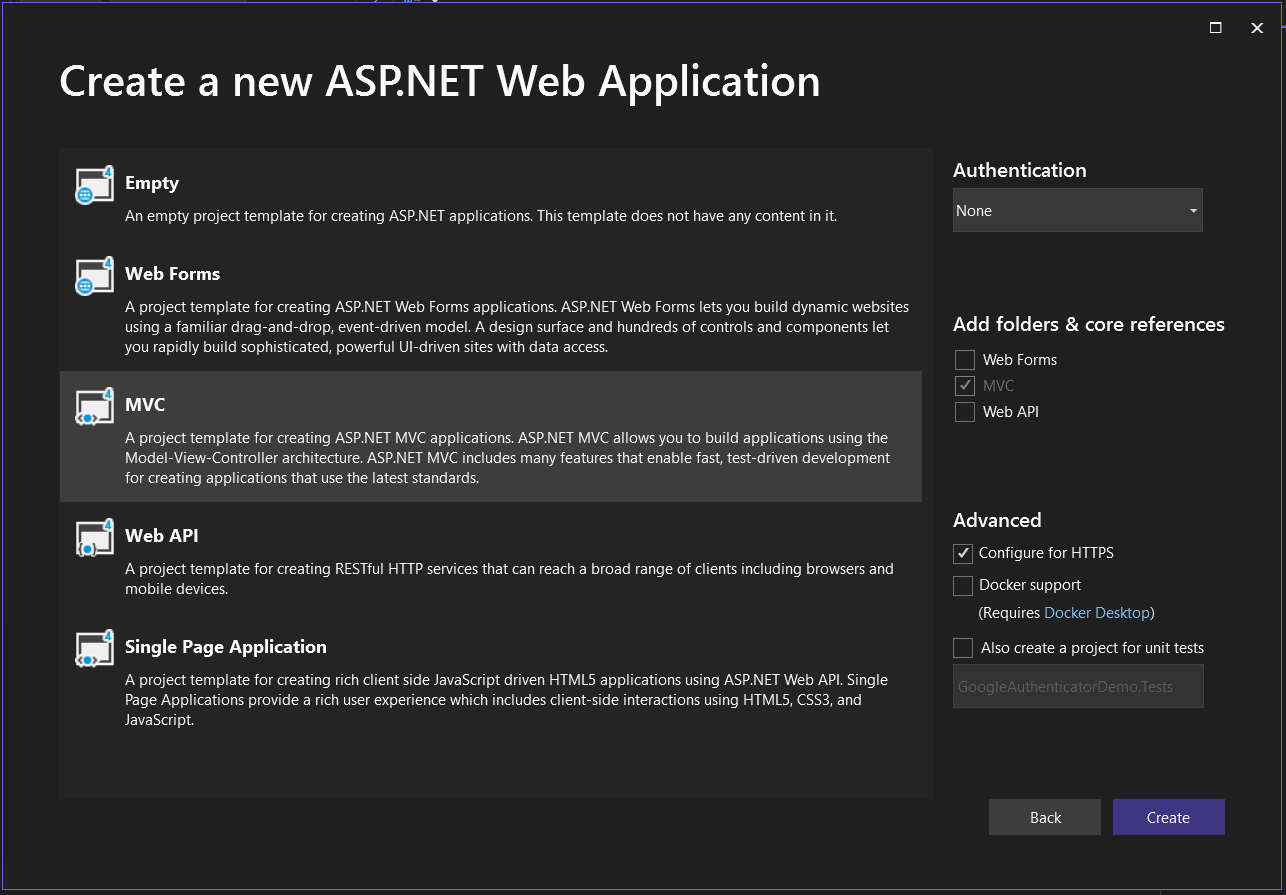
Select MVC Option for project type and click on the Create button. Now your project is created.
Step 4
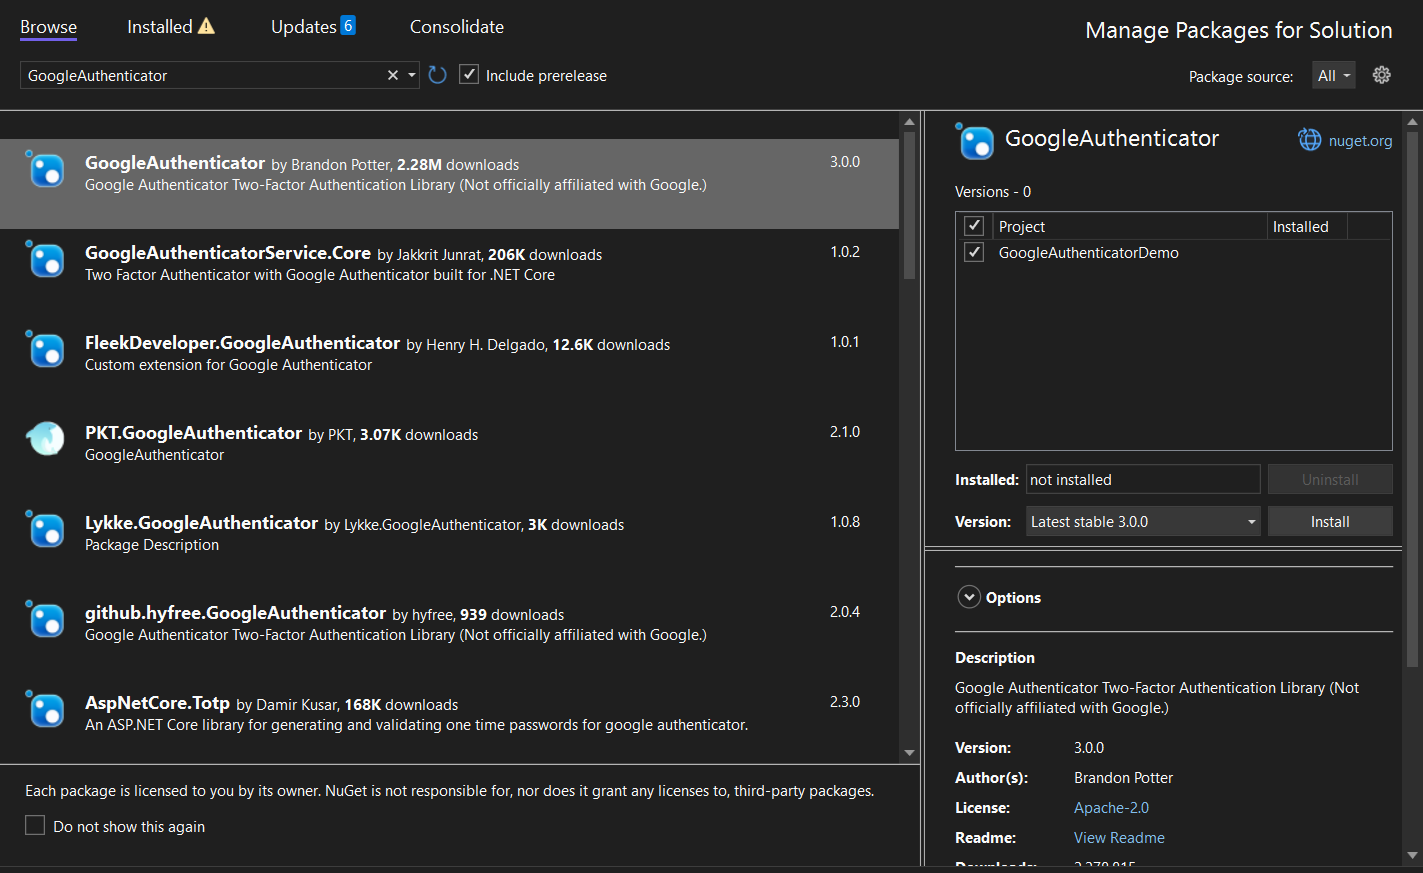
Add the Google.Authenticator package from NuGet.
Go to Tools Menu - NuGet Package Manager - Manage NuGetPackages For Solution - Search for Google.Authenticator > Install > Close.
Step 5
Add the Model class LoginModel.cs under Model Folder for login details that stores the username and password.
using System;
using System.Collections.Generic;
using System.Linq;
using System.Web;

namespace GoogleAuthenticatorDemo.Models
{
    public class LoginModel
    {
        public string UserName { get; set; }

        public string Password { get; set; }
    }
}


Step 6
Add the Google Authentication Private Key In Web.Config File under <appSettings>.
This key is not fixed; you can create it yourself with any character combination.
Any character combination use as private key in google authenticator.
<appSettings>
    <add key="webpages:Version" value="3.0.0.0" />
    <add key="webpages:Enabled" value="false" />
    <add key="ClientValidationEnabled" value="true" />
    <add key="UnobtrusiveJavaScriptEnabled" value="true" />

    <add key="GoogleAuthKey" value="U1d2A3y4" />
</appSettings>


Step 7
Create a Login action method in your controller; in my case, it's HomeController.
public ActionResult Login()
{
    Session["UserName"] = null;
    Session["IsValidTwoFactorAuthentication"] = null;
    return View();
}


Step 8

Right click on the Login action method and select Add View Option, and then select the following: Then click the Add Button button to add a view for this action method.
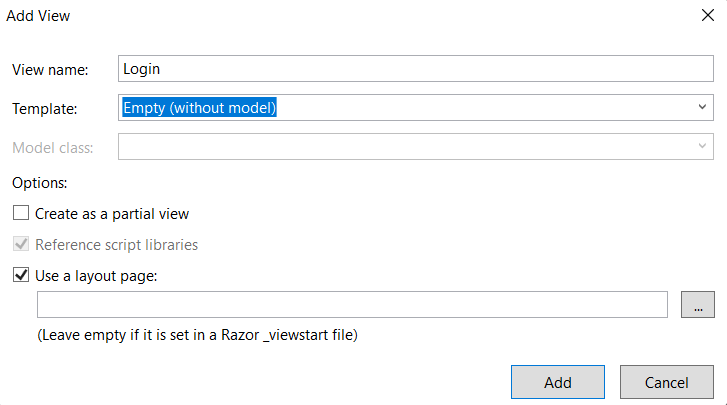
Now a new file is created under View > Home > Login.cshtml.

Step 9
Add the following code into Login.cshtml:
@model GoogleAuthenticatorDemo.Models.LoginModel
@{
    ViewBag.Title = "Login";
}

<center>
    <h2>Login Page</h2>
    @if (ViewBag.Status == null || !ViewBag.Status)
    {
        <div>@ViewBag.Message</div>
        <div>
            @using (Html.BeginForm())
            {
                <div class="form-group">
                    <label for="UserName">UserName : </label>
                    @Html.TextBoxFor(a => a.UserName, new { @class = "form-control" })
                </div>
                <div class="form-group">
                    <label for="Password">Password : </label>
                    @Html.TextBoxFor(a => a.Password, new { @class = "form-control", type = "password" })
                </div>
                <input type="submit" value="Login" class="btn btn-default" />
            }
        </div>
    }
    else
    {

        <div>@ViewBag.Message</div>
        <div>
            <img src="@ViewBag.BarcodeImageUrl" width="300" height="300" />

        </div>
        <div>
            Manual Setup Code : @ViewBag.SetupCode
        </div>
        <div>
            @using (Html.BeginForm("TwoFactorAuthenticate", "Home", FormMethod.Post))
            {
                <input type="text" name="CodeDigit" />
                <input type="submit" class="btn btn-success" />
            }
        </div>
    }
</center>


Step 10
Create a Post type Login Action method in your controller and add the following code:
[HttpPost]
public ActionResult Login(LoginModel login)
{
  bool status = false;

  if (Session["Username"] == null || Session["IsValidTwoFactorAuthentication"] == null || !(bool) Session["IsValidTwoFactorAuthentication"])
  {
      string googleAuthKey = WebConfigurationManager.AppSettings["GoogleAuthKey"];
      string UserUniqueKey = (login.UserName + googleAuthKey);

      //Take UserName And Password As Static - Admin As User And 12345 As Password
      if (login.UserName == "Admin" && login.Password == "12345")
      {
         Session["UserName"] = login.UserName;

         //Two Factor Authentication Setup
         TwoFactorAuthenticator TwoFacAuth = new TwoFactorAuthenticator();
         var setupInfo = TwoFacAuth.GenerateSetupCode("UdayDodiyaAuthDemo.com", login.UserName, ConvertSecretToBytes(UserUniqueKey, false), 300);
         Session["UserUniqueKey"] = UserUniqueKey;
         ViewBag.BarcodeImageUrl = setupInfo.QrCodeSetupImageUrl;
         ViewBag.SetupCode = setupInfo.ManualEntryKey;
         status = true;
      }
  }
  else
  {
    return RedirectToAction("Index");
  }
  ViewBag.Status = status;
  return View();
}

Step 11
Create the ConvertSecretToBytes function in the controller.
private static byte[] ConvertSecretToBytes(string secret, bool secretIsBase32) =>
           secretIsBase32 ? Base32Encoding.ToBytes(secret) : Encoding.UTF8.GetBytes(secret);


Step 12
Create a TwoFactorAuthenticate Action action method for your controller.
public ActionResult TwoFactorAuthenticate()
{
     var token = Request["CodeDigit"];
     TwoFactorAuthenticator TwoFacAuth = new TwoFactorAuthenticator();
     string UserUniqueKey = Session["UserUniqueKey"].ToString();
     bool isValid = TwoFacAuth.ValidateTwoFactorPIN(UserUniqueKey, token, false);
     if (isValid)
     {
         HttpCookie TwoFCookie = new HttpCookie("TwoFCookie");
         string UserCode =Convert.ToBase64String(MachineKey.Protect(Encoding.UTF8.GetBytes(UserUniqueKey)));

         Session["IsValidTwoFactorAuthentication"] = true;
         return RedirectToAction("Index");
      }

      ViewBag.Message = "Google Two Factor PIN is expired or wrong";
      return RedirectToAction("Login");
}


Step 13
Create a Logoff Action Method in your controller to handle the logout action.
public ActionResult Logoff()
{
     Session["UserName"] = null;
     Session["IsValidTwoFactorAuthentication"] = null;
     return RedirectToAction("Login");
}


Step 14
To handle an unauthorised login, add the following condition to all of your action methods, which in my case are three method.
public ActionResult Index()
{
    if (Session["Username"] == null || Session["IsValidTwoFactorAuthentication"] == null || !(bool)Session["IsValidTwoFactorAuthentication"])
    {
        return RedirectToAction("Login");
    }
    return View();
}

public ActionResult About()
{
     if (Session["Username"] == null || Session["IsValidTwoFactorAuthentication"] == null || !(bool)Session["IsValidTwoFactorAuthentication"])
     {
         return RedirectToAction("Login");
     }

     ViewBag.Message = "Your application description page.";
     return View();
}

public ActionResult Contact()
{
     if (Session["Username"] == null || Session["IsValidTwoFactorAuthentication"] == null || !(bool)Session["IsValidTwoFactorAuthentication"])
     {
         return RedirectToAction("Login");
     }

     ViewBag.Message = "Your contact page.";
     return View();
}

Final HomeController.cs File
using Google.Authenticator;
using GoogleAuthenticatorDemo.Models;
using System;
using System.Collections.Generic;
using System.Linq;
using System.Text;
using System.Web;
using System.Web.Configuration;
using System.Web.Mvc;
using System.Web.Security;

namespace GoogleAuthenticatorDemo.Controllers
{
    public class HomeController : Controller
    {
        public ActionResult Index()
        {
            if (Session["Username"] == null || Session["IsValidTwoFactorAuthentication"] == null || !(bool)Session["IsValidTwoFactorAuthentication"])
            {
                return RedirectToAction("Login");
            }
            return View();
        }

        public ActionResult About()
        {
            if (Session["Username"] == null || Session["IsValidTwoFactorAuthentication"] == null || !(bool)Session["IsValidTwoFactorAuthentication"])
            {
                return RedirectToAction("Login");
            }

            ViewBag.Message = "Your application description page.";
            return View();
        }

        public ActionResult Contact()
        {
            if (Session["Username"] == null || Session["IsValidTwoFactorAuthentication"] == null || !(bool)Session["IsValidTwoFactorAuthentication"])
            {
                return RedirectToAction("Login");
            }

            ViewBag.Message = "Your contact page.";
            return View();
        }

        public ActionResult Login()
        {
            Session["UserName"] = null;
            Session["IsValidTwoFactorAuthentication"] = null;
            return View();
        }

        [HttpPost]
        public ActionResult Login(LoginModel login)
        {
            bool status = false;

            if (Session["Username"] == null || Session["IsValidTwoFactorAuthentication"] == null || !(bool)Session["IsValidTwoFactorAuthentication"])
            {
                string googleAuthKey = WebConfigurationManager.AppSettings["GoogleAuthKey"];
                string UserUniqueKey = (login.UserName + googleAuthKey);


                //Take UserName And Password As Static - Admin As User And 12345 As Password
                if (login.UserName == "Admin" && login.Password == "12345")
                {
                    Session["UserName"] = login.UserName;

                    //Two Factor Authentication Setup
                    TwoFactorAuthenticator TwoFacAuth = new TwoFactorAuthenticator();
                    var setupInfo = TwoFacAuth.GenerateSetupCode("UdayDodiyaAuthDemo.com", login.UserName, ConvertSecretToBytes(UserUniqueKey, false), 300);
                    Session["UserUniqueKey"] = UserUniqueKey;
                    ViewBag.BarcodeImageUrl = setupInfo.QrCodeSetupImageUrl;
                    ViewBag.SetupCode = setupInfo.ManualEntryKey;
                    status = true;
                }
            }
            else
            {
                return RedirectToAction("Index");
            }
            ViewBag.Status = status;
            return View();
        }


        private static byte[] ConvertSecretToBytes(string secret, bool secretIsBase32) =>
           secretIsBase32 ? Base32Encoding.ToBytes(secret) : Encoding.UTF8.GetBytes(secret);


        public ActionResult TwoFactorAuthenticate()
        {
            var token = Request["CodeDigit"];
            TwoFactorAuthenticator TwoFacAuth = new TwoFactorAuthenticator();
            string UserUniqueKey = Session["UserUniqueKey"].ToString();
            bool isValid = TwoFacAuth.ValidateTwoFactorPIN(UserUniqueKey, token, false);
            if (isValid)
            {
                HttpCookie TwoFCookie = new HttpCookie("TwoFCookie");
                string UserCode = Convert.ToBase64String(MachineKey.Protect(Encoding.UTF8.GetBytes(UserUniqueKey)));

                Session["IsValidTwoFactorAuthentication"] = true;
                return RedirectToAction("Index");
            }
            ViewBag.Message = "Google Two Factor PIN is expired or wrong";
            return RedirectToAction("Login");
        }

        public ActionResult Logoff()
        {
            Session["UserName"] = null;
            Session["IsValidTwoFactorAuthentication"] = null;
            return RedirectToAction("Login");
        }
    }
}

Step 15
All pages display the user's name and the option to log out. So add that code to the _Layout.cshtml page, and your _Layout.cshtml should now look like this:
<!DOCTYPE html>
<html>
<head>
    <meta charset="utf-8" />
    <meta name="viewport" content="width=device-width, initial-scale=1.0">
    <title>@ViewBag.Title - My ASP.NET Application</title>
    @Styles.Render("~/Content/css")
    @Scripts.Render("~/bundles/modernizr")
</head>
<body>
    <div class="navbar navbar-inverse navbar-fixed-top">
        <div class="container">
            <div class="navbar-header">
                <button type="button" class="navbar-toggle" data-toggle="collapse" data-target=".navbar-collapse" title="more options">
                    <span class="icon-bar"></span>
                    <span class="icon-bar"></span>
                    <span class="icon-bar"></span>
                </button>
                @Html.ActionLink("Application name", "Index", "Home", new { area = "" }, new { @class = "navbar-brand" })
            </div>
            <div class="navbar-collapse collapse">
                <ul class="nav navbar-nav">
                    <li>@Html.ActionLink("Home", "Index", "Home")</li>
                    <li>@Html.ActionLink("About", "About", "Home")</li>
                    <li>@Html.ActionLink("Contact", "Contact", "Home")</li>
                </ul>

                @if (@HttpContext.Current.Session["UserName"] != null && @HttpContext.Current.Session["IsValidTwoFactorAuthentication"] != null)
                {
                   if(bool.Parse(@HttpContext.Current.Session["IsValidTwoFactorAuthentication"].ToString()) == true)
                   {
                        <ul class="nav navbar-nav navbar-right">
                            <li style="color: White; font-size: 15px; margin-top: 10px; margin-right: 100px;">
                                USER: @HttpContext.Current.Session["UserName"].ToString()
                            </li>
                            <li>
                                &nbsp;&nbsp;&nbsp;&nbsp;&nbsp;
                                @Html.ActionLink("Log Out", "Logoff", "Home", new { style = "color:White; font-size: 15px" })
                            </li>
                        </ul>
                   }
                }
            </div>
        </div>
    </div>
    <div class="container body-content">
        @RenderBody()
        <hr />
        <footer>
            <p>&copy; @DateTime.Now.Year - My ASP.NET Application</p>
        </footer>
    </div>
    @Scripts.Render("~/bundles/jquery")
    @Scripts.Render("~/bundles/bootstrap")
    @RenderSection("scripts", required: false)
</body>
</html>

Step 16
Display the username on the index page. So, add the following code to your index.cshtml page, and your index.cshtml should now look like this:
@{
    ViewBag.Title = "Home Page";
}

<div class="jumbotron">
    <h1>ASP.NET</h1>
    <p class="lead">ASP.NET is a free web framework for building great Web sites and Web applications using HTML, CSS and JavaScript.</p>
    <p><a href="https://asp.net" class="btn btn-primary btn-lg">Learn more &raquo;</a></p>
</div>
<center><h2 style="color: red;">Welcome Mr. @HttpContext.Current.Session["UserName"].ToString()</h2></center>
<div class="row">
    <div class="col-md-4">
        <h2>Getting started</h2>

        <p>
            ASP.NET MVC gives you a powerful, patterns-based way to build dynamic websites that
            enables a clean separation of concerns and gives you full control over markup
            for enjoyable, agile development.
        </p>
        <p><a class="btn btn-default" href="https://go.microsoft.com/fwlink/?LinkId=301865">Learn more &raquo;</a></p>
    </div>
    <div class="col-md-4">
        <h2>Get more libraries</h2>
        <p>NuGet is a free Visual Studio extension that makes it easy to add, remove, and update libraries and tools in Visual Studio projects.</p>
        <p><a class="btn btn-default" href="https://go.microsoft.com/fwlink/?LinkId=301866">Learn more &raquo;</a></p>
    </div>
    <div class="col-md-4">
        <h2>Web Hosting</h2>
        <p>You can easily find a web hosting company that offers the right mix of features and price for your applications.</p>
        <p><a class="btn btn-default" href="https://go.microsoft.com/fwlink/?LinkId=301867">Learn more &raquo;</a></p>
    </div>
</div>


You can design your page yourself and according to your needs, but I've used default content, only adding a username to understand the concept.

Step 17
Now run your project.

When you run the project, by default, the index method will invoke but not authorize, so it will redirect to the login page.

Enter "Admin" as the user name and "12345" as the password, then click the login button.
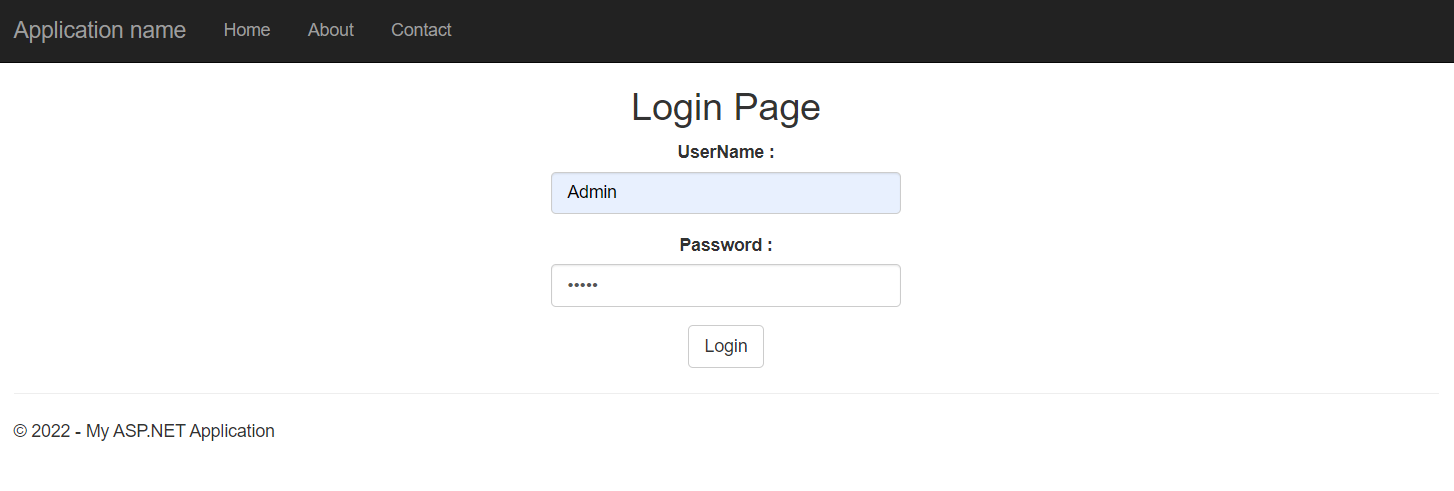

\Step 18

After clicking the login button, a QR code and the setup key for two-factor authentication were generated, which will be used later on the mobile app for code generation.

Step 19
Install the Google Authenticator app from the Play Store or here on your mobile device, and open it; you have two options: scan a QR code or enter a setup key.
We scan the QR code here, so you only have one Authenticator Code, which will change after a while. Enter this code on your website.

Step 20
If your code is correct, you will be redirected to your index page after clicking the submit button in the above screen.
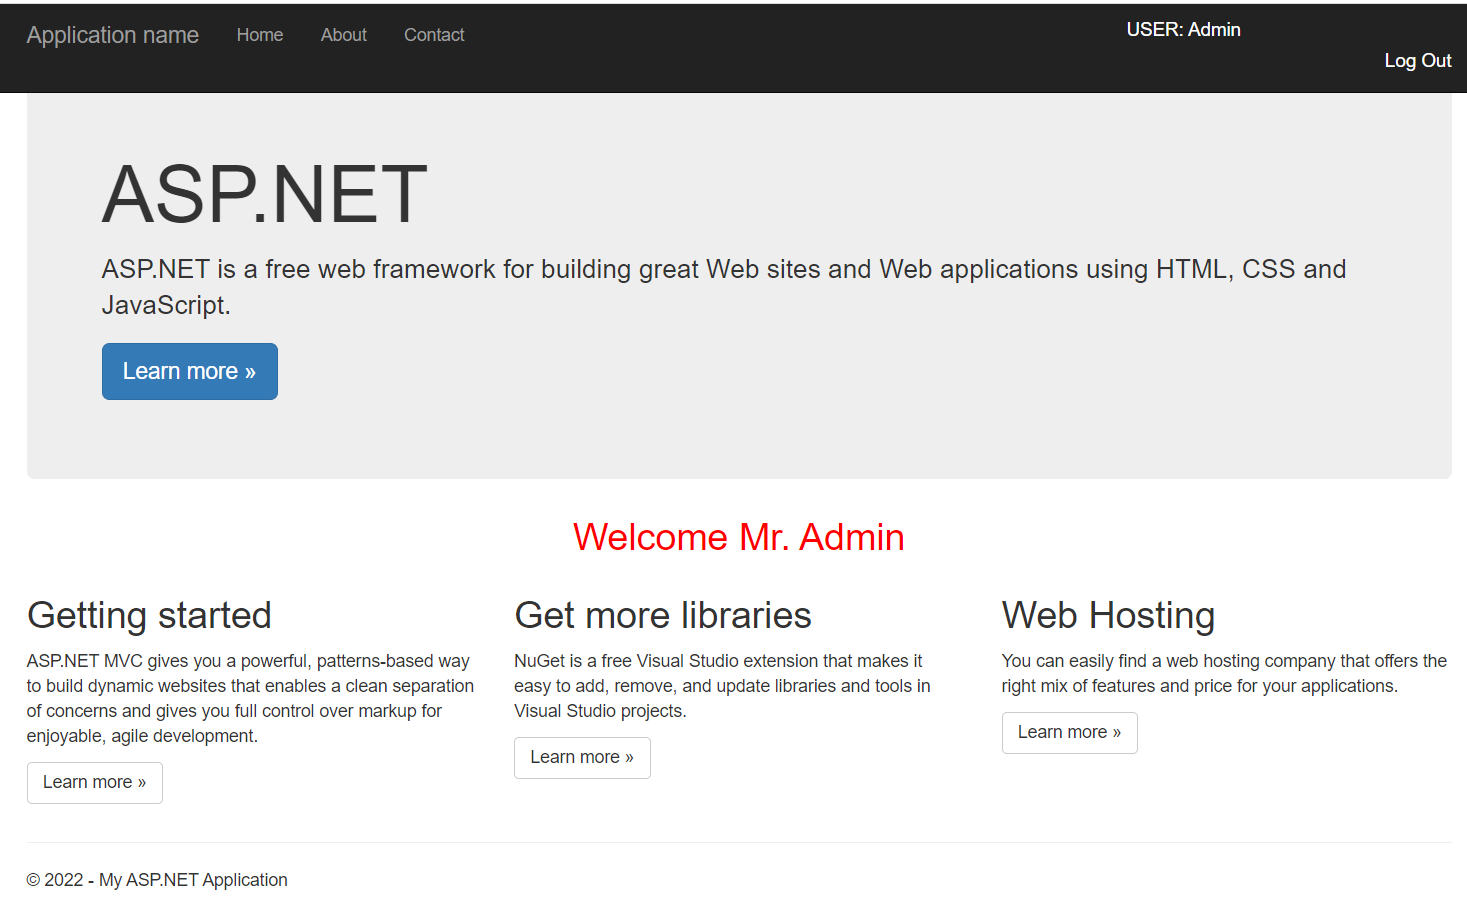
As you can see, the implementation of Google Authenticator in ASP.Net MVC is very simple.
In this article, we learned about Two-Factor Authentication using Google Authenticator in Asp.Net MVC.
Thank you for reading my article. Please leave your comments in the comment box below.
Enjoy Coding!


ASP.NET MVC Hosting - HostForLIFEASP.NET :: Partial View in MVC

clock December 13, 2022 07:32 by author Peter

Partial view in ASP.NET MVC is special view which renders a portion of view content. It is just like a user control of a web form application. Partial can be reusable in multiple views. It helps us to reduce code duplication. In other word a partial view enables us to render a view within the parent view.

The partial view is instantiated with its own copy of a ViewDataDictionary object which is available with the parent view so that partial view can access the data of the parent view. If we made the change in this data (ViewDataDictionary object), the parent view's data is not affected. Generally the Partial rendering method of the view is used when related data that we want to render in a partial view is part of our model.
 
Creating Partial View

To create a partial view, right-click on view -> shared folder and select Add -> View option. In this way we can add a partial view.


It is not mandatory to create a partial view in a shared folder but a partial view is mostly used as a reusable component, it is a good practice to put it in the "shared" folder.

HTML helper has two methods for rendering the partial view: Partial and RenderPartial.
    <div> 
        @Html.Partial("PartialViewExample") 
    </div> 
    <div> 
        @{ 
            Html.RenderPartial("PartialViewExample"); 
        } 
    </div>


@Html.RenderPartial
The result of the RenderPartial method is written directly into the HTTP response, it means that this method used the same TextWriter object as used by the current view. This method returns nothing.
 
@Html.Partial
This method renders the view as an HTML-encoded string. We can store the method result in a string variable.
The Html.RenderPartial method writes output directly to the HTTP response stream so it is slightly faster than the Html.Partial method.
Returning a Partial view from the Controller's Action method:
    public ActionResult PartialViewExample() 
    { 
        return PartialView(); 
    }


Render Partial View Using jQuery
Sometimes we need to load a partial view within a model popup at runtime, in this case we can render the partial view using JQuery element's load method.
    <script type="text/jscript"> 
            $('#partialView').load('/shared/PartialViewExample’); 
    </script> 

View Vs Partial View

View Partial View
View contains the layout page Partial view does not contain the layout page
_viewstart page is rendered before any view is rendered Partial view does not check for a _viewstart.cshtml. We cannot place any common code for a partial view within the _viewStart.cshtml page.
View may have markup tags like html, body, head, title, meta etc. The Partial view is specially designed to render within the view and as a result it does not contain any mark up.
Partial view is more lightweight than the view. We can also pass a regular view to the RenderPartial method.
If there is no layout page specified in the view, it can be considered as a partial view. In razor, there is no distinction between views and partial views as in the ASPX view engine (aspx and ascx).


ASP.NET MVC Hosting - HostForLIFEASP.NET :: CRUD Operation With Dapper Using ASP.NET Core 6 MVC

clock December 6, 2022 08:03 by author Peter

In this article will learn CURD (Create, Update, Read and Delete) operation which is common for most web applications. Here will understand SQL Database, Dapper Micro-ORM (Object Relation Mapper) along with repository pattern using ASP.NET Core 6 MVC.


What is Dapper?
Dapper is a micro ORM or it is a simple object mapper framework that helps to map the native query output to a domain class.
Creating a New Project in Visual Studio 2022

Start Visual Studio software and select Create a new project.

In the Create a new project dialog, select ASP.NET Core Web App (Model-View Controller) > Next.

In the Create a new project dialog, select ASP.NET Core Web App (Model-View Controller) > Next.

In the Configure your new project dialog, enter CURDWithDapperCore6MVC_Demo for Project name. It's important to name the project CURDWithDapperCore6MVC_Demo. The capitalization needs to match each namespace when code is copied. Select Next.

In the Additional information dialog, select .NET 6.0 (Long-term support). Select Create

The Visual Studio project 2022 will now generate the structure for the selected application. In this example, we are using ASP.Net MVC so we can create a controller to write the code, or so we can use the existing controller. There you can enter the code and build/run the application.
Install the Dapper, Microsoft.Data.SqlClient Library through NuGet Package Manager

The Visual Studio software provides the NuGet Package manager option to install the package directly to the solution.

In Visual Studio Select Tools > NuGet Package Manager > Manage NuGet Packages for the solution. The below screenshot shows how to open the NuGet Package Manager.

Search for the specific package Dapper, Microsoft.Data.SqlClient using the search box on the upper left. Select a package from the list to display its information, enable the Install button and a version-selection drop-down, as shown in the below screenshot. The NuGet package will be installed for your project and reference will be added, as seen in the screenshot below.

In the above image, we can see the list of the related search items. We need to select the required option to install the package to the solution.

Add Connection String
In solution explorer select a file appsettings.json double click on this file to open "Add" connection string as shown below.
{
  "Logging": {
    "LogLevel": {
      "Default": "Information",
      "Microsoft.AspNetCore": "Warning"
    }
  },
  "AllowedHosts": "*",
  "ConnectionStrings": {
    "DefaultConnection": "Data Source=.;Initial Catalog=Companies-DB;Integrated Security=True;Pooling=False;Encrypt=false"
  }
}


Add Models class
Right-click the Models folder > Add > Class. Name the file Company.cs
using System.ComponentModel.DataAnnotations;

namespace CURDWithDapperCore6MVC_Demo.Models
{
    public class Company
    {
        public int Id { get; set; }
        [Display(Name ="Company Name")]
        public string CompanyName { get; set; }

        [Display(Name = "Company Address")]
        public string CompanyAddress { get; set; }

        public string Country { get; set; }

        [Display(Name = "Glassdoor Rating")]
        public int GlassdoorRating { get; set; }
    }
}


Add DBContext Folder and DapperContext Class
Right click on Project in Solution Explorer>Add New>New Folder. Rename this folder to DBContext. Now right click on DBContext folder > Add> New Item> C# class name this class DapperContext.

using Microsoft.Data.SqlClient;
using System.Data;

namespace CURDWithDapperCore6MVC_Demo.DBContext
{
    public class DapperContext
    {
        private readonly IConfiguration _configuration;
        private readonly string _connectionString;
        public DapperContext(IConfiguration configuration)
        {
            _configuration = configuration;
            _connectionString = _configuration.GetConnectionString("DefaultConnection");
        }
        public IDbConnection CreateConnection() => new SqlConnection(_connectionString);
    }
}


Add Repositories Folder and ICompanyRepository Interface

Right click on Project in Solution Explorer>Add New>New Folder. Rename this folder to Repositories. Now right click on DBContext folder > Add> New Item>C# Interface and name this interface ICompanyRepository.
using CURDWithDapperCore6MVC_Demo.Models;

namespace CURDWithDapperCore6MVC_Demo.Repositories
{
    public interface ICompanyRepository
    {
        Task<IEnumerable<Company>> GetCompanies();
        Task<Company> GetCompany(int? id);
        Task CreateCompany(Company company);
        Task UpdateCompany(int id, Company company);
        Task DeleteCompany(int id);
    }
}


Add Company Repository class to Implement Interface

Right click on Repositories Add> New Item>C# class and name this class to CompanyRepository.
using CURDWithDapperCore6MVC_Demo.DBContext;
using CURDWithDapperCore6MVC_Demo.Models;
using Dapper;
using System.Data;

namespace CURDWithDapperCore6MVC_Demo.Repositories
{
    public class CompanyRepository : ICompanyRepository
    {
        private readonly DapperContext context;

        public CompanyRepository(DapperContext context)
        {
            this.context = context;
        }

        public async Task<IEnumerable<Company>> GetCompanies()
        {
            var query = "SELECT * FROM Companies";

            using (var connection = context.CreateConnection())
            {
                var companies = await connection.QueryAsync<Company>(query);
                return companies.ToList();
            }
        }

        public async Task<Company> GetCompany(int? id)
        {
            var query = "SELECT * FROM Companies WHERE Id = @Id";

            using (var connection = context.CreateConnection())
            {
                var company = await connection.QuerySingleOrDefaultAsync<Company>(query, new { id });
                return company;
            }
        }

        public async Task CreateCompany(Company company)
        {
            var query = "INSERT INTO Companies (CompanyName, CompanyAddress, Country,GlassdoorRating) VALUES (@CompanyName, @CompanyAddress, @Country, @GlassdoorRating)";

            var parameters = new DynamicParameters();
            parameters.Add("Name", company.CompanyName, DbType.String);
            parameters.Add("Address", company.CompanyAddress, DbType.String);
            parameters.Add("Country", company.Country, DbType.String);
            parameters.Add("Country", company.GlassdoorRating, DbType.Int32);

            using (var connection = context.CreateConnection())
            {
                await connection.ExecuteAsync(query, parameters);
            }
        }

        public async Task UpdateCompany(int id, Company company)
        {
            var query = "INSERT INTO Companies (CompanyName, CompanyAddress, Country,GlassdoorRating) VALUES (@CompanyName, @CompanyAddress, @Country, @GlassdoorRating WHERE Id = @Id)";
            var parameters = new DynamicParameters();
            parameters.Add("Name", company.CompanyName, DbType.String);
            parameters.Add("Address", company.CompanyAddress, DbType.String);
            parameters.Add("Country", company.Country, DbType.String);
            parameters.Add("Country", company.GlassdoorRating, DbType.Int32);
            using (var connection = context.CreateConnection())
            {
                await connection.ExecuteAsync(query, parameters);
            }
        }
        public async Task DeleteCompany(int id)
        {

            var query = "DELETE FROM Companies WHERE Id = @Id";
            using (var connection = context.CreateConnection())
            {
                await connection.ExecuteAsync(query, new { id });
            }
        }
    }
}

Add a controller
In Solution Explorer, right-click Controllers > Add > Controller.
In the Add New Scaffolded Item dialog box, select MVC Controller – MVC Controller with read/write actions > Add.
In the Add New Item - Companies dialog, enter CompaniesController.cs and select Add.
Replace the contents of Controllers/ CompaniesController.cs with the following code:

Add a view

Right-click on the Action in CompaniesController, and then Add View.
In the Add New Scaffolded Item dialog:
    Select Razor View Select Add
    View Name: Index
    Template: List
    Model Class: Company
    Select Add

Replace the contents of the Views/Companies/Index.cshtml Razor view file with the following:
@model IEnumerable<CURDWithDapperCore6MVC_Demo.Models.Company>

@{
    ViewData["Title"] = "Index";
}

<h2 class="text-capilization text-center">List of Companies</h2>

<p>
    <a asp-action="Create" class="btn btn-primary"> <i class="fa-solid fa-circle-plus"></i> Add New</a>
</p>
<table class="table table-bordered">
    <thead>
        <tr>
            <th>
                @Html.DisplayNameFor(model => model.Id)
            </th>
            <th>
                @Html.DisplayNameFor(model => model.CompanyName)
            </th>
            <th>
                @Html.DisplayNameFor(model => model.CompanyAddress)
            </th>
            <th>
                @Html.DisplayNameFor(model => model.Country)
            </th>
            <th>
                @Html.DisplayNameFor(model => model.GlassdoorRating)
            </th>
            <th>Action(s)</th>
        </tr>
    </thead>
    <tbody>
@foreach (var item in Model) {
        <tr>
            <td>
                @Html.DisplayFor(modelItem => item.Id)
            </td>
            <td>
                @Html.DisplayFor(modelItem => item.CompanyName)
            </td>
            <td>
                @Html.DisplayFor(modelItem => item.CompanyAddress)
            </td>
            <td>
                @Html.DisplayFor(modelItem => item.Country)
            </td>
            <td>
                @Html.DisplayFor(modelItem => item.GlassdoorRating)
            </td>
            <td>
                 <a href="@Url.Action("Details",new { id=item.Id})" class="btn btn-sm btn-primary"><i class="fa-solid fa-eye"></i></a>
                 <a href="@Url.Action("Edit",new { id=item.Id})" class="btn btn-sm btn-info"><i class="fa-solid fa-pen-to-square"></i></a>
                 <a href="@Url.Action("Delete",new { id=item.Id})" class="btn btn-sm btn-danger"><i class="fa-solid fa-trash"></i></a>
            </td>
        </tr>
}
    </tbody>
</table>

Note: Similarly Add all action view like Details, Create, Edit and Delete
Now its time to build and run your application Ctrl+F5


The above article has taught us. How we can use dapper with repository pattern. Dapper is Micro ORM whereas Entity Framework is ORM. Dapper is faster than entity framework. Hope you enjoyed the article. Happy Coding.


About HostForLIFE

HostForLIFE is European Windows Hosting Provider which focuses on Windows Platform only. We deliver on-demand hosting solutions including Shared hosting, Reseller Hosting, Cloud Hosting, Dedicated Servers, and IT as a Service for companies of all sizes.

We have offered the latest Windows 2019 Hosting, ASP.NET 5 Hosting, ASP.NET MVC 6 Hosting and SQL 2019 Hosting.


Month List

Tag cloud

Sign in