MiniProfiler is an open source profiling library that monitors a.NET application's performance. It is extremely lightweight and quick. Using this, we can readily identify an application performance issue. It was created by members of the Stack Overflow Team.

Why is MiniProfiler advantageous?
Developing a high-performance application is not a simple endeavor. Our application becomes too slow due to complex logic, mapping entities, multiple libraries, substantial quantities of HTML, CSS, and JS code, Database logic, connectivity, and server response time, etc. And it becomes exceedingly difficult to pinpoint the precise causes of our application's slowness.
MiniProfiler is an excellent instrument for determining how much time each application component requires to process. Using MiniProfiler, we can readily determine how much time our database logic and server response take, among other things. MiniProfiler essentially enables us to determine who is slowing down our application so that we can optimize that component and make the application quicker.
MiniProfiler configuration with Asp.Net MVC application
Create an application in ASP.NET MVC 4, right-click the project, and select "Manage NuGet Packages.." to install MiniProfiler for the ASP.NET MVC application. As shown in the screenshot below, we have conducted a search for MiniProfiler.MVC and will install the second result, "MiniProfiler.MVC4". MiniProfiler was designed for ASP.NET MVC 4+ websites, as stated in MiniProfiler's product description. Therefore, let's install this by selecting "Install" in the right pane.

After MiniProfiler installation, we will find two references inside the Project Reference section - “MiniProfiler” and “MiniProfiler.Mvc”. Now, it's time to configure when MiniProfiler will start profiling to the application. So, make the following entries inside the Global.asax file.
using StackExchange.Profiling;
using System.Web.Mvc;
using System.Web.Optimization;
using System.Web.Routing;
namespace MiniProfilerTest
{
public class MvcApplication : System.Web.HttpApplication
{
protected void Application_Start()
{
AreaRegistration.RegisterAllAreas();
FilterConfig.RegisterGlobalFilters(GlobalFilters.Filters);
RouteConfig.RegisterRoutes(RouteTable.Routes);
BundleConfig.RegisterBundles(BundleTable.Bundles);
}
protected void Application_BeginRequest()
{
if (Request.IsLocal)
{
//MiniProfiler will start at the begining of the request.
MiniProfiler.Start();
}
}
protected void Application_EndRequest()
{
//MiniProfiler will stop at the begining of the request.
MiniProfiler.Stop();
}
}
}
As we have configured with the above code, MiniProfiler should start profiling once a new request gets the process; and stop profiling at the end of the request.
Now, move to the View and configure MiniProfiler so that the profiling data will get inside the HTML portion at the top left corner. To do that, we have to add “@MiniProfiler.RenderIncludes()” code with Layout page. We have chosen layout page because we would like to profile each request that is using this layout page.
@using StackExchange.Profiling
<!DOCTYPE html>
<html>
<head>
<meta charset="utf-8" />
<meta name="viewport" content="width=device-width, initial-scale=1.0">
<title>@ViewBag.Title - My ASP.NET Application</title>
@Styles.Render("~/Content/css")
@Scripts.Render("~/bundles/modernizr")
</head>
<body>
<div class="navbar navbar-inverse navbar-fixed-top">
<div class="container">
<div class="navbar-header">
<button type="button" class="navbar-toggle" data-toggle="collapse" data-target=".navbar-collapse">
<span class="icon-bar"></span>
<span class="icon-bar"></span>
<span class="icon-bar"></span>
</button>
@Html.ActionLink("Application name", "Index", "Home", new { area = "" }, new { @class = "navbar-brand" })
</div>
<div class="navbar-collapse collapse">
<ul class="nav navbar-nav">
<li>@Html.ActionLink("Home", "Index", "Home")</li>
<li>@Html.ActionLink("About", "About", "Home")</li>
<li>@Html.ActionLink("Contact", "Contact", "Home")</li>
</ul>
</div>
</div>
</div>
<div class="container body-content">
@RenderBody()
<hr />
<footer>
<p>© @DateTime.Now.Year - My ASP.NET Application</p>
</footer>
</div>
@Scripts.Render("~/bundles/jquery")
@Scripts.Render("~/bundles/bootstrap")
@RenderSection("scripts", required: false)
@MiniProfiler.RenderIncludes()
</body>
</html>
DO NOT DO
Don’t install “MiniProfiler” and then “MiniProfiler.Mvc4” or “MiniProfiler.Mvc3” one by one with ASP.NET MVC application. It will create an issue with the MVC application; the MiniProfiler will not work and you will get the following issue.
“localhost:port/mini-profiler-resources/results” Not Found [404].
WHAT TO DO
Always install a specific version when working with ASP.NET MVC application. For example, if working with ASP.NET MVC 4, then choose “MiniProfiler.Mvc4” from NuGet and install it or if working with ASP.NET MVC 3, then choose “MiniProfiler.Mvc3” from NuGet and install it.
If you get an error after running the application with MiniProfiler.Mvc4 or MiniProfiler.Mvc3, which states “/mini-profiler-resources/includes.js 404 not found”, then simply add the following line of code in Web.Config inside Web Server section.
<system.webServer>
<handlers>
<add name="MiniProfiler" path="mini-profiler-resources/*"
verb="*" type="System.Web.Routing.UrlRoutingModule"
resourceType="Unspecified" preCondition="integratedMode" />
</handlers>
</system.webServer>
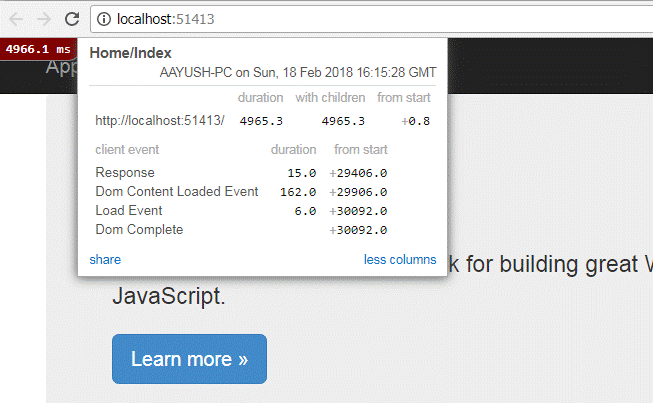
Finally, we have done all the installation and settings to configure MiniProfiler with ASP.NET MVC application. Now, we can run the application. To run, press F5 and the application will be populated as follows with MiniProfiler Data at the top left corner of the application. The output will be like in the below image. Here, we can see clearly how much time each event has taken to process.

If we view the “page source”, we will find the following scripting code which is auto generated and added with the View to display the profiling data.
<script async type="text/javascript" id="mini-profiler" src="/mini-profiler-resources/includes.js?v=sudYtmATCtlvvgsiJ+ijDWT8sy88Fx31VI8aPQ/CYM8=" data-version="sudYtmATCtlvvgsiJ+ijDWT8sy88Fx31VI8aPQ/CYM8=" data-path="/mini-profiler-resources/" data-current-id="bd11c448-99dd-4c44-a49a-e248cc52bb83" data-ids="bd11c448-99dd-4c44-a49a-e248cc52bb83" data-position="left" data-trivial="false" data-children="false" data-max-traces="15" data-controls="false" data-authorized="true" data-toggle-shortcut="Alt+P" data-start-hidden="false" data-trivial-milliseconds="2"></script>
Now, let us move on to see how MiniProfiler works with actual data. To complete this demonstration, we are going to create some dummy blog post data in one step and in the next step we are going to modify the actual username.
Note
I am creating dummy data inside the controller itself. Instead of this, we can get actual data from API.
We can define our own steps to see which process takes how much time. So, basically, STEPs in MiniProfiler are used to see the performance of each process, like getting data from the server, updating data on the server or posting data in Database etc. Here I am going to create a list for Blog Posts and define it inside one STEP. Another STEP will be defined to update the Username for Blog Post as in the below code shown.
So, first, let's create a model class for a blog post which has a few properties to define the blog data. Just create a class inside the Model folder with the name “BlogPost”.
using System;
using System.Collections.Generic;
using System.Linq;
using System.Web;
namespace MiniProfilerTest.Models
{
public class BlogPost
{
public int PostId { get; set; }
public string Title { get; set; }
public string Category { get; set; }
public string Content { get; set; }
public string UserName { get; set; }
}
}
Now, move to the home controller and define steps. The first step will be defined to“Get Blog Post Data”. Here, we are creating dummy details for the blog post to show on View but instead of this, we can also get the actual data from our services or APIs. With the next step “Update User Info”, we are modifying the username based on a certain condition. Once the Model is defined, it will be passed to View to render the data on the View in a tabular format.
using MiniProfilerTest.Models;
using StackExchange.Profiling;
using System;
using System.Collections.Generic;
using System.Linq;
using System.Web;
using System.Web.Mvc;
namespace MiniProfilerTest.Controllers
{
public class HomeController : Controller
{
public ActionResult Index()
{
var miniProfiler = MiniProfiler.Current;
List<BlogPost> post = new List<BlogPost>();
//Suppose getting blog post data form API call.
using (miniProfiler.Step("Get Blog Post Data", ProfileLevel.Info))
{
post.Add(new BlogPost() { PostId = 1, Title = "Blog Post Title 1", Category = "Category 1", Content = "Content for Blog Post 1" });
post.Add(new BlogPost() { PostId = 2, Title = "Blog Post Title 2", Category = "Category 2", Content = "Content for Blog Post 2" });
post.Add(new BlogPost() { PostId = 3, Title = "Blog Post Title 3", Category = "Category 1", Content = "Content for Blog Post 3" });
post.Add(new BlogPost() { PostId = 4, Title = "Blog Post Title 4", Category = "Category 2", Content = "Content for Blog Post 4" });
post.Add(new BlogPost() { PostId = 5, Title = "Blog Post Title 5", Category = "Category 1", Content = "Content for Blog Post 5" });
}
using (miniProfiler.Step("Update User Info", ProfileLevel.Info))
{
//Suppose updating user name form API call update here.
foreach (var item in post)
{
if (item.PostId < 3)
{
item.UserName = "Peter";
}
else
{
item.UserName = "Admin";
}
}
}
return View(post);
}
public ActionResult About()
{
ViewBag.Message = "Your application description page.";
return View();
}
public ActionResult Contact()
{
ViewBag.Message = "Your contact page.";
return View();
}
}
}
It's time to render the data on Index.cshtml View. So, make iteration on Model data and fill in the table as below.
@model IEnumerable<MiniProfilerTest.Models.BlogPost>
@{
ViewBag.Title = "Home Page";
}
<div class="pull-right" style="width:600px;">
<h3>MiniProfiler Test Data</h3>
<table style="border:3px solid #808080;">
<tr>
<th>ID</th>
<th>Title</th>
<th>Category</th>
<th>Content</th>
<th>User</th>
</tr>
@foreach (var post in Model)
{
<tr style="border:1px solid #808080">
<td>@post.PostId</td>
<td>@post.Title</td>
<td>@post.Category</td>
<td>@post.Content</td>
<td>@post.UserName</td>
</tr>
}
</table>
</div>
Now, we have set up the steps, let's run the application to see what happens. If we run the application, we will see the output as following where we can see the actual data in Table format along with profiling data created by MiniProfiler.
We can clearly see the STEPs [Blue Circled with Image] which we have defined at the time of creating dummy data “Get Blog Post Data” and “Update User Info”. Here, we can see how much time this application has taken to “Get Blog Post Data” and how much time is consumed to “Update User Info”.
So, based on this profiling report, we can modify our logic so that our application will get, post, update, or delete the data in minimal time.
Conclusion
Thus, we saw how to implement MiniProfiler with ASP.NET MVC application and how it can help us to know the actual time taken by each process. I hope this post will help you. Please put your feedback using comments which help me to improve myself for the next post. If you have any doubts, please ask; and if you like this post, please share it with your friends.