In this article, I am going to show you guys how to use ADO.NET and Entity framework core in .NET Core MVC. This way you can use either both or on way to implement your application as per your requirements. I attached the project solution which you can refer to. Also, I have shown a repository pattern to complete this project.

Step 1
I have used MS SQLServer for the database.
USE [CrudDB]
GO
/****** Object: Table [dbo].[Crud_Data] Script Date: 22-11-2020 09:33:14 ******/
SET ANSI_NULLS ON
GO
SET QUOTED_IDENTIFIER ON
GO
CREATE TABLE [dbo].[Crud_Data](
[id] [int] IDENTITY(1,1) NOT NULL,
[Name] [varchar](50) NULL,
[City] [varchar](50) NULL,
[InsertDate] [datetime] NULL,
[FatherName] [varchar](50) NULL,
CONSTRAINT [PK_Crud_Data] PRIMARY KEY CLUSTERED
(
[id] ASC
)WITH (PAD_INDEX = OFF, STATISTICS_NORECOMPUTE = OFF, IGNORE_DUP_KEY = OFF, ALLOW_ROW_LOCKS = ON, ALLOW_PAGE_LOCKS = ON, OPTIMIZE_FOR_SEQUENTIAL_KEY = OFF) ON [PRIMARY]
) ON [PRIMARY]
GO
Step-2
Change in the startup.cs file in the project root
public void ConfigureServices(IServiceCollection services)
{
services.AddControllersWithViews();
//By changing the service reference we are switching to ado.net to entity framwork core vice versa
//----Start
services.AddScoped<ICrudRepository, CrudRepository>();
//services.AddScoped<ICrudRepository, CrudContextRepository>();
//-----End
services.AddDbContext<DBAccessContext>(options => options.UseSqlServer(Configuration.GetConnectionString("MyKey")));
}

Step 3
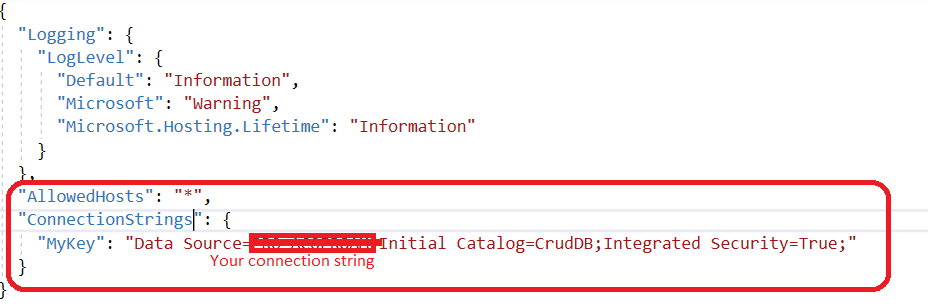
Connection string in appsettings.json:
{
"Logging": {
"LogLevel": {
"Default": "Information",
"Microsoft": "Warning",
"Microsoft.Hosting.Lifetime": "Information"
}
},
"AllowedHosts": "*",
"ConnectionStrings": {
"MyKey": "Data Source=PRO-ACQER8AM;Initial Catalog=CrudDB;Integrated Security=True;"
}
}
Step 4
Made model to communicate with View and DB Layer.
namespace TestDemo.Models
{
[Table("Crud_Data", Schema = "dbo")]
public class CrudModel
{
public int Id { get; set; }
[Required]
public string Name { get; set; }
[Required]
public string City { get; set; }
public DateTime? InsertDate { get; set; }
public string? FatherName { get; set; }
}
}

Step 5
Controller class CrudController.cs with dependency injection use with helps to lose coupling while switching from ADO.NET to Entity framework and vice-versa.
public class CrudController : Controller
{
private readonly ICrudRepository crudRepository;
public CrudController(ICrudRepository crudRepository)
{
this.crudRepository = crudRepository;
}
public IActionResult Index()
{
ViewBag.ModelList = crudRepository.GetData();
return View();
}
[HttpPost]
public IActionResult Index(CrudModel crudModel)
{
try
{
if (ModelState.IsValid)
{
// ICrudRepository crudRepository = new CrudRepository();
var result = crudRepository.insert(new string[] { crudModel.Name, crudModel.City, System.DateTime.Now.ToString(), crudModel.FatherName });
ViewBag.ModelList = crudRepository.GetData();
if (result)
{
ViewBag.Msg = "Succeed";
ViewBag.alertType = "alert alert-success";
}
else
{
ViewBag.Msg = "Insertion failed";
ViewBag.alertType = "alert alert-danger";
}
}
}
catch (Exception ex)
{
ViewBag.Msg = "Insertion failed";
ViewBag.alertType = "alert alert-danger";
ModelState.AddModelError("Message", ex.Message);
}
return View();
}
}
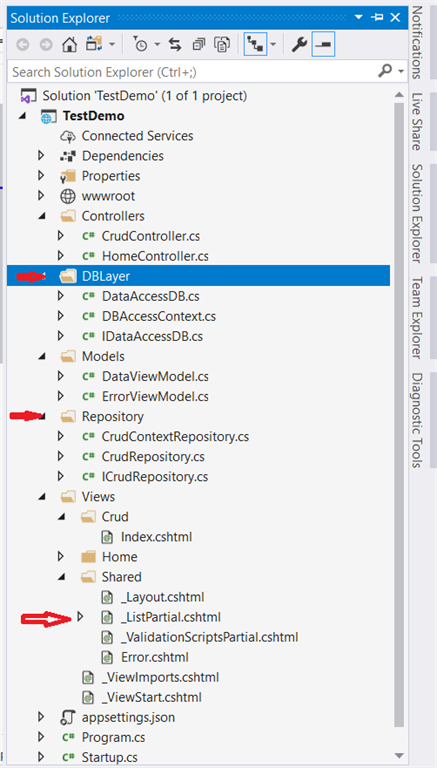
Step 6
The project consists of class files for the DB layer and Repository folder and one partial view for showing the detail view.
We have created an interface in the repository folder to make a service and use both the classes as a service.
We have created the DBLayer folder and created 2 classes one consists of ado.net insert and select the method and another one for Entity framework Core DBContext.
In Partial View, I have injected the service directly so that you no need to pass the model to communicate with a partial view. you can check the getdata() method by debugging and uncommenting the specific section over there.
System.Data.sqlclient reference required to use ado.net, you can add this by using NuGet package manager.
DataAccessDB.cs
public class DataAccessDB : IDataAccessDB
{
private readonly IConfiguration config;
string connsString = string.Empty;
public DataAccessDB(IConfiguration config)
{
this.config = config;
connsString = config.GetConnectionString("MyKey");
}
public List<CrudModel> GetData()
{
// string connsString = config.GetConnectionString("MyKey");// "Data Source=PRO-ACQER8AM;Initial Catalog=CrudDB;Integrated Security=True;";
List<TestDemo.Models.CrudModel> ModelList = new List<Models.CrudModel>();
using (SqlConnection conn = new SqlConnection(connsString))
{
conn.Open();
using (SqlCommand command = new SqlCommand($"select * from [dbo].[Crud_Data]", conn))
{
try
{
using (var result = command.ExecuteReader())
{
while (result.Read())
{
ModelList.Add(
new Models.CrudModel { Id = (int)result.GetValue("Id"), Name = (string)result.GetValue("Name"), City = (string)result.GetValue("City"), FatherName = (string)result.GetValue("FatherName").ToString() });
}
}
}
catch (Exception ex)
{
}
finally
{
conn.Close();
}
return ModelList;
}
}
}
public bool insert(string[] Param)
{
// string connsString = config.GetConnectionString("MyKey");// "Data Source=PRO-ACQER8AM;Initial Catalog=CrudDB;Integrated Security=True;";
using (SqlConnection conn = new SqlConnection(connsString))
{
conn.Open();
using (SqlCommand command = new SqlCommand($"INSERT INTO [dbo].[Crud_Data] ([Name],[City],[InsertDate],FatherName) VALUES ('{Param[0]}','{Param[1]}',getdate(),'{Param[3]}')", conn))
{
try
{
var result = command.ExecuteNonQuery();
if (result > 0)
{
return true;
}
}
catch (Exception)
{
}
finally
{
conn.Close();
}
return false;
}
}
}
}
DBAccessContext.cs
public class DBAccessContext:DbContext
{
public DBAccessContext(DbContextOptions<DBAccessContext> options):base(options)
{
}
public DbSet<CrudModel> Crud_Data { get; set; }
}
CrudRepository.cs
public class CrudRepository : ICrudRepository
{
private readonly IConfiguration configuration;
private readonly DataAccessDB DB;
public CrudRepository(IConfiguration configuration)
{
this.configuration = configuration;
this.DB = new DataAccessDB(configuration);
}
public List<CrudModel> GetData()
{
return DB.GetData();
}
public bool insert(string[] Param)
{
return DB.insert(Param);
}
}
CrudContextRepository.cs
public class CrudContextRepository : ICrudRepository
{
private readonly DBAccessContext dBAccessContext;
private readonly IConfiguration configuration;
public CrudContextRepository(DBAccessContext dBAccessContext,IConfiguration configuration)
{
this.dBAccessContext = dBAccessContext;
this.configuration = configuration;
}
public List<CrudModel> GetData()
{
return dBAccessContext.Crud_Data.ToList();
}
public bool insert(string[] Param)
{
var model = new CrudModel()
{
Name = Param[0],
City = Param[1],
InsertDate = System.DateTime.Now,
FatherName= Param[3]
};
dBAccessContext.Crud_Data.Add(model);
var result= dBAccessContext.SaveChanges();
if (result>0)
{
return true;
}
return false;
}
}
ICrudRepository.cs
public interface ICrudRepository
{
bool insert(string[] Param);
List<TestDemo.Models.CrudModel> GetData();
}
Index.cshtml under View/Crud/
@model TestDemo.Models.CrudModel
<partial name="_ValidationScriptsPartial" />
<style>
.bg-secondary {
background-color: #f4f5f7 !important;
}
</style>
<h1>Welcome to Crud</h1>
<form id="Form1" method="post" asp-action="Index" asp-controller="Crud" >
@if (ViewBag.Msg != null)
{
<div class="@ViewBag.alertType" role="alert">
<div asp-validation-summary="All">@ViewBag.Msg</div>
</div>
@*<script>
$(function () {
$.notify({
title: "<strong>Message:</strong> ",
message: "@ViewBag.Msg"
});
});
</script>*@
ViewBag.Msg = null;
}
<div class="card">
<div class="card-body">
<div class="form-group">
<label asp-for="Name">Name</label>
<input asp-for="Name" class="form-control">
<span asp-validation-for="Name" class="text-danger"></span>
</div>
<div class="form-group">
<label asp-for="City">City</label>
<input asp-for="City" class="form-control" />
<span asp-validation-for="City" class="text-danger"></span>
</div>
<div class="form-group">
<label asp-for="FatherName">Father Name</label>
<input asp-for="FatherName" class="form-control" />
<span asp-validation-for="FatherName" class="text-danger"></span>
</div>
</div>
<div class="card-footer">
<button type="submit" class="btn btn-primary">Submit</button>
</div>
</div>
@{ if (ViewBag.ModelList != null)
{ <div class="card">
<div class="card-body">
<partial name="_ListPartial" model="@ViewBag.ModelList" />
</div>
</div>
}}
@*@await Html.PartialAsync("_ListPartial", Model)*@
@*@(await Html.RenderComponentAsync<TestDemo.Components.Component>(RenderMode.ServerPrerendered,null))*@
</form>