December 16, 2024 06:41 by
 Peter
PeterYou will discover how to use and manage connection strings in the program in this post.

The following queries will be addressed:
- A Connection String: What Is It?
- How many ways exist for connection strings to be defined and managed?
- Examples of Codes
What is a Connection String?
The connection string is one kind of text string that is used to establish a connection from the application to the database server database. The connection string is the collective information of the data source, database name, user name, and password.
How many ways to define and manage connection strings?
Following ways to declare and manage the connection strings:
- AppSettings.json
- Environment Settings
- Static Class
AppSettings.json
Using the AppSettings.json file, you can easily write a connection string.
Define Connection-String
Creating a separate object under the main json object just below Logging.
{
"Logging": {
"LogLevel": {
"Default": "Information",
"Microsoft.AspNetCore": "Warning"
}
},
"ConnectionStrings": {
"MyConnectionString": "Server=xxx.xx.xxx.xx;Database=dbTest;User=xxxxxxx;Password=xx@xx;TrustServerCertificate=True"
},
"AllowedHosts": "*"
}
Using Connection-String
Open the HomeController.cs file and update the code.
public class HomeController : Controller
{
// Inject the IConfiguration interface into your controller to access the connection string from appsettings.json file
private readonly IConfiguration _configuration;
private readonly ILogger<HomeController> _logger;
public HomeController(ILogger<HomeController> logger, IConfiguration configuration)
{
_logger = logger;
_configuration = configuration;
}
public IActionResult Index()
{
// Get the connection string
string connectionString = _configuration.GetConnectionString("MyConnectionString");
return View();
}
public IActionResult Privacy()
{
return View();
}
[ResponseCache(Duration = 0, Location = ResponseCacheLocation.None, NoStore = true)]
public IActionResult Error()
{
return View(new ErrorViewModel { RequestId = Activity.Current?.Id ?? HttpContext.TraceIdentifier });
}
}
Environment Settings
Using the environment setting, it takes more steps to configure the connection string than the appsettings.json file.
Note. You can set environment variables in two ways.
Command Window
setx MyDbConnect "Server=(localdb)\\MSSQLLocalDB;Database=dbMyDb;Trusted_Connection=Tr

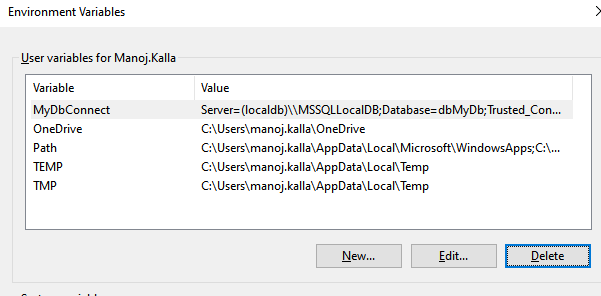
Edit Environment Variable Dialog box.

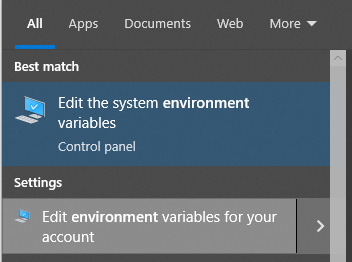
Search for “environment” in the start menu.
You can add the new environment variable by clicking the NEW button.

You can check and update the connection string in Local environment variables
To fetch the local environment variables
string Connt = Environment.GetEnvironmentVariable("MyDbConnect");
Note. You may get null value from above line, you have to restart the Visual Studio because visual studio read Environment Variable at startup only.
Static Class
Create a static class and static property to set the connection string.
public static class DbConnect
{
public static string DbConnectionString { get; set; } =
"Server=xxx.xx.xxx.xx;Database=dbTest;User=xxxxxxx;Password=xx@xx;TrustServerCertificate=True";
}
You can use it in the following way:
string ConStr = DbConnect.DbConnectionString;
Happy Coding.

December 12, 2024 07:30 by
 Peter
PeterHello everyone, in this post I will describe how to use MVC to implement remote validation. The technique of remote validation involves publishing data to a server without uploading all of the form data in order to verify particular data. Let's look at a real-world example. I had to verify whether an email address was already in the database for one of my projects. For that, remote validation was helpful; we could validate just the user-provided email address without publishing all the data.

Practical explanation
Let's make an MVC project and give it the appropriate name—in my case, "TestingRemoteValidation." Let's make a model called UserModel that will resemble the project once it has been created.
public class UserModel
{
[Required]
public string UserName { get; set; }
[Remote("CheckExistingEmail","Home",ErrorMessage = "Email already exists!")]
public string UserEmailAddress { get; set; }
}
Let's get some understanding of the remote attribute used, so the very first parameter “CheckExistingEmail” is the name of the action. The second parameter “Home” is referred to as the controller so to validate the input for the UserEmailAddress the “CheckExistingEmail” action of the “Home” controller is called and the third parameter is the error message. Let's implement the “CheckExistingEmail” action result in our home controller.
public ActionResult CheckExistingEmail(string UserEmailAddress)
{
bool ifEmailExist = false;
try
{
ifEmailExist = UserEmailAddress.Equals("[email protected]") ? true : false;
return Json(!ifEmailExist, JsonRequestBehavior.AllowGet);
}
catch (Exception ex)
{
return Json(false, JsonRequestBehavior.AllowGet);
}
}
For simplicity, I am just validating the user input with a hard-coded value ([email protected]) but we can call the database and determine whether or not the given input exists in the database.
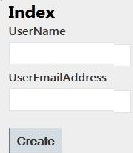
Let's create the view using the defined “UserModel” and using the create scaffold template; the UI will look like this.

I hope this will help.

December 5, 2024 06:47 by
 Peter
PeterASP.NET Core 6's authentication filters offer a strong way to incorporate unique authentication logic. They enable you to verify user credentials, intercept incoming requests, and give or restrict access according to predetermined standards. Here's how to use ASP.NET Core 6 to generate personalized authentication filters.

Create a Custom Authorization Attribute
You can create a custom authorization attribute by extending the AuthorizeAttribute or implementing IAuthorizationFilter or IAsyncAuthorizationFilter.
Example. Custom Attribute for Role-Based Authorization.
using Microsoft.AspNetCore.Authorization;
using Microsoft.AspNetCore.Http;
using Microsoft.AspNetCore.Mvc;
using Microsoft.AspNetCore.Mvc.Filters;
using System.Linq;
public class CustomAuthorizeAttribute : Attribute, IAuthorizationFilter
{
private readonly string _role;
public CustomAuthorizeAttribute(string role)
{
_role = role;
}
public void OnAuthorization(AuthorizationFilterContext context)
{
var user = context.HttpContext.User;
if (!user.Identity.IsAuthenticated)
{
context.Result = new UnauthorizedResult();
return;
}
if (!user.IsInRole(_role))
{
context.Result = new ForbidResult();
return;
}
}
}
How to use it?
[CustomAuthorize("Admin")]
public IActionResult AdminOnlyAction()
{
return Ok("This is an Admin-only area.");
}
Custom Middleware for Authentication
For more flexibility, you can create custom middleware that inspects HTTP requests and enforces authentication.
Example. Custom Authentication Middleware.
using Microsoft.AspNetCore.Http;
using System.Linq;
using System.Threading.Tasks;
public class CustomAuthenticationMiddleware
{
private readonly RequestDelegate _next;
public CustomAuthenticationMiddleware(RequestDelegate next)
{
_next = next;
}
public async Task InvokeAsync(HttpContext context)
{
var authHeader = context.Request.Headers["Authorization"].FirstOrDefault();
if (string.IsNullOrEmpty(authHeader) || !authHeader.StartsWith("Bearer "))
{
context.Response.StatusCode = StatusCodes.Status401Unauthorized;
await context.Response.WriteAsync("Unauthorized");
return;
}
var token = authHeader.Substring("Bearer ".Length).Trim();
// Validate the token (you can use JWT or any other token mechanism)
if (token != "valid-token") // Replace with your validation logic
{
context.Response.StatusCode = StatusCodes.Status403Forbidden;
await context.Response.WriteAsync("Forbidden");
return;
}
await _next(context); // Pass to the next middleware
}
}
Register Middleware in Program. cs
var builder = WebApplication.CreateBuilder(args);
var app = builder.Build();
// Add custom authentication middleware
app.UseMiddleware<CustomAuthenticationMiddleware>();
app.MapControllers();
app.Run();
Custom Policy-Based Authorization
Using ASP.NET Core’s policy-based authorization, you can define custom policies for advanced scenarios.
Define a Policy in the Program. cs.
var builder = WebApplication.CreateBuilder(args);
builder.Services.AddAuthorization(options =>
{
options.AddPolicy("AdminOnly", policy =>
{
policy.RequireClaim("Role", "Admin");
});
});
var app = builder.Build();
Apply policy
[Authorize(Policy = "AdminOnly")]
public IActionResult AdminOnlyAction()
{
return Ok("This is an Admin-only area.");
}
Add Custom Authorization Logic by Handler.
Create a custom requirement and handler
using Microsoft.AspNetCore.Authorization;
using System.Security.Claims;
using System.Threading.Tasks;
public class CustomRoleRequirement : IAuthorizationRequirement
{
public string Role { get; }
public CustomRoleRequirement(string role)
{
Role = role;
}
}
public class CustomRoleHandler : AuthorizationHandler<CustomRoleRequirement>
{
protected override Task HandleRequirementAsync(
AuthorizationHandlerContext context,
CustomRoleRequirement requirement)
{
if (context.User.HasClaim(c => c.Type == ClaimTypes.Role && c.Value == requirement.Role))
{
context.Succeed(requirement);
}
return Task.CompletedTask;
}
}
Register the handler in services.
builder.Services.AddSingleton<IAuthorizationHandler, CustomRoleHandler>();
- Use custom attributes for lightweight authorization checks.
- Implement custom middleware for broader authentication handling.
- Use policy-based authorization for flexible and reusable rules.