European ASP.NET MVC Hosting

BLOG about Latest ASP.NET MVC Hosting and Its Technology - Dedicated to European Windows Hosting Customer

ASP.NET MVC Hosting - HostForLIFEASP.NET :: ASP.NET MVC C# Demo Registration Integration with External APIs

clock November 26, 2024 06:46 by author Peter

Integrating external services into contemporary web applications can greatly increase functionality and enhance user experience. One example of an integration is with car registration systems, where administrators can easily handle vehicle data thanks to APIs. The method of incorporating an automobile registration API into an ASP.NET MVC application will be examined in this article. In particular, we will concentrate on a technique that connects to an external service (base API) for tag registration in order to add a car to an administrator's system.


The technique under discussion manages a number of tasks, including data preparation, HTTP request sending, response processing, and error management. You will have a firm grasp on how to integrate external APIs into your own web applications by the end of this tutorial, guaranteeing seamless communication between your system and outside services.

Code
public async Task<ActionResult> Demoadminvehicle(GetDemoadmin model)
{
    // Create an instance of GetDemoadmin
    GetDemoadmin vehiInfo = new GetDemoadmin();

    // Set the properties of the model
    model.Id = Convert.ToInt32(Session["Id"]);
    model.MobileNumber = model.MobileNumber;
    model.name = model.name;
    model.no = model.no;

    // Base URL for the API
    string Baseurl = "https://api.base.id/v1/clint/demo";

    // Create request payload
    var requestData = new
    {
        consent = true,
        consentText = "I approve baseto capture",
        Number = model.no
    };

    // Serialize the object to JSON
    string jsonContent = JsonConvert.SerializeObject(requestData);

    // Create the HTTP web request
    HttpWebRequest request = (HttpWebRequest)WebRequest.Create(Baseurl);
    request.Method = "POST";
    request.ContentType = "application/json";
    request.Accept = "application/json";
    request.Headers.Add("Authorization", "bse w6rCvk51oXJiKZgbhJeaHROpRe7AJf3T%2fmdiwjszkaU%2fnNgA%2f2");

    // Write JSON content to the request stream
    using (StreamWriter writer = new StreamWriter(await request.GetRequestStreamAsync()))
    {
        await writer.WriteAsync(jsonContent);
    }

    try
    {
        // Get the response from the server
        using (HttpWebResponse response = (HttpWebResponse)await request.GetResponseAsync())
        {
            ServicePointManager.Expect100Continue = true;
            ServicePointManager.SecurityProtocol = SecurityProtocolType.Tls11 | SecurityProtocolType.Tls12;

            using (StreamReader reader = new StreamReader(response.GetResponseStream()))
            {
                string responseData = await reader.ReadToEndAsync();
                vehiInfo = JsonConvert.DeserializeObject<GetResponseclientdash>(responseData);
                model.tagId = vehiInfo.tagId;

                Console.WriteLine("Response received successfully: " + responseData);
            }
        }
    }
    catch (WebException ex)
    {
        clsErrorLog.ErrorLog(
            "Exception: " + ex.ToString(),
            "Demoadminvehicle",
            "Demoadminvehicle"
        );
    }

    // Call provider method and return result as JSON
    var res = DemoProvider.Demoadminvehicle(model);
    return Json(res, JsonRequestBehavior.AllowGet);
}

The Demoadminvehiclemethod is responsible for registering a vehicle under a specific admin by making a request to the baseAPI, which handles vehicle services. This is achieved by accepting user input in the form of a GetDemoadmin object, preparing the request, and handling both the request and response.

Step-by-Step Breakdown
1. Model Preparation
The method begins by initializing a new instance of the GetDemoadmin class (vehiInfo) and sets the necessary properties from the input model (model). The properties include customer information such as NO, name, and VehicleNo. Additionally, the Id is fetched from the session (which may represent the location or specific context related to the admin).

2. Setting Up API Request Data
The next step is to configure the data that will be sent to the external API. A requestData anonymous object is created to include essential information, like the vehicle registration number and consent text. The consent is marked as true, indicating that the user agrees to the terms and conditions for data processing.

This request data is serialized into a JSON string using JsonConvert.SerializeObject will be the body of the HTTP POST request.

3. Setting Up the HTTP Web Request

With the data ready, the method sets up an HTTP POST request using the HttpWebRequest class. The request headers are configured to accept JSON responses, and an Authorization header is added for security purposes (Basic authentication).

The baseurl is the endpoint for the BureauID API, which provides fastag-related services.

4. Sending the Request
The method uses a StreamWriter to send the serialized JSON content to the API. This is done asynchronously using await writer.WriteAsync(jsonContent);.

5. Handling the API Response
Once the request is sent, the code awaits the response from the server. If successful, the response data is read and deserialized into a GetDemoadmin object. This object contains a tagId property, which is important to associate the vehicle with a unique identifier.

6. Error Handling
In the event of an error, such as network issues or API downtime, the method catches a WebException and logs the error using a custom logging class (clsErrorLog). This ensures that the application doesn't crash and that relevant error details are stored for debugging.

Output

Conclusion
The Demoadminvehicle method is a crucial part of the vehicle registration process for an admin, interacting with an external API for vehicle fastag services. It demonstrates how to handle HTTP requests and responses asynchronously, ensure data privacy with user consent, manage errors gracefully, and return useful information back to the client.


ASP.NET MVC Hosting - HostForLIFEASP.NET :: How to Use Single Sign-On for your ASP.NET MVC Application?

clock November 13, 2024 08:44 by author Peter

Implementing Single Sign-On (SSO) for ASP.NET MVC applications provides a seamless, hassle-free login experience for your users, regardless of whether you're creating SaaS apps or an educational platform.


However, how can SSO improve security and streamline user authentication?
We'll go over SSO's specifics, the advantages of integrating it with ASP.NET MVC applications, and how it can streamline and manage your authentication procedure in this article.

What is Single Sign-On (SSO)?
Single Sign-On (SSO) has become a must-have for modern web applications. It lets you log in once and access many different applications without having to type in your username and password each time. This not only makes logging in easier but also helps keep your accounts safer by reducing password issues.

If you’re working on an ASP.NET MVC app, adding SSO can really help with user management, especially in big companies where quick access to different systems is crucial.

Here’s how it works:
When a user wants to access secure parts of your app, they just enter their username and password once. If they need to use other related applications, they usually have to enter their info again and again.

But with SSO, you only need to sign in once to get access to all connected services. As the name implies, you’re only asked to log in once during a specific time period before your login session expires.

What Are the Types of SSO Protocols?

For Single Sign-On (SSO) to work smoothly, Service Providers (SP) and Identity Providers (IDP) need to agree on a common way to share identity and login information. Here are some of the main protocols they use:

OAuth (Open Authorization)

OAuth is a widely used standard that helps with token-based authentication. It allows users to share their account information with third-party services without giving away their passwords. Instead of sharing your password, OAuth acts as a middleman. It gives the service an access token, which lets them see only certain account details.

OpenID

OpenID is another popular authentication protocol used by major companies like Google and Facebook. It’s an open and decentralized standard. With OpenID, third-party Identity Providers help verify users for Relying Parties (RP). Think of it as an extra layer on top of OAuth, making it even more secure.

SAML (Security Assertion Markup Language)

SAML works by using session cookies in your web browser. This lets you access specific pages without needing to log in each time. It gives companies more control to keep their SSO logins secure. For a more detailed look at SAML, check out the information below.

Where Can We Use SAML SSO?

SAML SSO is mainly used for authentication. This means that different apps, websites, and services need to trust the SSO site to let you access and edit your data.

Here’s how it works:
When you want to access something on a service provider’s app, you first need to log in with your username and password. If you’ve done this before, getting in is easier! The app sends a request to authenticate you, and then the identity provider sends back a response to confirm you’re good to go.

SAML is handy, especially when a service provider offers their features across various applications. It even opens up opportunities for third-party apps to use the same data in their own unique ways.

For example:

  • Websites that provide data stats for online multiplayer games.
  • Social media apps and forums that share a common topic.
  • Online video streaming platforms that engage viewers.
  • Software marketplaces like Steam that track user analytics


Why is SAML SSO Great for ASP.NET MVC Applications?
SAML SSO is highly effective for ASP.NET MVC applications for several reasons. First, it boosts security so you can feel safe while using your apps. It also helps manage user identities in one place, making it easier for everyone.

With SAML SSO, users only need to log in once to access multiple applications, which saves time and hassle. Plus, it works well across different domains, meaning you can easily connect with other services.

For businesses with complicated authentication needs, SAML SSO offers great flexibility and meets compliance requirements. It’s also scalable, so as your business grows, it can keep up. Overall, SAML SSO provides a secure and easy-to-use login experience for both users and administrators.
What are the Benefits of Using ASP.NET MVC Single Sign-On?

Faster Development
Using ASP.NET MVC Single Sign-On (SSO) helps developers save time. With a common authentication framework, they can get things done quicker. Plus, if the SSO system works independently, it takes even more pressure off the developers.

Lower Costs
Shorter development time means lower costs. It is a success when developers spend less time building. Also, fewer users forget their passwords or call the IT help desk for assistance, which cuts down on overall expenses.

Better Security
One of the best things about SSO is that it makes users less likely to fall for phishing attacks. SSO also makes sure that users connect through secure channels. This way, only one place handles their login info. The apps themselves only get a simple signal to let the user in or not. This means less sensitive information is shared.

Easier Administration
Managing user accounts becomes much easier with SSO. It reduces the workload for administrators because they don’t have to handle multiple logins. Just remember, SSO only deals with who can log in. Deciding what users can access based on their permissions still needs to be set up separately.

Better User Experience
With ASP.NET MVC Single Sign-On, users only need to log in once. They won’t have to keep entering their usernames and passwords for different applications and browsers, making everything smoother and simpler.

Conclusion

Integrating Single Sign-On (SSO) into your ASP.NET MVC application can really boost both security and user experience. With SSO, users only need to log in once to access multiple systems. This not only reduces the hassle of remembering multiple passwords but also helps organizations manage identities more effectively.

By following the steps in this guide, you can easily set up SSO for your ASP.NET MVC app. Just remember to test everything thoroughly, pick the right identity provider, and make sure your authentication flow fits your business needs. With a solid SSO solution in place, you can enhance your application's security and make it easier for users to navigate.


ASP.NET MVC Hosting - HostForLIFEASP.NET :: Entity Framework with ASP.NET MVC, Database-First

clock November 1, 2024 06:46 by author Peter

Upon writing multiple articles on this website, I discovered that nearly all of them required me to build up an example application linked to an entity framework in order to access the database. Additionally, each time, I had to start over with the setup procedure so that a new reader could easily follow along. Even when I introduced a really basic idea like caching, I had to spend 80% of my time configuring the sample application and only 20% of my time explaining the caching concept.

As a result, I believe it is preferable to create a fundamental model, such as an entity framework sample, for each technique, which I can then reuse as needed. I established a list of the series of articles below, and I will write them one by one, while the Entity framework overview and concept will be addressed in article (0).

Note
We write the Entity Framework for MVC module, but the pattern is the same or similar when applying to Web Application or Web API.

Introduction

This article is about Entity Framework with .Net MVC, Database-First approach.  This will be the easist and convenient one in the whole six approaches.

We will make a sample app step by step,

  • Step 1: Create an ASP.NET MVC application
  • Step 2: Reverse Engineer Model
  • Step 3: Create Controller to access data from entity framework
  • Step 4: Run the app

At the end, we will have an .Net MVC app that can consume a database directly through entity framework.

Step 1 - Create an ASP.NET MVC app

We use the current version of Visual Studio 2019 16.9.3 and .NET Framework 4.8 to build the app:

  • Start Visual Studio and select Create a new project.
  • In the Create a new project dialog, select ASP.NET Web Application (.NET Framework) > Next.
  • In the Configure your new project dialog, enter MVC_DatabaseFirst for Project name > Create.
  • In the Create a new ASP.NET Web Application dialog, select MVC > Creat

Note
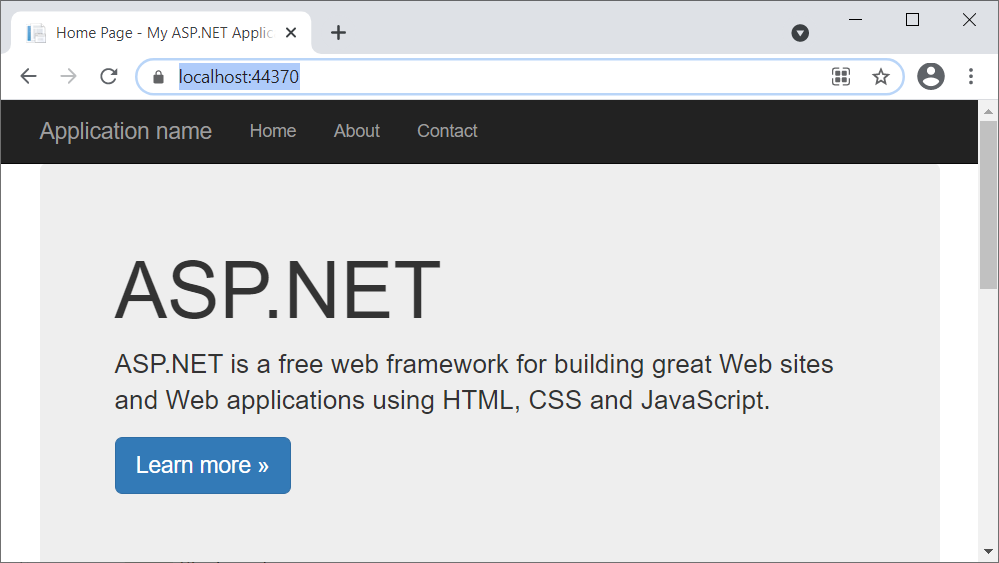
For biginners, you may see details from here. Build and run the app, you will see the following image shows the app,
Step 2, Reverse Engineer Model
We’re going to make use of Entity Framework Designer, which is included as part of Visual Studio, to create our model.

  • Project -> Add New Item…
  • Select Data from the left menu and then ADO.NET Entity Data Model
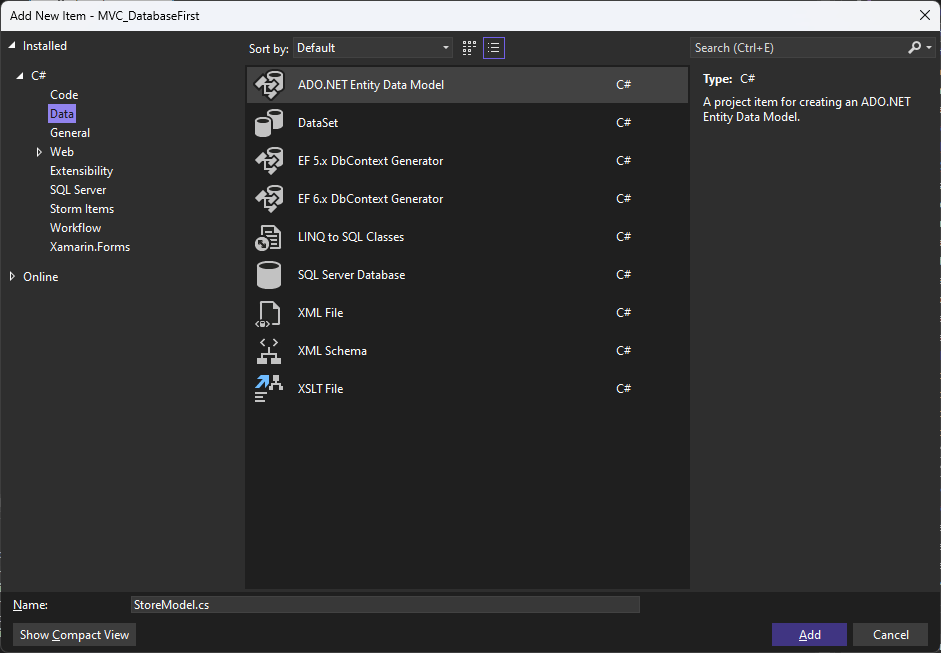
Enter StoreModel as the name and click Add
This launches the Entity Data Model Wizard
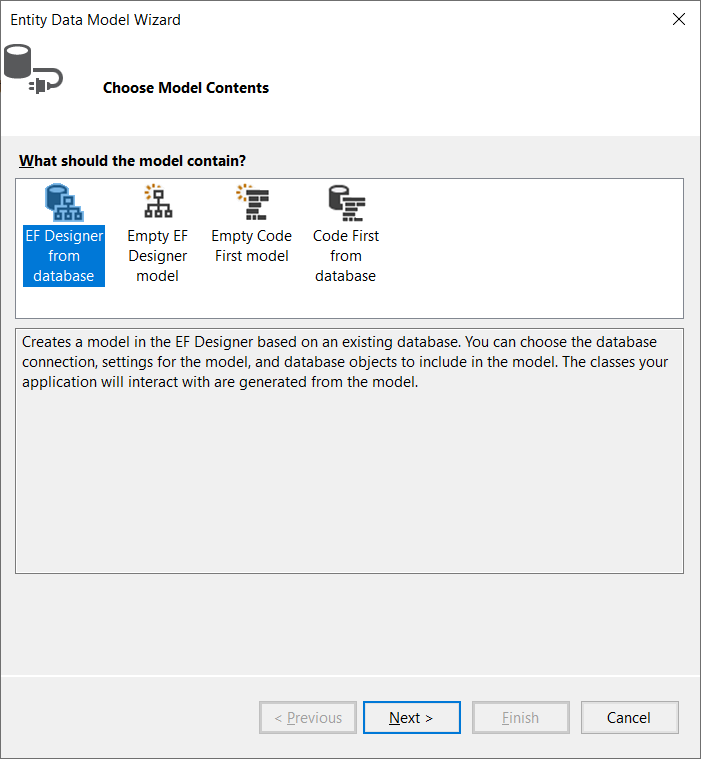
Select Generate from Database and click Next.
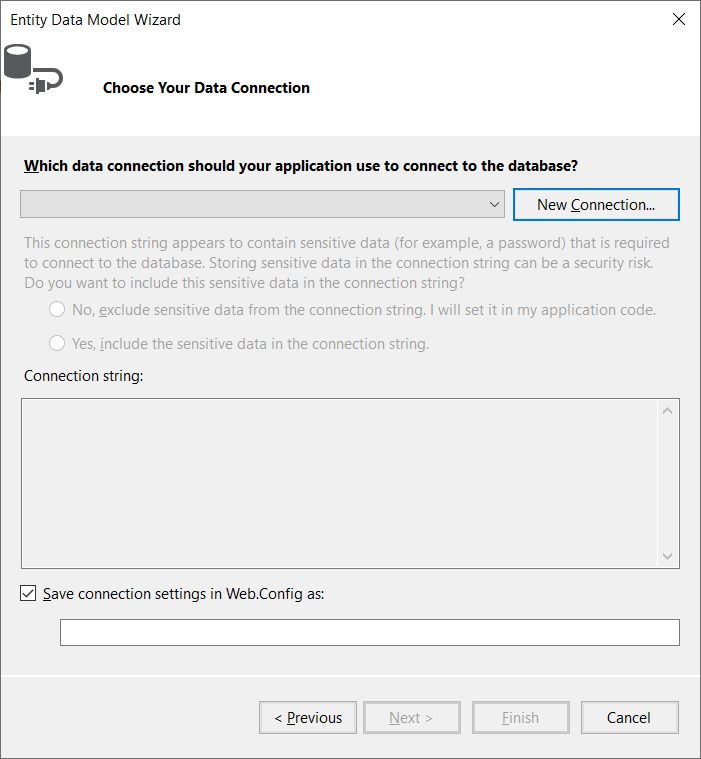
In the Choose Your Data Connection Dialog box, Click New Connection.
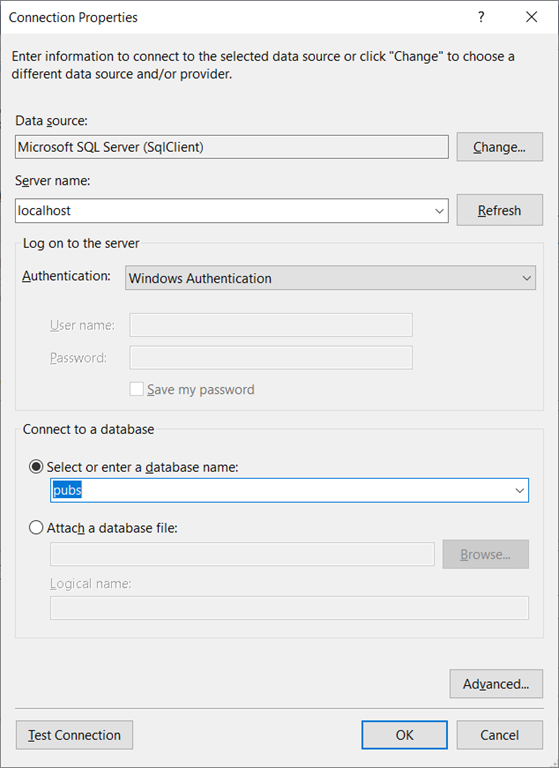
In the Connection Properties Dialog box, Choose Server Name: Localhost, and Select or Enter database name: Pubs, Click OK.
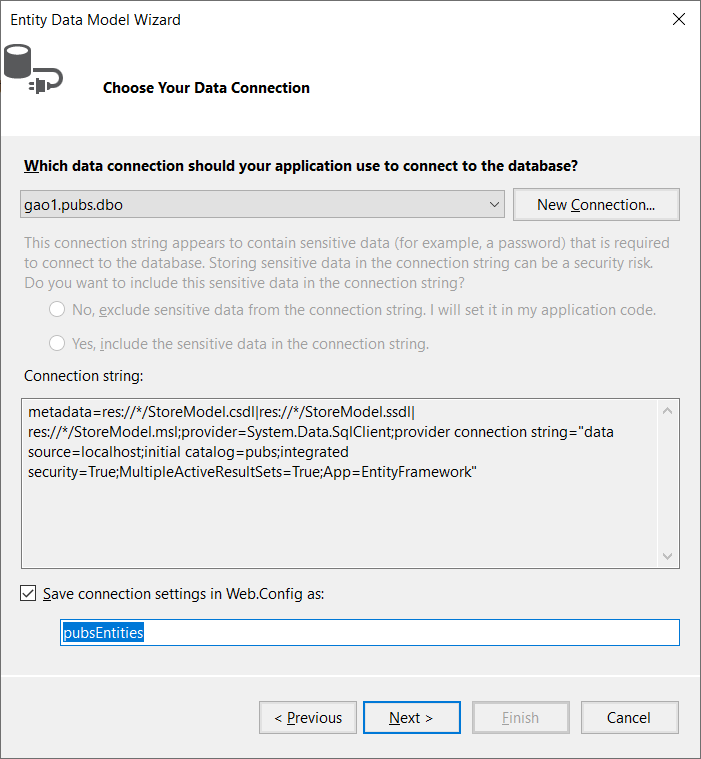
You got connection string, Click Next.
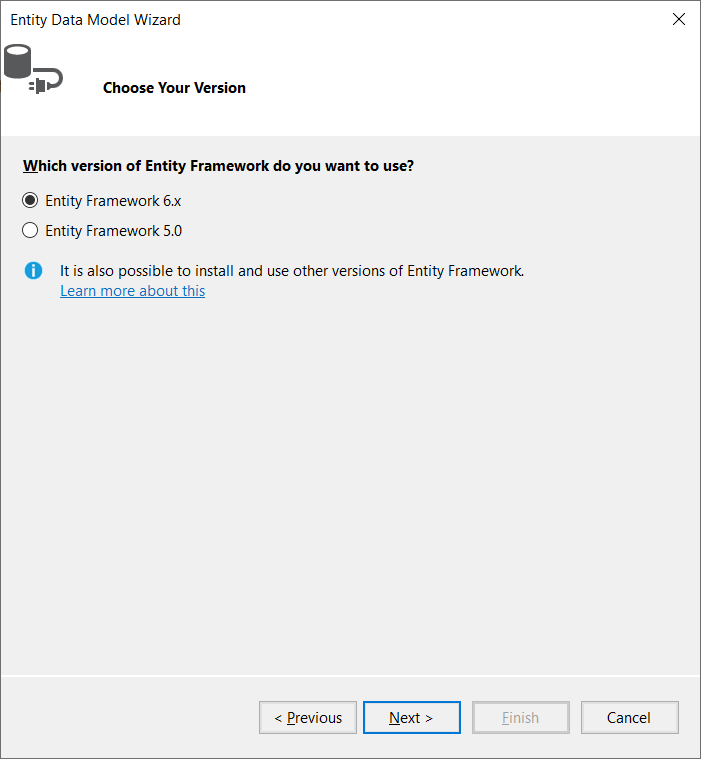
Click Next.
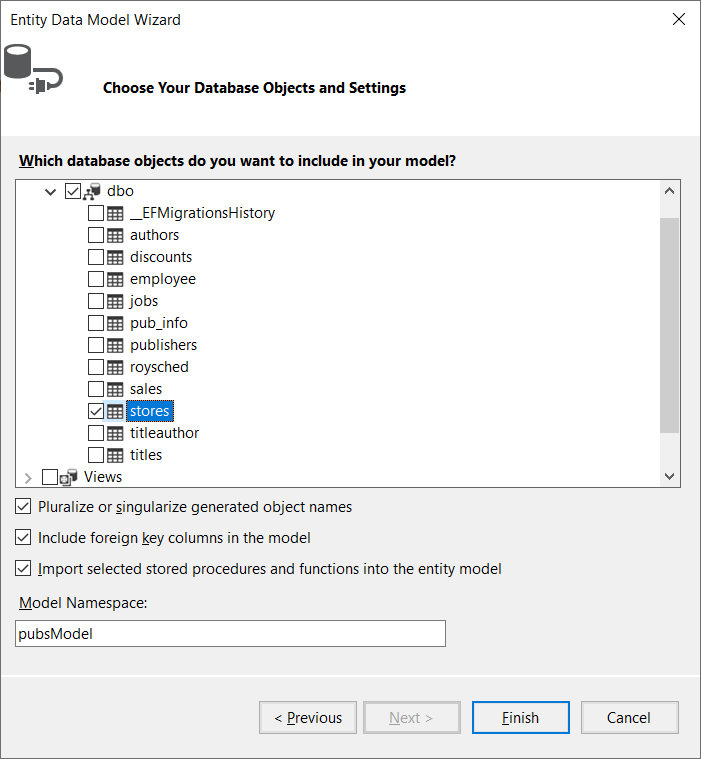
Click the checkbox next to ‘Tables’ to import stores and click Finish. Once the reverse engineer process completes the new model is added to your project and opened up for you to view in the Entity Framework Designer (StoreModel.edmx):
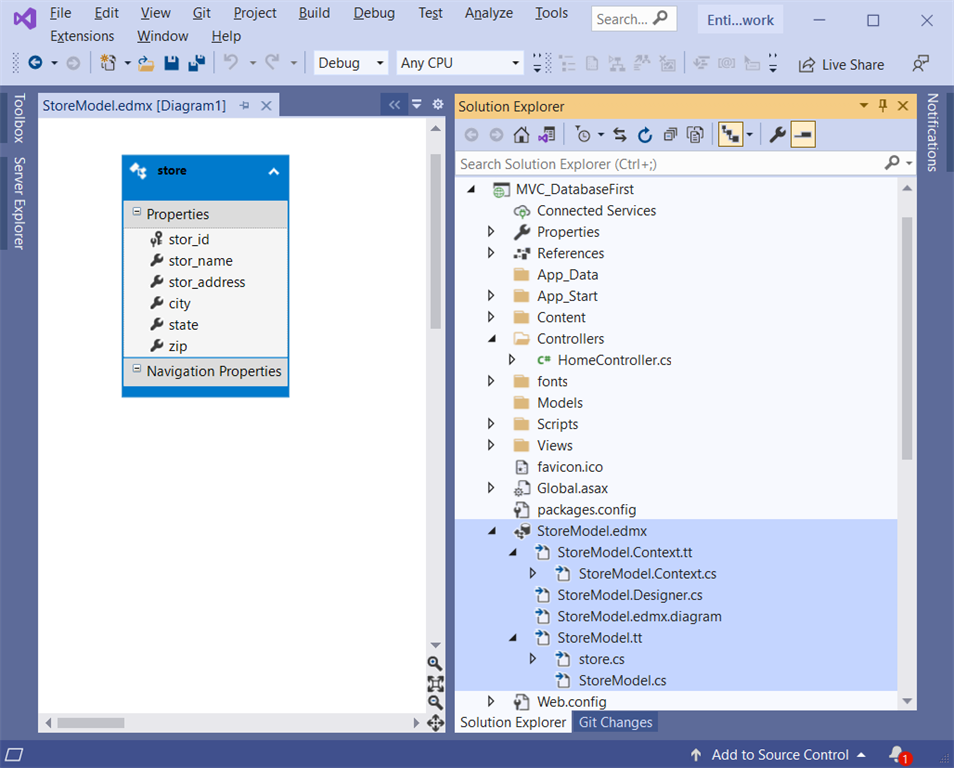
The created class Store like this (StoreModel.edmx/StoreModel.tt/store.cs)
//------------------------------------------------------------------------------
// <auto-generated>
//     This code was generated from a template.
//
//     Manual changes to this file may cause unexpected behavior in your application.
//     Manual changes to this file will be overwritten if the code is regenerated.
// </auto-generated>
//------------------------------------------------------------------------------

namespace MVC_DatabaseFirst
{
    using System;
    using System.Collections.Generic;

    public partial class store
    {
        public string stor_id { get; set; }
        public string stor_name { get; set; }
        public string stor_address { get; set; }
        public string city { get; set; }
        public string state { get; set; }
        public string zip { get; set; }
    }
}

The Data Context will be in pubsEntities class (StoreModel.edmx/StoreModel.Context.tt/StoreModel.Context.cs):
//------------------------------------------------------------------------------
// <auto-generated>
//     This code was generated from a template.
//
//     Manual changes to this file may cause unexpected behavior in your application.
//     Manual changes to this file will be overwritten if the code is regenerated.
// </auto-generated>
//------------------------------------------------------------------------------

namespace MVC_DatabaseFirst
{
    using System;
    using System.Data.Entity;
    using System.Data.Entity.Infrastructure;

    public partial class pubsEntities : DbContext
    {
        public pubsEntities()
            : base("name=pubsEntities")
        {
        }

        protected override void OnModelCreating(DbModelBuilder modelBuilder)
        {
            throw new UnintentionalCodeFirstException();
        }

        public virtual DbSet<store> stores { get; set; }
    }
}


and the connection details for the database will be inserted into web.config file:
<connectionStrings>
  <add name="pubsEntities" connectionString="metadata=res://*/Model1.csdl|res://*/Model1.ssdl|res://*/Model1.msl;provider=System.Data.SqlClient;provider connection string="data source=localhost;initial catalog=pubs;integrated security=True;MultipleActiveResultSets=True;App=EntityFramework"" providerName="System.Data.EntityClient" />
</connectionStrings>

Step 3:  Create Controller to access data from entity framework
From Visual Studio IDE,

  • Right-click the Controllers folder.
  • Select Add > New Scaffolded Item Or Controller to open the window Add New Scaffolded Item
  • In the Add New Scaffold Item dialog box, click MVC 5 Controller with views, using Entity Framework, and then click Add.;
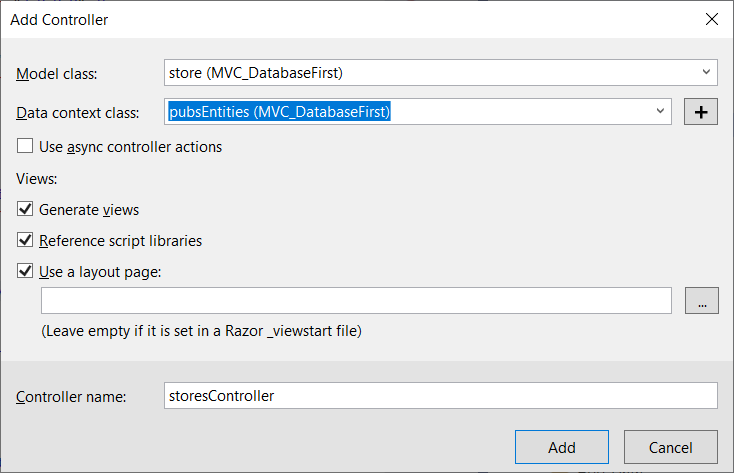
  • In the Add Controller dialog box,
    • Select store (MVC_DatabaseFirst) for the Model class.
    • Select pubsEntities (MVC_DatabaseFirst) for the Data context class.
    • For the Controller name enter storesController.
    • Click Add.  

Step 4: Run the app
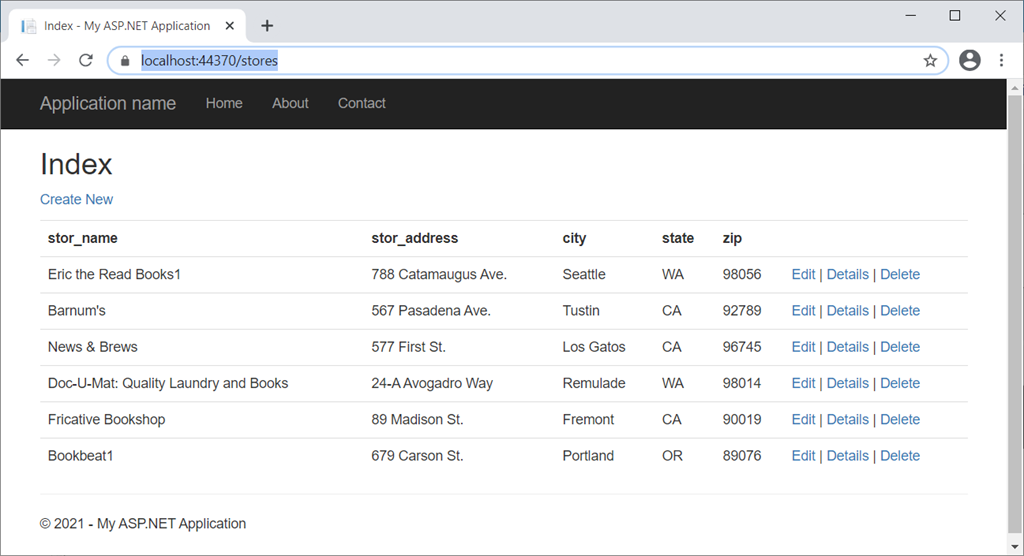
Type domain/stores into the link, you will get:


About HostForLIFE

HostForLIFE is European Windows Hosting Provider which focuses on Windows Platform only. We deliver on-demand hosting solutions including Shared hosting, Reseller Hosting, Cloud Hosting, Dedicated Servers, and IT as a Service for companies of all sizes.

We have offered the latest Windows 2019 Hosting, ASP.NET 5 Hosting, ASP.NET MVC 6 Hosting and SQL 2019 Hosting.


Month List

Tag cloud

Sign in