European ASP.NET MVC Hosting

BLOG about Latest ASP.NET MVC Hosting and Its Technology - Dedicated to European Windows Hosting Customer

ASP.NET MVC Hosting - HostForLIFEASP.NET :: Performance Optimization in ASP.NET MVC Applications

clock June 27, 2024 08:03 by author Peter

Performance optimization for ASP.NET MVC (Model-View-Controller) applications use a range of techniques in an effort to improve the efficiency, responsiveness, and speed of applications created using this framework. The following are some key areas and methods for optimizing the performance of ASP.NET MVC applications.

1. Efficient data access
Use Entity Framework wisely: Optimize queries, use lazy loading carefully, and prefer compiled queries for frequently used data access paths.
Stored Procedures: Use stored procedures for complex and frequently run queries to reduce the overhead of query parsing and execution planning.
Caching: Implement caching strategies like output caching, data caching, and distributed caching (e.g., using Redis) to reduce database load.

2. Optimizing server-side code
Async/Await: Use asynchronous programming (async/await) to handle I/O-bound operations without blocking threads.
Minimize ViewState: Reduce the use of ViewState to decrease the payload size.
Bundling and Minification: Combine and minify CSS and JavaScript files to reduce the number of HTTP requests and the size of requested resources.
Compression: Enable GZIP compression in IIS to compress the response data sent to the client, reducing the response size.

3. Efficient use of resources
Pooled Connections: Use connection pooling to reuse database connections.
Memory Management: Properly manage memory usage to avoid excessive garbage collection and memory leaks.
Thread Pooling: Utilize thread pooling to manage a pool of worker threads, which can be reused for executing tasks, reducing the overhead of thread creation.

4. Front-end performance
Lazy Loading: Implement lazy loading for images and other resources to load them only when they are in the viewport.
Content Delivery Network (CDN): Use CDNs to serve static resources like images, CSS, and JavaScript files from locations closer to the user, reducing latency.
Browser Caching: Set appropriate caching headers to enable browsers to cache static resources.

5. Optimizing Queries and Data Access
Indexing: Properly index database tables to improve query performance.
Pagination: Implement pagination for data-heavy views to load only a subset of data at a time.
Query Optimization: Analyze and optimize LINQ queries to reduce execution time.

6. Application Monitoring and Profiling
Application Insights: Use tools like Azure Application Insights for monitoring and diagnostics to identify performance bottlenecks.
Profiling Tools: Use profiling tools to analyze the performance of your application and identify hotspots.

7. Configuration and Deployment

Configuration Settings: Tune application settings such as session state management, request timeouts, and garbage collection modes.
Scalability: Design the application to be scalable, allowing it to handle increased load by adding more resources (horizontal scaling) or optimizing resource usage (vertical scaling).

8. Load Balancing
Load Balancers: Use load balancers to distribute incoming traffic across multiple servers, ensuring no single server is overwhelmed.
Session State Management: Ensure the session state is managed in a distributed manner (e.g., using a distributed cache) to support load balancing.

Example implementation
Here’s an example of how to implement output caching in an ASP.NET MVC controller.

using System.Web.Mvc;
public class HomeController : Controller
{
    [OutputCache(Duration = 60, VaryByParam = "none")]
    public ActionResult Index()
    {
        return View();
    }
}

In this example, the OutputCache attribute is applied to the Index action method, caching the output for 60 seconds.

Conclusion

By implementing these strategies, you can significantly improve the performance of your ASP.NET MVC application. Each application is unique, so it's important to profile and monitor your specific application to identify the most effective optimization techniques.


ASP.NET MVC Hosting - HostForLIFEASP.NET :: Integrate Twilio in C# ASP.NET Core MVC Project to Send SMS

clock June 21, 2024 08:38 by author Peter

There are a ton of in-app notifications, everyone uses a ton of websites and apps every day, communication is crucial in today's fast-paced environment. But those in-app alerts won't appear until we launch the program. Therefore, adding SMS functionality to projects could greatly increase user interaction and engagement. Among other communication services, Twilio, a well-known cloud communications company, offers developers a robust API that makes it simple to send and receive SMS texts.


This post will explain how to incorporate Twilio into a C# MVC project from scratch in order to send SMS. So let's get started on the project by first creating a Twilio account.

Setting up a Twilio account
To set up a Twilio account, we will first sign up, and that's quite easy. If you already have a Twilio account, you can skip step 1 and just follow from step 2.

Step 1. Sign Up in Twilio

Sign up by filling in the basic details on the following link - www.twilio.com. By clicking on "Continue," you will be redirected to another page to verify your email. Once the email is verified, you will need to verify your phone number as well. After that, you will be redirected to another page that will provide a recovery code. Please copy the code and keep it somewhere safe for future use.

Step 2. Log in to Twilio
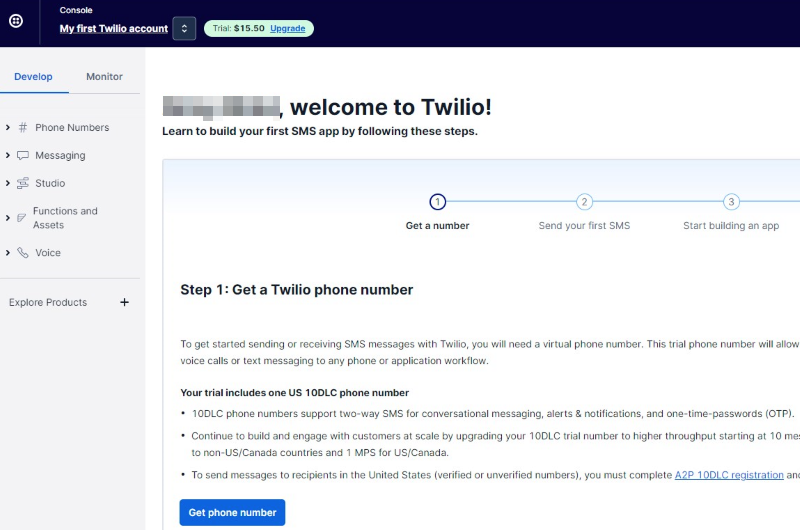
If you are logging in for the first time, Twilio will ask you a few questions. Just answer them, and it will take you to the dashboard, which will look like below.
 

Step 3. Get the Phone Number
Click on the "Get Phone Number" button, and you will receive the number. Before purchasing their plan, your account will be a trial account, and the number given to you will be a trial number.

Step 4. Get SID and Auth Token
In the same screen, you will have a section named "Account Info", where you will following information -Account SID, Auth Token, and My Twilio phone number, which we will be using during development.

Step 5. Verify Phone Numbers
This step is only for trial account users. Since it is a trial account, you will need to verify the numbers on which you want to send the SMS using your project. You can skip this step if you have purchased a Twilio SMS plan. To verify numbers, follow the following steps.

  • Click on the verified phone numbers link. You will be redirected to another page.
  • Click on the "Add a new caller ID" button in the right corner. A popup will open to add the number.
  • Select the country, number, and mode through which you want to verify the number.
  • Click verify the number, you will get an OTP on the number you just entered.
  • Enter the OTP to verify the number and it will be shown in verified caller IDs.

Now that you have set up the Twilio account. Let's move to the project.

Setting up the project

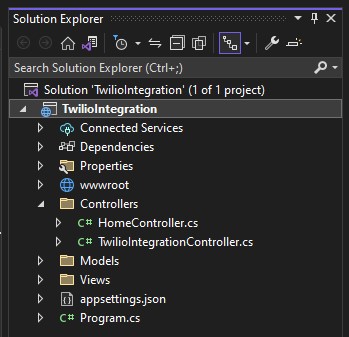
You can either create a new project or you can integrate Twilio into an existing project. Here, I have created a demo project to integrate Twilio in it and created a Controller named "TwilioIntegrationController". In this controller, I will be writing Twilio-related code. Let's move to the project.
Step 1. Install dependencies
To be able to integrate Twilio in the project, you will need some dependencies, that will help Twilio run.

  • Click on Tools.
  • Select "Nuget Package Manager".
  • Click "Manage Nuget Package for solution".
  • In the Browse section, search for Package "Twilio" and install the solution.
  • Then, search "Twilio.AspNet.Mvc" and install it too.

Now that you have installed all the necessary dependencies. Let's move to the next step.

Step 2. Code to Send SMS

In the "TwilioIntegrationController", write your code for sending SMS. Here, I am putting all my code in one file. But you should put the necessary code where it should be.
using Microsoft.AspNetCore.Mvc;
using Twilio;
using Twilio.Rest.Api.V2010.Account;

namespace TwilioIntegration.Controllers
{
public class TwilioIntegrationController : Controller
{
    [Route("send-SMS")]
    public IActionResult SendSMS()
    {
        string sId = ""; // add Account from Twilio
        string authToken = ""; //add Auth Token from Twilio
        string fromPhoneNumber = "+120*******"; //add Twilio phone number

        TwilioClient.Init(sId, authToken);
        var message = MessageResource.Create(
            body: "Hi, there!!",
            from: new Twilio.Types.PhoneNumber(fromPhoneNumber),
            to: new Twilio.Types.PhoneNumber("+9175********") //add receiver's phone number
        );
        Console.WriteLine(message.ErrorCode);
        return View(message);
    }
}
}

Code Explanation
In the above code,

  • Add 'using Microsoft.AspNetCore.Mvc;', 'using Twilio;', 'using Twilio.Rest.Api.V2010.Account;' to use Twilio API in the code.
  • Then, I have created a method named SendSMS().
  • In the method, I created three string variables - sId, authToken, and fromPhoneNumber to store Twilio account SId, Auth Token, and Twilio phone number. I have placed all three in this method, but you should store them in an appsettings file and access them from there.
  • Then, initiate TwilioClient by passing your account SId and Auth Token using this lineTwilioClient.Init(sId, authToken);.
  • In the next line "MessageResource.Create()" is a method call to create a new SMS message using the Twilio API. It indicates that we are creating a new message resource. We are passing the message body, from phone number and to phone number in it. It creates the message and sends it using the Twilio API.
  • In the next line, I have consoled the ErrorCode, if any error occurs during the sending of SMS.
  • If you got this exception while executing the method, Permission to send an SMS has not been enabled for the region indicated by the 'To' number. Click here to resolve this- solution

Step 3. Call the above method
Call the method that we created earlier from your code to send SMS from wherever you want in your code, and Twilio will send the SMS to the account that you mentioned earlier.

In the above image, you can see the message is sent successfully from the project and the body is the same as we mentioned in our code. But as we are using a trial account, hence, Twilio adds the prefix "Sent from your Twilio trial account-" in all the messages that you will send from your trial account. Hence, for real-life projects, it is better to buy a plan.

Conclusion

In this article, we have seen how to create a Twilio account, set it up, and integrate Twilio with the code in the C# MVC project. By following simple steps to set up a Twilio account and implementing Twilio's API, developers can easily send and receive SMS messages, offering a valuable tool for improving project functionality and user experience.

Like this, you can also integrate Twilio in other languages too. The process is almost similar. You can also use Twilio to send WhatsApp messages and voice messages, etc by simply integrating it into your project. This integration empowers developers to leverage Twilio's robust cloud communication platform to enhance their projects across various programming languages, facilitating effective communication and user engagement.


ASP.NET MVC Hosting - HostForLIFEASP.NET :: Dependency Injection In ASP.NET MVC 5

clock June 11, 2024 09:26 by author Peter

I was inspired to produce an article about utilizing Dependency Injection in ASP.NET MVC5 after reading many ones about it in MVC and C#.


In MVC, Dependency Injection (DI)

One way to put "Inversion of Control" into practice is through dependency injection. According to the theory known as Inversion of Control (IoC), objects obtain the objects they require from an external source (such as an XML configuration file) rather than creating other objects that they depend on to do their tasks.

Let's now put the same into practice.
Create a new project for ASP.NET MVC.

No, install the "Unity.Mvc5" Container using NuGet Package Manager, as shown below.

When it is installed successfully, you will find the following two references added to your project and a UnityConfig.cs class file in App-Start folder.

Now, let’s create the repository that will be accessed by the Controller.

  • Add a folder named Repository.
  • Add an interface IUserMasterRepository.

interface IUserMasterRepository
    {
        IEnumerable<UserMaster> GetAll();
        UserMaster Get(int id);
        UserMaster Add(UserMaster item);
        bool Update(UserMaster item);
        bool Delete(int id);
    }

Now, add the repository which has your data access code.
public class UserMasterRepository : IUserMasterRepository
{
    private List<UserMaster> users = new List<UserMaster>();
    private int Id = 1;

    public UserMasterRepository()
    {
        // Add products for the Demonstration
        Add(new UserMaster { Name = "User1", EmailID = "[email protected]", MobileNo = "1234567890" });
        Add(new UserMaster { Name = "User2", EmailID = "[email protected]", MobileNo = "1234567890" });
        Add(new UserMaster { Name = "User3", EmailID = "[email protected]", MobileNo = "1234567890" });
    }

    public UserMaster Add(UserMaster item)
    {
        if (item == null)
        {
            throw new ArgumentNullException("item");
        }

        item.ID = Id++;
        users.Add(item);
        return item;
    }

    public bool Delete(int id)
    {
        users.RemoveAll(p => p.ID == id);
        return true;
    }

    public UserMaster Get(int id)
    {
        return users.FirstOrDefault(x => x.ID == id);
    }

    public IEnumerable<UserMaster> GetAll()
    {
        return users;
    }

    public bool Update(UserMaster item)
    {
        if (item == null)
        {
            throw new ArgumentNullException("item");
        }

        int index = users.FindIndex(p => p.ID == item.ID);
        if (index == -1)
        {
            return false;
        }
        users.RemoveAt(index);
        users.Add(item);
        return true;
    }
}

Note. Here, we have used a repository. You can use services which will consume your Repository.
Now, register this repository to container in UnityConfig.cs.
    public static void RegisterComponents()
    {
        var container = new UnityContainer();
        container.RegisterType<IUserMasterRepository, UserMasterRepository>();
        DependencyResolver.SetResolver(new UnityDependencyResolver(container));
    }
Add UnityConfiguration in AppStart method of Global.asax
protected void Application_Start()
{
    AreaRegistration.RegisterAllAreas();
    FilterConfig.RegisterGlobalFilters(GlobalFilters.Filters);
    RouteConfig.RegisterRoutes(RouteTable.Routes);
    BundleConfig.RegisterBundles(BundleTable.Bundles);
    UnityConfig.RegisterComponents();
}

Inject the Dependency in Controller.

Create UserController

Now, in the below code, we have created a constructor of UserContoller, injected the UserMasterRepository, and accessed it in Index action.

public class UserController : Controller
{
    readonly IUserMasterRepository userRepository;

    public UserController(IUserMasterRepository repository)
    {
        this.userRepository = repository;
    }

    // GET: User
    public ActionResult Index()
    {
        var data = userRepository.GetAll();
        return View(data);
    }
}


Add a View for the same.
Add User folder in Views folder.
Add Index View.

Below is the code which needs to be written in Index View file.

@model IEnumerable<MVCWithDI.Repository.UserMaster>

@{
    ViewBag.Title = "Users";
    Layout = "~/Views/Shared/_Layout.cshtml";
}

<h2>Index</h2>

<p>
    @Html.ActionLink("Create New", "Create")
</p>

<table class="table">
    <tr>
        <th>
            @Html.DisplayNameFor(model => model.Name)
        </th>
        <th>
            @Html.DisplayNameFor(model => model.EmailID)
        </th>
        <th>
            @Html.DisplayNameFor(model => model.MobileNo)
        </th>
        <th></th>
    </tr>

@foreach (var item in Model) {
    <tr>
        <td>
            @Html.DisplayFor(modelItem => item.Name)
        </td>
        <td>
            @Html.DisplayFor(modelItem => item.EmailID)
        </td>
        <td>
            @Html.DisplayFor(modelItem => item.MobileNo)
        </td>
        <td>
            @Html.ActionLink("Edit", "Edit", new { id=item.ID }) |
            @Html.ActionLink("Details", "Details", new { id=item.ID }) |
            @Html.ActionLink("Delete", "Delete", new { id=item.ID })
        </td>
    </tr>
}

</table>


Now, run the project. Here is the output.


About HostForLIFE

HostForLIFE is European Windows Hosting Provider which focuses on Windows Platform only. We deliver on-demand hosting solutions including Shared hosting, Reseller Hosting, Cloud Hosting, Dedicated Servers, and IT as a Service for companies of all sizes.

We have offered the latest Windows 2019 Hosting, ASP.NET 5 Hosting, ASP.NET MVC 6 Hosting and SQL 2019 Hosting.


Month List

Tag cloud

Sign in