European ASP.NET MVC Hosting

BLOG about Latest ASP.NET MVC Hosting and Its Technology - Dedicated to European Windows Hosting Customer

ASP.NET MVC Hosting - HostForLIFEASP.NET :: Consuming Web Service In ASP.NET MVC

clock May 27, 2024 07:50 by author Peter

In order to transfer information, web services are still crucial in many modern applications. Because of my well-received series of articles on ASP.NET Web Services from two or three years ago, people have been requesting that I publish a straightforward piece on how to use Web Services in MVC applications. I have therefore chosen to produce an essay on ASP.NET MVC about using Web Services based on that requirement. We will learn how to use Web Services in ASP.NET MVC applications in this tutorial.

Step 1. Create MVC Application

  • "Start", followed by "All Programs" and select "Microsoft Visual Studio 2015".
  • Click "File", followed by "New" and click "Project". Select "ASP.NET Web Application Template", provide the Project; whatever name you wish, and click OK.
  • After clicking, the Window given below will appear. Choose an empty project template and check the MVC option.
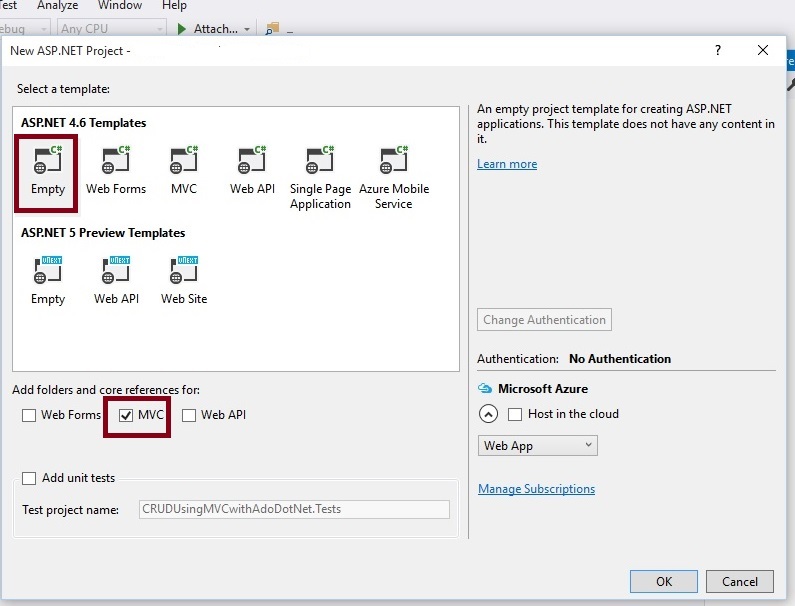
The preceding step creates the simple empty ASP.NET MVC Application without a Model, View, and Controller. The Solution Explorer of the created Web Application will look as shown below.
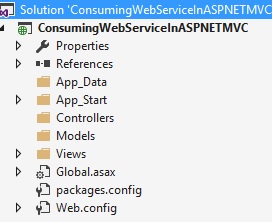
Step 2. Adding Web Service reference
There are many ways to consume Web Services but in this article, we will learn to consume the Web Service by using the Add Service reference method. Note. We are using Web Services, which are hosted in IIS. For more details, please watch my video by using the link given in the prerequisites section. The URL is given below, hosted by Service, which we are going to use in this application .

http://localhost:8080/PaymentWebService.asmx

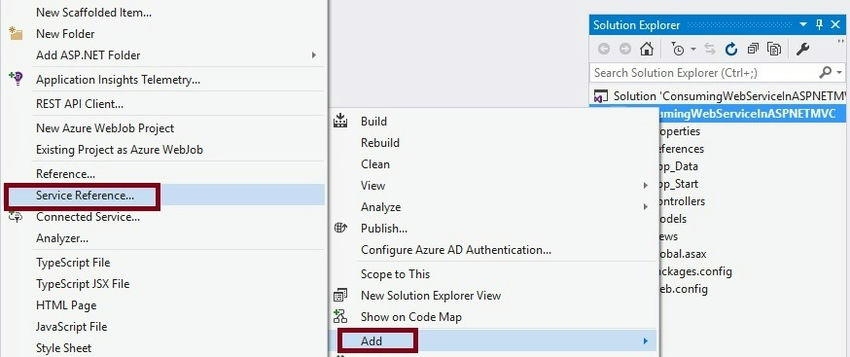
Right-click on the created ASP.NET MVC Application and click Add Service Reference, as shown below.
Now, after clicking on the preceding Service reference option, it will show the Window given below.
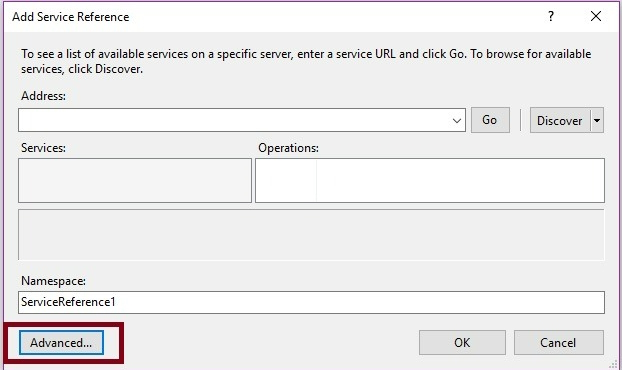
Now, click on the advanced button. It shows the Window given below, which allows us to configure how the entities and output should behave.
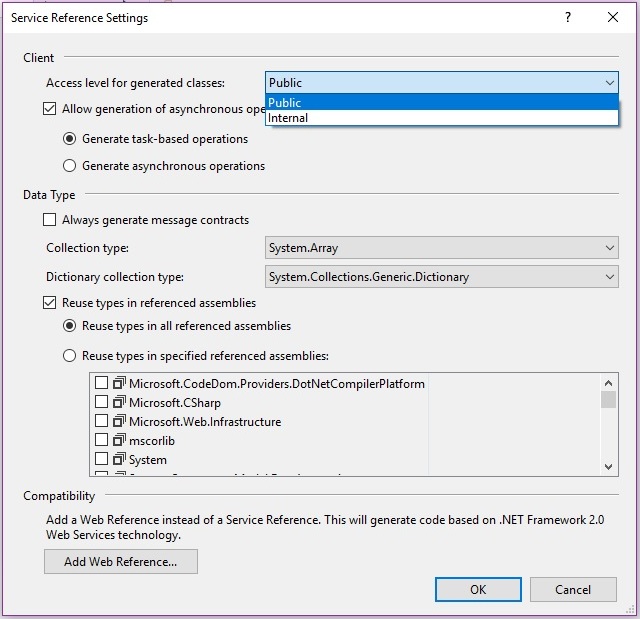
After configuring the appropriate Service reference settings, click Add Web Service reference. It will show the Window given below.
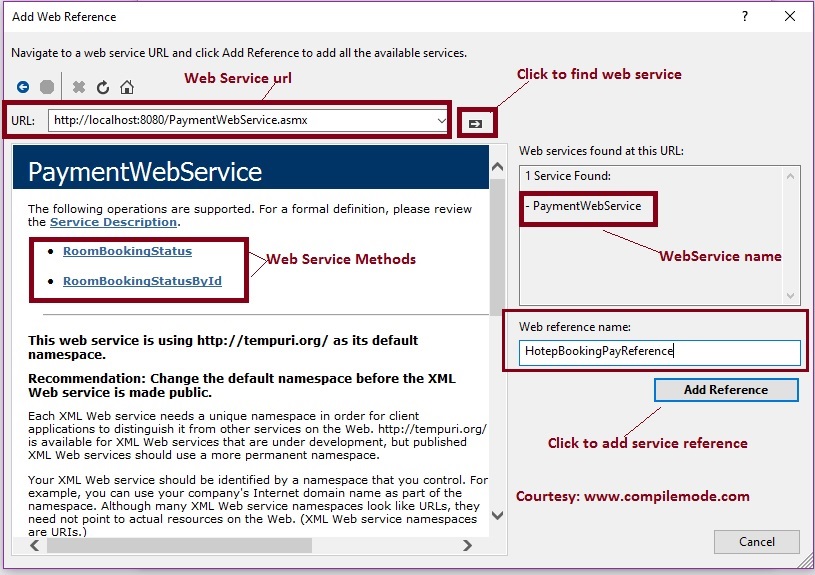
As shown in the preceding image, our Web Service found two web service methods which are highlighted with a red rectangle. Now provide the web service reference name as you wish and click on ok , it will add the Web Service reference in our created ASP.NET MVC application, as shown below.
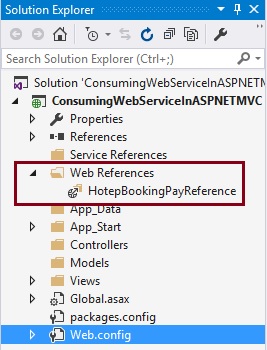
As you can see in the preceding highlighted square section, the Web Service reference gets added to our created ASP.NET MVC application. Now, we are done with adding the Web Service reference.

Step 3. Add Controller Class
Now, let us add the ASP.NET MVC controller, as shown in the screenshot given below.

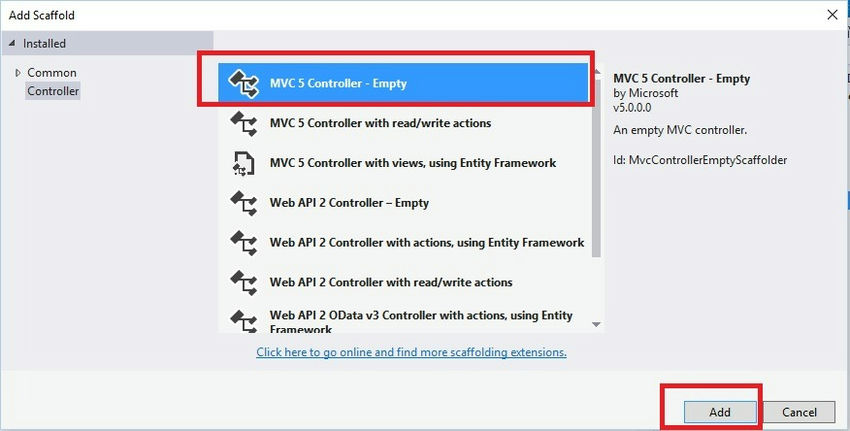
After clicking the Add button, it will show in the Window. Specify the Controller name as Home with the suffix Controller. Now, let's modify the default code of the Home controller. After modifying the code of Homecontroller class, the code will look, as shown below.

Home controller. cs
using System.Linq;
using System.Web.Mvc;

namespace ConsumingWebServiceInASPNETMVC.Controllers
{
    public class HomeController : Controller
    {
        // GET: Home
        public ActionResult Index()
        {
            return View();
        }

        [HttpGet]
        public JsonResult BookingStatus()
        {
            //Creating Web Service reference object
            HotepBookingPayReference.PaymentWebService objPayRef = new HotepBookingPayReference.PaymentWebService();

            //calling and storing web service output into the variable
            var BookingStatusInfo = objPayRef.RoomBookingStatus().ToList();
            //returning json result
            return Json(BookingStatusInfo, JsonRequestBehavior.AllowGet);
        }
    }
}


I hope, you have gone through the same steps and understood how to use and call ASP.NET Web Service.

Step 4. Create Empty View
Now, right-click on the Views folder of the created Application and create View, which is named by Index, to display hotel booking details from hosted ASP.NET Web Services, as shown below.
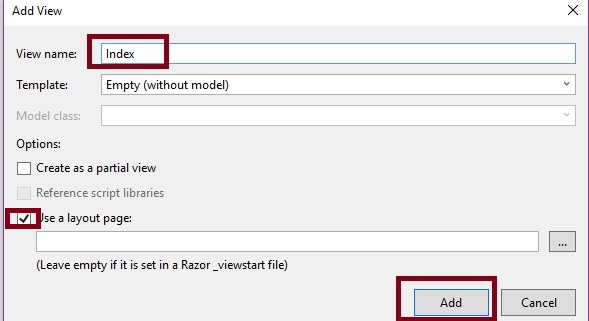
Now, click the Add button. It will create a View named index. Now, modify the code and write the jQuery function to bind the HTML table, using JSON data after modifying the default code. The code snippet of the Index View looks, as shown below.

Index. cshtml
@{
    ViewBag.Title = "Index";
}
<script src="~/Scripts/jquery-1.10.2.min.js"></script>
<script src="~/Scripts/jquery-1.10.2.intellisense.js"></script>

<script type="text/javascript">
    $(document).ready(function () {
        $.getJSON("/Home/BookingStatus", function (data) {
            var tr;
            $.each(data, function (d, i) {
                tr = $('<tr/>');
                tr.append("<td>" + i.RoomId + "</td>");
                tr.append("<td>" + i.RooType + "</td>");
                tr.append("<td>" + i.BookingStatus + "</td>");
                $('#tblBookingStatus').append(tr);
            });
        });
    });
</script>

<p class="form-horizontal">
    <hr />
    <p class="form-group">
        <table id="tblBookingStatus" class="table table-responsive" style="width:400px">
            <tr>
                <th>
                    Room Id
                </th>
                <th>
                    Room Type
                </th>
                <th>
                    Booking Status
                </th>
            </tr>
            <tbody>
            </tbody>
        </table>
    </p>
</p>


The preceding View will display all hotel booking details. Now, we have done all the coding.

Step 5. Run the Application
After running the Application, the hotel booking details from hosted ASP.NET Web Service will look, as shown below.
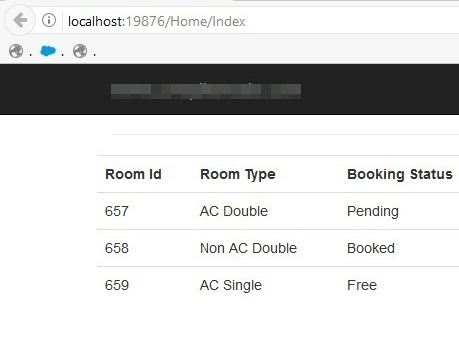
I hope, from the above examples, you have learned how to consume ASP.NET Web Services in ASP.NET MVC Applications.

Note

Download the zip file of the published code to learn and start quickly.
This article is just a guideline on how to consume ASP.NET Web Service in ASP.NET MVC Applications.
In this article, the optimization is not covered in depth; do it as per your skills.

Summary

I hope this article is useful for all the readers. If you have any suggestions, please mention them in the comments section.


ASP.NET MVC Hosting - HostForLIFEASP.NET :: New Features in ASP.NET MVC 6

clock May 8, 2024 09:02 by author Peter

An overview of MVC, or Model View Controller
A framework called Model View Controller (MVC) is used to create web applications based on predetermined designs.

  • M is an acronym for model.
  • V is an acronym for view.
  • Controller is represented by the letter C.

The portion of the program that manages the logic for application data is represented by ModelModel. The Model object's primary functions are data retrieval and database storage.

Views
The portion of a program that manages data display is called a view. Model data are used to construct views.

Controller
The portion of the program that manages user interaction is called the Controller. It serves as a link between the View and the Model. Usually, the Controller provides input data to the model after reading data from the View and controlling user input.

What has ASP.NET MVC 6 added?
Cloud-optimized Framework vs. Entire Framework

Because System.Web.Dll is so expensive and often uses 30k of memory for each request and answer, Microsoft eliminated its reliance from MVC 6. As a result, MVC 6 now only uses 2k of memory for requests and responses, which is a relatively minimal amount of memory. One benefit of utilizing the cloud-optimized framework is that your website will come with a copy of the mono CLR. We don't need to update the.NET version on the whole system only for one website. A separate CLR version operating side by side with another website.

ASP.NET 5's MVC 6 component was created with cloud-optimized apps in mind. When our MVC application is pushed to the cloud, the runtime chooses the appropriate version of the library automatically.

It is also intended to optimize the Core CLR with a high degree of resource efficiency.

Microsoft created numerous Web API, WebPage, MVC, and SignalLr components that we refer to as MVC 6.

The Roslyn Compiler is used to solve the majority of the difficulties. The Roslyn Compiler is used with ASP.NET vNext. We can avoid compiling the program by using the Roslyn Compiler, which builds the application code automatically. Without pausing or restarting the project, you will update a code file and be able to view the changes by refreshing the browser.

Use hosts other than Windows
On the other hand, MVC 6 has an improved functionality that is housed on an IIS server and a self-user pipeline. Where we use MVC5, we can host it on an IIS server and we can also run it on top of an ASP. Net Pipeline.

Configuration system based on the environment
An environment for cloud application deployment is made available via the configuration system. Our program functions similarly to one that provides configurations. Retrieving the value from other configuration sources, such as XML files, is helpful.

A brand-new environment-based configuration system is part of MVC6. It is dependent only on the Web, as opposed to something else. Configuration file from the prior iteration.

Dependency injection
Using the IServiceProvider interface we can easily add our own dependency injection container. We can replace the default implementation with our own container.

Supports OWIN

We have complete control over the composable pipeline in MVC 6 applications. MVC 6 supports the OWIN abstraction.
Important components of an MVC6 application

The is a new file type in MVC6 as in the following.

The preceding files are new in MVC 6. Let's see what each of these files contains.

Config.Json

This file contains the application configuration in various places. We can define our application configuration, not just this file. There is no need to be concerned about how to connect to various sources to get the confutation value.

In the following code, we add a connection string in the Config.json file.
{
    "Data": {
        "DefaultConnection": {
            "ConnectionString": "Server=server_name;Database=database_name;Trusted_Connection=True;MultipleActiveResultSets=true"
        }
    }
}


Project.json

This file contains the build information as well as project dependencies. It can contain the commands used by the application.
{
    "webroot": "wwwroot",
    "version": "1.0.0-*",
    "dependencies": {
        "Microsoft.AspNet.Mvc": "6.0.0-beta1",
        "Microsoft.AspNet.Server.IIS": "1.0.0-alpha4"
    },
    "commands": {
        /* Change the port number when you are self hosting this application */
        "web": "Microsoft.AspNet.Hosting --server Microsoft.AspNet.Server.WebListener --server.urls http://localhost:5000"
    },
    "frameworks": {
        "aspnet50": {},
        "aspnetcore50": {}
    }
}

Startup.cs

The Application Builder is used as a parameter when the configure method is used when the Startup class is used by the host.

Global.json
Define the location for the project reference so that the projects can reference each other.

Defining the Request Pipeline

If we look at the Startup.cs it contains a startup method.
public Startup(IHostingEnvironment env)
{
    // Setup configuration sources.
    var Configuration = new Configuration();
    Configuration.AddJsonFile("config.json");
    Configuration.AddEnvironmentVariables();
}


Create a Controller

If we look at the controller it is similar to the controller in a MVC 5 application.
public class HomeController : Controller
{
    public IActionResult Index()
    {
        return View();
    }
}

The namespace for MVC6 is Microsoft.ASPNET.MVC, unlike the System.Web.MVC in the previous version. That is a big difference. In MVC 6 the application does not need to be derived from the controller class. In our controller, there are many default functionalities. Most of the time we might need to derive from the controller class, but if we do not need access to all of the functionally provided by the controller class, we can define our controller class.
public class HomeController : Controller
{
    public ActionResult Index()
    {
        return View();
    }

    public string atul()
    {
        return "hello i am mvc6";
    }
}


If you execute the preceding method we may see the following page.

Summary
In this article, we have learned about the new features of MVC 6. We have now become familiar with MVC 6.


About HostForLIFE

HostForLIFE is European Windows Hosting Provider which focuses on Windows Platform only. We deliver on-demand hosting solutions including Shared hosting, Reseller Hosting, Cloud Hosting, Dedicated Servers, and IT as a Service for companies of all sizes.

We have offered the latest Windows 2019 Hosting, ASP.NET 5 Hosting, ASP.NET MVC 6 Hosting and SQL 2019 Hosting.


Month List

Tag cloud

Sign in