Nearly all of the information you need to know about action selectors in ASP.NET MVC action methods is covered in this article. I'm producing this post to explain to you the most important, fundamental, and advanced ideas of action selectors.

Overview and Context
The characteristics that can be added to action methods to affect the choice of action method are known as action selectors. Which action methods are called in response to an HTTP request are determined by action selectors. As you may have observed in my earlier post, "MVC Architecture and its Pipeline," under the "Pipeline in MVC" section, the HTTP request first reaches "Routing," then "Controller Initialization," and finally "Action Execution." The rendering of the view is thereby limited to the "Result Execution." Action selectors are used in the section titled "Action Execution" and are crucial in determining which action method is best for handling a given HTTP request. Now let's examine action methods.
Which action methods are there?
The controller's action methods are those whose names must coincide with the method names in the request URL. Following the execution of the request, these methods produce the response. A controller may have numerous action methods. Additionally, you can designate a controller's default action method for handling requests.
What do you mean by action selectors?
A certain action method needs to be chosen in the answer to a request sent to the routing engine. Therefore, action selectors are in charge of choosing this course of action. Because of the attribute applied above the action method, the action selector does its job. Let's examine the many kinds of action selectors.
Types of action selectors
There are three types of action selectors
- NonAction
- ActionName
- ActionVerbs
Name of Action
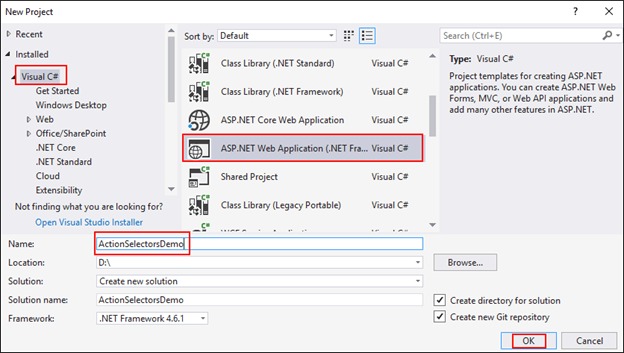
An action selector called the [ActionName] attribute is used to change the name of the action method. When we want that action method to be called by a different name than the method's real name, we utilize the [ActionName] attribute. The example that follows shows you how to use an action method that was originally named "Time." Let's make the ActionSelectorsDemo project. Choose "Visual C#," then "ASP.NET Web Application," then give the project a name and click "OK."
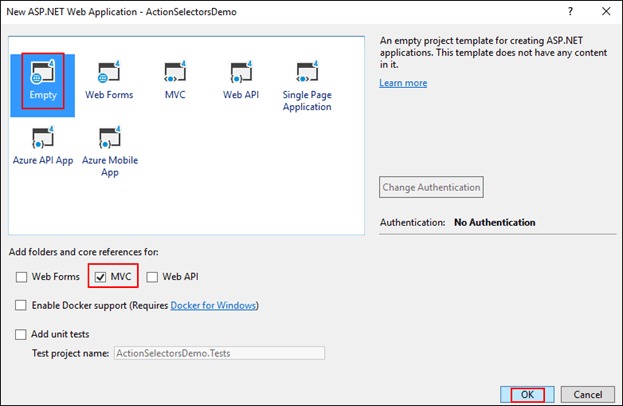
Select “Empty” and mark “MVC” then click OK, as shown below.
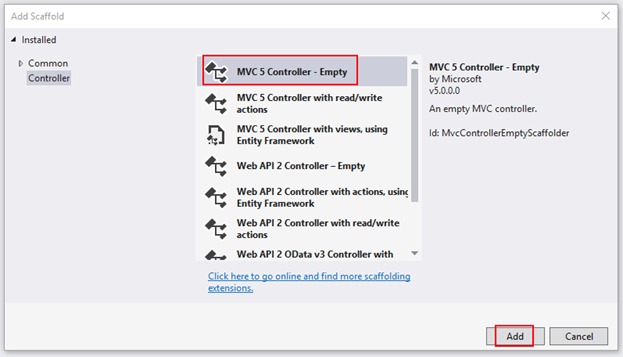
The project is created successfully. Now, create a Controller as shown below.

Select the type of Controller as “MVC 5 Controller – Empty” and click “Add”.
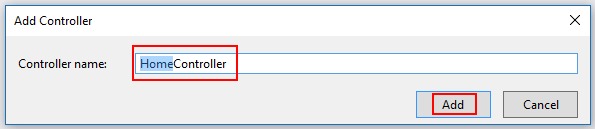
Then, give the name of the Controller and click “Add”.
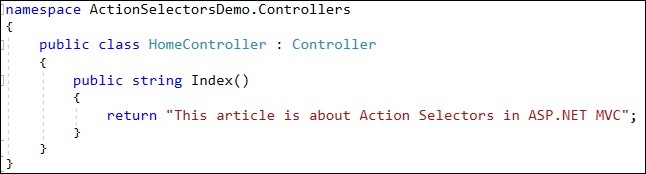
Make the following changes in the Index action method of the HomeController, as shown below in the screenshot.
Now, the project is ready to take a look at a practical example of [ActionName] action selector. Now, let’s add an action method with the name of “Time” whose purpose is to print the current time. See the code below.
public String Time() {
return @"Current Time is: " + DateTime.Now;
}
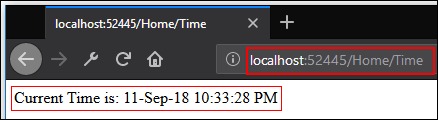
When you build and run the application with this /Home/Time URL, you should see the following output.
Now we are going to use the [ActionName] attribute with the “Time” action method. See the code below.
[ActionName("GetTime")]
public String Time() {
return @"Current Time is: " + DateTime.Now;
}
Now build and run the application with this /Home/Time URL, you should see the following error, it is because of the [ActionName] action selector.
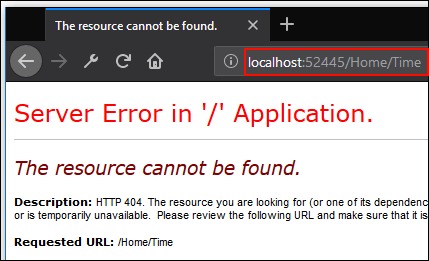
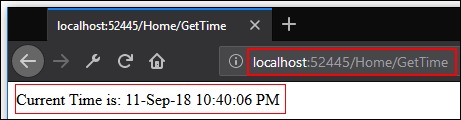
By using this action selector, you have changed the name of the action method, now the URL /Home/GetTime only works instead of /Home/Time. See the output below.
Hence you have seen that the [ActionName] action selector can change the name of the action method.
NonAction
[NonAction] attribute is an action selector that indicates a public method of the controller is not an action method. We use the [NonAction] attribute when we want a method that shouldn’t be treated as an action method.
As you know, the Controller contains the methods that are public and are termed action methods because of one-to-one mapping with the HTTP-requested URL. But when you want that, any method of Controller shouldn’t be treated as an action method, then you have to use the [NonAction] attribute.
Example
Now let’s make some changes in the HomeController of ActionSelectorsDemo project. Add another method named “GetTimeMethod” whose responsibility is also to print the current time. And then call this newly added method into the “Time” action method. You can see the code of both action methods below.
[ActionName("GetTime")]
public String Time() {
return GetTimeMethod();
}
public String GetTimeMethod() {
return @"Current Time is: " + DateTime.Now;
}
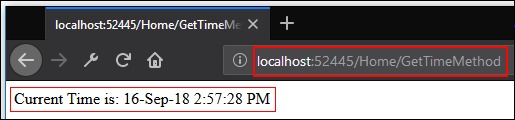
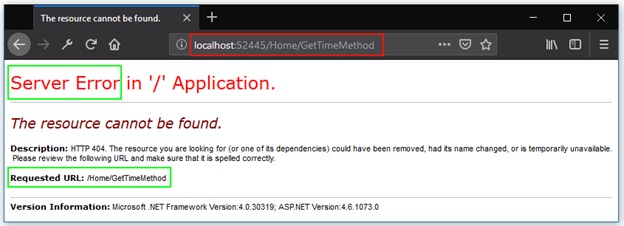
Now observe the output, after building and running the application. When we run the application with this /Home/Time URL, we’ll see an error because we are bound to use the name “GetTime” for this action method because of the [ActionName] action selector. Now when you run the application with this /Home/GetTimeMethod, you should see the output given below.
As you have seen, you are still able to access GetTimeMethod while there is no need to access it because it is producing the same output as produced by the “GetTime” action method. So we need to restrict its access by using the [NonAction] action selector because it makes the method a non-action method. So it can’t be called in the request URL at all. Let’s see its example. The code of the “GetTimeMethod” method will become as follows.
[NonAction]
public String GetTimeMethod() {
return @ "Current Time is: " + DateTime.Now;
}
So the output will become.
So as you have seen, the [NonAction] action selector is used to make an action method Non-Action method.
ActionVerbs
You have seen in the beginning of this article what actions are. And you should also know “Verbs” which are defined as “words which are used to describe an action, state or occurrence of an event”. So as the name suggests, “ActionVerbs” can be defined as “the words that describe the action, purpose, and state of the action method of a Controller”. Now, let’s move towards its technical explanation.
When an HTTP request comes to the controller on a specific action method, then this selector helps us to select the correct action method based on the HTTP requested method. It also helps us to create more than one action method with the same name, also referred to as overloading. So to differentiate these action methods, we use action verbs. We’ll see its example later in this article.
MVC framework supports different ActionVerbs, shown as follows.
- HttpGet: It is used to get information from the server. When this applies to the action method, it restricts the action method to accept only HTTP GET requests.
- HttpPost: It is used to post information on the server. When this applies to the action method, it restricts the action method to accept only HTTP POST requests.
- HttpPut: It is used to create or replace existing information on the server, but can’t update. And when this applies to the action method, it restricts the action method to accept only HTTP PUT requests.
- HttpDelete: It is used to delete any existing information from the server. When this applies to an action method, it restricts the action method to accept only HTTP Delete requests.
- HttpPatch: It is used to fully or partially update any existing information on the server. When this applies to the action method, it restricts the action method to accept only HTTP Patch requests.
- HttpOptions: It is used to represent information about the options of the communication that are supported by the web server.
Action verbs are very popular in using APIs. In the MVC framework, if you don’t apply any attribute of the action selector on the top of the action method when the method is called from the HTTP request, then that HTTP request will behave like a HttpGet request by default.
Conclusion
I hope this article has helped you understand all the concepts of action selectors in ASP.NET MVC. And stay tuned for my next article. If you have any queries then feel free to contact me in the comments section. Also, giving feedback, either positive or negative, will help me to make my articles better and increase my enthusiasm to share my knowledge.