European ASP.NET MVC Hosting

BLOG about Latest ASP.NET MVC Hosting and Its Technology - Dedicated to European Windows Hosting Customer

European ASP.NET MVC 5 Hosting :: Upgrade ASP .NET MVC 5 default layout to bootstrap 3

clock December 20, 2013 06:58 by author Patrick

If you have started developing web applications with ASP .NET MVC 5 you might have noticed that it comes with bootstrap version 2 and the latest version 3. In order to upgrade the default template for version 3, you can use these files as a reference.

Right click solution -> Manage NuGet packages Updates -> Update bootstrap to version 3 >

***Views/Shared/_Layout.cshtml***

<!DOCTYPE html>
<html>
<head>
    <meta charset="utf-8" />
    <meta name="viewport" content="width=device-width, initial-scale=1.0">
    <title>@ViewBag.Title - My ASP.NET Application</title>
    @Styles.Render("~/Content/css")
    @Scripts.Render("~/bundles/modernizr")
</head>
<body>
    <div class="navbar navbar-default navbar-static-top">
        <div class="container">
            <div class="navbar-header">
                <button type="button" class="navbar-toggle" data-toggle="collapse" data-target=".navbar-collapse">
                    <span class="icon-bar"></span>
                    <span class="icon-bar"></span>
                    <span class="icon-bar"></span>
                </button>
                @Html.ActionLink("Application name", "Index", "Home", null, new { @class = "navbar-brand" })
            </div>
                           @Html.Partial("_LoginPartial")
            <div class="navbar-collapse collapse">
                <ul class="nav navbar-nav">
                    <li class="active">@Html.ActionLink("Home", "Index", "Home")</li>
                    <li>@Html.ActionLink("About", "About", "Home")</li>
                    <li>@Html.ActionLink("Contact", "Contact", "Home")</li>
                    <li class="dropdown">
                        <a href="#" class="dropdown-toggle" data-toggle="dropdown">Dropdown <b class="caret"></b></a>
                        <ul class="dropdown-menu">
                            <li><a href="#">Action</a></li>
                            <li><a href="#">Another action</a></li>
                            <li><a href="#">Something else here</a></li>
                            <li class="divider"></li>
                            <li class="dropdown-header">Nav header</li>
                            <li><a href="#">Separated link</a></li>
                            <li><a href="#">One more separated link</a></li>
                        </ul>
                    </li>
                </ul>
            </div><!--/.nav-collapse -->
        </div>
    </div>
    <div class="container">
        @RenderBody()
        <hr />
        <footer>
            <p>&copy; @DateTime.Now.Year - My ASP.NET Application</p>
        </footer>
    </div>
    @Scripts.Render("~/bundles/jquery")
    @Scripts.Render("~/bundles/bootstrap")
    @RenderSection("scripts", required: false)
</body>
</html>


***Views/Shared/_LoginPartial.cshtml***

@using Microsoft.AspNet.Identity
@if (Request.IsAuthenticated)
{
    using (Html.BeginForm("LogOff", "Account", FormMethod.Post, new { id = "logoutForm", @class = "navbar-form pull-right" }))
    {
    @Html.AntiForgeryToken()
    <ul class="nav navbar-nav navbar-right">
        <li>
            @Html.ActionLink("Hello " + User.Identity.GetUserName() + "!", "Manage", "Account", routeValues: null, htmlAttributes: new { title = "Manage" })
        </li>
        <li><a href="javascript:document.getElementById('logoutForm').submit()">Log off</a></li>
    </ul>
    }
}
else
{
    <ul class="nav navbar-nav navbar-right">
        <li>@Html.ActionLink("Register", "Register", "Account", routeValues: null, htmlAttributes: new { id
= "registerLink" })</li>
        <li>@Html.ActionLink("Log in", "Login", "Account", routeValues: null, htmlAttributes: new { id =
"loginLink" })</li>
    </ul>
}


HostForLIFE.eu Proudly Launches Scalable Enterprise Email Hosting

clock December 17, 2013 09:32 by author Patrick


HostForLIFE.eu, a leading Windows web hosting provider with innovative technology solutions and a dedicated professional services team proudly announces Enterprise Email Hosting for all costumer. HostForLIFE.eu aim to help you grow your bottom line whether it is driving direct sales from emails, driving website traffic or delivering outstanding service.

Enterprise Email is a great tool for communicating to existing customers, or individuals who know your organization well enough and have interest in opting-in to receive your e-mail. Your promotions, sales and offers get their attention, meet a need, and encourage them to do more business with you.  What e-mail marketing typically doesn’t do very effectively is attract the attention of new customers.

Robert Junior and Sophia Levine from HostForLIFE.eu say:
"Once a business has secured a domain name, we setup an email hosting account for them and they can choose any email account they wish.  Most popular email accounts for small business are sales, info and accounts, although it can be virtually anything once you own your own domain name." Robert says.

"I would expect that once more small business owners had the flexibility to mange their own email hosting, they would save money on their monthly internet costs because there are always cheaper deals being promoted. Of course email hosting does not replace your internet service, but it enables you to switch to a cheaper plan and not loose contact with your customers."  Sophia says.

"Our clients have found that they are able to save money on their internet services because once they no longer rely to manage their email, they can shop around for a better deal, save some money and take their Email Hosting with them.  Having your own domain name and email hosting also improves your business image far more that an ISP account or hotmail email address." Robert says.

"What many small business owners often struggle with is continuing to pay high internet service costs to keep their allocated ISP email address if they use their ISP email for their business.  What people do not realise is that if they were to purchase their own .com or etc domain name they have a unique email address like '[email protected]'.  It means they can move to a cheaper ISP if they find a better deal and not risk losing contact with their business contacts." Sophia Says.

HostForLIFE.eu provides a full suite of self-service marketing solutions with the following features: Total Bulk Email up to 10.000 emails/month with total maibox is 5, users receive 2 GB mailbox quota, a platform fully support Blackberry, SPF/DKIM/TXT, WebMail Access, and POP/SMTP/IMAP.

Are you sending direct mails to your customers just once a month or every three days? Simply choose the plan that suits you the most. All price plans are based on actual use of the system - from 10,000 e-mails sent out in a month starting at €8.00!

Further information and the full range of features Enterprise Email Hosting can be viewed here http://www.hostforlife.eu.


European ASP.NET MVC 5 Hosting :: Introducing ASP.Net SignalR in MVC 5

clock December 17, 2013 05:29 by author Patrick

In this article I am using the ASP.NET SignalR library in the latest MVC 5 project template. Now, what is this real-time functionality? It is used to access the server code and push the content to the connected clients instantly instead of the server waiting for the client's request.

Prerequisites

Using Visual Studio 2013. There are some prerequisites to develop the application:

  • Visual Studio 2010 SP1 or Visual Studio 2012.
  • ASP.NET and Web Tools 2012.2

Let's create an application for SignalR development using the following sections:

  • MVC 5 Application
  • Code Execution

MVC 5 Application

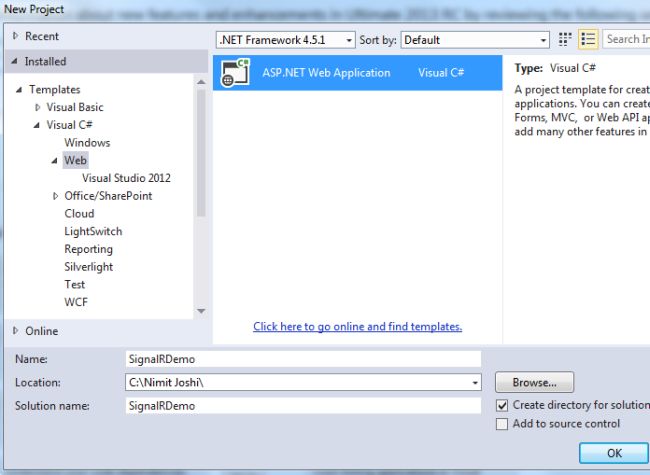
Step 1: Open Visual Studio 2013 and create a New Project.

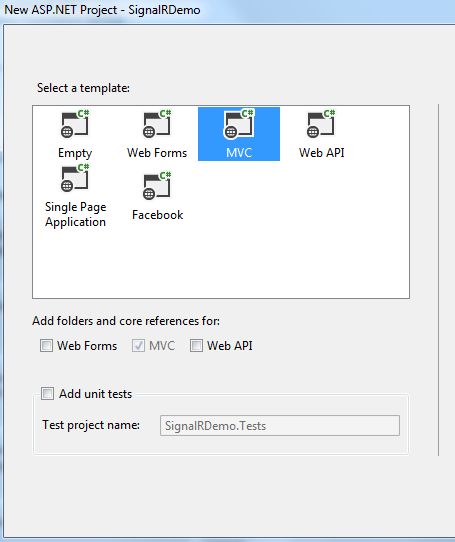
Step 2: Select MVC project template.

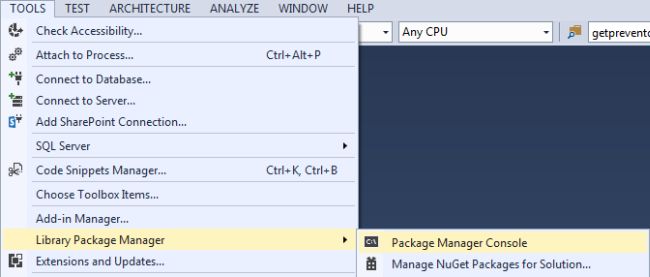
Step 3: Open the Package Manager Console.

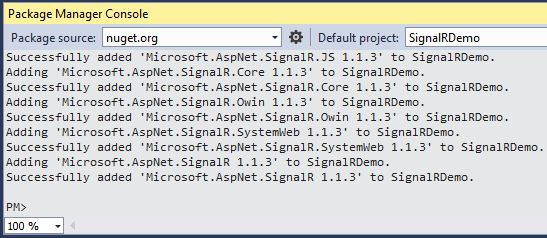
And write the following command:

install-package Microsoft.AspNet.SignalR

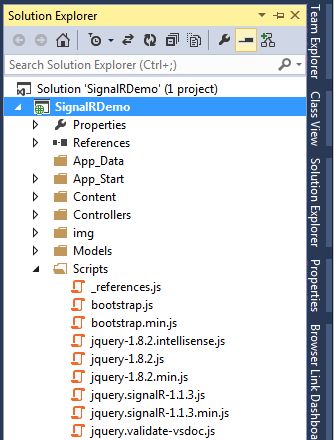
Step 4: You can see in your Solution Explorer that the SignalR was successfully added to your application.

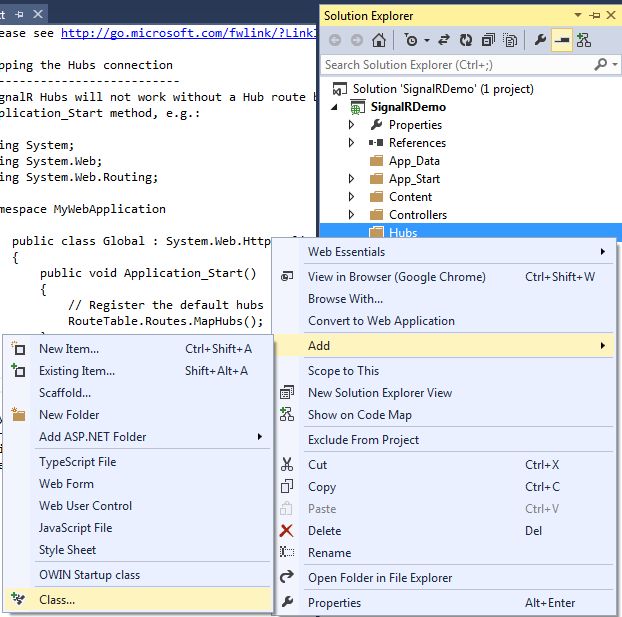
Step 5: Add a new folder named Hubs in your application and add a class in it.

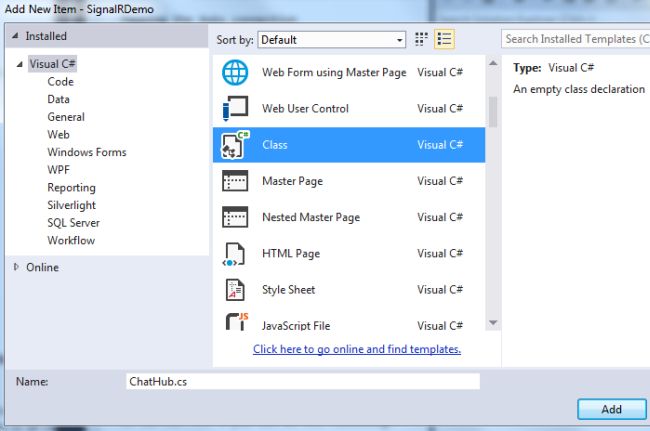
Give the name of your class ChatHub as shown below:

Step 6: Add the following code in the class:

using Microsoft.AspNet.SignalR;
namespace SignalRDemo.Hubs
{
    public class ChatHub : Hub
    {
        public void  LetsChat(string Cl_Name, string Cl_Message)
        {
            Clients.All.NewMessage(Cl_Name, Cl_Message);
        }
    }
}
Step 7: Open the Global.asax file and modify the Applicatio_Start() method as shown below:
public class MvcApplication : System.Web.HttpApplication
{
    protected void Application_Start()
    {
        RouteTable.Routes.MapHubs();
        AreaRegistration.RegisterAllAreas();
        FilterConfig.RegisterGlobalFilters(GlobalFilters.Filters);
        RouteConfig.RegisterRoutes(RouteTable.Routes);
        BundleConfig.RegisterBundles(BundleTable.Bundles);
    }
}

Step 8:
Open your HomeController.cs file and modify it as shown below:
public ActionResult Contact()
{
    ViewBag.Message = "Your contact page."
    return View();
}
public ActionResult Chat()
{
    ViewBag.Message = "Your chat page";
    return View();
}

Step 9: Generate the view for the Chat method as shown in the following parts:

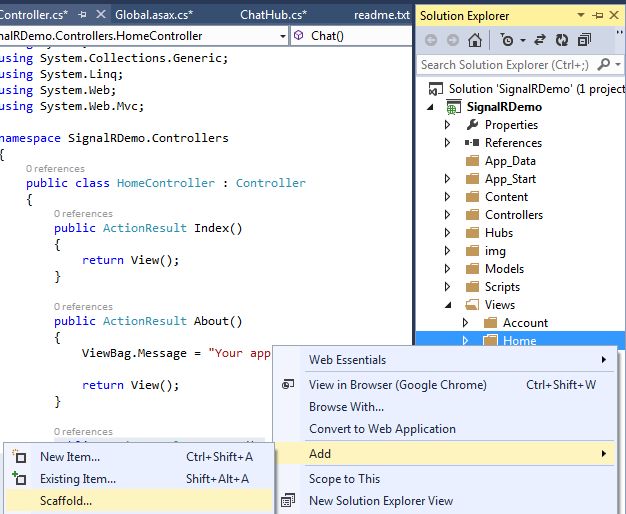
Select Home folder and right-click to add Scaffold

(m8)

Select MVC 5 View in the Add Scaffold wizard

Do as directed in the following image:

Step 10: Add the following code in the Chat.cshtml file:
@{
    ViewBag.Title = "Chat";
}
<hgroup>
    <h2>@ViewBag.Title.</h2>
    <h3>@ViewBag.Message</h3>
</hgroup>
<div class="container">
    <input type="text" id="TxtMessage" />
    <input type="button" id="BtnSend" value="Send" />
    <input type="hidden" id="UserName" />
    <ul id="Chats"></ul>
</div>
@section scripts {
    <script src="~/Scripts/jquery.signalR-1.1.3.js"></script>
    <script src="~/signalr/Hubs"></script>
    <script
        $(function () {
            var chat = $.connection.chatHub;
            chat.client.NewMessage=function(Cl_Name, Cl_Message) {
                $('#Chats').append('<li><strong>' + htmlEncode(Cl_Name)
                    + '</strong>: ' + htmlEncode(Cl_Message) + '</li>');
            };
            $('#UserName').val(prompt('Please Enter Your Name:', ''));
            $('#TxtMessage').focus();
            $.connection.hub.start().done(function () {
                $('#BtnSend').click(function () {
                    chat.server.LetsChat($('#UserName').val(), $('#TxtMessage').val())
                    $('#TxtMessage').val('').focus()
                });
            });
        });
        function htmlEncode(value) {
            var encodedValue = $('<div />').text(value).html();
            return encodedValue;
        }
    </script>
}

Code Execution

Save all your application and debug the application. Use the following procedure.

Step 1: Debug your application. Open /Home/Chat in your browser like: http://localhost:12345/Home/Chat
Step 2: Enter your name in the prompt
Step 3: Enter message and send
Step 4: Copy the browser URL and open more browsers, paste the URL in the address bar and do the same thing as above.


European ASP.NET MVC 5 Hosting :: Getting Started With Areas in MVC 5

clock December 12, 2013 09:51 by author Patrick

MVC (Model, View, Controller) is a design pattern to separate the data logic from the business and presentation logic. We can also design the structure physically, where we can keap the logic in the controllers and views to exemplify the relationships.

It is also possible that we can have large projects that use MVC, then we need to split the application into smaller units called areas that isolate the larger MVC application into smaller functional groupings. A MVC application could contain several MVC structures (areas).  

How to creating a simple application for defining the area in MVC 5. MVC 5 is the latest version of MVC used in Visual Studio 2013?

You need to have the following to complete this article:

  • MVC 5
  • Visual Studio 2013

In that context, we'll follow the sections given below:MVC 5 application:

  • Adding Controller for Area
  • Adding Views for Area
  • Area Registration
  • Application Execution
  • MVC 5 Application

Use the following procedure to create a Web application based on a MVC 5 template.

Step 1: Open Visual Studio 2013.
Step 2: Create an ASP.NET Web Application with MVC 5 project template.

Step 3: In Solution Explorer, right-click on the project and click "Add" to add an area as shown below:
Step 4: Enter the name for the area, such as "News".
Step 5: Similarly add an another area named "Article".
Now from the steps above you have added two areas for your application named News and Article.

Adding Controller for Area

We have successfully added an area, now we'll add controllers for each of our areas using the following procedure.

Step 1: Right-click on the Controller in your Article area to add a controller.
Step 2: Select "MVC 5 Empty Controller".
Step 3: Enter the name as "ArticleController" .
Step 4: Similarly add the controller for "News".

Now your Area folder should be as in the following screenshot:
Adding Views for Area

We have successfully added a controller for our area, now to add a view for the area using the following procedure.

Step 1: Right-click on the "News" folder in the View to add a View for the News Area.
Step 2: Enter the view name as defined in the NewsController.
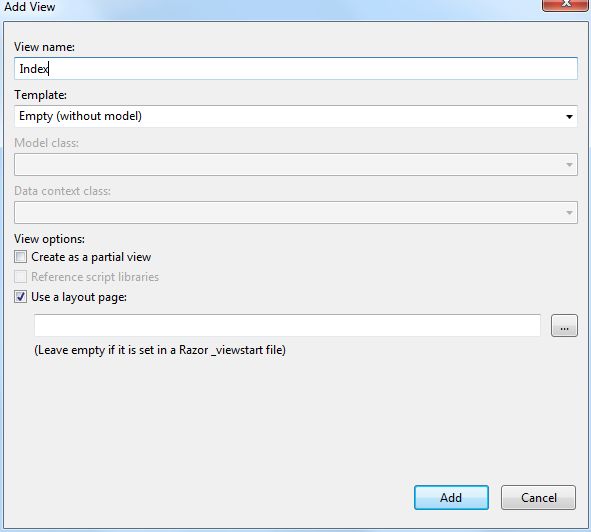
Step 3: Generate some content in the View of News as in the following screenshot:
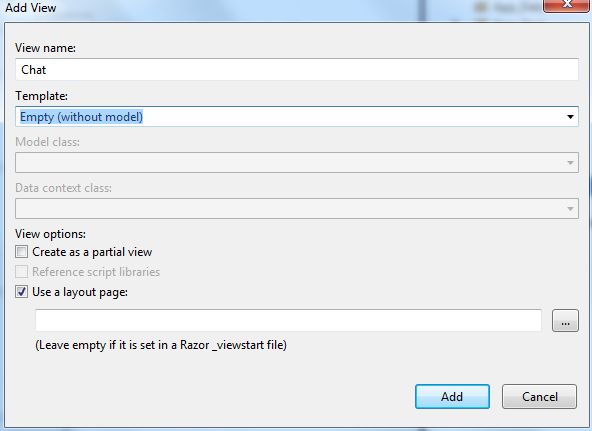
Step 4: You can also add a view as shown in the following screenshot:
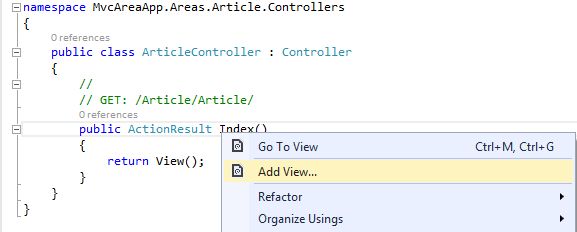
Step 5: Generate some content for the Article view.

Area Registration

Step 1: Open the "Global.asax" file.

Step 2: Add the following code in your Application_Start() method:

AreaRegistration.RegisterAllAreas();

Application Execution

Step 1: Open the project view Layout file.
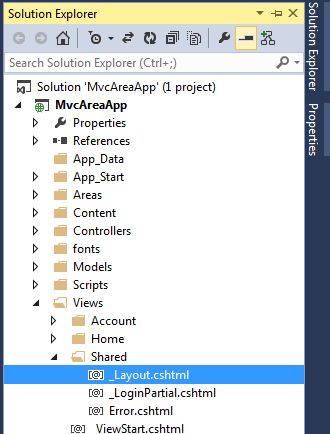
Step 2: Modify the <ul> in the layout file as shown in the following code:

<ul class="nav navbar-nav">
<li>@Html.ActionLink("Home", "Index", "Home")</li>
<li>@Html.ActionLink("About", "About", "Home")</li>
<li>@Html.ActionLink("Contact", "Contact", "Home")</li>
<li>@Html.ActionLink("Article", "Index", "Article", new {area= "Article" }, null)</li>
<li>@Html.ActionLink("News", "Index", "News", new { area = "News" }, null)</li>
</ul>

Step 3: Debug the application, and finish!


European HostForLIFE.eu Proudly Launches Entity Framework 6 with FREE Trial Hosting

clock December 11, 2013 06:23 by author Patrick

HostForLIFE.eu offers a variety of cheap and affordable European Windows ASP.NET Shared Hosting Plans to fit any need. No matter whether you’re starting a Blog with WordPress, installing a CMS solution with Drupal, opening a Forum with PHPBB, starting an Online Store with nopCommerce, or any number ventures beyond those mentioned above, our Windows ASP.NET Web Hosting plans are exactly what you’ve been looking for. HostForLIFE.eu is Microsoft No #1 Recommended ASP.NET Host Provider.
Entity Framework 6 (EF6) is an object-relational mapper that enables .NET developers to work with relational data using domain-specific objects. It eliminates the need for most of the data-access code that developers usually need to write.

Entity Framework is now available and there are top features to consider in this minor release:

Features that come for free. These are capabilities that are part of the core. You don’t even have to know they’re there to benefit from them, much less learn any new coding.

Level-setting features. A major enhancement is that Code First now supports mapping to Stored Procedures, something that has been supported by models created in the designer.

Another change is more interesting. With EF6, the EF APIs have been extracted from the .NET Framework; they’re now completely encapsulated in the NuGet package.

EF Designer in this category. It has been moved out of Visual Studio as of the 2013 edition, and instead provided as an extension to Visual Studio.

Ninja features. Support for asynchronous queries and saves, the return of custom Code First conventions, more extensibility using the new DbConfiguration type, support for mocking in unit tests, configurable retries on spotty connections, and even more.

For complete information about this new product, please visit our site at http://www.hostforlife.eu


European ASP.NET MVC 4 Hosting :: Tips on How To Improve MVC Application Performance

clock December 10, 2013 07:32 by author Patrick

In this post we will cover a few tips and tricks to improve ASP.NET MVC Application Performance. While working on this site, I have tried to improve page loading speeds as much as possible. There are a lot of tricks that you can do to improve the speed of your site. I have constantly been learning new things by delving into the world of site performance.

These are a few of the steps that I took to speed up my site:

Run in Release mode

Make sure your production application always runs in release mode in the web.config

  <compilation debug="false"></compilation>

or change this in the machine.config on the production servers

<configuration>
    <system.web>
          <deployment retail="true"></deployment>
    </system.web>
</configuration>

Only use the View Engines that you require

protected void Application_Start()
{
    ViewEngines.Engines.Clear();
    ViewEngines.Engines.Add(new RazorViewEngine());
}

Use the CachedDataAnnotationsModelMetadataProvider

ModelMetadataProviders.Current = new CachedDataAnnotationsModelMetadataProvider();

Avoid passing null models to views

Because a NullReferenceException will be thrown when the expression gets evaluated, which .NET then has to handle gracefully.

// BAD
public ActionResult Profile()
{
    return View();
}

// GOOD
public ActionResult Profile()
{
    return View(new Profile());
}

Use OutputCacheAttribute when appropriate

For content that does not change often, use the OutputCacheAttribute to save unnecessary and action executions.

[OutputCache(VaryByParam = "none", Duration = 3600)]
public ActionResult Categories()
{
    return View(new Categories());
}

Use HTTP Compression

<system.webserver>
<urlcompression dodynamiccompression="true" dostaticcompression="true" dynamiccompressionbeforecache="true"></urlcompression>
</system.webserver>

Remove unused HTTP Modules

If you run into any problems after removing them, try adding them back in.

<httpmodules>
      <remove name="WindowsAuthentication"></remove>
      <remove name="PassportAuthentication"></remove>
      <remove name="Profile"></remove>
      <remove name="AnonymousIdentification"></remove>
</httpmodules>

Flush your HTML as soon as it is generated

<pages buffer="true" enableviewstate="false"></pages>

Turn off Tracing

<configuration>
     <system.web>
          <trace enabled="false"></trace>
     </system.web>
</configuration>

Remove HTTP Headers

This is more of a security thing

<system.web>
    <httpruntime enableversionheader="false"></httpruntime>
</system.web>

<httpprotocol>
 <customheaders>
  <remove name="X-Powered-By"></remove>
 </customheaders>
</httpprotocol>

Uninstall the URL Rewrite module if not required

This saves CPU cycles used to check the server variable for each request.

Go to "Add or Remove Programs" and find "Microsoft URL Rewrite Module" and select uninstall.


About HostForLIFE

HostForLIFE is European Windows Hosting Provider which focuses on Windows Platform only. We deliver on-demand hosting solutions including Shared hosting, Reseller Hosting, Cloud Hosting, Dedicated Servers, and IT as a Service for companies of all sizes.

We have offered the latest Windows 2019 Hosting, ASP.NET 5 Hosting, ASP.NET MVC 6 Hosting and SQL 2019 Hosting.


Month List

Tag cloud

Sign in