European ASP.NET MVC Hosting

BLOG about Latest ASP.NET MVC Hosting and Its Technology - Dedicated to European Windows Hosting Customer

European ASP.NET MVC 6 Hosting - HostForLIFE.eu :: New Configuration and AppSetings for ASP.NET MVC 6

clock January 17, 2017 10:35 by author Scott

There’s a new place to put the app settings for your MVC6 ASP.NET Core application. Web.config is gone but the new solution is great, you get a dependency injected POCO with strongly typed settings instead!

New Settings File - appsettings.json

Instead of web.config, all your settings are now located in appsettings.json. Here’s what the default one looks like, though I’ve also added an AppSettings section:

{
  "AppSettings": {
    "BaseUrls": {
      "API": "https://localhost:44307/",
      "Auth": "https://localhost:44329/",
      "Web": https://localhost:44339/
    },
    "AnalyticsEnabled": true
  },
  "Data": {
    "DefaultConnection": {
      "ConnectionString": "Server=(localdb)\\mssqllocaldb;Database=aspnet5-AppSettings1-ad2c59cc-294a-4e72-bc31-078c88eb3a99;Trusted_Connection=True;MultipleActiveResultSets=true"
    }
  },
  "Logging": {
    "IncludeScopes": false,
    "LogLevel": {
      "Default": "Verbose",
      "System": "Information",
      "Microsoft": "Information"
    }
  }
}

Notice that we’re using JSON instead of XML now. This is pretty great with one big exception, No Intellisense.

Create an AppSettings class

If you’re used to using ConfigurationManager.AppSettings["MySetting"] in your controllers then you’re out of luck, instead you need to setup a class to hold your settings. As you can see above I like to add an “AppSettings” section to the config that maps directly to an AppSettings POCO. You can even nest complex classes as deep as you like:

public class AppSettings
{
    public BaseUrls BaseUrls { get; set; }
    public bool AnalyticsEnabled { get; set; }
}

public class BaseUrls
{
    public string Api { get; set; }
    public string Auth { get; set; }
    public string Web { get; set; }
}  

Configure Startup.cs

Now that we have a class to hold our settings, lets map the data from our appsettings.json. You can do it in a couple of ways

Automatically bind all app settings:

public IServiceProvider ConfigureServices(IServiceCollection services)
{           
    services.Configure<AppSettings>(Configuration.GetSection("AppSettings"));
}

or if you need to alter or transform anything you can assign each property manually:

public IServiceProvider ConfigureServices(IServiceCollection services)
{           
    services.Configure<AppSettings>(appSettings =>
    {
        appSettings.BaseUrls = new BaseUrls()
        {
            // Untyped Syntax - Configuration[""]
            Api = Configuration["AppSettings:BaseUrls:Api"],
            Auth = Configuration["AppSettings:BaseUrls:Auth"],
            Web = Configuration["AppSettings:BaseUrls:Web"],
        };               

        // Typed syntax - Configuration.Get<type>("")
        appSettings.AnalyticsEnabled = Configuration.Get<bool>("AppSettings:AnalyticsEnabled");
    });
}

Using the settings

Finally we can access our settings from within our controllers. We’ll be using dependency injection, so if you’re unfamiliar with that, get ready to learn!

public class HomeController : Controller
{
    private readonly AppSettings _appSettings;

    public HomeController(IOptions<AppSettings> appSettings)
    {
        _appSettings = appSettings.Value;
    }

    public IActionResult Index()
    {
        var webUrl = _appSettings.BaseUrls.Web;

        return View();
    }
}

There are a few important things to note here:

The class we are injecting is of type IOptions<AppSettings>. If you try to inject AppSettings directly it won’t work.

Instead of using the IOptions class throughout the code, instead I set the private variable to just AppSettings and assign it in the constructor using the .Value property of the IOptions class.

By the way, the IOptions class is essentially a singleton. The instance we create during startup is the same throughout the lifetime of the application.

While this is a lot more setup than the old way of doing things, I think it forces developers to code in a cleaner and more modular way.


European ASP.NET MVC 6 Hosting - HostForLIFE.eu :: Binding and Minification in SiteCore MVC

clock January 6, 2017 07:01 by author Scott

This is a quick blog post on how to implement bundling and minification in Sitecore MVC project.  During development phase, it is always good to have multiple Javascripts and CSS files for better readability and maintainability of code.  But multiple Javascripts and CSS files degrade the performance of production website and also increase the load time of webpages as it requires multiple HTTP requests from browser to server.  Bundling and minification reduce the size of Javascript and CSS files and bundle multiple files into a single file and make the site perform faster by making fewer HTTP requests. Below steps explain how to implement bundling and minification for Sitecore MVC project: 

1. Add Microsoft ASP.NET Web Optimization Framework to your solution from nuget or run the following command in the Package Manager Console to install Microsoft ASP.NET Web Optimization Framework.

PM> Install-Package Microsoft.AspNet.Web.Optimization

2. Create your CSS and Javascript bundles in “BundleConfig” class under App_Start folder and add reference of "System.Web.Optimization" namespace.

public class BundleConfig
    {
        public static void RegisterBundles(BundleCollection bundles)
        {
            //js bundling using wildcard character *
            bundles.Add(new ScriptBundle("~/bundles/js").Include("~/assets/js/*.js"));

            //css bundling using wildcard character *
            bundles.Add(new StyleBundle("~/bundles/css").Include("~/assets/css/*.css"));
        }
    }

3. Register bundle in the Application_Start method in the Global.asax file. If you are using Multi-site instance of Sitecore MVC then recommend way to implement bundling logic is by creating a new processor into the initialize pipeline. 

protected void Application_Start(object sender, EventArgs e)
        {
            BundleConfig.RegisterBundles(BundleTable.Bundles);
        }

We can override the value of the debug attribute in code by using EnableOptimizations property of the BundleTable class.

protected void Application_BeginRequest(object sender, EventArgs e)
        {
            EnableBundleOptimizations();
        }

        private void EnableBundleOptimizations()
        {
            string debugMode = Request.QueryString["debug"];
            if (!string.IsNullOrEmpty(debugMode) && string.Equals(debugMode, "true", StringComparison.InvariantCultureIgnoreCase))
            {
                BundleTable.EnableOptimizations = false;
            }
            else
            {
                BundleTable.EnableOptimizations = true;
            }
        }

Here in Application_BeginRequest method of Global.asax I am calling one custom method EnableBundleOptimizations() which sets the value of EnableOptimizations property to true or false based on value of querystring “debug”. Main idea behind this logic is that we can check/debug CSS or Javascript file on production by passing querystring parameter debug as true. 

5. Replace Javascripts and CSS references in layout or rendering view with below code:

@Styles.Render("~/bundles/css")
@Styles.Render("~/bundles/js")

6. In web.config set an ignore url prefix for your bundle so that Sitecore won’t try to resolve the URL to the bundle. Update setting IgnoreUrlPrefixes according to your bundle name:

<setting name="IgnoreUrlPrefixes" value="/sitecore/default.aspx|/trace.axd|/webresource.axd|/sitecore/shell/Controls/Rich Text Editor/Telerik.Web.UI.DialogHandler.aspx|/sitecore/shell/applications/content manager/telerik.web.ui.dialoghandler.aspx|/sitecore/shell/Controls/Rich Text Editor/Telerik.Web.UI.SpellCheckHandler.axd|/Telerik.Web.UI.WebResource.axd|/sitecore/admin/upgrade/|/layouts/testing|/bundles/js|/bundles/css"/>

7. Now compile your solution and verify that bundling and minification is enabled by checking view source of webpage.

Pass querystring as debug=true in url and now verify view source of webpage. Bundling and minification is not enabled. This enables us to debug Javascript and CSS files in production website. 


European ASP.NET MVC Hosting - HostForLIFE.eu :: Custom Model Binders in ASP.NET MVC

clock December 22, 2016 06:31 by author Scott

In ASP.NET MVC, our system is built such that the interactions with the user are handled through Actions on our Controllers. We select our actions based on the route the user is using, which is a fancy way of saying that we base it on a pattern found in the URL they’re using. If we were on a page editing an object and we clicked the save button we would be sending the data to a URL somewhat like this one.

Notice that in our route that we have specified the name of the object that we’re trying to save. There is a default Model Binder for this in MVC that will take the form data that we’re sending and bind it to a CLR objects for us to use in our action. The standard Edit action on a controller looks like this.

[HttpPost]
public ActionResult Edit(int id, FormCollection collection)
{
    try
    {
        // TODO: Add update logic here
 
        return RedirectToAction("Index");
    }
    catch
    {
        return View();
    }
}

If we were to flesh some of this out the way it’s set up here, we would have code that looked a bit like this.

[HttpPost]
public ActionResult Edit(int id, FormCollection collection)
{
    try
    {
        Profile profile = _profileRepository.GetProfileById(id);

        profile.FavoriteColor = collection["favorite_color"];
        profile.FavoriteBoardGame = collection["FavoriteBoardGame"];

        _profileRepository.Add(profile);

        return RedirectToAction("Index");
    }
    catch
    {
        return View();
    }
}

What is bad about this is that we are accessing the FormCollection object which is messy and brittle. Once we start testing this code it means that we are going to be repeating code similar to this elsewhere. In our tests we will need to create objects using these magic strings. What this means is that we are now making our code brittle. If we change the string that is required for this we will have to go through our code correcting them. We will also have to find them in our tests or our tests will fail. This is bad. What we should do instead is have these only appear on one place, our model binder. Then all the code we test is using CLR objects that get compile-time checking. To create our Custom Model Binder this is all we need to do is write some code like this.

public class ProfileModelBinder : IModelBinder
{
    ProfileRepository _profileRepository = new ProfileRepository();

    public object BindModel(ControllerContext controllerContext,
        ModelBindingContext bindingContext)
    {
        int id = (int)controllerContext.RouteData.Values["Id"];
        Profile profile = _profileRepository.GetProfileById(id);

        profile.FavoriteColor = bindingContext
            .ValueProvider
            .GetValue("favorite_color")
            .ToString();


        profile.FavoriteBoardGame = bindingContext
            .ValueProvider
            .GetValue("FavoriteBoardGame")
            .ToString();

        return profile;
    }
}

Notice that we are using the form collection here, but it is limited to this one location. When we test we will just have to pass in the Profile object to our action, which means that we don’t have to worry about these magic strings as much, and we’re also not getting into the situation where our code becomes so brittle that our tests inhibit change. The last thing we need to do is tell MVC that when it is supposed to create a Profile object that it is supposed to use this model binder. To do this, we just need to Add our binder to the collection of binders in the Application_Start method of our GLobal.ascx.cs file. It’s done like this. We say that this binder is for objects of type Profile and give it a binder to use.

ModelBinders.Binders.Add(typeof (Profile), new ProfileModelBinder());

Now we have a model binder that should let us keep the messy code out of our controllers. Now our controller action looks like this.

[HttpPost]
public ActionResult Edit(Profile profile)
{
    try
    {
        _profileRepository.Add(profile);

        return RedirectToAction("Index");
    }
    catch
    {
        return View();
    }
}

That looks a lot cleaner to me, and if there were other things I needed to do during that action, I could do them without all of the ugly binding logic.


European ASP.NET MVC 6 Hosting - HostForLIFE.eu :: How to Implement Sessions in ASP.NET MVC 6

clock December 15, 2016 07:36 by author Scott

Imagine you have created an MVC project and you are all set to create a session object in order to save your current user Email but after few minutes, you realize that the session object is not working, as it was before.

Oh! Why is it so?

It is because .NET team has created a NuGet package for Session, which is nothing but a very fresh ASP.NET 5 Session State middleware.

OK. So, how to get it?

To install Microsoft.AspNet.Session, run the command, given below, in the Package Manager Console. 

We need to update the startup.cs file, as shown below:

public void ConfigureServices(IServiceCollection services) {  
    // Adds a default in-memory implementation of IDistributedCache  
    services.AddCaching();  
    services.AddSession();  
    //// This Method may contain other code as well  
}  
and in Configure method write below code: public void Configure(IApplicationBuilder app) {  
    app.UseSession();  
    //// This Method may contain other code as well  
}  

How to get and set session?

Let's take some examples.

1. Suppose, you want to use Session in your controller class. For it, you simply have to write Context.Session to access Session.

Set Session syntax:

public IActionResult Index() {  
    ////Context.Session.SetString("First", "I am first!"); ////Before Beta 8  
    HttpContext.Session.SetString("First""I am first!"); ////From Beta 8 onwards  
    return View();  
}  
Get Session syntax: public IActionResult Index() {  
    ////var myValue = Context.Session.GetString("First"); ////Before Beta 8  
    var myValue = HttpContext.Session.GetString("First"); ////From Beta 8 onwards  
    return View();  
}  

2. Suppose, you want to use Session in a normal class. If you’re not in a Controller, you can still access the HttpContext by injecting IHttpContextAccessor, as shown below:

private readonly IHttpContextAccessor _httpContextAccessor;  
public SessionUtility(IHttpContextAccessor httpContextAccessor) {  
    _httpContextAccessor = httpContextAccessor;  
}  
Set Session syntax: public void SetSession(string key, string value) {  
    HttpContextAccessor.HttpContext.Session.SetString(key, value);  
}  
Get Session syntax: public string GetSession(string key) {  
    return HttpContextAccessor.HttpContext.Session.GetString(key);  
}  
So, whole SessionUtility would be as below: public class SessionUtility {  
    private readonly IHttpContextAccessor HttpContextAccessor;  
    public SessionUtility(IHttpContextAccessor httpContextAccessor) {  
        HttpContextAccessor = httpContextAccessor;  
    }  
    public void SetSession(string key, string value) {  
        HttpContextAccessor.HttpContext.Session.SetString(key, value);  
    }  
    public string GetSession(string key) {  
        return HttpContextAccessor.HttpContext.Session.GetString(key);  
    }  
}  

and it would be registered as:

services.AddTransient<SessionUtility>();  

Here, SessionUtility should be registered only as Transient or Scoped and not Singleton as HttpContext is per-request based.

Please note, I have used it with the key value pair of the string, but you can create the same SessionUtility for the complex scenarios.

Now, suppose you want to check how many times a visitor has visited your site.

For it, you need to add the code, given below, in your startup.cs:

public void Configure(IApplicationBuilder app) {  
    app.UseSession();  
    app.Map("/session", subApp => {  
        subApp.Run(async context => {  
            int visits = 0;  
            visits = context.Session.GetInt32("visits") ? ? 0;  
            context.Session.SetInt32("visits", ++visits);  
            await context.Response.WriteAsync("Counting: You have visited our page this many times: " + visits);  
        });  
    });  
}  

Important!

If you have followed the steps, given above and you still can't get success, you might need a look in your project.json file for the following piece of the code. Well, it should be there.

"frameworks": {  
"dnx451": { },  
"dnxcore50": { } // <-- Remove this if it is in your project.json file.  
},  

Why?

ASP.NET5 Sessions aren’t supported by the DNX Core Runtime.

NuGet package site: https://www.nuget.org/packages/Microsoft.AspNet.Session/

Session is still in its beta versions. Thus, some changes might come, which I will update in this post.

Stay tuned for more updates!


European ASP.NET MVC 6 Hosting - HostForLIFE.eu :: ASP.NET MVC 6 Dependency Injection

clock October 5, 2016 23:32 by author Scott

Dependency injection (DI) has been possible in previous versions of MVC. With each new version DI has been easier to implement and, with MVC6, DI is supplied right out of the box. In this article we’ll look at how the new DI implementation works, what are its weaknesses and how we can replace it with our favorite DI framework.

What’s new

The unification of APIs across ASP.NET is a common theme throughout ASP.NET 5, and dependency injection is no different. The new ASP.NET stack including: MVC, SignalR and Web API, etc. rely on a built-in minimalistic DI container. The core features of the DI container have been abstracted out to the IServiceProvider interface and are available throughout the stack. Because the IServiceProvider is the same across all components of the ASP.NET framework a single dependency can be resolved from any part of the application.

The DI container supports just 4 modes of operation:

  • Instance – a specific instance is given all the time. You are responsible for its initial creation.
  • Transient – a new instance is created every time.
  • Singleton – a single instance is created and it acts like a singleton.
  • Scoped – a single instance is created inside the current scope. It is equivalent to Singleton in the current scope.

BASIC SETUP

Let’s walk through setting up DI in a MVC application. To demonstrate the basics, we’ll resolve the dependency for the service used to get project data. We don’t need to know anything about the service other than that it implements the IProjectService interface, an interface custom to our demo project. IProjectService has one method,GetOrganization(), that method retrieves an organization and its corresponding list of projects.

public interface IProjectService
{
    string Name { get; }
    Organization GetOrganization();
}

public class Organization
{
    public string Name { get; set; }
    [JsonProperty("Avatar_Url")]
    public string AvatarUrl { get; set; }
    public IQueryable<Project> Projects { get; set; }
}

We’ll use the IProjectService to get the organization data and display it in a view. Let’s start by setting up the controller where the service will be used. We’ll use constructor injection by creating a new constructor method for our controller that accepts anIProjectService. Next, the Index action will callGetOrganization, sending the data to the view to be rendered.

private readonly IProjectService projectService;
public HomeController(IProjectService projectService)
{
    this.projectService = projectService;
}
public IActionResult Index()
{
    Organization org = projectService.GetOrganization();
    return View(org);
}

If we try to run the application at this point we’ll receive an exception because we haven’t yet added a concrete implementation of ourIProjectService to the DI container.

InvalidOperationException: Unable to resolve service for type 'DependencyInjectionMVC6Demo. Services. IProjectService' while attempting to activate 'DependencyInjectionMVC6Demo. Controllers. HomeController'.
Microsoft. Framework. DependencyInjection. ActivatorUtilities.GetService(IServiceProvider sp, Type type, Type requiredBy, Boolean isDefaultParameterRequired)

The exception message shows that the code fails during a call toActivatorUtilities.GetService. This is valuable information because it shows that in MVC6 the DI container is already involved in the controller’s construction. Now we just need to tell the container how to resolve the dependency.

In order to resolve the dependency, we need a concrete implementation ofIProjectService. We’ll add a DemoService class and, for simplicity, it will use static dummy data.

public class DemoService : IProjectService
{
    public string Name { get; } = "Demo";

    public Organization GetOrganization() => new Organization
    {
        Name = this.Name,
        AvatarUrl = $"http://placehold.it/100&text={this.Name}",
        Projects = GetProjects()
    };

private IQueryable<Project> GetProjects() => new List<Project> {
         new Project {
             Id = 0,
             Description = "Test project 0",
             Name = "Test 0",
             Stars = 120
         },
         //...
         new Project {
             Id = 4,
             Description = "Test project 4",
             Name = "Test 4",
             Stars = 89
         }
    }.AsQueryable();
}

Finally, we’ll instruct the DI container to instantiate a new DemoServicewhenever IProjectService is required. To configure the container we’ll modify the ConfigureServices method in Startup.cs. Our configuration will be added to the end of this method.

// This method gets called by the runtime. Use this method to add services to the container.
public void ConfigureServices(IServiceCollection services)
{
    //... other services
    // Add MVC services to the services container.
    services.AddMvc();

    //our services
}

The service is added by using the AddTransient extension method on the services collection, and setting the IProjectService as the type of service and the DemoService as the implementation.

public void ConfigureServices(IServiceCollection services)
{
    //... other services
    // Add MVC services to the services container.
    services.AddMvc();

    //our services
    services.AddTransient<IProjectService, DemoService>();
}

With the service added, DemoService will now be instantiated when the controller is created, and the exception will no longer be thrown.


European ASP.NET MVC Hosting - HostForLIFE.eu :: Tag Helpers in ASP.NET Core

clock September 29, 2016 21:44 by author Scott

What's a Tag Helper?

It's a set of code that allows you to no longer have to use Razor helpers to build your cshtml forms. What this means is that when you had to write this:

@Html.ActionLink("Add a Movie", "Add", "Movie")

You can now write this:

<a asp-action="Add" asp-controller="Movie">Add a Movie</a> 

Because of this, you can now write views that look like HTML rather than an unwieldy mix of HTML and C#.

The Completed Form

I like to show the results first. Here's the view model we will be using:

public class AddMovieVM 
{
    [Required(ErrorMessage = "Please enter a title for this movie.")]
    [Display(Name = "Title:")]
    public string Title { get; set; }

    [Required(ErrorMessage = "Please select a release date for this movie.")]
    [Display(Name = "Release Date:")]
    public DateTime ReleaseDate { get; set; }

    [Required(ErrorMessage = "Please enter a running time for this movie")]
    [Range(1, 1000, ErrorMessage = "The running time must be between 1 and 1000 minutes.")]
    [Display(Name = "Running Time:")]
    public int RunningTime { get; set; }

    [Display(Name = "Description:")]
    public string Description { get; set; }

    [Display(Name = "Genre:")]
    public int SelectedGenre { get; set; }

    public List<SelectListItem> AllGenres { get; set; }
}

Now, if we were using HTML Helpers, our corresponding Add view might look like this:

@model MoreTagHelpers.ViewModels.AddMovieVM

<h2>Add a Movie</h2> 
@Html.ActionLink("Back to Movies", "Add", "Movie")
@using (Html.BeginForm("Add", "Movie"))
{
    <div>
        <div>
            @Html.LabelFor(x=>x.Title)
            @Html.TextBoxFor(x=>x.Title)
            @Html.ValidationMessageFor(x=>x.Title)
        </div>
        <div>
            @Html.LabelFor(x => x.ReleaseDate)
            @Html.TextBoxFor(x => x.ReleaseDate, new { @type = "date" })
            @Html.ValidationMessageFor(x => x.ReleaseDate)
        </div>
        <div>
            @Html.LabelFor(x => x.RunningTime)
            @Html.TextBoxFor(x => x.RunningTime, new { @type = "number" })
            @Html.ValidationMessageFor(x => x.RunningTime)
        </div>
        <div>
            @Html.LabelFor(x => x.Description)
            @Html.TextAreaFor(x => x.Description)
            @Html.ValidationMessageFor(x => x.Description)
        </div>
        <div>
            @Html.LabelFor(x=>x.SelectedGenre)
            @Html.DropDownListFor(x => x.SelectedGenre, Model.AllGenres)
            @Html.ValidationMessageFor(x => x.SelectedGenre)
        </div>
        <div>
            <input type="submit" value="Save" />
        </div>
    </div>
}

Now, here's that same form, using Tag Helpers.

@model MoreTagHelpers.ViewModels.AddMovieVM

<h2>Add a Movie</h2> 
<a asp-action="Index" asp-controller="Movie">Back to Movies</a> 
<form asp-action="Add" asp-anti-forgery="true" asp-controller="Movie"> 
    <div>
        <div>
            <label asp-for="Title"></label>
            <input type="text" asp-for="Title" />
            <span asp-validation-for="Title"></span>
        </div>
        <div>
            <label asp-for="ReleaseDate"></label>
            <input type="date" asp-for="ReleaseDate" />
            <span asp-validation-for="ReleaseDate"></span>
        </div>
        <div>
            <label asp-for="RunningTime"></label>
            <input type="number" asp-for="RunningTime" />
            <span asp-validation-for="RunningTime"></span>
        </div>
        <div>
            <label asp-for="Description"></label>
            <textarea asp-for="Description"></textarea>
            <span asp-validation-for="Description"></span>
        </div>
        <div>
            <label asp-for="SelectedGenre"></label>
            <select asp-for="SelectedGenre" asp-items="Model.AllGenres"></select>
            <span asp-validation-for="SelectedGenre"></span>
        </div>
        <div>
            <input type="submit" value="Save" />
        </div>
    </div>
</form> 

HTML all the things! That second form is much cleaner than the first IMHO. But, what really makes it is that Visual Studio will highlight which HTML tags are using tag helpers:
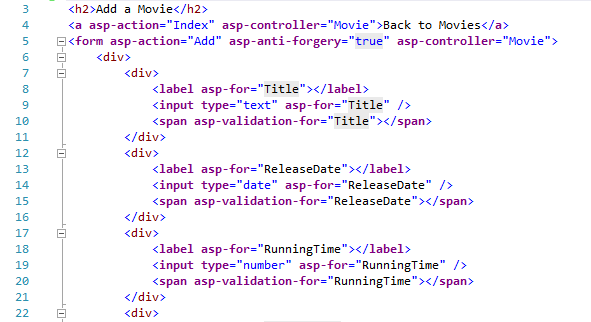


The normal HTML is highlighted regularly, and the tag helper HTML is in purple, making it really obvious which is which and hopefully negating some of the complaints I've seen about Razor being more obvious than Tag Helpers.

Let's dive into some of these helpers to see how you can use them in your ASP.NET MVC 6 projects.

Anchor Tag Helper

First, let's look at this helper:

<a asp-action="Index" asp-controller="Movie">Back to Movies</a> 

That's just an anchor tag with two tag helper attributes. Notice that each tag helper attribute begins with "asp-", and their names make intrinsic sense to us: "action" and "controller".

In the particular case of the anchor tag helper, there's a few other properties we could set, like asp-fragment, asp-route, and asp-path. Even better, Visual Studio now gives you intellisense for these attributes:

Form Tag Helper

The form tag helper looks something like this:

<form asp-action="Add" asp-anti-forgery="true" asp-controller="Movie"></form> 

The properties "asp-action" and "asp-controller" are same as in the anchor tag helper, but notice the "asp-anti-forgery" property. Setting this to true is the same as using the @Html.AntiForgeryToken helper in Razor. This helper has simply made your views a little bit cleaner.

Label Tag Helper

Making your views a little bit cleaner is a theme you'll see woven into each of the tag helpers, and the next example comes with the label tag helper. Here's our example:

<label asp-for="Title"></label> 

Input Tag Helper

Continuing with the simple theme:

<input type="text" asp-for="Title" /> 

Now there are many different kinds of input tags (e.g. date, checkbox, text, radio, etc.) and each kind had a different Razor helper. In the new tag helpers, there's just the input tag helper, with two attributes: "asp-for" and "asp-format".

TextArea Tag Helper

The text area is a separate tag in HTML. Here's the helper for it:

<textarea asp-for="Description"></textarea> 

Select Tag Helper

Another tag which is different from the standard input tag is the select tag, and consequently it has a different tag helper:

<select asp-for="SelectedGenre" asp-items="Model.AllGenres"></select> 

Again we see "asp-for" but now we also see the source collection specified using "asp-items." Easy. One odd thing I noticed about this is that "asp-for" doesn't require the Model. prefix, but "asp-items" does. If anybody knows why this is, I'd love to hear it.

Validation Tag Helper

The final tag helper we see on the completed form above is the one on a <span> tag. This is an unusual one, since under many circumstances you won't want to use a span tag as anything other than a <span>.

Except when what you want is a validation message. In that case, you'd use this:

<span asp-validation-for="Description"></span> 

This is the time when we should show the HTML that this renders:

<span class="field-validation-valid" data-valmsg-for="SelectedGenre" data-valmsg-replace="true"></span> 

But wait, that's not all! There are several other helpers we can use.

Environment Tag Helper

Here's one of those other helpers:

<environment names="Development"> 
...
</environment> 
<environment names="Staging,Production"> 
...
</environment> 

This helper is really interesting because the contents of the helper only get rendered if the HTML is deployed into specific environments. It does this by looking at an environment variable called ASPNET_ENV, and which you can set by right-clicking on the Project file and selecting Properties, then selecting Debug.
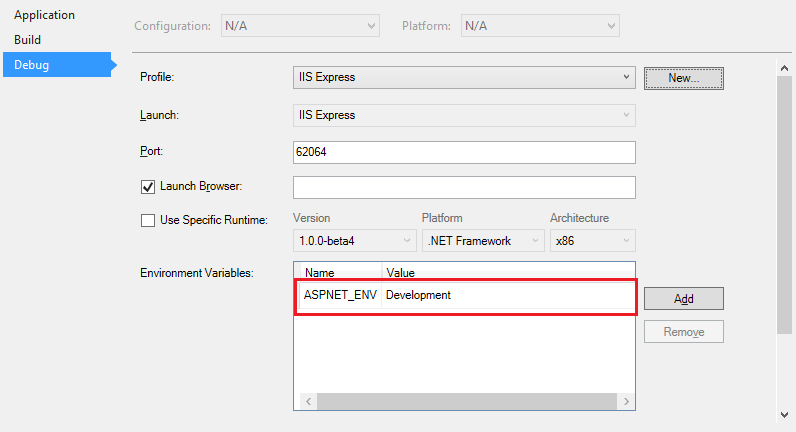
I'm hoping there's an easier way to change this variable in the fully-released version of Visual Studio, but until then, this is how you use it.

Link and Script Tag Helpers

These are possibly the most interesting new helpers.

<link rel="stylesheet" href="//ajax.aspnetcdn.com/ajax/bootstrap/3.0.0/css/bootstrap.min.css" 
asp-fallback-href="~/lib/bootstrap/css/bootstrap.min.css" asp-fallback-test-class="hidden" asp-fallback-test-property="visibility" asp-fallback-test-value="hidden" />

<script src="//ajax.aspnetcdn.com/ajax/mvc/5.2.3/jquery.validate.unobtrusive.js" asp-fallback-src="~/lib/jquery-validation-unobtrusive/jquery.validate.unobtrusive.js" asp-fallback-test="window.jQuery"></script> 

There's a lot going on here. First, notice the values in the src attribute. Those urls point to the Microsoft Ajax CDN, a new (to me, at least) content-delivery network that holds many commonly-used production CSS and JS files, particularly those produced and maintained by Microsoft. In our case, in the sample project we get the script files for jQuery, unobtrusive validation, bootstrap, and others.

But what about those "asp-fallback-src" attributes? They specify a second location that we can go grab the source files from should the first location be unavailable. In other words, we now have a fallback plan that allows our CSS and JS files to gracefully degrade over should the CDN (if we are using one) not be available. Finally, note that the fallback parameters are entirely optional.

Image Tag Helper

New in the Beta 5 release of ASP.NET is the Image Tag Helper which looks like this:

<img src="~/content/images/profile.jpg" 
     alt="John Smith"
     asp-append-version="true" />

Notice the new asp-append-version attribute; that's the only TagHelper attribute in this tag. What that does is render an <img> with a query string attribute appended on the source URL, like this:

<img src="/content/images/profile.jpg?v=X5q6D366_nQ2fQqUso0F24gWy2ZekXjHz83KmWyaiOOk" 
     alt="company logo"/>

The content of the v attribute is determined by the content of the image; if the content of the image changes, so does the v attribute. This forces the browser to download the image again.

This is a technique known as cache busting; writing code that forces the browser to download a resource (in this case, an image) if that resource changes. This technique guarantees that the user will always get the most recent version of the resource.

Cache Tag Helper

The Cache tag helper is similar to the Environment tag helper in that it doesn't target a specific HTML tag. Rather, it caches its contents in server-side memory, set to an expiration date. An example might look like this:

<cache expires-after="@TimeSpan.FromMinutes(5)" vary-by-user="true"> 
    @Html.Partial("WeatherReport")
</cache> 

In this sample, the WeatherReport partial view will be cached for 5 minutes, and will vary by the user. We can do this to significantly reduce load on the server as all of these requests will be cached server-side.

What actually happens is that ASP.NET generates an ID that is unique to the context of the cached content, which allows you to have multiple <cache> on a single page and not have them interfere with one another.

There are quite a few ways to control how the cache operates. Attributes include expires-after, expires-on, expires-sliding, vary-by-user, vary-by-query, vary-by-route, etc. You can use any combination of vary-by-* attributes on a single cache tag, and doing so modifies the ID that is generated for the cache.

There's one major limitation to this tag: on the back end, it uses a construct called MemoryCache to store the cached content. MemoryCache is limited by the amount of memory available; once there's not enough memory to go around, MemoryCache will purge items until it has the memory necessary. Further, any app pool reset or server shutdown will destroy this cache. Basically, don't treat MemoryCache like a persistent storage solution, because it is not such a thing.


European ASP.NET MVC 5 Hosting - UK :: Creating Custom Scaffold Templates in ASP.NET MVC

clock November 27, 2015 18:59 by author Scott

Microsoft provides a powerful scaffolding engine for models in ASP.NET MVC applications that use Entity Framework. Scaffolding relieves web developers from the mundane task of writing the create, read, update, and delete (CRUD) code over and over again. The scaffolding engine uses T4 templates to generate basic controllers and views for models. However, scaffolded code is just a starting point, since it often needs to be customized to meet specific business requirements or satisfy specific design patterns.

In this blog post, I’ll provide a walkthrough on how to create project-specific custom scaffold templates for ASP.NET MVC. This can be a huge time-saver in applications with a large number of controllers and views. I will use Visual Studio 2013, ASP.NET MVC 5, Entity Framework 6, and C#.

SETUP

To get started, create a new ASP.NET MVC web application and add a simple Product model with the properties shown below and build the project.

namespace CustomScaffoldingDemo.Models
{
    public class Product
    {
        public int Id { get; set; }
        public string Name { get; set; }
        public decimal Price { get; set; }
        public bool IsDeleted { get; set; }
        public DateTime CreatedDate { get; set; }
        public DateTime UpdatedDate { get; set; }
    }
}

SCAFFOLDING CONTROLLER AND VIEWS

First, let’s use default templates to scaffold a controller and CRUD views for the Product model so we can review the results. To do so, right-click the Controllers folder in Solution Explorer and click Add New Scaffolded Item. In the Add Scaffold dialog, choose the MVC 5 Controller with views, using Entity Framework. On the Add Controller dialog, create a new data context and choose appropriate options that serve as parameters for the scaffolding engine. Then hit the Add button.

The scaffolding engine will use the default T4 templates to generate code for the controller and five views and add them to the appropriate folders. At this point you have full CRUD functionality for the Product model and can run the application.

As you review the generated code, you may notice that the scaffolding engine is intelligent enough to treat the Product ID properly by not scaffolding the editor for this property on the Create or Edit forms. You may also realize that the default templates do not meet the functional specification or your desired design patterns. For example, you may want to achieve the following:

–  Created Date and Updated Date properties should be set automatically by the system on create or update action respectively, and thus should not be editable on the Create and Edit views.
–  Products should be soft-deleted, so the Delete action of the Product controller must be changed to set the IsDeleted property and updating the Product instead of deleting it from the database. Index action should only return Products with IsDeleted set to false.
–  None of the views should display the IsDeleted property.
–  Views should use @ViewBag.Title as the page header instead of the view name. 
–  You may be using a Unit of Work pattern, so all calls to save changes to the database may need to be tweaked. 

You can manually make changes to the generated code, which has several drawbacks, including:

–  Typically, you would want most, if not all, controllers and views to be consistent across all models in your application. Making similar manual changes to controllers and views for all models is not an efficient approach.
–  When you make changes to a model, you will either have to scaffold these files again and lose your manual changes or manually update all views to match the updated model.

The best way to avoid manual changes and enforce consistency is to customize the scaffold templates.

CUSTOMIZING SCAFFOLD TEMPLATES

The original T4 templates used by the scaffolding engine are located in this folder: %programfiles%\Microsoft Visual Studio 12.0\Common7\IDE\Extensions\Microsoft\Web\Mvc\Scaffolding\Templates.

While you can directly edit these templates, this will affect scaffolding for all future projects, which is not recommended. Instead, you can create project-specific copies of these templates so you can customize them. To do so, copy these templates into your MVC project’s CodeTemplates folder, following the same sub-folder structure. You only need to copy either C# or VB.NET templates, based on your project. The template filenames include the language they use. The convention is that the scaffolding engine uses the templates in the CodeTemplates project folder, if one exists, instead of the global templates.

Now you can modify these custom scaffold templates, which would affect scaffolded code only for this project. T4 templates are simply text files and can be edited directly in Visual Studio. Unfortunately, Visual Studio 2013 does not include a good T4 editor—there’s no syntax highlighting or IntelliSense. Fortunately, there are some third party add-on products that provide this functionality. Below is a screenshot of how the templates look in Visual Studio 2013. You can see I modified the header on line 26 to use @ViewBag.Title instead of the view name. 

&lt;#@ template language="C#" HostSpecific="True" #&gt;
&lt;#@ output extension=".cshtml" #&gt;
&lt;#@ include file="Imports.include.t4" #&gt;
@model &lt;#= ViewDataTypeName #&gt;
&lt;#
// The following chained if-statement outputs the file header code and
// markup for a partial view, a view using a layout page, or a regular view.
if(IsPartialView) {
#&gt; 

&lt;#
} else if(IsLayoutPageSelected) {
#&gt; 

@{
    ViewBag.Title = "&lt;#= ViewName#&gt;";
&lt;#
if (!String.IsNullOrEmpty(LayoutPageFile)) {
#&gt;
    Layout = "&lt;#= LayoutPageFile#&gt;";
&lt;#
}
#&g
t;
}

@ViewBag.Title

To learn more about scaffolding check out this walkthrough from Microsoft. To learn more about T4 templates in general, start by reading this MSDN article


European ASP.NET MVC 5 Hosting :: How to Use AngularJS in ASP.NET MVC

clock November 12, 2015 20:18 by author Scott

In this short tutorial, I will show how to use AngularJS in ASP.NET MVC. I hope that you enjoy this short tutorial and this is helpful.

Application Inception

While Angular is a framework for the modern Single Page App, I have found that a lot of our MVC applications call for a collection of these “ng-apps”. In this instance they typically don’t include the client side routing.

Please See Sample Application

The image to the right is the file structure for a sample airplane scheduling app. There are three sections:

  Home (simple js) - A simple calendar showing flights
  Details (angular) - Information about a single flight
  Manage (angular) - A place for settings, pilots, etc...

Bundle Configuration

While asset bundling is a great feature of ASP.Net, it is easy to get carried away. When I came on there were a lot of projects that just included all the js files for the entire application in a single ScriptBundle. This was one of the first places I set my sights.

I decided that a lot of the services would be shared, so they could go in their own Angular module and in their own ASP Bundle. Then each mini-app could get it’s own module and bundle. Lets take a look at theBundleConfiguration.cs file.

using System.Web.Optimization;

namespace Jobney.App.Web
{
    public class BundleConfig
    {
        public static void RegisterBundles(BundleCollection bundles)
        {
            bundles.Add(new ScriptBundle("~/bundles/js-base").Include(
                        "~/Scripts/libs/jquery-{version}.js",
                        "~/Scripts/libs/bootstrap.js",
                        "~/Scripts/libs/select2.js",
                        "~/Scripts/libs/bootstrap-datepicker.js",
                        "~/Scripts/libs/respond.js",
                        "~/Scripts/libs/lodash.js",
                        "~/Scripts/endless.js"
                        ));

            bundles.Add(new ScriptBundle("~/bundles/ng-base").Include(
                        "~/Scripts/libs/angular/angular.js",
                        "~/Scripts/libs/angular/ui-router.js",
                        "~/Scripts/libs/angular/ui-bootstrap-custom-0.9.0.js",
                        "~/Scripts/libs/angular/ui-bootstrap-custom-tpls-0.9.0.js",
                        "~/Scripts/libs/angular/angular-animate.js",
                        "~/Scripts/libs/angular/toaster.js"
                        ));

            bundles.Add(new ScriptBundle("~/bundles/ng-shared-services")
                .IncludeDirectory("~/Scripts/apps/shared/", "*.js"));

            bundles.Add(new ScriptBundle("~/bundles/ng-manage-app")
                .IncludeDirectory("~/Scripts/apps/manage/","*.js"));

            bundles.Add(new ScriptBundle("~/bundles/ng-tripinfo-app")
                .Include(
                    "~/Scripts/libs/jquery-ui.js",
                    "~/Scripts/libs/angular/sortable.js",
                    "~/Scripts/libs/angular/select2.js",
                    "~/Scripts/libs/angular/ngAutocomplete.js"
                )
                .IncludeDirectory("~/Scripts/apps/tripinfo/", "*.js"));

            bundles.Add(new StyleBundle("~/Content/css/base").Include(
                      "~/Content/css/bootstrap.css",
                      "~/Content/css/datepicker3.css",
                      "~/Content/css/select2.css",
                      "~/Content/css/toaster.css",
                      "~/Content/css/select2-bootstrap.css",
                      "~/Content/css/font-awesome.css"
                    ));
            bundles.Add(new StyleBundle("~/Content/css/custom").Include(
                      "~/Content/css/endless.css",
                      "~/Content/css/endless-skin.css",
                      "~/Content/css/site.css"));
        }
    }
}

Then using the bundles, say in the manage app, it would look like this:

@model Jobney.Casm.Web.Models.ManageDataBootstrapper
<div data-ng-app="Jobney.Casm.ManageApp" data-ng-controller="ManageAppCtrl">
    <ul class="tab-bar grey-tab">
        <!-- content here -->
    </ul>

    <div data-ui-view></div>
</div>

@section scripts
{
    <!-- Start ng-base -->
    @Scripts.Render("~/bundles/ng-base")

    <!-- Start ng-shared-services -->
    @Html.Partial("_SharedServices")

    <!-- Start ng-manage-app -->
    @Html.Partial("_ManageAppSetup", Model)
}

Services Need Data And Data Needs Urls

As an ASP.Net MVC developer, you are probably used to letting the routing engine create urls for you when you need them. And why not? Who knows what crazy routing constraints the client/pm/other developers decided needed to be in your application. And with Razor helpers, this is pretty easy. Angular shouldn’t have to try hard to figure out those rules. So how do we combine these two worlds?

@section scripts
{
    app.constant('RouteConfig', {
        base: '@Url.Content("~/")',
        project: {
            all: '@Url.Action("All", "Project")',
            details: '@Url.Action("Details", "Project")',
            post: '@Url.Action("Post", "Project")'
        },
        vendor: {
            category: '@Url.Action("GetByCategory", "Vendor")',
            details: '@Url.Action("GetById", "Vendor")',
            getProductRating: '@Url.Action("GetByProduct", "Rating")'
        },
        resolve: function (url) {
            return this.base + url;
        }
    });
}

Such http. Many calls.

In the manage app we are going to need some data. When the situation calls for it, I don’t mind sending that data down with the app. I think I took this idea from John Papa or one of those PluralSight authors. Basically, I just use JSON.Net to serialize my dataset on the page. Let’s take a look at it.

@model Jobney.Casm.Web.Models.ManageDataBootstrapper

<script>
    (function () {
        'use strict';

        var app = angular.module('Jobney.Casm.ManageApp', [
            'ui.router',
            'ui.bootstrap',
            'Jobney.Casm.SharedServices'
        ]);

        app.factory('BootstrappedData', [function() {
            var service = {};

            service.pilots = @Html.Raw(Model.Pilots);
            service.passengers = @Html.Raw(Model.Passengers);
            service.airplanes = @Html.Raw(Model.Airplanes);
            service.settings = @Html.Raw(Model.Settings);

            return service;
        }]);       

    })();
</script>

@Scripts.Render("~/bundles/ng-manage-app")


ASP.NET MVC 6 Hosting Russia - HostForLIFE.eu :: How to show Multiple Models in a Single View Using Dynamically Created Object ?

clock April 9, 2015 08:11 by author Scott

In this article I will disclose about How to show Multiple Models in a Single View utilizing dynamically created object in ASP.NET MVC. Assume I have two models, Course and Student, and I have to show a list of courses and students within a single view. By what means would we be able to do this? And here is the code that I used:

Model(Student.cs)
using System;
using System.Collections;
using System.Collections.Generic;
using System.Linq;
using System.Web;
namespace MVCMultipleModelsinView.Models
{
    public class Student
    {
        public int studentID { get; set; }
        public string studentName { get; set; }
        public string EnrollmentNo { get; set; }
        public string courseName { get; set; }
        public List<Student> GetStudents()
        {
            List<Student> students = new List<Student>();
            students.Add(new Student { studentID = 1, studentName = "Peter", EnrollmentNo = "K0001", courseName ="ASP.NET"});
            students.Add(new Student { studentID = 2, studentName = "Scott", EnrollmentNo = "K0002", courseName = ".NET MVC" });
            students.Add(new Student { studentID = 3, studentName = "Rebecca", EnrollmentNo = "K0003", courseName = "SQL Server" });
            return students;
        }
    }
}


Model(Course.cs):
using System;
using System.Collections.Generic;
using System.Linq;
using System.Web;
namespace MVCMultipleModelsinView.Models
{
    public class Course
    {
        public int courseID { get; set; }
        public string courseCode { get; set; }
        public string courseName { get; set; }
        public List<Course> GetCourses()
        {
            List<Course> Courses = new List<Course>();
            Courses.Add(new Course { courseID = 1, courseCode = "CNET", courseName = "ASP.NET" });
            Courses.Add(new Course { courseID = 2, courseCode = "CMVC", courseName = ".NET MVC" });
            Courses.Add(new Course { courseID = 3, courseCode = "CSVR", courseName = "SQL Server" });
            return Courses;
        }
    }
}


Controller (CourseStudentController.cs):
using System;
using System.Collections.Generic;
using System.Linq;
using System.Web;
using System.Web.Mvc;
using System.Dynamic;
using MVCMultipleModelsinView.Models;
namespace MVCMultipleModelsinView.Controllers
{
    public class CourseStudentController : Controller
   {
        public ActionResult Index()
        {
            ViewBag.Message = "Welcome!";
            dynamic model = new ExpandoObject();
            Student stu = new Student();
            model.students = stu.GetStudents();
            Course crs = new Course();
            model.courses = crs.GetCourses();
            return View(model);
       }
    }
}

View(Index.cshtml):
@using MVCMultipleModelsinView.Models;
@{
   ViewBag.Title = "Index";
}
<h2>@ViewBag.Message</h2>
<style type="text/css">
table
    {
        margin: 4px;
        border-collapse: collapse;
        width: 500px;
        font-family:Tahoma;
   }
    th
    {
        background-color: #990000;
        font-weight: bold;
        color: White !important;
    }
    table th a
    {
        color: White;
        text-decoration: none;
    }
    table th, table td
    {
        border: 1px solid black;
        padding: 5px;
    }
</style>
<p>
    <b>Student List</b></p>
<table>
    <tr>
        <th>
            Student Id
        </th>
        <th>
            Student Name
        </th>
        <th>
            Course Name
        </th>
        <th>
            Enrollment No
        </th>
    </tr>
    @foreach (Student stu in Model.students)
    {
        <tr>
            <td>@stu.studentID
            </td>
            <td>@stu.studentName
            </td>
            <td>@stu.courseName
            </td>
            <td>@stu.EnrollmentNo
            </td>
        </tr>
    }
</table>
<p> 
 <b>Course List</b></p>
<table>
   <tr>
       <th>
            Course Id
        </th>
        <th>
            Course Code
        </th>
        <th>
            Course Name
       </th>
    </tr>
    @foreach (Course crs in Model.courses)
    {
        <tr>
            <td>@crs.courseID
            </td>
            <td>@crs.courseCode
            </td>
            <td>@crs.courseName
        </tr>
    }
</table>

HostForLIFE.eu ASP.NET MVC 6.0 Hosting
HostForLIFE.eu is European Windows Hosting Provider which focuses on Windows Platform only. We deliver on-demand hosting solutions including Shared hosting, Reseller Hosting, Cloud Hosting, Dedicated Servers, and IT as a Service for companies of all sizes. We have customers from around the globe, spread across every continent. We serve the hosting needs of the business and professional, government and nonprofit, entertainment and personal use market segments.


European ASP.NET MVC Hosting - UK :: Tips Using BindAttribute in ASP.NET MVC

clock March 3, 2015 06:21 by author Scott

The Bind attribute is used to protect against over-posting. Represents an attribute that is used to provide details about how model binding to a parameter should occur.

Let’s take an example of Employee Controller which creates the records for employee basic information.

This code adds the Employee entity created by the ASP.NET MVC model binder to the Employees entity set and then saves the changes to the database.

The ValidateAntiForgeryToken attribute helps prevent cross-site request forgery attacks.

EmployeeController.cs –> Create

[HttpPost]
[ValidateAntiForgeryToken]
public ActionResult Create(
   [Bind(Include = "FirstName, LastName, JoiningDate")]
   Employee employee)
{
   try
   {
      if (ModelState.IsValid)
      {
         db.Employees.Add(employee);
         db.SaveChanges();
         return RedirectToAction("Index");
      }
   }
   catch (DataException ex)
   {
      //Log the error
      ModelState.AddModelError("", "Unable to save. Try again.");
   }
   return View(employee);
}

Employee.cs

public class Employee
   {
      public int ID { get; set; }
      public string LastName { get; set; }
      public string FirstName { get; set; }
      public DateTime JoiningDate { get; set; }
      public string City { get; set; }

    }

For example, suppose the Employee entity includes a City property that you don’t want this web page to update. Even if you don’t have a City field on the web page, a hacker could use a tool such as fiddler, or write some JavaScript, to post a City form value. Without the Bind attribute limiting the fields that the model binder uses when it creates an Employee instance, the model binder would pick up that City form value and use it to update the Employee entity instance. Then whatever value the hacker specified for the City form field would be updated in your database.

It’s a security best practice to use the Include parameter with the Bind attribute to whitelist fields. It’s also possible to use the Exclude parameter to blacklist fields you want to exclude. The reason Include is more secure is that when you add a new property to the entity, the new field is not automatically protected by an Exclude list.

Another alternative approach, and one preferred by many, is to use only view models with model binding. The view model contains only the properties you want to bind. Once the MVC model binder has finished, you copy the view model properties to the entity instance.


About HostForLIFE

HostForLIFE is European Windows Hosting Provider which focuses on Windows Platform only. We deliver on-demand hosting solutions including Shared hosting, Reseller Hosting, Cloud Hosting, Dedicated Servers, and IT as a Service for companies of all sizes.

We have offered the latest Windows 2019 Hosting, ASP.NET 5 Hosting, ASP.NET MVC 6 Hosting and SQL 2019 Hosting.


Month List

Tag cloud

Sign in