European ASP.NET MVC Hosting

BLOG about Latest ASP.NET MVC Hosting and Its Technology - Dedicated to European Windows Hosting Customer

European ASP.NET MVC 5 Hosting - Amsterdam :: New Filter Overrides Feature in ASP.NET MVC 5

clock December 30, 2013 07:07 by author Scott

In this quick article, I will tell you the problem that filter overrides is trying to solve(with an example). I will also show you a quick fix of a bug that I found in ASP.NET MVC 5 regarding filter overrides.

Description:

Let say you have an Authorize filter applied on a controller and a action

[Authorize(Roles = "PowerUsers")]
public class AController : ApiController
{   

    // GET api/api
    public IEnumerable<string> Get()
    {
        return new string[] { "value1", "value2" };
    }
    [Authorize(Roles = "Admin")]
    // GET api/api/5
    public string Get(int id)
    {
        return "value";
    }
}

Now you want that all actions of above controller should only run when the user is in PowerUsers role except for second Get method which requires an Admin role. Before ASP.NET MVC 5 and ASP.NET Web API 2, it was not possible to achieve this(without using a dirty hack). But the current version make this a piece of cake, using OverrideAuthorizationAttribute. Just put this attribute on the second Get action above and then you are done. For the further understanding of this, just use this controller and custom authorize filter,

public class MyAuthorizeAttribute : AuthorizeAttribute
   {
       string name;
       public MyAuthorizeAttribute(string s)
       {
           name = s;
       }
       public override void OnAuthorization(System.Web.Http.Controllers.HttpActionContext actionContext)
       {
           base.OnAuthorization(actionContext);
       }
   }
   [MyAuthorize("Controller")]
   public class AController : ApiController
   {
       [MyAuthorize("Action")]
       //[OverrideAuthorization]
       // GET api/api
       public IEnumerable<string> Get()
       {
           return new string[] { "value1", "value2" };
       }
       // GET api/api/5
       public string Get(int id)
       {
           return "value";
       }
   }

Now just put a break-point on MyAuthorizeAttribute constructor and OnAuthorization method. You will find that the constructor is invoked for both action and controller but only the controller's MyAuthorizeAttribute.OnAuthorization(by checking name variable) is called. Now just un-comment the[OverrideAuthorization], you will find that action method's MyAuthorizeAttribute.OnAuthorization is called. When you do the same in MVC 5, it will not work due to a bug(AFAIK) in MVC 5 RC. Hopefully will be fixed in RTM. But for now you can use this hack to make this work in MVC 5 as well. Here is an example,

public class OverrideAuthorizeAttribute : AuthorizeAttribute, IOverrideFilter
   {
       public Type FiltersToOverride
       {
           get { return typeof(IAuthorizationFilter); }
       }
   }
   [Authorize(Users="Admin")]
   public class HomeController : Controller
   {
       [OverrideAuthorize(Users = "Imran Baloch")]
       public ActionResult Index()
       {
           return View();
       }       

       public ActionResult About()
       {
           ViewBag.Message = "Your application description page.";
           return View();
       }

       public ActionResult Contact()
       {
           ViewBag.Message = "Your contact page.";

           return View();
       }
   }

The hack is simply creating a new OverrideAuthorizeAttribute inheriting from AuthorizeAttribute and implementing IOverrideFilter interface and then applying this to the Index action method.


European ASP.NET MVC 4 Hosting :: Single Page Application in ASP.NET MVC 4

clock December 5, 2013 11:20 by author Scott

Single Page Applications (SPA)?

Normally a web application is a collection of web pages, each doing a specific task. For example, consider a web application that does CRUD operations (Create, Read, Update and Delete) on data. A common practice is to create different web pages for operations such as showing a list of existing records, adding a new record, updating an existing record and deleting a record. A trend becoming increasingly popular is to have a single web page perform all of these operations. Such an application is called Single Page Application or SPA. So, in this example instead of developing four separate web pages you develop just one web page. At runtime, depending on the operation selected by a user, the web page renders an appropriate user interface. Such an application heavily relies on client side JavaScript libraries.

It should be noted that SPA is a general concept and ASP.NET MVC 4 has decided to offer some basic infrastructure to the developers to put this concept into practice. ASP.NET MVC 4 provides a project template that creates a basic yet functional SPA application. You can then customize the application to add more functionality. In the discussion that follows you will learn SPA with respect to ASP.NET MVC 4.

Parts of SPA

A Single Page Application consists of several pieces that fit together to provide the overall functionality of the application. A typical SPA consists of the following pieces:

  • Data Model : This is a server side piece that represents your data (often mapping database tables as .NET objects).
  • Data Service : Data service provides operations for database access (typically CRUD operations). This is also a service side piece and uses Entity Framework Code First approach.
  • ViewModel : View Model refers to your data and UI level operations that you wish to perform on the data. You can think of View Model as a wrapper over your model data that adds UI level operations to it.
  • Views : Views display your data to the user and also contain associated JavaScript. The default SPA project template uses Razor views.
  • Database: SPA uses Entity Framework Code First approach for database operations. The default project template creates a database in the local installation of SQL Server Express.

The following sections discuss all these parts from the default SPA project template in detail.

Creating a New Project Based on SPA Template

Installing ASP.NET MVC 4 adds a new project template in Visual Studio 2010. To create a new SPA you should create an ASP.NET MVC4 Web Application project based on this template.

The default project created using the SPA project template contains data models, views and client script files for performing CRUD operations of a sample "To Do" application. SPA extensively uses two JavaScript libraries, namely Knockout and Upshot. The following figure shows these libraries added in the Solution Explorer.

Data Model

The sample application created by the default SPA project template deals with "To Do" items, i.e. tasks. A task is represented by a data model class - TodoItem. The TodoItem class resides in the Models folder and looks like this:

public class TodoItem
{
    public int TodoItemId { get; set; }
    [Required]
    public string Title { get; set; }
    public bool IsDone { get; set; }
}

As you can see the TodoItem is a simple class with three properties, viz. TodoItemId, Title and IsDone. The Title property is a required property as indicated by Data Annotation Attribute [Required].

To deal with the application data you need to create a DbContext and a DbDataController. This is done for you when you add a new controller to the project specifying the SPA controller template. Right click on the Controllers folder and select Add > Controller. In the Add Controller dialog specify details as shown below:

Specify the controller name as TodoController. Select scaffolding template of "Single Page Application with read/write actions and views, using Entity Framework". In the Model class drop-down select TodoItem class. In the Data context class drop-down click "New data context" and specify a name for the DbContext class. Once you click on the Add button the following files will be created for you:

  1. TodoController.cs (Controllers folder)
  2. SPADefaultDemoController.cs (Controllers folder)
  3. SPADefaultDemoController.TodoItem.cs (Controllers folder)
  4. SPADefaultDemoContext.cs (Models folder)
  5. Index.cshtml and associated partial views (Views folder)

Out of these classes the DbContext class (SPADefaultDemoContext) looks like this:

public class SPADefaultDemoContext : DbContext
{
    public DbSet<TodoItem> TodoItems { get; set; }
}

As you can see the SPADefaultDemoContext class inherits from DbContext base class and contains a DbSet of TodoItem.

Data Service

The job of performing CRUD operations is handled by the SPADefaultDemoController (the data service) class. This class is shown below:

public partial class SPADefaultDemoController :
               DbDataController<SPADefaultDemo.Models.SPADefaultDemoContext>
{
    public IQueryable<SPADefaultDemo.Models.TodoItem> GetTodoItems() {
        return DbContext.TodoItems.OrderBy(t => t.TodoItemId);
    } 

    public void InsertTodoItem(SPADefaultDemo.Models.TodoItem entity) {
        InsertEntity(entity);
    } 

    public void UpdateTodoItem(SPADefaultDemo.Models.TodoItem entity) {
        UpdateEntity(entity);
    } 

    public void DeleteTodoItem(SPADefaultDemo.Models.TodoItem entity) {
        DeleteEntity(entity);
    }
}

As you can see the SPADefaultDemoController class inherits from DbDataController base class and includes methods for selecting, inserting, updating and deleting TodoItem records to the database. The data service is called from the client side JavaScript code as you will see later.

ViewModel

The ViewModel class for the TodoItem data model is created automatically for you and is placed in the Scripts folder.

As you can see TodoItemsViewModel.js file is placed in the Scripts folder. This ViewModel is developed using Knockout and a part of it is shown below:

// TodoItem class
var entityType = "TodoItem:#SPADefaultDemo.Models";
MyApp.TodoItem = function (data) {
    var self = this;
    // Underlying data
    self.TodoItemId = ko.observable(data.TodoItemId);
    self.Title = ko.observable(data.Title);
    self.IsDone = ko.observable(data.IsDone);
    upshot.addEntityProperties(self, entityType);
}
...

As you can see the TodoItem ViewModel class contains the same properties as the server side data model. These properties are observable properties as indicated by ko.observable() syntax. Knockout synchronizes the data between views and ViewModel. The communication between the ViewModel and the server side data happens through Upshot.js.

View

The Index.cshtml file represents the main view of the application. Three partial views are also created viz. _Grid, _Editor and _Paging that provide the user interface for list, insert/update and paging respectively. Depending on the operation selected by the user the appropriate partial view is rendered. The following markup shows a fragment from the Index.cshtml.

@{
    ViewBag.Title = "TodoItems";
    Layout = "~/Views/Shared/_SpaLayout.cshtml";


<div data-bind="visible: editingTodoItem">
    @Html.Partial("_Editor")
</div> 

<div data-bind="visible: !editingTodoItem()">
    @Html.Partial("_Grid")
</div> 

<div class="message-info message-success" data-bind="flash: { text: successMessage, duration: 5000
}"></div>
<div class="message-info message-error" data-bind="flash: { text: errorMessage, duration: 20000 }"></div>

<script type="text/javascript" src="@Url.Content("~/Scripts/TodoItemsViewModel.js")"></script>
<script type="text/javascript">
    $(function () {
        upshot.metadata(@(Html.Metadata<SPADefaultDemo.Controllers.SPADefaultDemoController>())); 

        var viewModel = new MyApp.TodoItemsViewModel({
            serviceUrl: "@Url.Content("~/api/SPADefaultDemo")"
        });
        ko.applyBindings(viewModel);
    });
</script>

Notice that data service URL is specified as ~/api/SPADefaultDemo. The Html.Metadata() method provides the metadata of the types to the Upshot. The binding between View and ViewModel is provided by the applyBindings() method of Knockout.

If you run the application and navigate to http://localhost:1275/todo (change the port no. as per your setup) you will see something similar to the following figure.

You can click on the "Create TodoItem" button to add a few records. You can then modify or delete them. The following figure shows the view in edit mode.

Database

At this stage the sample "To do" application is able to store and retrieve the data but you might be wondering where the actual data is. Since SPA uses Code First approach to database operations, the database is automatically created for you when you run the application for the first time. The subsequent runs use the previously created database. Have a look at the following figure that shows a sample database generated under local installation of SQL Express.

As you can see, by default the database name is the same as the fully qualified name of the DbContext class. Inside there is a TodoItems table that stores the application data.


European ASP.NET MVC 4 Hosting :: How to Setup Scheduler in ASP.NET MVC 4

clock November 27, 2013 06:02 by author Scott

As always, we try to keep our Scheduler .NET control up-to-date and easy to use. Nowadays it supports all the latest .NET frameworks and IDEs, including ASP.NET 4.5 and Visual Studio 2012.

With regard to all recent updates, your remarks and fixed bugs, we decided to give you further setup instructions. This time we explain how Scheduler .NET setup process can be reduced to only 5 steps that you can cover in less than 5 minutes.

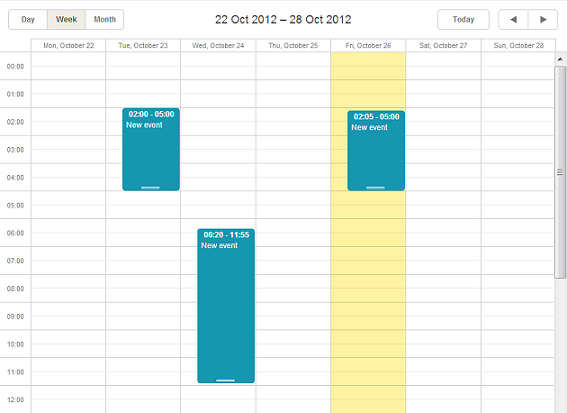
This article represents a new step-by-step guide on how to create a simple yet elegant Google-like calendar/scheduler in ASP.NET MVC3/MVC4 Razor (C#).

Follow the steps described below and you’ll get a nice-looking scheduler in ASP.NET with a rich user interface. It provides the following features:

- Day, week and month views 
- Convenient drag-and-drop
- Highlighting of the current day
- Ajax loading
- Easy data load and save


Create a New Project

Create a new project in Visual Studio by selecting ASP.NET MVC 3/ MVC4 Web Application from the list. The project template should be empty. The view engine is Razor by default.

We will create a simple scheduler in C#.

Set Up the Database

The next step is to set up a database. Right-click on ‘Your_project_name’ (e.g. SimpleScheduler) ->  Add -> Add ASP.NET Folder -> App_Data -> Add New Item and name it “Sample.mdf”. 

A new database has been created. 

Note: for ASP.NET MVC4 project the folder App_Data is created automatically.

Go to the Server Explorer to create a new Table “Events”. Right-click on the Table folder to add the following query. It creates a table with all necessary fields including primary key and identity column:

CREATE TABLE [dbo].[Events](
  [id] int IDENTITY(1,1) NOT NULL,
  [text] nvarchar(250) NULL,
  [start_date] datetime NOT NULL,
  [end_date] datetime NOT NULL,
  PRIMARY KEY (id)
)
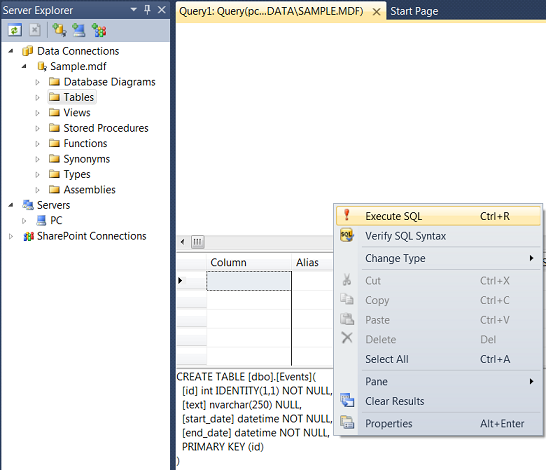
Note: To see the updates, remember to refresh connection in the Server Explorer.

Scheduler Setup via NuGet

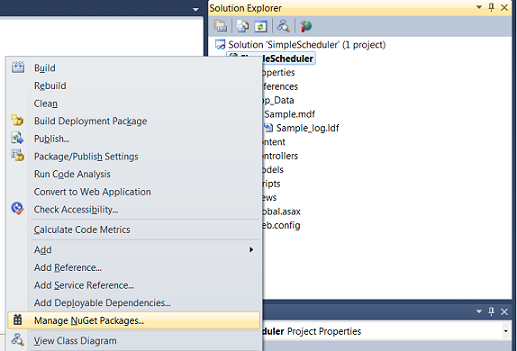
Right-click on you project name in the Solution Explorer to select “Manage NuGet Packages…”: 
For quick search type  ‘dhtmlx’ in the input. In a moment you’ll see DHMTLX Scheduler .NET library and the available samples: 
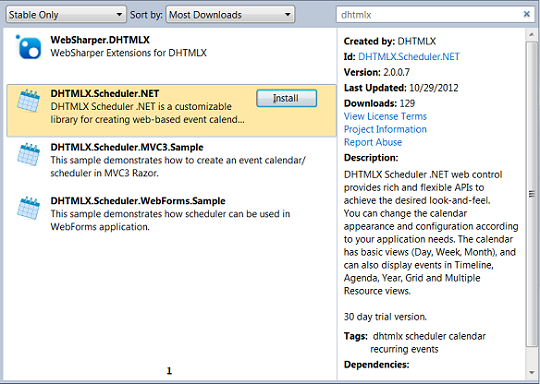
To save your time, install MVC3 Sample first. It contains the basic template of Scheduler .NET calendar control. The template includes a controller with three actions (initialization, data load and save) and view with a calendar.

Thus, the installed sample updates the project with:

- /Controllers/CalendarController.cs  -- a controller that needs updating;
- /Views/Calendar/Index.cshtml   -- a calendar page that requires no changes;
- /Models/CalendarEvent.cs  -- a sample model that can be deleted. 

Create Scheduler Model

The installed MVC3 Sample also contains a sample class model. You don’t need it and can delete it.

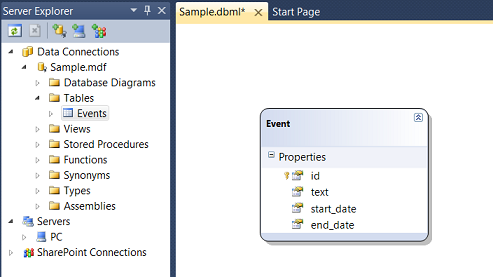
To create a new model right-click on the folder Models -> Add New Item. In the new opened window choose LINQ to SQL Classes and name it Sample.dbml. Double click it to open a visual editor and drag the Event table from the Server Explorer to the Editor.
Updating a Controller

As stated above, the controller has been created when you installed MVC3 Sample. It contains action templates for data load and save, working with static data.

Let’s update the methods in the CalendarController.cs to connect the controller with the newly created Model. 

First we need to load data from the Model. 

The default data load before update looks as follows:

public ContentResult Data()
{
    var data = new SchedulerAjaxData(
        new List<CalendarEvent>{
            new CalendarEvent{
                id = 1,
                text = "Sample Event",
                start_date = new DateTime(2012, 09, 03, 6, 00, 00),
                end_date = new DateTime(2012, 09, 03, 8, 00, 00)
            },
            ...
        });
    return (ContentResult)data;
}

Let’s update the DataAction to load data from SampleDataContext:

public ContentResult Data()
{
            var data = new SchedulerAjaxData(new SampleDataContext().Events);
            return (ContentResult)data;
}

Secondly, enable data save. The data save set by default is:

public ContentResult Save(int? id, FormCollection actionValues)
{
    var action = new DataAction(actionValues);             

    try
    {
        var changedEvent = (CalendarEvent)DHXEventsHelper.Bind(typeof(CalendarEvent), actionValues);
        switch (action.Type)
        {
            case DataActionTypes.Insert:
                //do insert
                action.TargetId = changedEvent.id;//assign postoperational id
                break;
            case DataActionTypes.Delete:
                //do delete
                break;
            default:// "update"                         
                //do update
                break;
        }
    }
}

Data save parses the request, contains a switch case for all types of operations and returns operation success. Let’s update it to enable save of actual changes:

public ContentResult Save(int? id, FormCollection actionValues)
{
     var action = new DataAction(actionValues); 

     var changedEvent = (Event)DHXEventsHelper.Bind(typeof(Event), actionValues); 

     var data = new SampleDataContext(); 

     try
     {
          switch (action.Type)
          {
              case DataActionTypes.Insert: // define here your Insert logic
                  data.Events.InsertOnSubmit(changedEvent);                             
                  break;
              case DataActionTypes.Delete: // define here your Delete logic
                  changedEvent = data.Events.SingleOrDefault(ev => ev.id == action.SourceId);
                  data.Events.DeleteOnSubmit(changedEvent);
                  break;
              default:// "update" // define here your Update logic
                  var eventToUpdate = data.Events.SingleOrDefault(ev => ev.id == action.SourceId);
                  DHXEventsHelper.Update(eventToUpdate, changedEvent, new List<string>() { "id" });//update all properties, except for id
                  break;
              }
              data.SubmitChanges();
              action.TargetId = changedEvent.id;
         }
     }
}

We have changed the Model class used in the method. We’ve also added the required methods from LINQ to SQL and a helper that updates all object properties in the data base (except for the id).

Notes.

The initial class model in the action used to be:

public ContentResult Save(int? id, FormCollection actionValues)
        {
            var action = new DataAction(actionValues);

If a new event is added to the data base, an id assigned to the new event in the data base should be returned to the client. It returns TargetId of the object itself.

action.TargetId = changedEvent.id;

This action is implemented after changes are submitted: data.SubmitChanges();

The full code will look like this:

using System;
using System.Collections.Generic;
using System.Linq;
using System.Web;
using System.Web.Mvc; 

using DHTMLX.Scheduler;
using DHTMLX.Common;
using DHTMLX.Scheduler.Data;
using SimpleScheduler.Models;
namespace SimpleScheduler.Controllers
{
    public class CalendarController : Controller
    {
        public ActionResult Index()
        {
            var scheduler = new DHXScheduler(this); 

            scheduler.Skin = DHXScheduler.Skins.Terrace;
            scheduler.InitialDate = new DateTime(2012, 09, 03); 

            scheduler.Config.multi_day = true;//render multiday events 

            scheduler.LoadData = true;
            scheduler.EnableDataprocessor = true; 

            return View(scheduler);
        } 

        public ContentResult Data()
        {
            var data = new SchedulerAjaxData(
                    new SampleDataContext().Events
                ); 

            return (ContentResult)data;
        } 

        public ContentResult Save(int? id, FormCollection actionValues)
        {
            var action = new DataAction(actionValues);
            var changedEvent = (Event)DHXEventsHelper.Bind(typeof(Event), actionValues);
            var data = new SampleDataContext(); 

            try
            {
                switch (action.Type)
                {
                    case DataActionTypes.Insert: // define here your Insert logic
                        data.Events.InsertOnSubmit(changedEvent); 

                        break;
                    case DataActionTypes.Delete: // define here your Delete logic
                        changedEvent = data.Events.SingleOrDefault(ev => ev.id == action.SourceId);
                        data.Events.DeleteOnSubmit(changedEvent);
                        break;
                    default:// "update" // define here your Update logic
                        var eventToUpdate = data.Events.SingleOrDefault(ev => ev.id == action.SourceId);
                        DHXEventsHelper.Update(eventToUpdate, changedEvent, new List<string>() { "id" });//update all properties, except for id
                        break;
                }
                data.SubmitChanges();
                action.TargetId = changedEvent.id;
            }
            catch (Exception a)
            {
                action.Type = DataActionTypes.Error;
            }
            return (new AjaxSaveResponse(action));
        }
    }
}

Finally, update the route from ‘Home’ to ‘Calendar’ in Global.asax.cs as follows:

routes.MapRoute(
              "Default", // Route name
              "{controller}/{action}/{id}", // URL with parameters
              new { controller = "Calendar", action = "Index", id = UrlParameter.Optional } // Parameter defaults
          );

Note: ASP.NET MVC4 project creates App_Start directory with configuration files. The controller route is changed to "Calendar" in Route.Config.cs:

routes.MapRoute(
                name: "Default",
                url: "{controller}/{action}/{id}",
                defaults: new { controller = "Calendar", action = "Index", id = UrlParameter.Optional }
            );

That’s it! The scheduler for ASP.NET MVC3/MVC4 Razor is ready to use.


European ASP.NET MVC Hosting :: How to Send Email Using ASP.NET MVC

clock November 12, 2013 11:53 by author Scott

Introduction

Sending email is a very common task in any web application for many purposes. In daily development we need to add some mail functionality to our project to send e-mail to the customer or another in our web site.

Using the code

For sending mail from ASP.NET MVC we use the "System.Net.Mail" namespace. Let's see how to do this.

Open Visual Studio

"File" -> "New" -> "Project..."

Choose Visual C#- Web then select ASP.NET MVC4 Web Application

Add a new Internet Application then click OK

Step 1: Create a new Model Class in the model folder.

The following is the code for the new Model

MailModel.cs

public class MailModel

{
   
 public string From { get; set; }
   
 public string To { get; set; }
   
 public string Subject { get; set; }
   
 public string Body { get; set; }
}

Step 2: Create a New SendMailerController in the Controller folder.

The following is the code for the design of the new Controller.

SendMailerController.cs

using System;

using System.Collections.Generic;
using
 System.Linq;
using
 System.Net.Mail;
using
 System.Web;
using
 System.Web.Mvc; 

namespace SendMail.Controllers

{
   
 public class SendMailerController : Controller
    {
       
 //
       
 // GET: /SendMailer/  
       
 public ActionResult Index()
        {
           
 return View();
        } 
 
        [HttpPost]
       
 public ViewResult Index(SendMail.Models.MailModel _objModelMail)
       {
           
 if (ModelState.IsValid)
            {
               
 MailMessage mail = new MailMessage();
                mail.To.Add(_objModelMail.To);
                mail.From =
 new MailAddress(_objModelMail.From);
                mail.Subject = _objModelMail.Subject;
               
 string Body = _objModelMail.Body;
                mail.Body = Body;
                mail.IsBodyHtml =
 true;
               
 SmtpClient smtp = new SmtpClient();
                smtp.Host =
 "smtp.gmail.com";
                smtp.Port = 587;
                smtp.UseDefaultCredentials =
 false;
                smtp.Credentials =
 new System.Net.NetworkCredential
                ("username",
 "password");// Enter seders User name and password
                smtp.EnableSsl =
 true;
                smtp.Send(mail);
               
 return View("Index", _objModelMail);
            }
           
 else
            {
               
 return View();
            }
        }
    }

}

Index.cshtml

@model SendMail.Models.MailModel
@{
ViewBag.Title =
 "Index";
}
<h2>Index</h2>
<fieldset>
<legend>
Send Email
</legend>
@using (Html.BeginForm())
{
@Html.ValidationSummary()
<
p>From:
 </p>
<p>
@Html.TextBoxFor(m=>m.From)</p>
 <p>To:
 </p>
<p>
@Html.TextBoxFor(m=>m.To)</p>
<p>Subject:
 </p>
<p>
@Html.TextBoxFor(m=>m.Subject)</p>
 <p>Body:
 </p>
<p>
@Html.TextAreaFor(m=>m.Body)</p>
<input
 type ="submit" value ="Send" />
}
  </fieldset>

In the code above we have the following 3 fields:

  • To
  • Subject
  • Message

When the user clicks the "Send" button, the mail will be sent to the specified mail address that you provide in the To TextBox. So add the following code for the [HttpPost] Method for the send button click.

SendMailerController.cs

using System;

using System.Collections.Generic;
using
 System.Linq;
using
 System.Net.Mail;
using
 System.Web;
using
 System.Web.Mvc; 

namespace SendMail.Controllers

{
   
 public class SendMailerController : Controller
    {
       
 //
       
 // GET: /SendMailer/ 
 
       
 public ActionResult Index()
        {
           
 return View();
        } 

        [HttpPost]

       public ViewResult Index(SendMail.Models.MailModel _objModelMail)
        {
           
 if (ModelState.IsValid)
            {
               
 MailMessage mail = new MailMessage();
                mail.To.Add(_objModelMail.To);
                mail.From =
 new MailAddress(_objModelMail.From);
               mail.Subject = _objModelMail.Subject;
               
 string Body = _objModelMail.Body;
                mail.Body = Body;
                mail.IsBodyHtml =
 true;
               
 SmtpClient smtp = new SmtpClient();
                smtp.Host =
 "smtp.gmail.com";
                smtp.Port = 587;
                smtp.UseDefaultCredentials =
 false;
                smtp.Credentials =
 new System.Net.NetworkCredential
                ("username",
 "password");// Enter seders User name and password 
 
                smtp.EnableSsl =
 true;
                smtp.Send(mail);
               
 return View("Index", _objModelMail);
            }
          
 else
            {
               
 return View();
            }
        }
    }

}

Understanding the Code

In the code above we have a:

ViewResult Index(SendMail.Models.MailModel _objModelMail)

user defined method. In this method, we have a parameter of our MailModel object. Now we create a MailMessage object.

MailMessage mail = new MailMessage();

MailMessage is the main class for sending mail, it is in the System.Net.Mail namespace.

The MailMessage class has properties, the important ones are:

  • To
  • From
  • Cc
  • Bcc
  • Subject
  • Body

So we add our data into specified properties.

For sending mail we need a SMTP Server, so in ASP.Net we have the SmtpClient class, we set the SMTP settings using the properties of that class.

SmtpClient smtp = new SmtpClient();

The SMTPClient class has these basic properties:

  • Host
  • Port
  • UseDefaultCredential
  • Credentials
  • EnableSsl
  • Send

smtp.Host = "smtp.gmail.com";
smtp.Port = 587;
smtp.UseDefaultCredentials = false;
smtp.Credentials = new System.Net.NetworkCredential("username", "password");
smtp.EnableSsl = true;

In the code above is:

smtp.Host = "smtp.gmail.com";

That is the SMTP Host address of Gmail, if you want to use any other SMTP host service then please add a different SMTP host protocol, for example for Hotmail it is smtp.live.com.

For example, in:

Smtp.Port=587

587 is the port for Gmail, so for any other service port you need to change the port correspondingly.

smtp.Credentials = new System.Net.NetworkCredential("username""password");

Smtp.Credentials specifies the Network Crendentials of your Gmail id so please add your username and password instead of ("username", "password");

The following is for a secure mail server, so you enable your SSL layer.

smtp.EnableSsl = true;

Smtp.Send sends the mail so please add your MailMesssage object here. Then, based on the properties, your mail will be sent


European ASP.NET MVC 4 Hosting :: Preventing Cross Site Scripting Attacks in ASP.NET MVC 4

clock November 8, 2013 08:14 by author Scott

A website is exposed to various types of attacks and one of the most common types of attack is what is known as Cross Site Scripting (XSS). In a cross site scripting attack, malicious markup and script is entered in the web pages that are viewed by other users. If proper care is not taken to filter this malicious piece of markup, the script gets stored in the system and also rendered on web pages. Depending on the script injected by the hacker it can cause damage ranging from annoying popups to stolen credentials to accessing data stored in cookies. Therefore, it is important for ASP.NET MVC developers to prevent these types of attacks. Luckily, ASP.NET MVC offers a helping hand in safeguarding your websites. This article discusses some of the basics involved in the process.

What is Cross Site Scripting Attack?

In order to understand what a cross site scripting attack is, let's develop a simple ASP.NET MVC website that accepts some user input. Suppose that you are developing a blog engine and users are allowed to leave comments on blog posts. The following figure shows how the comments might be accepted:

As you might have guessed, the user can enter any text in the textbox and the textarea, including HTML markup tags and script fragments! Once the form is submitted the posted data is saved in the database as shown below:

public ActionResult SaveData(FormCollection form)

{
   
BlogEntities1 db = new BlogEntities1();
   
Comment comment = new Comment();
    comment
.UserName = form["username"];
    comment
.UserComment = form["usercomment"];
    comment
.PostedOn = DateTime.Now;
    db
.Comments.Add(comment);
    db
.SaveChanges();
   
return View("Index");
}

As shown above, the form is submitted to the SaveData() action method. The SaveData() method saves the data in a SQL Server database table named Comments. So far so good. Now assume that a use enters the following text in the comments textarea:

<h1>Hello   World!</h1>
<script>
alert('Cross   site scripting attack!');
</script>  

When such a user posts the above content it gets saved in the database. Later when this saved content is rendered on a web page it executes the script!

What the above example illustrates is a very mild version of a cross site scripting attack. Imagine what would happen if a clever hacker loads a malicious script from some different location and stole end user cookies or loaded undesirable content. That is why it is important for you to prevent cross site scripting attacks.

Note: 
By default ASP.NET 4.5 throws an exception if potentially dangerous content is detected in the request. However, you may need to deviate from this default mechanism in certain cases. In certain legitimate cases it is perfectly acceptable for the user to submit markup. For example, a web page where a blog owner enters the content of a blog post should accept HTML tags. In such cases you can skip the default checking performed by ASP.NET. You can either set requestValidationMode in web.config or use the [ValidateInput] attribute on action methods.

Preventing Cross Site Scripting Attacks

Most of the cross site scripting attacks can be prevented if you encode all the user input properly. You need to ensure that strings are encoded properly at two distinct places as far as ASP.NET MVC applications are concerned:

- Views
- Controllers or classes

In order to encode strings in views you can use the Html.Encode() method as shown below:

<%= Html.Encode(c.UserComment) %>

As you can see the view that displays the user comment now encodes the comment using the Html.Encode() method; this way all of the special characters such as <, > and & are encoded properly. For example, once Encode() method is in place the same malicious input by the end user is encoded and then rendered on the page as shown below:

As you can see the script is no longer executed even if the comment saved in the database contains the <script> tag. Instead the HTML markup is encoded and then displayed on the page.

There is also a shortcut to using the Html.Encode(), you can use <%: and %> block instead of <%= and %>. The following code shows how:

<%: c.UserComment %>

The <%: and %> block HTML encodes the string and then emits on the page.

The above code takes care of displaying content on the page by HTML encoding it. Here the encoding happens at the View level but the database still contains the malicious markup and script. Wouldn't it be nice if you HTML encode the content before saving it into the database? You can do so in your controllers or other classes using the Server.HtmlEncode() method.

comment.UserComment   = Server.HtmlEncode(form["usercomment"]);
...
db.SaveChanges();
...

As you can see the HtmlEncode() method of Server object accepts the raw string and returns an HTML encoded version of the same. The database now stores the HTML encoded version of the comments rather than the raw version. If you need to decode the HTML encoded version back you can use Server.HtmlDecode() method.

In addition to the HTML output displayed on a web page, you may also consider encoding attributes and URLs. Encoding attribute values is important if you are dynamically changing them based on user input. For example, you might be accepting a user's website URL and then setting the href attribute of an anchor tag dynamically. In such cases it is better to encode attribute values using the Html.AttributeEncode() method. On the same lines you can encode URL values using the  Url.Encode() method.

Using AntiXssEncoder to Encode Strings

The techniques to prevent cross site scripting attacks that we covered so far are traditional techniques that have roots in the core ASP.NET framework. In some cases where security is extremely important you may want to use an even more secure technique of encoding. Luckily, System.Web.Security.AntiXss namespace provides a class - AntiXssEncoder - that can be used to encode HTML content and attribute values. The major difference between the default encoder used by ASP.NET and the AntiXssEncoder class is that the former uses a blacklist of a set of prohibited characters whereas the later uses a whitelist of a set of allowed characters making it more secure.

The following code shows how AntiXssEncoder class can be used in a controller:

public   ActionResult SaveData(FormCollection form)
{
     BlogEntities1 db = new BlogEntities1();
     Comment comment = new Comment();
 comment.UserName   = AntiXssEncoder.HtmlEncode(form["username"], false);   comment.UserComment =   AntiXssEncoder.HtmlEncode(form["usercomment"], false);    comment.PostedOn =   DateTime.Now;
     db.Comments.Add(comment);
     db.SaveChanges();
     return View("Index");
}

As you can see, AntiXssEncoder class has static methods such as HtmlEncode() and HtmlAttributeEncode() that can be used to encode form data.

By default, methods such as Server.HtmlEncode() use the HttpEncoder class for performing the encoding. You can override this default with the AntiXssEncoder class by adding the following markup in the web.config file:

<httpRuntime encoderType="System.Web.Security.AntiXss.AntiXssEncoder" />

As shown above, the encoderType attribute of the <httpRuntime> tag is set to System.Web.Security.AntiXss.AntiXssEncoder so that the default encoder class is now set to AntiXssEncoder.


European ASP.NET MVC 4 Hosting - Amsterdam :: ValidateInput and AllowHtml attribute in MVC4

clock October 28, 2013 09:43 by author Scott

Sometimes, your required to save Html data in the database. By default Asp.Net MVC doesn't allow a user to submit html for avoiding Cross Site Scripting attack to your application. Suppose you have below form and you can submit the Html in description textarea.

If you do this and try to submit it you will get the error below

However, if you want to do this, you can achieve it by using ValidateInput attribute and AllowHtml attribute.

ValidateInput Attribute

This is the simple way to allow the submission of HTML. This attribute can enable or disable input validation at the controller level or at any action method.

ValidateInput at Controller Level

[ValidateInput(false)]
public class HomeController : Controller
{
public ActionResult AddArticle()
{
return View();
}

[HttpPost]
public ActionResult AddArticle(BlogModel blog)
{
if (ModelState.IsValid)
{

}
return View();
}
}

Now, the user can submit Html for this Controller successfully.

ValidateInput at Action Method Level

public class HomeController : Controller
{
public ActionResult AddArticle()
{
return View();
}

[ValidateInput(false)]
[HttpPost]
public ActionResult AddArticle(BlogModel blog)
{
if (ModelState.IsValid)
{

}
return View();
}
}

Now, the user can submit Html for this action method successfully.

Limitation of ValidateInput attribute

This attribute also has the issue since this allow the Html input for all the properties and that is unsafe. Since you have enable Html input for only one-two properties then how to do this. To allow Html input for a single property, you should useAllowHtml attribute.

AllowHtml Attribute

This is the best way to allow the submission of HTML for a particular property. This attribute will be added to the property of a model to bypass input validation for that property only. This explicit declaration is more secure than the ValidateInput attribute.

using System.ComponentModel.DataAnnotations;
using System.Web.Mvc; 

public class BlogModel
{
[Required]
[Display(Name = "Title")]
public string Title { get; set; } 

[AllowHtml]
[Required]
[Display(Name = "Description")]
public string Description{ get; set; } 

}

Make sure, you have removed the ValidateInput attribute from Conroller or Action method. Now, the user can submit Html only for the Description property successfully.


European ASP.NET MVC Hosting - Amsterdam :: Example Routing in ASP.NET MVC

clock October 18, 2013 12:32 by author Scott

Basically, Routing is a pattern matching system that monitor the incoming request and figure out what to do with that request. At runtime, Routing engine use the Route table for matching the incoming request's URL pattern against the URL patterns defined in the Route table. You can register one or more URL patterns to the Route table at Application_Start event.

How to defining route...

    public static void RegisterRoutes(RouteCollection routes)
    {
    routes.MapRoute(
    "Default", // Route name
    "{controller}/{action}/{id}", // Route Pattern
    new { controller = "Home", action = "Index", id = UrlParameter.Optional } // Default values for above defined parameters
    );
    }    

    protected void Application_Start()
    {
    RegisterRoutes(RouteTable.Routes);
    //To:DO
    }

When the routing engine finds a match in the route table for the incoming request's URL, it forwards the request to the appropriate controller and action. If there is no match in the route table for the incoming request's URL, it returns a 404 HTTP status code.

Note

Always remeber route name should be unique across the entire application. Route name cann't be duplicate.

How it works...

In above example we have defined the Route Pattern {controller}/{action}/{id} and also provide the default values for controller,action and id parameters. Default values means if you will not provide the values for controller or action or id defined in the pattern then these values will be serve by the routing system.

Suppose your webapplication is running on www.example.com then the url pattren for you application will be www.example.com/{controller}/{action}/{id}. Hence you need to provide the controller name followed by action name and id if it is required. If you will not provide any of the value then default values of these parameters will be provided by the routing system.

Difference between Routing and URL Rewriting

Many developers compares routing to URL rewritting that is wrong. Since both the approaches are very much different. Moreover, both the approaches can be used to make SEO friendly URLs. Below is the main difference between these two approaches.

  • URL rewriting is focused on mapping one URL (new url) to another URL (old url) while routing is focused on mapping a URL to a resource.
  • Actually, URL rewriting rewrites your old url to new one while routing never rewrite your old url to new one but it map to the original route.


Press Release - Premier European HostForLIFE.eu Proudly Announces FREE Trial Windows ASP.NET Hosting

clock October 8, 2013 12:33 by author Scott

European Windows and ASP.NET hosting specialist, HostForLIFE.eu, has officially launched FREE trial web hosting package. This free trial is offered for the next 14 days and at anytime, the customers can always cancel anytime. This FREE trial packages combine generous or unlimited web space, unlimited bandwith, unlimited email accounts, 1 MSSQL database, 1 MySQL database. There is also the ability to host multiple websites in this package. As the market for hosted solutions continues to grow, the new hosting range is designed to exceed the growing technical demands of businesses and IT professionals.

HostForLIFE.eu continues to invest heavily in developing powerful and resilient Business web hosting packages. The new range scales to accommodate a wide range of business needs including ecommerce and multiple websites. The range comprises of Classic Package, which is priced €3.00/month. The Budget Package is priced at €5.50/month. There is Economy package which is priced €8.00/month, this is the most favourite package and it is designed for Portal/Business site. And then Business Package is priced at €11.00/month. Furthermore, the Business Package delivers HostForLIFE’s most powerful shared hosting feature set to date, and is optimized for hosting multiple and business websites.

Every day thousands of people decide to set up a website for business or personal use. New business owners and the average consumer don't always have access to unlimited budgets. HostForLIFE.eu understand the importance of reliable hosting but are not always prepared to pay the exorbitant prices that reliable hosts charge.

“We believe that all customers should be given a free trial before buying into a service and with such approach, customers are confident that the product / service that they choose is not faulty or wrong.” Said John Curtis, VP Marketing and Business Development at HostForLIFE.eu. “With this free trial hosting, we want our customers to test drive our quality services. We believe that our web hosting platform and customer support are up there with the best and our commitment to give the best for our customers.”

HostForLIFE.eu is awarded Top No#1 SPOTLIGHT Recommended Hosting Partner by Microsoft (see www.microsoft.com/web/hosting/HostingProvider/Details/953). HostForLIFE.eu services is ranked the highest top #1 spot in several European countries, such as: Germany, Italy, Netherlands, France, Belgium, United Kingdom, Sweden, Finland, Switzerland and other European countries. Besides this award, HostForLIFE.eu has also won several awards from reputable organizations in the hosting industry and the detail can be found on HostForLIFE.eu official website.

For more information about this FREE trial package offered by HostForLIFE.eu, please visit http://www.hostforlife.eu

About HostForLIFE.eu:

HostForLIFE.eu is European Windows Hosting Provider which focuses on Windows Platform only. HostForLIFE.eu deliver on-demand hosting solutions including Shared hosting, Reseller Hosting, Cloud Hosting, Dedicated Servers, and IT as a Service for companies of all sizes.

HostForLIFE.eu number one goal is constant uptime. HostForLIFE.eu data center uses cutting edge technology, processes, and equipment. HostForLIFE.eu has one of the best up time reputations in the industry.

HostForLIFE.eu second goal is providing excellent customer service. HostForLIFE.eu technical management structure is headed by professionals who have been in the industry since it's inception. HostForLIFE.eu has customers from around the globe, spread across every continent. HostForLIFE.eu serves the hosting needs of the business and professional, government and nonprofit, entertainment and personal use market segments.   


European ASP.NET MVC 3 Hosting - Amsterdam :: It is an error to use a section registered as allowDefinition='MachineToApplication' beyond application level. This error can be caused by a virtual directory not being configured as an application in IIS.

clock September 18, 2013 09:14 by author Scott

I write this blog post as I saw many people get this error message when deployed their MVC 3 application:

Error 1 It is an error to use a section registered as allowDefinition='MachineToApplication' beyond application level. This error can be caused by a virtual directory not being configured as an application in IIS.

You can find the resource error on http://stackoverflow.com/questions/5161511/mvc3-strange-error-after-switching-on-compilation-of-views or forums.asp.net.

Its always a good idea to compile your Razor views. The reason being that errors within a view file are not detected until run time.

To let you detect these errors at compile time, ASP.NET MVC projects now include an MvcBuildViews property, which is disabled by default. To enable this property, open the project file and set the MvcBuildViews property to true, as shown in the following example:

After enabling MvcBuildViews you may find that error above.

Turns out that this problem occurs when there is web project output (templated web.config or temporary publish files) in the obj folder. The ASP.NET compiler used isn't smart enough to ignore stuff in the obj folder, so it throws errors instead.

The fix was a modification to the MVC Project File as shown below:

Under the <Target Name="MvcBuildViews" AfterTargets="AfterBuild" Condition="'$(MvcBuildViews)'=='true'"> node, add the following :

<ItemGroup>


  <ExtraWebConfigs Include="$(BaseIntermediateOutputPath)\**\web.config" />

  <ExtraPackageTmp Include="$([System.IO.Directory]::GetDirectories(&quot;$(BaseIntermediateOutputPath)&quot;, &quot;PackageTmp&quot;, System.IO.SearchOption.AllDirectories))" />

</ItemGroup>
<Delete Files="@(ExtraWebConfigs)" />
<RemoveDir Directories="@(ExtraPackageTmp)" />

Hope this helps!


European ASP.NET MVC 4 Hosting - Amsterdam :: Asynchronous Controllers in ASP.NET MVC 4

clock September 6, 2013 12:01 by author Scott

One of the most important features of ASP.NET MVC 4 is the introduction of the new ASP.NET Web API, which simplifies REST programming with a strongly typed HTTP object model. In addition, ASP.NET MVC 4 takes advantage of the new asynchronous programming model introduced with .NET Framework 4.5 to allow developers to write asynchronous action methods. It is important to understand the advantages and disadvantages of the new asynchronous methods to use them whenever they will provide a benefit.

(ASP.NET MVC 4 also includes many enhancements focused on mobile development, such as jQuery Mobile support and selecting views based on which mobile browser makes requests. If you work with previous ASP.NET MVC versions and you target multiple mobile devices, the new display modes are worth moving to ASP.NET MVC 4. In addition, the bundling and minification framework makes it simpler to reduce HTTP requests for each page without having to use third-party tools.)

Asynchronous controllers ASP.NET MVC 4

Asynchronous execution is the future of Windows development : it has been largely demonstrated during the //Build conference two weeks ago.

In previous versions of ASP.NET MVC it was possible to create asynchronous controllers by inheriting the AsyncController class and using some conventions :

- MyActionAsync : method that returns void and launches an asynchronous process
- MyActionCompleted : method that returns an ActionResult (the result of the MVC action “MyAction”, in this case)

To allow the MVC engine to manage asynchronous operations and pass the result to the view engine, developers had to use the propery AsyncManager of the AsyncController. The “completed” method parameters was passed by the MVC engine through this object.

For example, the controller that is defined bellow allows to get a Json-serialized list of movies – asynchronously – from an OData service :

public class MoviesController : AsyncController
{
    public ActionResult Index()
    {
        return View();
    } 

    public void GetJsonMoviesAsync(int? page)
    {
        const int pageSize = 20;
        int skip = pageSize * ((page ?? 1) - 1);
        string url = string.Format("http://odata.netflix.com/[…]&$skip={0}&$top={1}",
            skip, pageSize); 

        //the asynchronous operation is declared
        AsyncManager.OutstandingOperations.Increment(); 

        var webClient = new WebClient();
        webClient.DownloadStringCompleted += OnWebClientDownloadStringCompleted;
        webClient.DownloadStringAsync(new Uri(url));//the asynchronous process is launched
    } 

    private void OnWebClientDownloadStringCompleted(object sender,
        DownloadStringCompletedEventArgs e)
    {
        //the asynchronous process ends
        //"movies" result is added to the parameters of the AsyncManager
        //NB : it's the name of the parameter that is take by the
        //GetJsonMoviesCompleted method
        List<Movie> movies = null;
        if (AsyncManager.Parameters.ContainsKey("movies"))
        {
            movies = (List<Movie>)AsyncManager.Parameters["movies"];
            movies.Clear();
        }
        else
        {
            movies = new List<Movie>();
            AsyncManager.Parameters["movies"] = movies;
        } 

        movies.AddRange(Movie.FromXml(e.Result)); 

        //the ends of the asynchronous operation (launches the call of "Action"Completed)
        AsyncManager.OutstandingOperations.Decrement();
    } 

    public ActionResult GetJsonMoviesCompleted(List<Movie> movies)
    {
        //on retourne le résultat Json
        return Json(movies, JsonRequestBehavior.AllowGet);
    }
}

It’s not really complicated to create an asynchronous controller but ASP.NET MVC 4 and C# 5 with the new async and await keywords will make it easier !

public class MoviesController : AsyncController
{
    public ActionResult Index()
    {
        return View();
    } 

    public async Task<ActionResult> GetJsonMovies(int? page)
    {
        const int pageSize = 20;
        int skip = pageSize * ((page ?? 1) - 1);
        string.Format("http://odata.netflix.com/[…]&$skip={0}&$top={1}",
                    skip, pageSize); 

        var webClient = new WebClient();
        string xmlResult = await webClient.DownloadStringTaskAsync(url);
        return Json(Movie.FromXml(xmlResult), JsonRequestBehavior.AllowGet);
    }
}

As you can see in the previous code snippet, in ASP.NET MVC 4 you always should inherits from AsyncController but there is no more naming conventions, no more Async/Completed methods, no more AsyncManager and the action returns a Task instead of an ActionResult !


About HostForLIFE

HostForLIFE is European Windows Hosting Provider which focuses on Windows Platform only. We deliver on-demand hosting solutions including Shared hosting, Reseller Hosting, Cloud Hosting, Dedicated Servers, and IT as a Service for companies of all sizes.

We have offered the latest Windows 2019 Hosting, ASP.NET 5 Hosting, ASP.NET MVC 6 Hosting and SQL 2019 Hosting.


Month List

Tag cloud

Sign in