This article tells how to create a parent / child tree view in ASP.NET MVC using Bootstrap and jQuery. It is a practical approach so you can create an example in which you will create a parent object. The parent object will have associated child objects.

Step 1
You will create two classes, one is AuthorViewModel and another is BookViewModel. AuthorViewModel is the main class that has an association with the BookViewModel class. In other words each AuthorViewModel class object has a list of BookViewModel class objects. The following is the code snippet for the BookViewModel class.
namespace TreeView.Models
{
public class BookViewModel
{
public long Id
{
get;
set;
}
public string Title
{
get;
set;
}
public bool IsWritten
{
get;
set;
}
}
}
The following is the code snippet for the AuthorViewModel class:
using System.Collections.Generic;
namespace TreeView.Models {
public class AuthorViewModel
{
public AuthorViewModel()
{
BookViewModel = new List < BookViewModel > ();
}
public int Id
{
get;
set;
}
public string Name
{
get;
set;
}
public bool IsAuthor
{
get;
set;
}
public IList < BookViewModel > BookViewModel
{
get;
set;
}
}
}
Step 2
Now, create a controller “HomeController” that has two action methods for both GET and POST requests. The action method's name is “Index”. The Get request action method returns a tree view in the UI whereas the POST request method gets the posted data from the UI. The following is the code snippet for HomeController.
using System.Collections.Generic;
using System.Linq;
using System.Web.Mvc;
using TreeView.Models;
namespace TreeView.Controllers
{
public class HomeController : Controller
{
[HttpGet]
public ActionResult Index()
{
List<AuthorViewModel> model = new List<AuthorViewModel>();
AuthorViewModel firstAuthor = new AuthorViewModel
{
Id = 1,
Name = "John",
BookViewModel = new List<BookViewModel>{
new BookViewModel{
Id=1,
Title = "JQuery",
IsWritten = false
}, new BookViewModel{
Id=1,
Title = "JavaScript",
IsWritten = false
}
}
};
AuthorViewModel secondAuthor = new AuthorViewModel
{
Id = 2,
Name = "Deo",
BookViewModel = new List<BookViewModel>{
new BookViewModel{
Id=3,
Title = "C#",
IsWritten = false
}, new BookViewModel{
Id=4,
Title = "Entity Framework",
IsWritten = false
}
}
};
model.Add(firstAuthor);
model.Add(secondAuthor);
return View("Index", model);
}
[HttpPost]
public ActionResult Index(List<AuthorViewModel> model)
{
List<AuthorViewModel> selectedAuthors = model.Where(a => a.IsAuthor).ToList();
List<BookViewModel> selectedBooks = model.Where(a => a.IsAuthor)
.SelectMany(a => a.BookViewModel.Where(b => b.IsWritten)).ToList();
return View();
}
}
The preceding code shows how books are associated with an author in the GET action method and how to get a selected tree node (authors and books) in the POST request.
Step 3
Bootstrap CSS is already added to the application but we write a new custom CSS for the tree view design. The following is the code snippet for the tree CSS.
.tree li {
margin: 0px 0;
list-style-type: none;
position: relative;
padding: 20px 5px 0px 5px;
}
.tree li::before{
content: '';
position: absolute;
top: 0;
width: 1px;
height: 100%;
right: auto;
left: -20px;
border-left: 1px solid #ccc;
bottom: 50px;
}
.tree li::after{
content: '';
position: absolute;
top: 30px;
width: 25px;
height: 20px;
right: auto;
left: -20px;
border-top: 1px solid #ccc;
}
.tree li a{
display: inline-block;
border: 1px solid #ccc;
padding: 5px 10px;
text-decoration: none;
color: #666;
font-family: 'Open Sans',sans-serif;
font-size: 14px;
font-weight :600;
border-radius: 5px;
-webkit-border-radius: 5px;
-moz-border-radius: 5px;
}
/*Remove connectors before root*/
.tree > ul > li::before, .tree > ul > li::after{
border: 0;
}
/*Remove connectors after last child*/
.tree li:last-child::before{
height: 30px;
}
/*Time for some hover effects*/
/*We will apply the hover effect the the lineage of the element also*/
.tree li a:hover, .tree li a:hover+ul li a {
background: #dd4814; color: #ffffff; border: 1px solid #dd4814;
}
/*Connector styles on hover*/
.tree li a:hover+ul li::after,
.tree li a:hover+ul li::before,
.tree li a:hover+ul::before,
.tree li a:hover+ul ul::before{
border-color: #dd4814;
}
.tree-checkbox{
margin :4px !important;
}
.tree:before {
border-left: 1px solid #ccc;
bottom: 16px;
content: "";
display: block;
left: 0;
position: absolute;
top: -21px;
width: 1px;
z-index: 1;
}
.tree ul:after {
border-top: 1px solid #ccc;
content: "";
height: 20px;
left: -29px;
position: absolute;
right: auto;
top: 37px;
width: 34px;
}
*:before, *:after {
box-sizing: border-box;
}
*:before, *:after {
box-sizing: border-box;
}
.tree {
overflow: auto;
padding-left: 0px;
position: relative;
}
Step 4
Now, create an Index view that renders in the browser and shows the tree view for the author and book. The following is the code snippet for the Index view.
@model List
<TreeView.Models.AuthorViewModel>
@section head{
@Styles.Render("~/Content/css/tree.css")
}
<div class="panel panel-primary">
<div class="panel-heading panel-head">Author Book Tree View</div>
<div id="frm-author" class="panel-body">
@using (Html.BeginForm())
{
<div class="tree">
@for (int i = 0; i < Model.Count(); i++)
{
<ul>
<li>
<a href="#">
@Html.CheckBoxFor(model => model[i].IsAuthor, new { @class = "tree-checkbox parent", @id = @Model[i].Id })
<label for=@i>
<strong>Author:</strong>
@Html.DisplayFor(model => model[i].Name)
</label>
</a>
<ul>
@for (int j = 0; j < Model[i].BookViewModel.Count(); j++)
{
int k = 1 + j;
@Html.HiddenFor(model => model[i].BookViewModel[j].Id)
<li>
<a href="#">
@Html.CheckBoxFor(model => model[i].BookViewModel[j].IsWritten, new { @class = "tree-checkbox node-item", @iid = i + "" + j })
<label for=@i@j>
<strong>Book @(k):</strong> @Html.DisplayFor(model => model[i].BookViewModel[j].Title)
</label>
</a>
</li>
}
</ul>
</li>
</ul>
}
</div>
<div class="form-group">
<div class="col-lg-9"></div>
<div class="col-lg-3">
<button class="btn btn-success" id="btnSubmit" type="submit">
Submit
</button>
</div>
</div>
}
</div>
</div>
@section scripts{
@Scripts.Render("~/Scripts/tree.js")
}
Step 5
Thereafter, you can create the JavaScript file tree.js with the following code:
(function($)
{
function Tree() {
var $this = this;
function treeNodeClick()
{
$(document).on('click', '.tree li a input[type="checkbox"]', function() {
$(this).closest('li').find('ul input[type="checkbox"]').prop('checked', $(this).is(':checked'));
}).on('click', '.node-item', function() {
var parentNode = $(this).parents('.tree ul');
if ($(this).is(':checked')) {
parentNode.find('li a .parent').prop('checked', true);
} else {
var elements = parentNode.find('ul input[type="checkbox"]:checked');
if (elements.length == 0) {
parentNode.find('li a .parent').prop('checked', false);
}
}
});
};
$this.init = function() {
treeNodeClick();
}
}
$(function() {
var self = new Tree();
self.init();
})
}(jQuery))
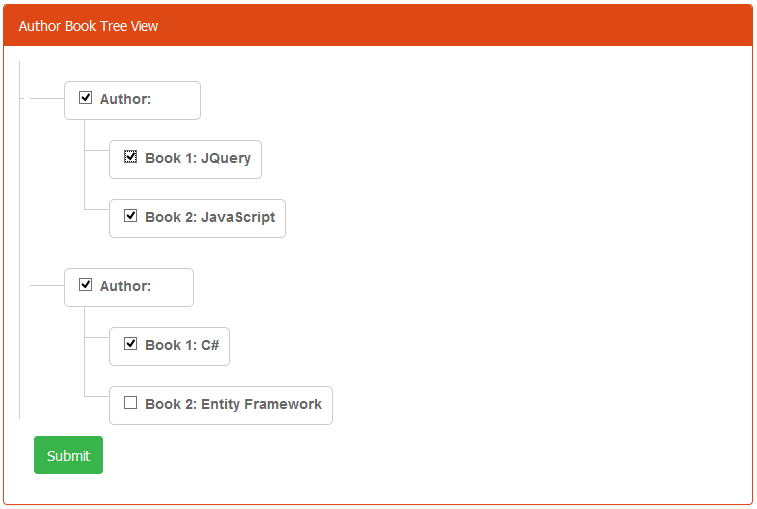
Output
This figure shows the parent child (author-book) tree view:
HostForLIFE.eu ASP.NET MVC 6 Hosting
HostForLIFE.eu is European Windows Hosting Provider which focuses on Windows Platform only. We deliver on-demand hosting solutions including Shared hosting, Reseller Hosting, Cloud Hosting, Dedicated Servers, and IT as a Service for companies of all sizes. We have customers from around the globe, spread across every continent. We serve the hosting needs of the business and professional, government and nonprofit, entertainment and personal use market segments.
