This article is about Entity Framework with .Net Core MVC, Code-First approach. Entity Framework with .Net MVC, Code-First, they have a lot of similar features. We try to emphasize the differences.

At the end, we will have an .Net Core MVC app that can consume a database directly through entity framework.
Step 1 - Create an ASP.NET Core MVC app
We use the current version of Visual Studio 2019 16.9.3 and .NET Core 5.0 to build the app:
Start Visual Studio and select Create a new project.
In the Create a new project dialog, select ASP.NET Core Web App (Model-View-Controller) > Next.
In the Configure your new project dialog, enter MvcMovie for Project name > Next.
In the Additional Information dialog, select .NET 5.0 in the target framework dropdowns > Create
Note
For beginners, you may reference here.
We use the same project name as article (1), to keep it consistent.
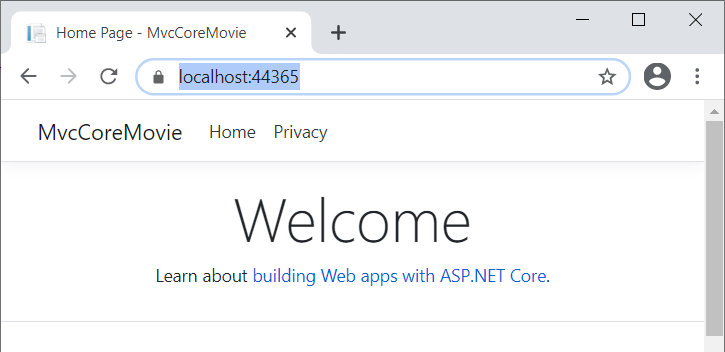
Build and run the app, you will see the following image shows the app,
Step 2: Add a Data Model
Add a data model, an entity class, into the app, with name as Movie:
In Solution Explorer, right click the Models folder, > Add,
In the Add New item dialog, Select Class, Enter the class name Movie > Add.
Add the following five properties to the Movie class:
using System;
namespace MvcMovie.Models
{
public class Movie
{
public int ID { get; set; }
public string Title { get; set; }
public DateTime ReleaseDate { get; set; }
public string Genre { get; set; }
public decimal Price { get; set; }
}
}
Step 3: Set up DbContext
Add another class for DbContext name as MvcMovieContext (Note: the content is different from one of MVC):
using Microsoft.EntityFrameworkCore;
namespace MvcMovie.Models
{
public partial class MovieCoreDBContext : DbContext
{
public MovieCoreDBContext()
{ }
public MovieCoreDBContext(DbContextOptions<MovieCoreDBContext> options)
: base(options)
{ }
public virtual DbSet<Movie> Movies { get; set; }
}
}
In order to use Microsoft.EntityFrameworkCore, and the related class, you need to install it from NuGet Package Manager.
Step 4: Set up Data Connection
Add the Connection in the appsettings.json file
{
"Logging": {
"LogLevel": {
"Default": "Information",
"Microsoft": "Warning",
"Microsoft.Hosting.Lifetime": "Information"
}
},
"ConnectionStrings": {
"MovieCoreConnection": "Data Source=(LocalDb)\\MSSQLLocalDB;Initial Catalog=aspnet-MvcMovie;Integrated Security=SSPI;AttachDBFilename=|DataDirectory|\\Movies.mdf",
},
"AllowedHosts": "*"
}
Register the database connection context into Class starup.cs inside ConfigureServices,
public void ConfigureServices(IServiceCollection services)
{
services.AddDbContext<MovieCoreDBContext>(options =>
options.UseSqlServer(Configuration.GetConnectionString("MvcCoreMovieContext")));
......
}
In order to use the middleware UseSqlServer, you need to install Microsoft.EntityFrameworkCore.SqlServer from NuGet Package Manager.
Note
In .Net Framework MVC, you don't actually need to add connection string, Entity Framework will create a LocalDB database in the users directory with the fully qualified name of the DbContext class. However, in .Net Core, you have to add a connection string in the appsettings.json file and have to register it in Startup file. Otherwise, it will not work.
And finally, you even have to Migrate and Update database before to make the database work, see the next step.
Step 4.5: Migrate and Update database (not necessary for .Net Framework MVC)
We add the Step 4.5 here to do the extra job. Click "Tools->NuGet Package Manager->Package Manager Console", and run the PMC command (make them in one line),
Add-Migration -Name initialMigration -Context MvcCoreMovieContext
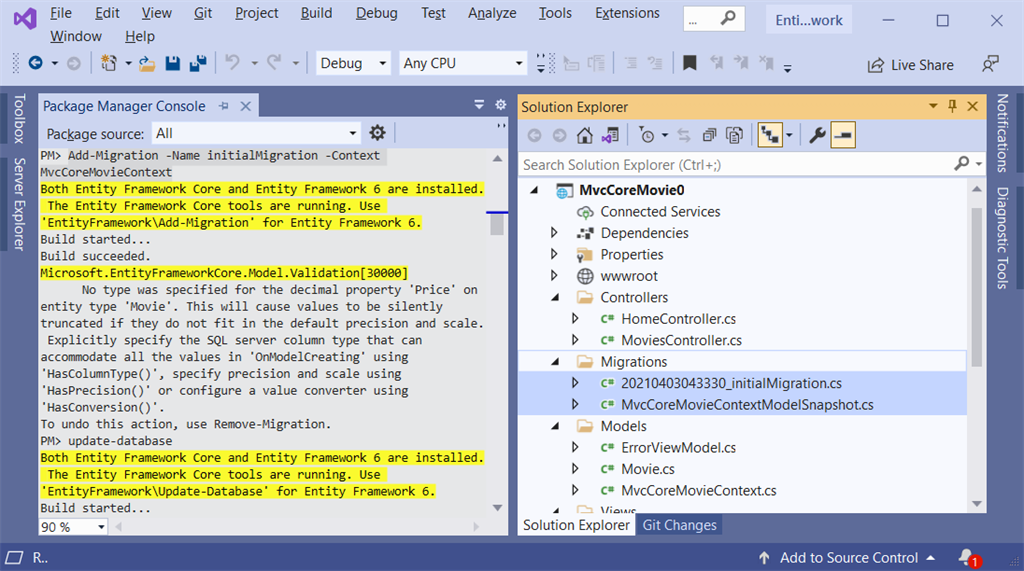
Run PMC command,
update-database
Note
her stuff from the Step 5 below will be the exactly same procedure as MVC module, we will just keep it for consistence.
Step 5: Create Controller to access data from entity framework
From Visual Studio IDE,
Right-click the Controllers folder.
Select Add > New Scaffolded Item Or Controller to open the window Add New Scaffolded Item
In the Add New Scaffold Item dialog box, click MVC 5 Controller with views, using Entity Framework, and then click Add.;
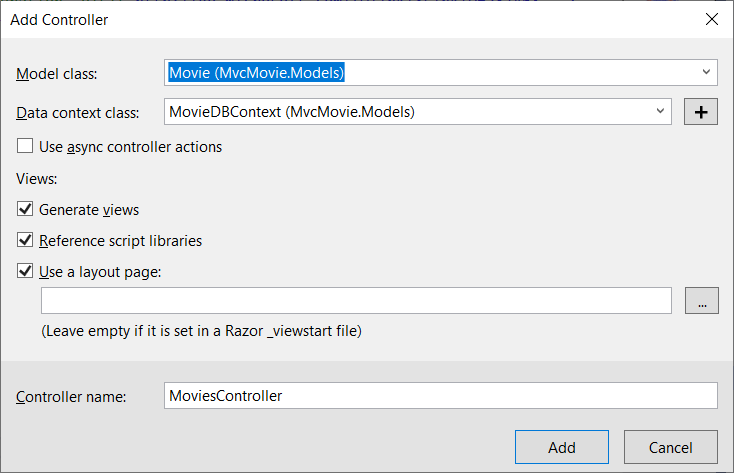
In the Add Controller dialog box,
Select Movie (MvcMovie.Models) for the Model class.
Select MovieDBContext (MvcMovie.Models) for the Data context class.
For the Controller name enter MoviesController.
Click Add.
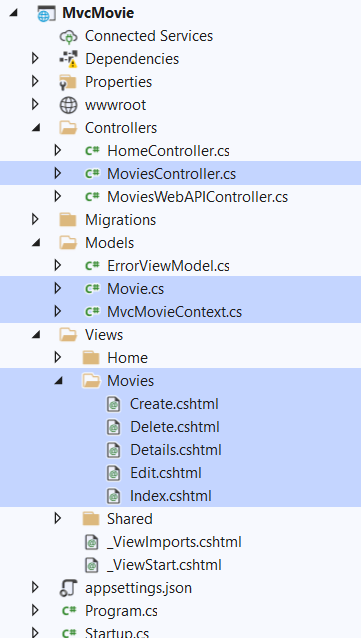
If you get an error, you probably didn't build the application before starting adding the controller.) Visual Studio creates the following files and folders:
A MoviesController.cs file in the Controllers folder.
A Views\Movies folder.
Create.cshtml, Delete.cshtml, Details.cshtml, Edit.cshtml, and Index.cshtml in the new Views\Movies folder
Visual Studio automatically created the CRUD (create, read, update, and delete) action methods and views:
Note
We will not exame the code in details, if you wanted, you may go here.
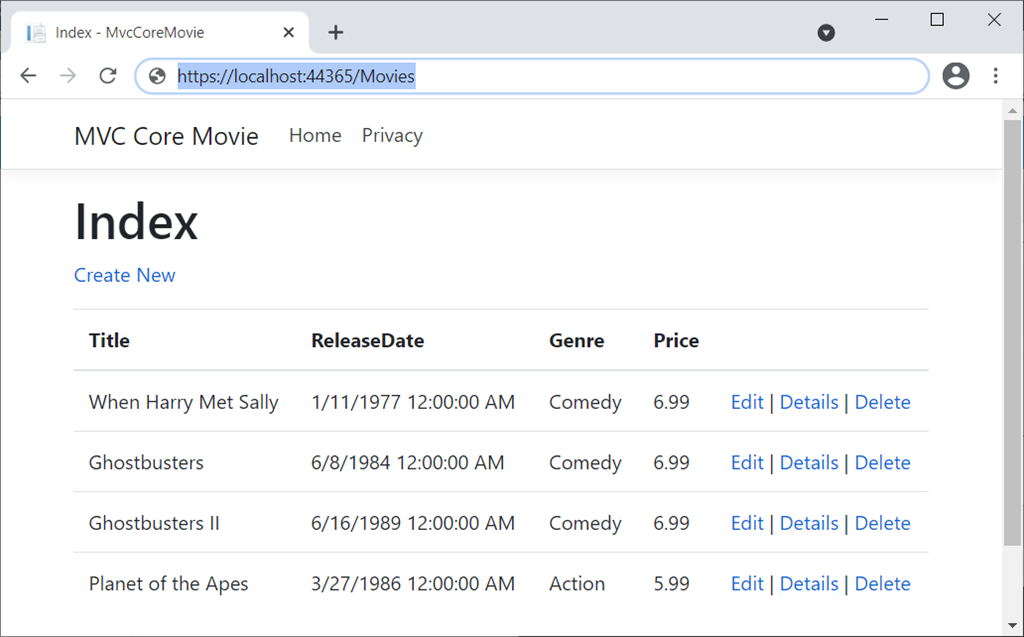
Step 6: Run the App, and Test
For convenience, you can update one line code in file Views/Shared/_Layout.chtml
<body>
<div class="navbar navbar-inverse navbar-fixed-top">
<div class="container">
<div class="navbar-header">
<button type="button" class="navbar-toggle" data-toggle="collapse" data-target=".navbar-collapse">
<span class="icon-bar"></span>
<span class="icon-bar"></span>
<span class="icon-bar"></span>
</button>
@Html.ActionLink("MVC Core Movie", "Index", "Movies", new { area = "" }, new { @class = "navbar-brand" })
</div>
<div class="navbar-collapse collapse">
<ul class="nav navbar-nav">
<li>@Html.ActionLink("Home", "Index", "Home")</li>
<li>@Html.ActionLink("About", "About", "Home")</li>
<li>@Html.ActionLink("Contact", "Contact", "Home")</li>
</ul>
</div>
</div>
</div>
......
</body>
Run the App, the final result will be: