It’s good idea to stay on the same page while performing create, update, and delete operations. There are many ways to do it such as making them partial views, using Bootstrap’s model popup, loading partial views, using AJAX etc. However, In this post, we will learn how to do it, using jQuery, Generic Repository Pattern, and Entity Framework code first migration.

Repository Pattern
Repository mediates between the domain and the data mapping layers, using a collection-like interface to access the domain objects.

Getting started,
Step 1 Create MVC Application
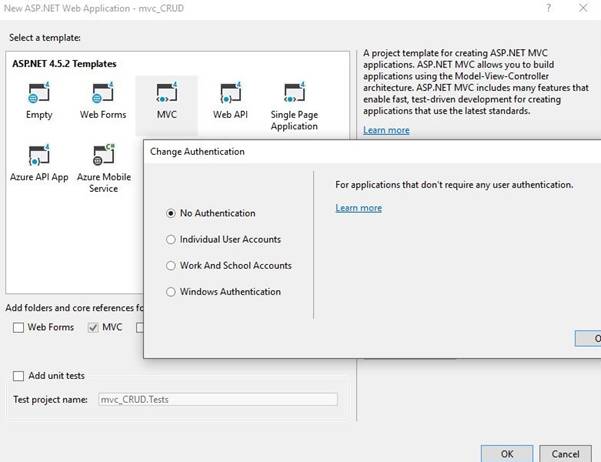
Open Visual Studio to create a new project, followed by selecting ASP.NET Web Application and name mvc_crud and click OK. In the templatesSelectMvc template and keep the authentication off.
Step 2
Install Entity Framework and fluent validation through NuGet Package.
Step 3 Add Model Class
Now, add new class under models and name it as employee class.
namespacemvc_CRUD.Models {
publicclassEmployee {
publicint Id {
get;
set;
}
publicstring Phone {
get;
set;
}
publicstringFirstName {
get;
set;
}
publicstringLastName {
get;
set;
}
publicstring Email {
get;
set;
}
publicDepartmentDepartment {
get;
set;
}
publicGenderGender {
get;
set;
}
publicboolIsActive {
get;
set;
}
}
}
publicenumDepartment {
Sales,
Management,
Security
}
publicenumGender {
Male,
Female
}
Step 4 Create validation class
Create new folder validation. Afterwards, right click on validation folder and add new class, name it EmployeeValidation.
publicclassEmployeeValidation AbstractValidator < Employee > {
publicEmployeeValidation() {
RuleFor(e => e.FirstName).NotEmpty().Length(0, 8);
RuleFor(e => e.LastName).NotEmpty().Length(0, 8);
RuleFor(e => e.Phone).Length(10).WithMessage("Enter valid number");
RuleFor(s => s.Email).NotEmpty().WithMessage("Email address is required").EmailAddress().WithMessage("A valid email is required");
}
}
Step 5 Create DbContext class
Now, let’s create a new folder, DAL. Afterwards, add new class, which is derived from DbContext and name it EmployeeContext.
publicclassEmployeeContext DbContext {
publicEmployeeContext()
base("EmployeeDB") {}
publicDbSet < Employee > Empoyees {
get;
set;
}
}
Step 6 Create Repository Interface class
Now, let’s add a new generic interface, IRepositoryunder abstract folder .
publicinterfaceIRepository < T > whereT class {
IEnumerable < T > GetAll();
TFindBy(object id);
void Add(Tobj);
void Update(Tobj);
void Delete(object id);
void Save();
}
Step 7 Create Repository Base class
Now, we are going to add an abstract class RepositoryBase, which has virtual implementation on IRepositary interface. For every other Repository, we will add later, which will inherit this abstract class by overriding the virtual methods.
publicabstractclassRepositoryBase < T > whereT class {
protectedEmployeeContext _context;
protectedDbSet < T > dbSet;
publicRepositoryBase() {
this._context = newEmployeeContext();
dbSet = _context.Set < T > ();
}
publicRepositoryBase(EmployeeContext _dataContext) {
this._context = _dataContext;
dbSet = _dataContext.Set < T > ();
}
publicvirtualIEnumerable < T > GetAll() {
returndbSet.ToList();
}
publicTFindBy(object id) {
returndbSet.Find(id);
}
publicvirtualvoid Add(Tobj) {
dbSet.Add(obj);
}
publicvirtualvoid Update(Tobj) {
dbSet.Attach(obj);
_context.Entry(obj).State = EntityState.Modified;
}
publicvirtualvoid Delete(object id) {
T existing = dbSet.Find(id);
dbSet.Remove(existing);
}
publicvirtualvoid Save() {
_context.SaveChanges();
}
}
Step 8 Create Repository class
Now, let’s create a new folder repository. Afterwards, add new class EmployeeRepository class, which will inherit from Abstract but with a generic repository base andIEmployeeRepository interface.
namespacemvc_CRUD.Repository {
publicclassEmployeeRepository RepositoryBase < Employee > , IEmployeeRepository {}
publicinterfaceIEmployeeRepository IRepository < Employee > {}
}
Step 9 Add connection string
Now, add the connection string in web.config file.
<connectionStrings>
<addname="EmployeeDB" connectionString="Data Source=.\SQLEXPRESS;InitialCatalog=EmployeeDB;Integrated Security=True;MultipleActiveResultSets=true" providerName="System.Data.SqlClient" /> </connectionStrings>
Step 10
In the packet manager console, run the commands given below.
enable-migrations
add-migration "initial-migration"
update-database -verbose
Step 11 Add Controller class
Now, let’s EditHomeController and add the code given below.
publicclassHomeController Controller {
publicreadonlyIEmployeeRepository _employeeRepository;
publicHomeController(IEmployeeRepository _employeeRepository) {
this._employeeRepository = _employeeRepository;
}
publicActionResult Index() {
varemp = _employeeRepository.GetAll();
return View(emp);
}
publicActionResult Create() {
return View();
}
[HttpPost]
publicActionResult Create(Employeeobj) {
EmployeeValidationval = newEmployeeValidation();
ValidationResult model = val.Validate(obj);
if (model.IsValid) {
_employeeRepository.Add(obj);
_employeeRepository.Save();
} else {
foreach(ValidationFailure _error inmodel.Errors) {
ModelState.AddModelError(_error.PropertyName, _error.ErrorMessage);
}
}
return View(obj);
}
// GET Employees/Edit/5
publicActionResult Update(int id) {
varemp = _employeeRepository.FindBy(id);
return View(emp);
}
[HttpPost]
[ValidateAntiForgeryToken]
publicActionResult Update(Employeeemp) {
if (ModelState.IsValid) {
_employeeRepository.Update(emp);
_employeeRepository.Save();
returnRedirectToAction("Index");
}
return View(emp);
}
// GET Employees/Delete/5
publicActionResult Delete(int id) {
varemp = _employeeRepository.FindBy(id);
return View(emp);
}
[HttpPost, ActionName("Delete")]
[ValidateAntiForgeryToken]
publicActionResultDeleteConfirmed(int id) {
_employeeRepository.Delete(id);
_employeeRepository.Save();
returnRedirectToAction("Index");
}
}
Step 12 Add Dependency Container
Before we generate views, let’s add a Dependency container. Install UnityMvc5 through NuGet Package and edit the unityConfig class in the App_Start folder.
publicstaticclassUnityConfig {
publicstaticvoidRegisterComponents() {
var container = newUnityContainer();
// register all your components with the container here
// it is NOT necessary to register your controllers
// e.g. container.RegisterType<ITestService, TestService>();
container.RegisterType < IEmployeeRepository, EmployeeRepository > ();
DependencyResolver.SetResolver(newUnityDependencyResolver(container));
}
}
Register in the global.asax file
UnityConfig.RegisterComponents();
Step 13 Add Index view
Now, let’s add Index view. Right click inside the action method and then click add view, followed by selecting the create strongly-typed view.
We will use the index to load the other pages, using jQuery but before it, lets get jqueryreveal. Here, we need the jqueryreveal.js and reveal.css files to render in the layout. Afterwards, add the create, update, and delete views.
@model IEnumerable<mvc_CRUD.Models.Employee>
@{
ViewBag.Title = "Index";
}
<div id="main_div" class="panel panel-primary"> <div class="panel-heading">Employee List</div>
<div class="panel-body">
<div class="col-md-6"><a href="#" data-reveal-id="Create" class="CreateBtn"><i class="glyphicon glyphicon-file">Add</i></a><br /> </div>
<div class="table table-responsive">
<table class="table table-striped table-condensed flip-content">
<thead class="flip-content">
<tr>
<th>Phone</th>
<th>First name</th>
<th>Last name</th>
<th>Email</th>
<th>Department</th>
<th>Gender</th>
<th>Is Active</th>
<th></th>
</tr>
</thead>
<tbody>
@foreach (var item in Model)
{
<tr>
<td> @Html.DisplayFor(modelItem => item.Phone) </td>
<td> @Html.DisplayFor(modelItem => item.FirstName) </td>
<td> @Html.DisplayFor(modelItem => item.LastName) </td>
<td> @Html.DisplayFor(modelItem => item.Email)</td>
<td>@Html.DisplayFor(modelItem => item.Department) </td>
<td> @Html.DisplayFor(modelItem => item.Gender) </td>
<td> @Html.DisplayFor(modelItem => item.IsActive)</td>
<td>
<a href="#" id="@item.Id" data-reveal-id="Update" class="UpdateBtn"><i class="glyphicon glyphicon-edit"></i</a>
<a href="#" id="@item.Id" data-reveal-id="Delete" class="DeleteBtn"><i class="glyphicon glyphicon-remove"></i></a>
</td>
</tr>
}
</tbody>
</table>
</div>
</div>
</div>
<div id="Update" class="reveal-modal"></div>
<div id="Delete" class="reveal-modal"></div>
<a href="#" id="Create" class="reveal-modal"></a>
Add the following jQuery in the script section at the bottom of the index view to load other views.
@section Scripts{
<script type="text/javascript">
$(document).ready(function () {
$('.UpdateBtn').click(function () {
var url = '@Url.Action("Update","Home")';
url = url + "?Id=" + this.id;
$('#Update').load(url);
});
});
</script>
<script type="text/javascript">
$(document).ready(function () {
$('.DeleteBtn').click(function () {
var url = '@Url.Action("Delete","Home")';
url = url + "?Id=" + this.id;
$('#Delete').load(url);
});
});
</script>
<script type="text/javascript">
$(document).ready(function () {
$('.CreateBtn').click(function () {
var url = '@Url.Action("Create","Home")';
$('#Create').load(url);
});
});
</script>
}
Step 14
Now, run the application.

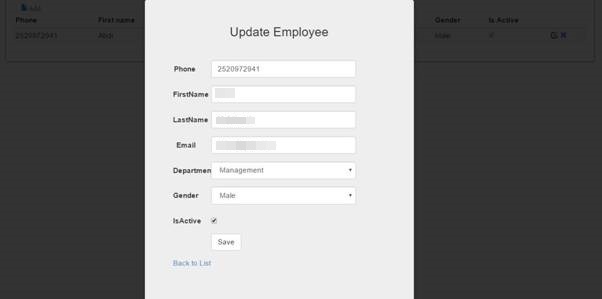
Update view
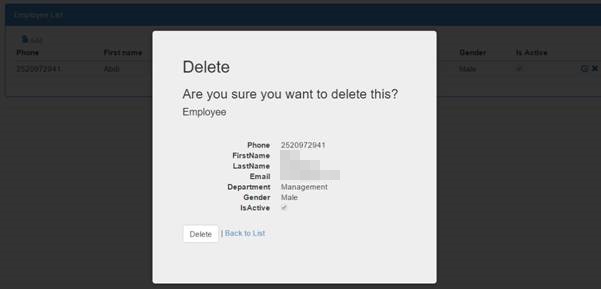
Delete view
Thank you so much for your reading. I hope the article is useful for all the readers. If you have any complaint or suggestion about the code or the article, please let me know. Don't forget to leave your opinion in the comments section bellow.