What's a Tag Helper?
It's a set of code that allows you to no longer have to use Razor helpers to build your cshtml forms. What this means is that when you had to write this:
@Html.ActionLink("Add a Movie", "Add", "Movie")
You can now write this:
<a asp-action="Add" asp-controller="Movie">Add a Movie</a>
Because of this, you can now write views that look like HTML rather than an unwieldy mix of HTML and C#.
The Completed Form
I like to show the results first. Here's the view model we will be using:
public class AddMovieVM
{
[Required(ErrorMessage = "Please enter a title for this movie.")]
[Display(Name = "Title:")]
public string Title { get; set; }
[Required(ErrorMessage = "Please select a release date for this movie.")]
[Display(Name = "Release Date:")]
public DateTime ReleaseDate { get; set; }
[Required(ErrorMessage = "Please enter a running time for this movie")]
[Range(1, 1000, ErrorMessage = "The running time must be between 1 and 1000 minutes.")]
[Display(Name = "Running Time:")]
public int RunningTime { get; set; }
[Display(Name = "Description:")]
public string Description { get; set; }
[Display(Name = "Genre:")]
public int SelectedGenre { get; set; }
public List<SelectListItem> AllGenres { get; set; }
}
Now, if we were using HTML Helpers, our corresponding Add view might look like this:
@model MoreTagHelpers.ViewModels.AddMovieVM
<h2>Add a Movie</h2>
@Html.ActionLink("Back to Movies", "Add", "Movie")
@using (Html.BeginForm("Add", "Movie"))
{
<div>
<div>
@Html.LabelFor(x=>x.Title)
@Html.TextBoxFor(x=>x.Title)
@Html.ValidationMessageFor(x=>x.Title)
</div>
<div>
@Html.LabelFor(x => x.ReleaseDate)
@Html.TextBoxFor(x => x.ReleaseDate, new { @type = "date" })
@Html.ValidationMessageFor(x => x.ReleaseDate)
</div>
<div>
@Html.LabelFor(x => x.RunningTime)
@Html.TextBoxFor(x => x.RunningTime, new { @type = "number" })
@Html.ValidationMessageFor(x => x.RunningTime)
</div>
<div>
@Html.LabelFor(x => x.Description)
@Html.TextAreaFor(x => x.Description)
@Html.ValidationMessageFor(x => x.Description)
</div>
<div>
@Html.LabelFor(x=>x.SelectedGenre)
@Html.DropDownListFor(x => x.SelectedGenre, Model.AllGenres)
@Html.ValidationMessageFor(x => x.SelectedGenre)
</div>
<div>
<input type="submit" value="Save" />
</div>
</div>
}
Now, here's that same form, using Tag Helpers.
@model MoreTagHelpers.ViewModels.AddMovieVM
<h2>Add a Movie</h2>
<a asp-action="Index" asp-controller="Movie">Back to Movies</a>
<form asp-action="Add" asp-anti-forgery="true" asp-controller="Movie">
<div>
<div>
<label asp-for="Title"></label>
<input type="text" asp-for="Title" />
<span asp-validation-for="Title"></span>
</div>
<div>
<label asp-for="ReleaseDate"></label>
<input type="date" asp-for="ReleaseDate" />
<span asp-validation-for="ReleaseDate"></span>
</div>
<div>
<label asp-for="RunningTime"></label>
<input type="number" asp-for="RunningTime" />
<span asp-validation-for="RunningTime"></span>
</div>
<div>
<label asp-for="Description"></label>
<textarea asp-for="Description"></textarea>
<span asp-validation-for="Description"></span>
</div>
<div>
<label asp-for="SelectedGenre"></label>
<select asp-for="SelectedGenre" asp-items="Model.AllGenres"></select>
<span asp-validation-for="SelectedGenre"></span>
</div>
<div>
<input type="submit" value="Save" />
</div>
</div>
</form>
HTML all the things! That second form is much cleaner than the first IMHO. But, what really makes it is that Visual Studio will highlight which HTML tags are using tag helpers:
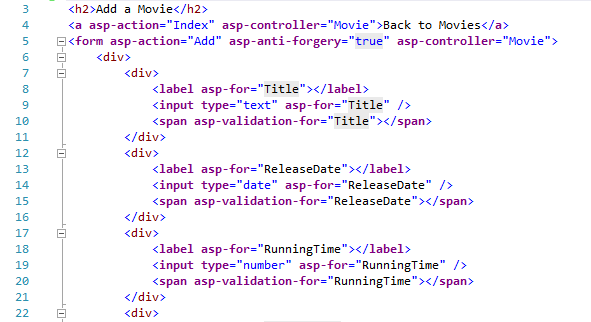
The normal HTML is highlighted regularly, and the tag helper HTML is in purple, making it really obvious which is which and hopefully negating some of the complaints I've seen about Razor being more obvious than Tag Helpers.
Let's dive into some of these helpers to see how you can use them in your ASP.NET MVC 6 projects.
Anchor Tag Helper
First, let's look at this helper:
<a asp-action="Index" asp-controller="Movie">Back to Movies</a>
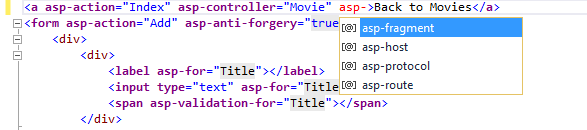
That's just an anchor tag with two tag helper attributes. Notice that each tag helper attribute begins with "asp-", and their names make intrinsic sense to us: "action" and "controller".
In the particular case of the anchor tag helper, there's a few other properties we could set, like asp-fragment, asp-route, and asp-path. Even better, Visual Studio now gives you intellisense for these attributes:
Form Tag Helper
The form tag helper looks something like this:
<form asp-action="Add" asp-anti-forgery="true" asp-controller="Movie"></form>
The properties "asp-action" and "asp-controller" are same as in the anchor tag helper, but notice the "asp-anti-forgery" property. Setting this to true is the same as using the @Html.AntiForgeryToken helper in Razor. This helper has simply made your views a little bit cleaner.
Label Tag Helper
Making your views a little bit cleaner is a theme you'll see woven into each of the tag helpers, and the next example comes with the label tag helper. Here's our example:
<label asp-for="Title"></label>
Input Tag Helper
Continuing with the simple theme:
<input type="text" asp-for="Title" />
Now there are many different kinds of input tags (e.g. date, checkbox, text, radio, etc.) and each kind had a different Razor helper. In the new tag helpers, there's just the input tag helper, with two attributes: "asp-for" and "asp-format".
TextArea Tag Helper
The text area is a separate tag in HTML. Here's the helper for it:
<textarea asp-for="Description"></textarea>
Select Tag Helper
Another tag which is different from the standard input tag is the select tag, and consequently it has a different tag helper:
<select asp-for="SelectedGenre" asp-items="Model.AllGenres"></select>
Again we see "asp-for" but now we also see the source collection specified using "asp-items." Easy. One odd thing I noticed about this is that "asp-for" doesn't require the Model. prefix, but "asp-items" does. If anybody knows why this is, I'd love to hear it.
Validation Tag Helper
The final tag helper we see on the completed form above is the one on a <span> tag. This is an unusual one, since under many circumstances you won't want to use a span tag as anything other than a <span>.
Except when what you want is a validation message. In that case, you'd use this:
<span asp-validation-for="Description"></span>
This is the time when we should show the HTML that this renders:
<span class="field-validation-valid" data-valmsg-for="SelectedGenre" data-valmsg-replace="true"></span>
But wait, that's not all! There are several other helpers we can use.
Environment Tag Helper
Here's one of those other helpers:
<environment names="Development">
...
</environment>
<environment names="Staging,Production">
...
</environment>
This helper is really interesting because the contents of the helper only get rendered if the HTML is deployed into specific environments. It does this by looking at an environment variable called ASPNET_ENV, and which you can set by right-clicking on the Project file and selecting Properties, then selecting Debug.

I'm hoping there's an easier way to change this variable in the fully-released version of Visual Studio, but until then, this is how you use it.
Link and Script Tag Helpers
These are possibly the most interesting new helpers.
<link rel="stylesheet" href="//ajax.aspnetcdn.com/ajax/bootstrap/3.0.0/css/bootstrap.min.css"
asp-fallback-href="~/lib/bootstrap/css/bootstrap.min.css" asp-fallback-test-class="hidden" asp-fallback-test-property="visibility" asp-fallback-test-value="hidden" />
<script src="//ajax.aspnetcdn.com/ajax/mvc/5.2.3/jquery.validate.unobtrusive.js" asp-fallback-src="~/lib/jquery-validation-unobtrusive/jquery.validate.unobtrusive.js" asp-fallback-test="window.jQuery"></script>
There's a lot going on here. First, notice the values in the src attribute. Those urls point to the Microsoft Ajax CDN, a new (to me, at least) content-delivery network that holds many commonly-used production CSS and JS files, particularly those produced and maintained by Microsoft. In our case, in the sample project we get the script files for jQuery, unobtrusive validation, bootstrap, and others.
But what about those "asp-fallback-src" attributes? They specify a second location that we can go grab the source files from should the first location be unavailable. In other words, we now have a fallback plan that allows our CSS and JS files to gracefully degrade over should the CDN (if we are using one) not be available. Finally, note that the fallback parameters are entirely optional.
Image Tag Helper
New in the Beta 5 release of ASP.NET is the Image Tag Helper which looks like this:
<img src="~/content/images/profile.jpg"
alt="John Smith"
asp-append-version="true" />
Notice the new asp-append-version attribute; that's the only TagHelper attribute in this tag. What that does is render an <img> with a query string attribute appended on the source URL, like this:
<img src="/content/images/profile.jpg?v=X5q6D366_nQ2fQqUso0F24gWy2ZekXjHz83KmWyaiOOk"
alt="company logo"/>
The content of the v attribute is determined by the content of the image; if the content of the image changes, so does the v attribute. This forces the browser to download the image again.
This is a technique known as cache busting; writing code that forces the browser to download a resource (in this case, an image) if that resource changes. This technique guarantees that the user will always get the most recent version of the resource.
Cache Tag Helper
The Cache tag helper is similar to the Environment tag helper in that it doesn't target a specific HTML tag. Rather, it caches its contents in server-side memory, set to an expiration date. An example might look like this:
<cache expires-after="@TimeSpan.FromMinutes(5)" vary-by-user="true">
@Html.Partial("WeatherReport")
</cache>
In this sample, the WeatherReport partial view will be cached for 5 minutes, and will vary by the user. We can do this to significantly reduce load on the server as all of these requests will be cached server-side.
What actually happens is that ASP.NET generates an ID that is unique to the context of the cached content, which allows you to have multiple <cache> on a single page and not have them interfere with one another.
There are quite a few ways to control how the cache operates. Attributes include expires-after, expires-on, expires-sliding, vary-by-user, vary-by-query, vary-by-route, etc. You can use any combination of vary-by-* attributes on a single cache tag, and doing so modifies the ID that is generated for the cache.
There's one major limitation to this tag: on the back end, it uses a construct called MemoryCache to store the cached content. MemoryCache is limited by the amount of memory available; once there's not enough memory to go around, MemoryCache will purge items until it has the memory necessary. Further, any app pool reset or server shutdown will destroy this cache. Basically, don't treat MemoryCache like a persistent storage solution, because it is not such a thing.