Members rating plays a vital role in deciding whether a product or services should be bought or not. In this article, you are going to learn how to create a star rating system in ASP.NET MVC.

Database structure
There are two small changes needed in our database for this rating system
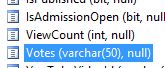
1. Add a field called "Votes" (or "Rating" whatever best suits you) in the existing database table where we are going to save other data of the post.
2. Add another database table called "VoteLog" that will save each vote details. Below are details of each field of this table.
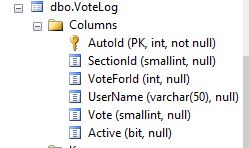
- AutoId - auto increment
- SectionId - id of different sections of the website (we might be interested in implementing this rating system in multiple sections of the website, so all rating details will be saved into this database table)
- VoteForId - unique id of the record for which member has rated
- UserName - username of the member who has rated
- Vote - rate given by a member for this post
- Active -whether this record is active and should be counted
Different status of Rating control
Status 1 - When a visitor is visiting the website

Status 2 - When a visitor has logged in (is a member of the website)

Status 3 - After rating the post

Status 4 - When a visitor had rated the post and coming back to the same post again and browser cookie is still present in visitors' machine.

Status 5 - When a visitor had voted and browser cookies are cleared and he/she tried to vote again for the same post.

Lets start to create the Star Rating system
Step 1
Create a partial view named _VoteNow.cshtml in the Views/Shared folder and copy-paste below code.
@model string
@{
var url = Request.Url.AbsolutePath;
}
@if (!User.Identity.IsAuthenticated)
{
<text>Please <a href="/Account/[email protected]" title="Login to rate">Login</a> to rate</text>
return;
}
@if (Request.Cookies[url] == null) {
<div id="ratingDiv" class="smallText"> Poor
<img src="/images/whitestar.gif" alt="" class="ratingStar" data-value="1" /><img src="/images/whitestar.gif" alt="" class="ratingStar" data-value="2" /><img src="/images/whitestar.gif" alt="" class="ratingStar" data-value="3" /><img src="/images/whitestar.gif" alt="" class="ratingStar" data-value="4" /><img src="/images/whitestar.gif" alt="" class="ratingStar" data-value="5" /> Excellent
<label id="lblResult"></label>
</div>
<style type="text/css">
.ratingStar {
cursor:pointer;
}
</style>
<script type="text/javascript">
var clickedFlag = false;
$(".ratingStar").mouseover(function () {
$(this).attr("src", "/images/yellowstar.gif").prevAll("img.ratingStar").attr("src", "/images/yellowstar.gif");
});
$(".ratingStar, #radingDiv").mouseout(function () {
$(this).attr("src", "/images/whitestar.gif");
});
$("#ratingDiv").mouseout(function () {
if (!clickedFlag)
{
$(".ratingStar").attr("src", "/images/whitestar.gif");
}
});
$(".ratingStar").click(function () {
clickedFlag = true;
$(".ratingStar").unbind("mouseout mouseover click").css("cursor", "default");
var url = "/Home/SendRating?r=" + $(this).attr("data-value") + "&s=5&id=@Model&url=@url";
$.post(url, null, function (data) {
$("#lblResult").html(data);
});
});
$("#lblResult").ajaxStart(function () {
$("#lblResult").html("Processing ....");
});
$("#lblResult").ajaxError(function () {
$("#lblResult").html("<br />Error occured.");
});
</script>
}else{
<text><span style="color:green;">Thanks for your vote !</span></text>
}
Step 2
Create a SendRating action method in HomeController.
public JsonResult SendRating(string r, string s, string id, string url)
{
int autoId = 0;
Int16 thisVote = 0;
Int16 sectionId = 0;
Int16.TryParse(s, out sectionId);
Int16.TryParse(r, out thisVote);
int.TryParse(id, out autoId);
if (!User.Identity.IsAuthenticated)
{
return Json("Not authenticated!");
}
if (autoId.Equals(0))
{
return Json("Sorry, record to vote doesn't exists");
}
switch (s)
{
case "5" : // school voting
// check if he has already voted
var isIt = db.VoteModels.Where(v => v.SectionId == sectionId &&
v.UserName.Equals(User.Identity.Name, StringComparison.CurrentCultureIgnoreCase) && v.VoteForId == autoId).FirstOrDefault();
if (isIt != null)
{
// keep the school voting flag to stop voting by this member
HttpCookie cookie = new HttpCookie(url, "true");
Response.Cookies.Add(cookie);
return Json("<br />You have already rated this post, thanks !");
}
var sch = db.SchoolModels.Where(sc => sc.AutoId == autoId).FirstOrDefault();
if (sch != null)
{
object obj = sch.Votes;
string updatedVotes = string.Empty;
string[] votes = null;
if (obj != null && obj.ToString().Length > 0)
{
string currentVotes = obj.ToString(); // votes pattern will be 0,0,0,0,0
votes = currentVotes.Split(',');
// if proper vote data is there in the database
if (votes.Length.Equals(5))
{
// get the current number of vote count of the selected vote, always say -1 than the current vote in the array
int currentNumberOfVote = int.Parse(votes[thisVote - 1]);
// increase 1 for this vote
currentNumberOfVote++;
// set the updated value into the selected votes
votes[thisVote - 1] = currentNumberOfVote.ToString();
}
else
{
votes = new string[] { "0", "0", "0", "0", "0" };
votes[thisVote - 1] = "1";
}
}
else
{
votes = new string[] { "0", "0", "0", "0", "0" };
votes[thisVote - 1] = "1";
}
// concatenate all arrays now
foreach (string ss in votes)
{
updatedVotes += ss + ",";
}
updatedVotes = updatedVotes.Substring(0, updatedVotes.Length - 1);
db.Entry(sch).State = EntityState.Modified;
sch.Votes = updatedVotes;
db.SaveChanges();
VoteModel vm = new VoteModel()
{
Active = true,
SectionId = Int16.Parse(s),
UserName = User.Identity.Name,
Vote = thisVote,
VoteForId = autoId
};
db.VoteModels.Add(vm);
db.SaveChanges();
// keep the school voting flag to stop voting by this member
HttpCookie cookie = new HttpCookie(url, "true");
Response.Cookies.Add(cookie);
}
break;
default:
break;
}
return Json("<br />You rated " + r + " star(s), thanks !");
}
Step 3
Now, it's time to display current rating. Create _VoteShow.cshtml partial view in the Views/Shared folder and copy-paste below code.
@model string
@{
Single m_Average = 0;
Single m_totalNumberOfVotes = 0;
Single m_totalVoteCount = 0;
Single m_currentVotesCount = 0;
Single m_inPercent = 0;
var thisVote = string.Empty;
if (Model.Length > 0)
{
// calculate total votes now
string[] votes = Model.Split(',');
for (int i = 0; i < votes.Length; i++)
{
m_currentVotesCount = int.Parse(votes[i]);
m_totalNumberOfVotes = m_totalNumberOfVotes + m_currentVotesCount;
m_totalVoteCount = m_totalVoteCount + (m_currentVotesCount * (i + 1));
}
m_Average = m_totalVoteCount / m_totalNumberOfVotes;
m_inPercent = (m_Average * 100) / 5;
thisVote = "<span style=\"display: block; width: 65px; height: 13px; background: url(/images/starRating.png) 0 0;\">" +
"<span style=\"display: block; width: "+ m_inPercent + "%; height: 13px; background: url(/images/starRating.png) 0 -13px;\"></span> " +
"</span>" +
"<span class=\"smallText\">Overall ratings: <span itemprop=\"ratingCount\">" + m_totalNumberOfVotes + "</span> | Rating: <span itemprop=\"ratingValue\">" + m_Average.ToString("##.##") + "</span> out of 5 </span> ";
}
}
<div itemprop="aggregateRating" itemscope itemtype="http://schema.org/AggregateRating">
<meta itemprop="bestRating" content="5" />
<meta itemprop="worstRating" content="1">
<meta itemprop="ratingValue" content="@m_Average.ToString("##.##") %>" />
@Html.Raw(thisVote)
</div>
Step 4
Calling rating controls (partial vies) on the post page.
<div class="tr" style="background-color:#f1f1f1;">
<div class="td0">Please rate this school</div>
<div class="td">@Html.Partial("_VoteNow", Model.AutoId.ToString())</div>
<div class="td">@Html.Partial("_VoteShow", Model.Votes)</div>
</div>
While calling _VoteNow, we are passing the unique post id as parameter and while calling _VoteShow, we are passing current votes (Rates) in the form of "x,x,x,x,x" as parameter and here is the final output displays on the web page.

Done! Your own rating system is up and live!
Free ASP.NET MVC Hosting
Try our Free ASP.NET MVC Hosting today and your account will be setup soon! You can also take advantage of our Windows & ASP.NET Hosting support with Unlimited Domain, Unlimited Bandwidth, Unlimited Disk Space, etc.
