Overview on ASP.NET
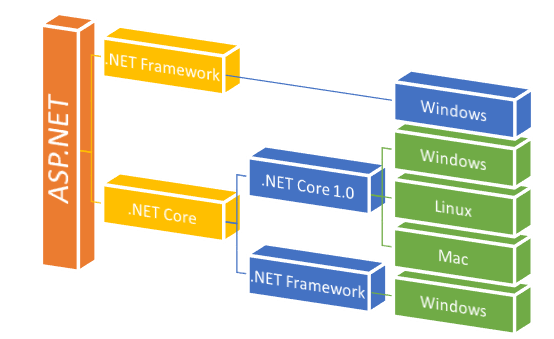
Let’s differentiate both.
.NET Framework
- Developed and run on Windows platform only.
- Built on the .NET Framework runtime.
- Supported (MVC, Web API & SignalR) Dependency Injection (DI).
- MVC & Web API Controller are separated.
.Net Core
- Open Source.
- Developed & run on Cross Platform.
- Built on the .NET Core runtime & also on .NET Framework.
- Facility of dynamic compilation.
- Built in Dependency Injection (DI).
- MVC & Web API Controller are unified, Inherited from same base class.
- Smart tooling (Bower, NPM, Grunt & Gulp).
- Command-line tools.

Start with .NET Core 1.0
Let’s create a new project with Visual Studio 2015 > File > New > Project.
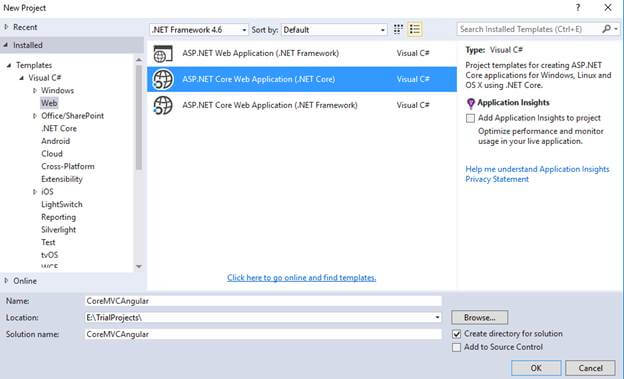
Choose empty template and click OK.
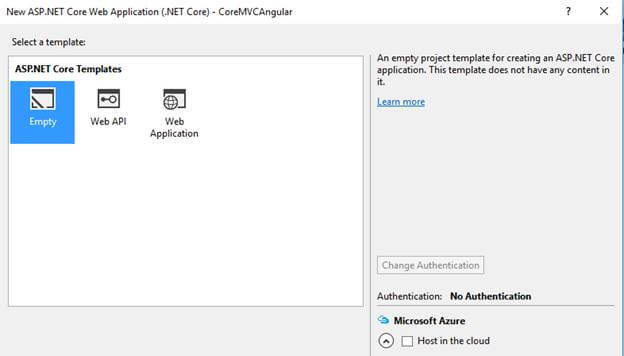
Visual Studio will create a new project of ASP.NET Core empty project.
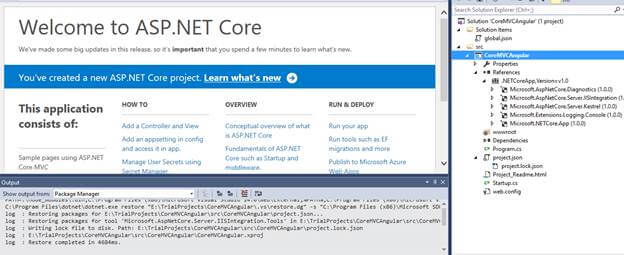
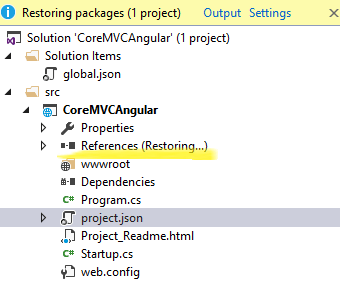
We will now explore all initial files one by one.
Explore Initial Template
Those marked from Solution Explorer are going to be explored, one by one.
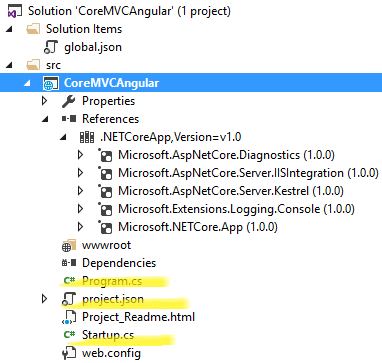
First of all, we know about program.cs file. Let’s concentrate on it.
Program.cs: Here, we have sample piece of code. Let’s get explanation.
namespace CoreMVCAngular
{
public class Program
{
public static void Main(string[] args) {
var host = new WebHostBuilder().UseKestrel().UseContentRoot(Directory.GetCurrentDirectory()).UseIISIntegration().UseStartup < Startup > ().Build();
host.Run();
}
}
}
.UseKestrel() : Define the Web Server. ASP.NET Core supports hosting in IIS and IIS Express.
HTTP servers
Microsoft.AspNetCore.Server.Kestrel (cross-platform)
Microsoft.AspNetCore.Server.WebListener (Windows-only)
.UseContentRoot(Directory.GetCurrentDirectory()) : Application base path that specifies the path to the root directory of the Application.
.UseIISIntegration() : For hosting in IIS and IIS Express.
.UseStartup<Startup>() : Specifies the Startup class.
.Build() : Build the IWebHost, which will host the app & manage incoming HTTP requests.
Startup.cs
This is the entry point of every .NET Core Application. It provides services, that the Application required.
namespace CoreMVCAngular
{
public class Startup
{
// This method gets called by the runtime. Use this method to add services to the container.
// For more information on how to configure your application, visit http://go.microsoft.com/fwlink/?LinkID=398940
public void ConfigureServices(IServiceCollection services) {}
// This method gets called by the runtime. Use this method to configure the HTTP request pipeline.
public void Configure(IApplicationBuilder app, IHostingEnvironment env, ILoggerFactory loggerFactory) {}
}
}
As you can see, there are two methods; one is ConfigureServices & another is Configure. In Configure method, three parameters are specified.
IApplicationBuilder defines a class, which provides the mechanisms to configure an Application's request.
We can add MVC (middleware) to the request pipeline by using “Use” extension method. Later, we will use it.
ConfigureServices is an extension method, which is configured to use the several services.
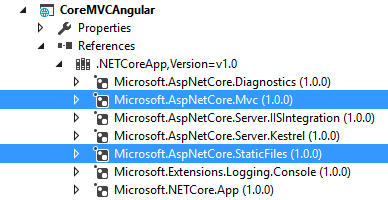
Project.json: This is where our Application dependencies are listed i.e by name & version. This file also manages runtime, compilation settings.
Dependencies: All Application dependencies can add new dependencies, if required, intellisense will help up to include with the name & version.
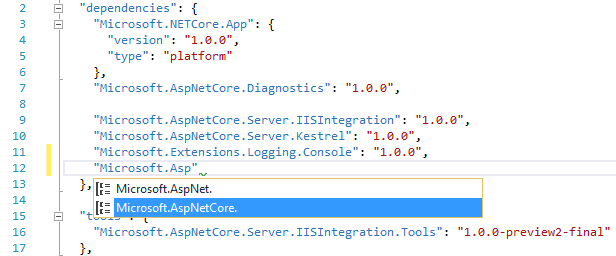
After saving changes, it will automatically restore the dependencies from NuGet.
Here, the code snippet is changed.
"dependencies": {
"Microsoft.NETCore.App": {
"version": "1.0.0",
"type": "platform"
},
"Microsoft.AspNetCore.Diagnostics": "1.0.0",
"Microsoft.AspNetCore.Server.IISIntegration": "1.0.0",
"Microsoft.AspNetCore.Server.Kestrel": "1.0.0",
"Microsoft.Extensions.Logging.Console": "1.0.0",
"Microsoft.AspNetCore.Mvc": "1.0.0"
},
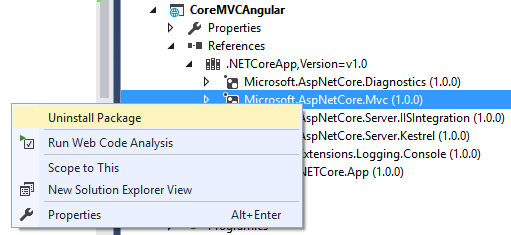
To uninstall, go to Solution explorer > right click on package > Uninstall package.
Tools: This section manages and lists command line tools. We can see IISIntegration.Tools is added by default, which is a tool that contains dotnet publish iis command for publishing the Application on IIS.
"tools": {
"Microsoft.AspNetCore.Server.IISIntegration.Tools": "1.0.0-preview2-final"
},
Frameworks: As we can see, initially our app is running on the .NET Core platform by default with the runtime.
“netcoreapp1 .0”.
"frameworks": {
"netcoreapp1.0": {
"imports": ["dotnet5.6", "portable-net45+win8"]
}
},
Build Options: Options, which are passed to the compiler while building the Application.
"buildOptions": {
"emitEntryPoint": true,
"preserveCompilationContext": true
},
RuntimeOptions: Manage Server garbage collection at Application runtime.
"runtimeOptions": {
"configProperties": {
"System.GC.Server": true
}
},
PublishOptions: This defines the file/folder to include/exclude to/from the output folder, while publishing the Application.
"publishOptions": {
"include": ["wwwroot", "web.config"]
},
Scripts: Scripts is an object type, which specifies that scripts run during building or publishing the Application.
"scripts": {
"postpublish": ["dotnet publish-iis --publish-folder %publish:OutputPath% --framework %publish:FullTargetFramework%"]
}
Add MVC6
It’s time to add MVC6. In .NET Core 1.0 MVC & Web API are unified, and become a single class, which inherits from the same base class.
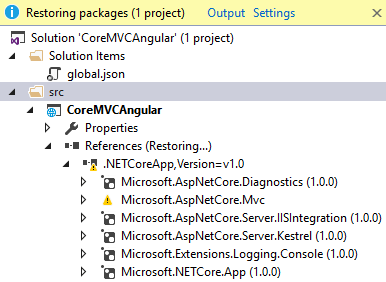
Let’s add MVC Service to our Application. Open project.json to add new dependencies in it. In dependencies section, add two dependencies.
"Microsoft.AspNetCore.Mvc": "1.0.0",
"Microsoft.AspNetCore.StaticFiles": "1.0.0"
Click Save.
It will start restoring the packages automatically.
Now let’s add MVC (midleware) to request pipeline in Config method at startup class.
public void Configure(IApplicationBuilder app, IHostingEnvironment env, ILoggerFactory loggerFactory) {
loggerFactory.AddConsole();
if (env.IsDevelopment()) {
app.UseDeveloperExceptionPage();
}
//app.UseStaticFiles();
app.UseMvc(routes => {
routes.MapRoute(name: "default", template: "{controller=Home}/{action=Index}/{id?}");
});
}
In ConfigureServices method, we need to add framework Service. We have added services.AddMvc();
public void ConfigureServices(IServiceCollection services) {
services.AddMvc();
}
MVC Folder Structure
Let’s add MVC folder structure to our sample Application. We have added view files in the views folder & MVC controller in Controllers folder like old MVC Application.
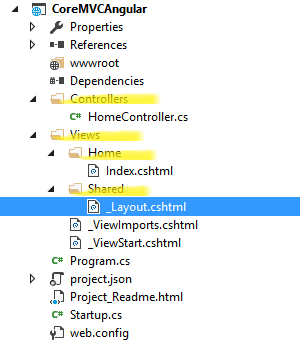
Here, you may notice that there is a new file in the views folder “_ViewImports.cshtml”. This file is responsible for setting up the namespaces, which can be accessed by the views in the project, which was previously done by the Web.config file in the views folder.
We are almost done. Let’s modify our view content with welcome message. Now, run the Application. You can see welcome message appears in the home page.

Output

AngularJS2
AngularJS2 is a modern Client end JavaScript Framework for the Application development. This JavaScript framework is totally new & written, based on TypeScript.
We will follow the steps, given below, to learn, how we install it to our Application,
Manage Client-side Dependencies
Use Package Manager (NPM).
Use Task Runner.
Bootstrapping using Type Script.
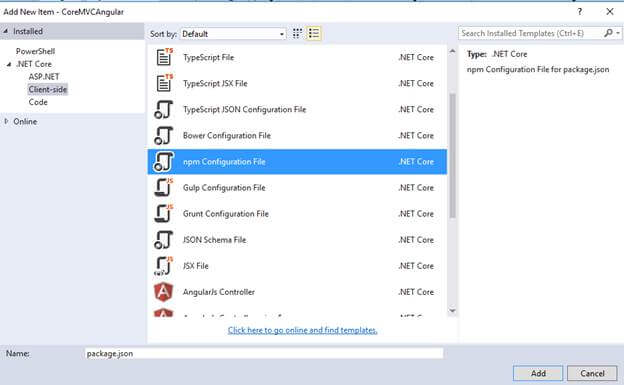
Client-side Dependencies: We need to add a JSON config file for Node Package Manager(NPM). Click add > New Item > Client- Side > npm Configuration File and click OK.
Open our newly added npm config file and modify the initial settings.
Package.json
{
"version": "1.0.0",
"name": "asp.net",
"private": true,
"Dependencies": {
"angular2": "2.0.0-beta.9",
"systemjs": "0.19.24",
"es6-shim": "^0.33.3",
"rxjs": "5.0.0-beta.2"
},
"devDependencies": {
"gulp": "3.8.11",
"gulp-concat": "2.5.2",
"gulp-cssmin": "0.1.7",
"gulp-uglify": "1.2.0",
"rimraf": "2.2.8"
}
}
In the dependencies section, we need to add AngularJS2 with other dependencies and they are for:
Es6-shim is a library, which provides compatibility on old environment.
Rxjs provides more modular file structure in a variety of formats.
SystemJS enables System.import TypeScript files directly.
As you can see, there are two different type objects; one is dependencies, which are used for the production purposes & the other one is devDependencies for development related things, like gulp is to run different tasks.
Click save. It will restore automatically. Here, we have all our required packages in the Dependencies section.

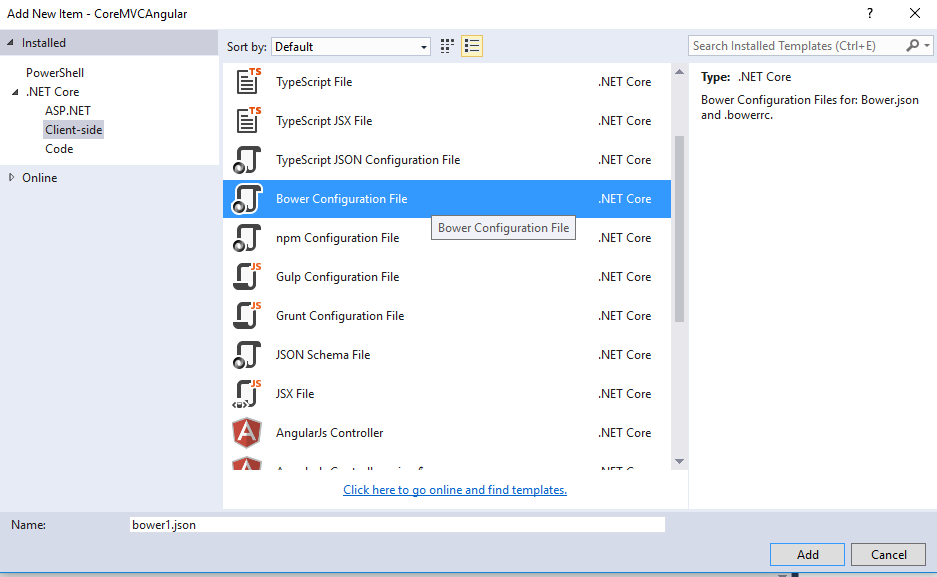
In this application we have added another package manager called Bower, Click add > New Item > Client- Side > Bower Configuration File then click Ok.
Comparing with NPM,
Bower:
Manage html, css, js component
Load minimal resources
Load with flat dependencies
NPM:
Install dependencies recursively
Load nested dependencies
Manage NodeJS module
Open the config file then add required dependencies in dependencies secction with specific version.
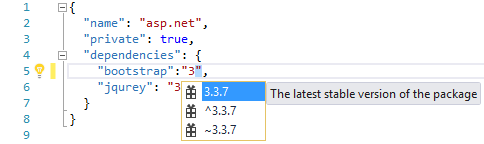
Save the JSON file after edit, it will automatically restore that package in our project. Here you can see we have added Jquery & Bootstrap package with Bower package manager.

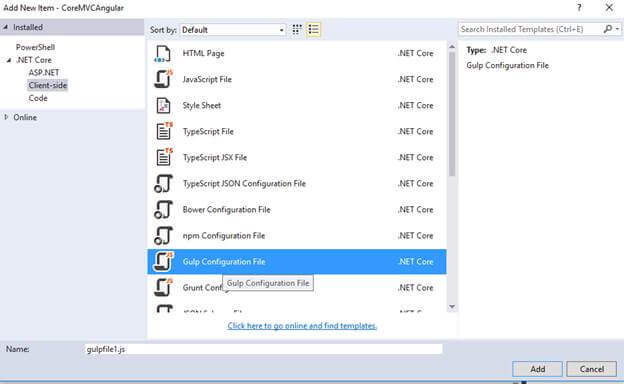
Now, let’s add a gulp configuration file to run the task. Click Add > New Item > Client-Side. Select gulp JSON file to include.
Gulp.json
/*
This file in the main entry point for defining Gulp tasks and using Gulp plugins.
Click here to learn more. http://go.microsoft.com/fwlink/?LinkId=518007
*/
"use strict";
var gulp = require("gulp");
var root_path = {
webroot: "./wwwroot/"
};
//library source
root_path.nmSrc = "./node_modules/";
//library destination
root_path.package_lib = root_path.webroot + "lib-npm/";
gulp.task("copy-systemjs", function() {
return gulp.src(root_path.nmSrc + '/systemjs/dist/**/*.*', {
base: root_path.nmSrc + '/systemjs/dist/'
}).pipe(gulp.dest(root_path.package_lib + '/systemjs/'));
});
gulp.task("copy-angular2", function() {
return gulp.src(root_path.nmSrc + '/angular2/bundles/**/*.js', {
base: root_path.nmSrc + '/angular2/bundles/'
}).pipe(gulp.dest(root_path.package_lib + '/angular2/'));
});
gulp.task("copy-es6-shim", function() {
return gulp.src(root_path.nmSrc + '/es6-shim/es6-sh*', {
base: root_path.nmSrc + '/es6-shim/'
}).pipe(gulp.dest(root_path.package_lib + '/es6-shim/'));
});
gulp.task("copy-rxjs", function() {
return gulp.src(root_path.nmSrc + '/rxjs/bundles/*.*', {
base: root_path.nmSrc + '/rxjs/bundles/'
}).pipe(gulp.dest(root_path.package_lib + '/rxjs/'));
});
gulp.task("copy-all", ["copy-rxjs", 'copy-angular2', 'copy-systemjs', 'copy-es6-shim']);
To run the task, right click on Gulp.json file to reload.
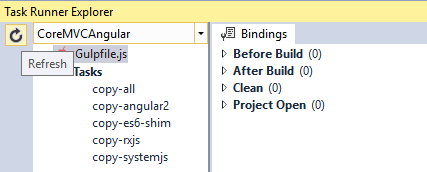
Right click on copy-all & click run.
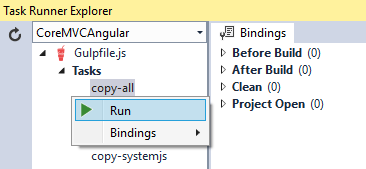
Task run & finish.
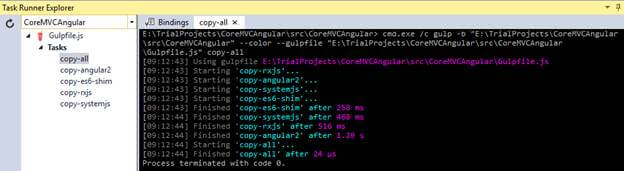
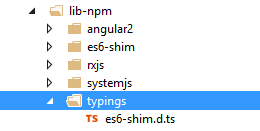
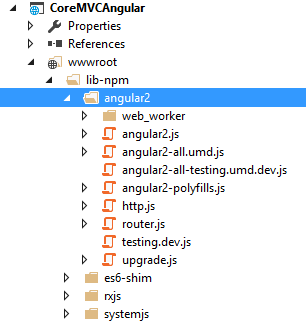
In Solution Explorer, all the required packages are copied. We also need to put the type definitions for es6-shim(typing folder), without this, it will cause error - "Cannot find name 'Promise'".
Bootstrapping with TypeScript
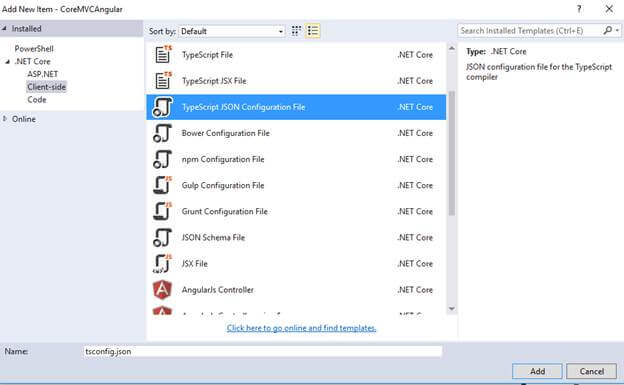
tsConfig.json
{
"compilerOptions": {
"noImplicitAny": false,
"noEmitOnError": true,
"removeComments": false,
"sourceMap": true,
"target": "es5",
//add this to compile app component
"emitDecoratorMetadata": true,
"experimentalDecorators": true,
"module": "system",
"moduleResolution": "node"
},
"exclude": ["node_modules", "wwwroot/lib"]
}
noImplicitAny : Raise an error on the expressions and declarations with an implied ‘any’ type.
noEmitOnError : Do not emit outputs, if any errors were reported.
Target : Specify ECMAScript target version: ‘es5’ (default), ‘es5’, or ‘es6’.
experimentalDecorators : Enables an experimental support for ES7 decorators.
Create an app folder for .ts file in wwwroot folder.

In Solution Explorer, you may add the files, given below.
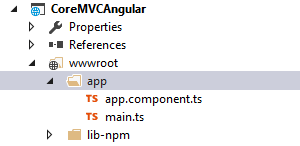
In main.ts code snippet, bootstrap AngularJS with importing the component.
import {bootstrap} from 'angular2/platform/browser';
import {AppComponent} from './app.component';
import {enableProdMode} from 'angular2/core';
enableProdMode();
bootstrap(AppComponent);
Component: imports the Component function from Angular 2 library; use of import, app component class can be imported from other component.
import {Component} from 'angular2/core';
@Component({
selector: 'core-app',
template: '<h3>Welcome to .NET Core 1.0 + MVC6 + Angular 2</h3>'
})
export class AppComponent {}
MVC View: It’s time to update our layout & linkup the library.
Now, we will add the reference to our layout page.
<!DOCTYPE html>
<html>
<head>
<meta name="viewport" content="width=device-width" />
<title>@ViewBag.Title</title>
<script src="~/lib-npm/es6-shim/es6-shim.js"></script>
<script src="~/lib-npm/angular2/angular2-polyfills.js"></script>
<script src="~/lib-npm/systemjs/system.src.js"></script>
<script src="~/lib-npm/rxjs/Rx.js"></script>
<script src="~/lib-npm/angular2/angular2.js"></script>
</head>
<body>
<div> @RenderBody() </div> @RenderSection("scripts", required: false) </body>
</html> Index.cshtml @{ ViewData["Title"] = "Home Page"; }
<core-app>
<div>
<p><img src="~/img/ajax_small.gif" /> Please wait ...</p>
</div>
</core-app> @section Scripts {
<script>
System.config({
packages: {
'app': {
defaultExtension: 'js'
}
},
});
System.import('app/main').then(null, console.error.bind(console));
</script> }
One more thing to do is to enable the static file serving. Add this line to startup config method.
app.UseStaticFiles();
Build & run application
Finally, build & run the Application.
Here, we can see our app is working with AngularJS2.