As always, we try to keep our Scheduler .NET control up-to-date and easy to use. Nowadays it supports all the latest .NET frameworks and IDEs, including ASP.NET 4.5 and Visual Studio 2012.
With regard to all recent updates, your remarks and fixed bugs, we decided to give you further setup instructions. This time we explain how Scheduler .NET setup process can be reduced to only 5 steps that you can cover in less than 5 minutes.
This article represents a new step-by-step guide on how to create a simple yet elegant Google-like calendar/scheduler in ASP.NET MVC3/MVC4 Razor (C#).
1. Create a New Project
Create a new project in Visual Studio by selecting ASP.NET MVC 3/ MVC4 Web Application from the list. The project template should be empty. The view engine is Razor by default.
We will create a simple scheduler in C#.
2. Set Up the Database
The next step is to set up a database. Right-click on ‘Your_project_name’ (e.g. SimpleScheduler) -> Add -> Add ASP.NET Folder -> App_Data -> Add New Item and name it “Sample.mdf”.
A new database has been created.
Note: for ASP.NET MVC4 project the folder App_Data is created automatically.
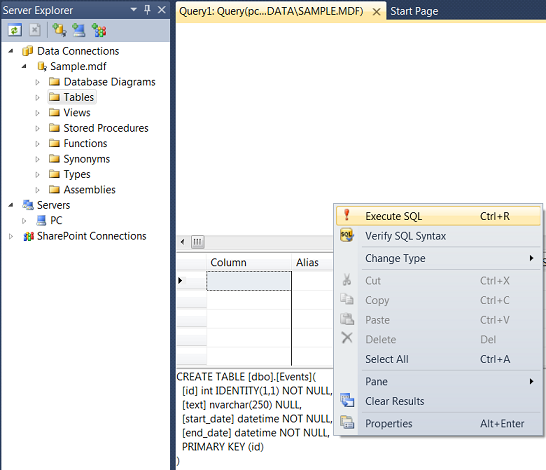
Go to the Server Explorer to create a new Table “Events”. Right-click on the Table folder to add the following query. It creates a table with all necessary fields including primary key and identity column:
CREATE TABLE [dbo].[Events](
[id] int IDENTITY(1,1) NOT NULL,
[text] nvarchar(250) NULL,
[start_date] datetime NOT NULL,
[end_date] datetime NOT NULL,
PRIMARY KEY (id)
)

3. Scheduler Setup via NuGet
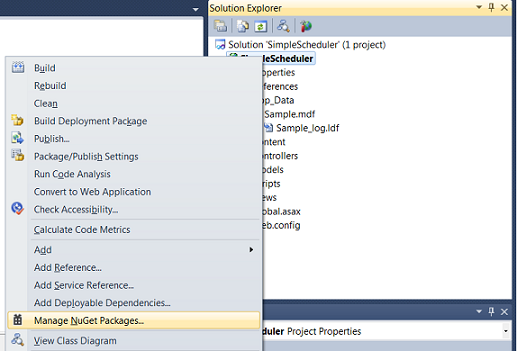
Right-click on you project name in the Solution Explorer to select “Manage NuGet Packages…”:

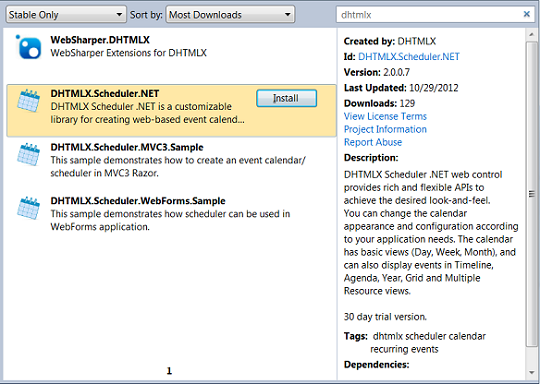
For quick search type ‘dhtmlx’ in the input. In a moment you’ll see DHMTLX Scheduler .NET library and the available samples:

To save your time, install MVC3 Sample first. It contains the basic template of Scheduler .NET calendar control. The template includes a controller with three actions (initialization, data load and save) and view with a calendar.
Thus, the installed sample updates the project with:
- /Controllers/CalendarController.cs -- a controller that needs updating;
- /Views/Calendar/Index.cshtml -- a calendar page that requires no changes;
- /Models/CalendarEvent.cs -- a sample model that can be deleted.
4. Create Scheduler Model
The installed MVC3 Sample also contains a sample class model. You don’t need it and can delete it.
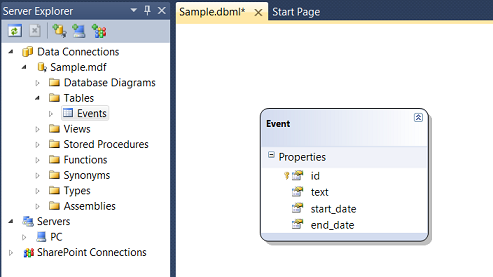
To create a new model right-click on the folder Models -> Add New Item. In the new opened window choose LINQ to SQL Classes and name it Sample.dbml. Double click it to open a visual editor and drag the Event table from the Server Explorer to the Editor.

5. Updating a Controller
As stated above, the controller has been created when you installed MVC3 Sample. It contains action templates for data load and save, working with static data.
Let’s update the methods in the CalendarController.cs to connect the controller with the newly created Model.
First we need to load data from the Model.
The default data load before update looks as follows:
public ContentResult Data()
{
var data = new SchedulerAjaxData(
new List<CalendarEvent>{
new CalendarEvent{
id = 1,
text = "Sample Event",
start_date = new DateTime(2012, 09, 03, 6, 00, 00),
end_date = new DateTime(2012, 09, 03, 8, 00, 00)
},
...
});
return (ContentResult)data;
}
Let’s update the DataAction to load data from SampleDataContext:
public ContentResult Data()
{
var data = new SchedulerAjaxData(new SampleDataContext().Events);
return (ContentResult)data;
}
Secondly, enable data save. The data save set by default is:
public ContentResult Save(int? id, FormCollection actionValues)
{
var action = new DataAction(actionValues);
try
{
var changedEvent = (CalendarEvent)DHXEventsHelper.Bind(typeof(CalendarEvent), actionValues);
switch (action.Type)
{
case DataActionTypes.Insert:
//do insert
action.TargetId = changedEvent.id;//assign postoperational id
break;
case DataActionTypes.Delete:
//do delete
break;
default:// "update"
//do update
break;
}
}
}
Data save parses the request, contains a switch case for all types of operations and returns operation success. Let’s update it to enable save of actual changes:
public ContentResult Save(int? id, FormCollection actionValues)
{
var action = new DataAction(actionValues);
var changedEvent = (Event)DHXEventsHelper.Bind(typeof(Event), actionValues);
var data = new SampleDataContext();
try
{
switch (action.Type)
{
case DataActionTypes.Insert: // define here your Insert logic
data.Events.InsertOnSubmit(changedEvent);
break;
case DataActionTypes.Delete: // define here your Delete logic
changedEvent = data.Events.SingleOrDefault(ev => ev.id == action.SourceId);
data.Events.DeleteOnSubmit(changedEvent);
break;
default:// "update" // define here your Update logic
var eventToUpdate = data.Events.SingleOrDefault(ev => ev.id == action.SourceId);
DHXEventsHelper.Update(eventToUpdate, changedEvent, new List<string>() { "id" });//update all properties, except for id
break;
}
data.SubmitChanges();
action.TargetId = changedEvent.id;
}
}
}
We have changed the Model class used in the method. We’ve also added the required methods from LINQ to SQL and a helper that updates all object properties in the data base (except for the id).
Notes.
The initial class model in the action used to be:
public ContentResult Save(int? id, FormCollection actionValues)
{
var action = new DataAction(actionValues);
If a new event is added to the data base, an id assigned to the new event in the data base should be returned to the client. It returns TargetId of the object itself.
action.TargetId = changedEvent.id;
This action is implemented after changes are submitted: data.SubmitChanges();
The full code will look like this:
using System;
using System.Collections.Generic;
using System.Linq;
using System.Web;
using System.Web.Mvc;
using DHTMLX.Scheduler;
using DHTMLX.Common;
using DHTMLX.Scheduler.Data;
using SimpleScheduler.Models;
namespace SimpleScheduler.Controllers
{
public class CalendarController : Controller
{
public ActionResult Index()
{
var scheduler = new DHXScheduler(this);
scheduler.Skin = DHXScheduler.Skins.Terrace;
scheduler.InitialDate = new DateTime(2012, 09, 03);
scheduler.Config.multi_day = true;//render multiday events
scheduler.LoadData = true;
scheduler.EnableDataprocessor = true;
return View(scheduler);
}
public ContentResult Data()
{
var data = new SchedulerAjaxData(
new SampleDataContext().Events
);
return (ContentResult)data;
}
public ContentResult Save(int? id, FormCollection actionValues)
{
var action = new DataAction(actionValues);
var changedEvent = (Event)DHXEventsHelper.Bind(typeof(Event), actionValues);
var data = new SampleDataContext();
try
{
switch (action.Type)
{
case DataActionTypes.Insert: // define here your Insert logic
data.Events.InsertOnSubmit(changedEvent);
break;
case DataActionTypes.Delete: // define here your Delete logic
changedEvent = data.Events.SingleOrDefault(ev => ev.id == action.SourceId);
data.Events.DeleteOnSubmit(changedEvent);
break;
default:// "update" // define here your Update logic
var eventToUpdate = data.Events.SingleOrDefault(ev => ev.id == action.SourceId);
DHXEventsHelper.Update(eventToUpdate, changedEvent, new List<string>() { "id" });//update all properties, except for id
break;
}
data.SubmitChanges();
action.TargetId = changedEvent.id;
}
catch (Exception a)
{
action.Type = DataActionTypes.Error;
}
return (new AjaxSaveResponse(action));
}
}
}
Finally, update the route from ‘Home’ to ‘Calendar’ in Global.asax.cs as follows:
routes.MapRoute(
"Default", // Route name
"{controller}/{action}/{id}", // URL with parameters
new { controller = "Calendar", action = "Index", id = UrlParameter.Optional } // Parameter defaults
);
Note: ASP.NET MVC4 project creates App_Start directory with configuration files. The controller route is changed to "Calendar" in Route.Config.cs:
routes.MapRoute(
name: "Default",
url: "{controller}/{action}/{id}",
defaults: new { controller = "Calendar", action = "Index", id = UrlParameter.Optional }
);
That’s it! The scheduler for ASP.NET MVC3/MVC4 Razor is ready to use.