European ASP.NET MVC Hosting

BLOG about Latest ASP.NET MVC Hosting and Its Technology - Dedicated to European Windows Hosting Customer

European ASP.NET MVC 5 Hosting :: Upgrade ASP .NET MVC 5 default layout to bootstrap 3

clock December 20, 2013 06:58 by author Patrick

If you have started developing web applications with ASP .NET MVC 5 you might have noticed that it comes with bootstrap version 2 and the latest version 3. In order to upgrade the default template for version 3, you can use these files as a reference.

Right click solution -> Manage NuGet packages Updates -> Update bootstrap to version 3 >

***Views/Shared/_Layout.cshtml***

<!DOCTYPE html>
<html>
<head>
    <meta charset="utf-8" />
    <meta name="viewport" content="width=device-width, initial-scale=1.0">
    <title>@ViewBag.Title - My ASP.NET Application</title>
    @Styles.Render("~/Content/css")
    @Scripts.Render("~/bundles/modernizr")
</head>
<body>
    <div class="navbar navbar-default navbar-static-top">
        <div class="container">
            <div class="navbar-header">
                <button type="button" class="navbar-toggle" data-toggle="collapse" data-target=".navbar-collapse">
                    <span class="icon-bar"></span>
                    <span class="icon-bar"></span>
                    <span class="icon-bar"></span>
                </button>
                @Html.ActionLink("Application name", "Index", "Home", null, new { @class = "navbar-brand" })
            </div>
                           @Html.Partial("_LoginPartial")
            <div class="navbar-collapse collapse">
                <ul class="nav navbar-nav">
                    <li class="active">@Html.ActionLink("Home", "Index", "Home")</li>
                    <li>@Html.ActionLink("About", "About", "Home")</li>
                    <li>@Html.ActionLink("Contact", "Contact", "Home")</li>
                    <li class="dropdown">
                        <a href="#" class="dropdown-toggle" data-toggle="dropdown">Dropdown <b class="caret"></b></a>
                        <ul class="dropdown-menu">
                            <li><a href="#">Action</a></li>
                            <li><a href="#">Another action</a></li>
                            <li><a href="#">Something else here</a></li>
                            <li class="divider"></li>
                            <li class="dropdown-header">Nav header</li>
                            <li><a href="#">Separated link</a></li>
                            <li><a href="#">One more separated link</a></li>
                        </ul>
                    </li>
                </ul>
            </div><!--/.nav-collapse -->
        </div>
    </div>
    <div class="container">
        @RenderBody()
        <hr />
        <footer>
            <p>&copy; @DateTime.Now.Year - My ASP.NET Application</p>
        </footer>
    </div>
    @Scripts.Render("~/bundles/jquery")
    @Scripts.Render("~/bundles/bootstrap")
    @RenderSection("scripts", required: false)
</body>
</html>


***Views/Shared/_LoginPartial.cshtml***

@using Microsoft.AspNet.Identity
@if (Request.IsAuthenticated)
{
    using (Html.BeginForm("LogOff", "Account", FormMethod.Post, new { id = "logoutForm", @class = "navbar-form pull-right" }))
    {
    @Html.AntiForgeryToken()
    <ul class="nav navbar-nav navbar-right">
        <li>
            @Html.ActionLink("Hello " + User.Identity.GetUserName() + "!", "Manage", "Account", routeValues: null, htmlAttributes: new { title = "Manage" })
        </li>
        <li><a href="javascript:document.getElementById('logoutForm').submit()">Log off</a></li>
    </ul>
    }
}
else
{
    <ul class="nav navbar-nav navbar-right">
        <li>@Html.ActionLink("Register", "Register", "Account", routeValues: null, htmlAttributes: new { id
= "registerLink" })</li>
        <li>@Html.ActionLink("Log in", "Login", "Account", routeValues: null, htmlAttributes: new { id =
"loginLink" })</li>
    </ul>
}


European ASP.NET MVC 5 Hosting :: Introducing ASP.Net SignalR in MVC 5

clock December 17, 2013 05:29 by author Patrick

In this article I am using the ASP.NET SignalR library in the latest MVC 5 project template. Now, what is this real-time functionality? It is used to access the server code and push the content to the connected clients instantly instead of the server waiting for the client's request.

Prerequisites

Using Visual Studio 2013. There are some prerequisites to develop the application:

  • Visual Studio 2010 SP1 or Visual Studio 2012.
  • ASP.NET and Web Tools 2012.2

Let's create an application for SignalR development using the following sections:

  • MVC 5 Application
  • Code Execution

MVC 5 Application

Step 1: Open Visual Studio 2013 and create a New Project.

Step 2: Select MVC project template.

Step 3: Open the Package Manager Console.

And write the following command:

install-package Microsoft.AspNet.SignalR

Step 4: You can see in your Solution Explorer that the SignalR was successfully added to your application.

Step 5: Add a new folder named Hubs in your application and add a class in it.

Give the name of your class ChatHub as shown below:

Step 6: Add the following code in the class:

using Microsoft.AspNet.SignalR;
namespace SignalRDemo.Hubs
{
    public class ChatHub : Hub
    {
        public void  LetsChat(string Cl_Name, string Cl_Message)
        {
            Clients.All.NewMessage(Cl_Name, Cl_Message);
        }
    }
}
Step 7: Open the Global.asax file and modify the Applicatio_Start() method as shown below:
public class MvcApplication : System.Web.HttpApplication
{
    protected void Application_Start()
    {
        RouteTable.Routes.MapHubs();
        AreaRegistration.RegisterAllAreas();
        FilterConfig.RegisterGlobalFilters(GlobalFilters.Filters);
        RouteConfig.RegisterRoutes(RouteTable.Routes);
        BundleConfig.RegisterBundles(BundleTable.Bundles);
    }
}

Step 8:
Open your HomeController.cs file and modify it as shown below:
public ActionResult Contact()
{
    ViewBag.Message = "Your contact page."
    return View();
}
public ActionResult Chat()
{
    ViewBag.Message = "Your chat page";
    return View();
}

Step 9: Generate the view for the Chat method as shown in the following parts:

Select Home folder and right-click to add Scaffold

(m8)

Select MVC 5 View in the Add Scaffold wizard

Do as directed in the following image:

Step 10: Add the following code in the Chat.cshtml file:
@{
    ViewBag.Title = "Chat";
}
<hgroup>
    <h2>@ViewBag.Title.</h2>
    <h3>@ViewBag.Message</h3>
</hgroup>
<div class="container">
    <input type="text" id="TxtMessage" />
    <input type="button" id="BtnSend" value="Send" />
    <input type="hidden" id="UserName" />
    <ul id="Chats"></ul>
</div>
@section scripts {
    <script src="~/Scripts/jquery.signalR-1.1.3.js"></script>
    <script src="~/signalr/Hubs"></script>
    <script
        $(function () {
            var chat = $.connection.chatHub;
            chat.client.NewMessage=function(Cl_Name, Cl_Message) {
                $('#Chats').append('<li><strong>' + htmlEncode(Cl_Name)
                    + '</strong>: ' + htmlEncode(Cl_Message) + '</li>');
            };
            $('#UserName').val(prompt('Please Enter Your Name:', ''));
            $('#TxtMessage').focus();
            $.connection.hub.start().done(function () {
                $('#BtnSend').click(function () {
                    chat.server.LetsChat($('#UserName').val(), $('#TxtMessage').val())
                    $('#TxtMessage').val('').focus()
                });
            });
        });
        function htmlEncode(value) {
            var encodedValue = $('<div />').text(value).html();
            return encodedValue;
        }
    </script>
}

Code Execution

Save all your application and debug the application. Use the following procedure.

Step 1: Debug your application. Open /Home/Chat in your browser like: http://localhost:12345/Home/Chat
Step 2: Enter your name in the prompt
Step 3: Enter message and send
Step 4: Copy the browser URL and open more browsers, paste the URL in the address bar and do the same thing as above.


European ASP.NET MVC 5 Hosting :: Getting Started With Areas in MVC 5

clock December 12, 2013 09:51 by author Patrick

MVC (Model, View, Controller) is a design pattern to separate the data logic from the business and presentation logic. We can also design the structure physically, where we can keap the logic in the controllers and views to exemplify the relationships.

It is also possible that we can have large projects that use MVC, then we need to split the application into smaller units called areas that isolate the larger MVC application into smaller functional groupings. A MVC application could contain several MVC structures (areas).  

How to creating a simple application for defining the area in MVC 5. MVC 5 is the latest version of MVC used in Visual Studio 2013?

You need to have the following to complete this article:

  • MVC 5
  • Visual Studio 2013

In that context, we'll follow the sections given below:MVC 5 application:

  • Adding Controller for Area
  • Adding Views for Area
  • Area Registration
  • Application Execution
  • MVC 5 Application

Use the following procedure to create a Web application based on a MVC 5 template.

Step 1: Open Visual Studio 2013.
Step 2: Create an ASP.NET Web Application with MVC 5 project template.

Step 3: In Solution Explorer, right-click on the project and click "Add" to add an area as shown below:

Step 4: Enter the name for the area, such as "News".

Step 5: Similarly add an another area named "Article".

Now from the steps above you have added two areas for your application named News and Article.

Adding Controller for Area

We have successfully added an area, now we'll add controllers for each of our areas using the following procedure.

Step 1: Right-click on the Controller in your Article area to add a controller.

Step 2: Select "MVC 5 Empty Controller".

Step 3: Enter the name as "ArticleController" .

Step 4: Similarly add the controller for "News".

Now your Area folder should be as in the following screenshot:

Adding Views for Area

We have successfully added a controller for our area, now to add a view for the area using the following procedure.

Step 1: Right-click on the "News" folder in the View to add a View for the News Area.

Step 2: Enter the view name as defined in the NewsController.

Step 3: Generate some content in the View of News as in the following screenshot:

Step 4: You can also add a view as shown in the following screenshot:

Step 5: Generate some content for the Article view.

Area Registration

Step 1: Open the "Global.asax" file.

Step 2: Add the following code in your Application_Start() method:

AreaRegistration.RegisterAllAreas();

Application Execution

Step 1: Open the project view Layout file.

Step 2: Modify the <ul> in the layout file as shown in the following code:

<ul class="nav navbar-nav">
<li>@Html.ActionLink("Home", "Index", "Home")</li>
<li>@Html.ActionLink("About", "About", "Home")</li>
<li>@Html.ActionLink("Contact", "Contact", "Home")</li>
<li>@Html.ActionLink("Article", "Index", "Article", new {area= "Article" }, null)</li>
<li>@Html.ActionLink("News", "Index", "News", new { area = "News" }, null)</li>
</ul>

Step 3: Debug the application, and finish!


European ASP.NET MVC 4 Hosting :: Single Page Application in ASP.NET MVC 4

clock December 5, 2013 11:20 by author Scott

Single Page Applications (SPA)?

Normally a web application is a collection of web pages, each doing a specific task. For example, consider a web application that does CRUD operations (Create, Read, Update and Delete) on data. A common practice is to create different web pages for operations such as showing a list of existing records, adding a new record, updating an existing record and deleting a record. A trend becoming increasingly popular is to have a single web page perform all of these operations. Such an application is called Single Page Application or SPA. So, in this example instead of developing four separate web pages you develop just one web page. At runtime, depending on the operation selected by a user, the web page renders an appropriate user interface. Such an application heavily relies on client side JavaScript libraries.

It should be noted that SPA is a general concept and ASP.NET MVC 4 has decided to offer some basic infrastructure to the developers to put this concept into practice. ASP.NET MVC 4 provides a project template that creates a basic yet functional SPA application. You can then customize the application to add more functionality. In the discussion that follows you will learn SPA with respect to ASP.NET MVC 4.

Parts of SPA

A Single Page Application consists of several pieces that fit together to provide the overall functionality of the application. A typical SPA consists of the following pieces:

  • Data Model : This is a server side piece that represents your data (often mapping database tables as .NET objects).
  • Data Service : Data service provides operations for database access (typically CRUD operations). This is also a service side piece and uses Entity Framework Code First approach.
  • ViewModel : View Model refers to your data and UI level operations that you wish to perform on the data. You can think of View Model as a wrapper over your model data that adds UI level operations to it.
  • Views : Views display your data to the user and also contain associated JavaScript. The default SPA project template uses Razor views.
  • Database: SPA uses Entity Framework Code First approach for database operations. The default project template creates a database in the local installation of SQL Server Express.

The following sections discuss all these parts from the default SPA project template in detail.

Creating a New Project Based on SPA Template

Installing ASP.NET MVC 4 adds a new project template in Visual Studio 2010. To create a new SPA you should create an ASP.NET MVC4 Web Application project based on this template.
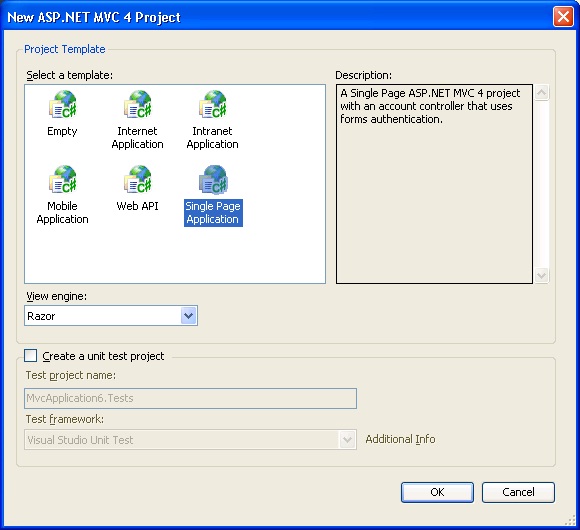
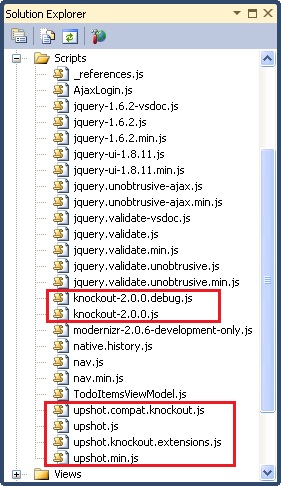
The default project created using the SPA project template contains data models, views and client script files for performing CRUD operations of a sample "To Do" application. SPA extensively uses two JavaScript libraries, namely Knockout and Upshot. The following figure shows these libraries added in the Solution Explorer.
Data Model

The sample application created by the default SPA project template deals with "To Do" items, i.e. tasks. A task is represented by a data model class - TodoItem. The TodoItem class resides in the Models folder and looks like this:

public class TodoItem
{
    public int TodoItemId { get; set; }
    [Required]
    public string Title { get; set; }
    public bool IsDone { get; set; }
}

As you can see the TodoItem is a simple class with three properties, viz. TodoItemId, Title and IsDone. The Title property is a required property as indicated by Data Annotation Attribute [Required].

To deal with the application data you need to create a DbContext and a DbDataController. This is done for you when you add a new controller to the project specifying the SPA controller template. Right click on the Controllers folder and select Add > Controller. In the Add Controller dialog specify details as shown below:
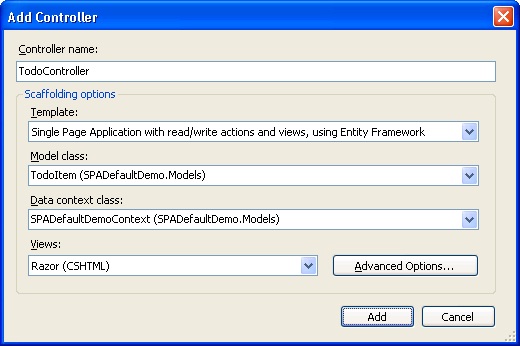
Specify the controller name as TodoController. Select scaffolding template of "Single Page Application with read/write actions and views, using Entity Framework". In the Model class drop-down select TodoItem class. In the Data context class drop-down click "New data context" and specify a name for the DbContext class. Once you click on the Add button the following files will be created for you:

  1. TodoController.cs (Controllers folder)
  2. SPADefaultDemoController.cs (Controllers folder)
  3. SPADefaultDemoController.TodoItem.cs (Controllers folder)
  4. SPADefaultDemoContext.cs (Models folder)
  5. Index.cshtml and associated partial views (Views folder)

Out of these classes the DbContext class (SPADefaultDemoContext) looks like this:

public class SPADefaultDemoContext : DbContext
{
    public DbSet<TodoItem> TodoItems { get; set; }
}

As you can see the SPADefaultDemoContext class inherits from DbContext base class and contains a DbSet of TodoItem.

Data Service

The job of performing CRUD operations is handled by the SPADefaultDemoController (the data service) class. This class is shown below:

public partial class SPADefaultDemoController :
               DbDataController<SPADefaultDemo.Models.SPADefaultDemoContext>
{
    public IQueryable<SPADefaultDemo.Models.TodoItem> GetTodoItems() {
        return DbContext.TodoItems.OrderBy(t => t.TodoItemId);
    } 

    public void InsertTodoItem(SPADefaultDemo.Models.TodoItem entity) {
        InsertEntity(entity);
    } 

    public void UpdateTodoItem(SPADefaultDemo.Models.TodoItem entity) {
        UpdateEntity(entity);
    } 

    public void DeleteTodoItem(SPADefaultDemo.Models.TodoItem entity) {
        DeleteEntity(entity);
    }
}

As you can see the SPADefaultDemoController class inherits from DbDataController base class and includes methods for selecting, inserting, updating and deleting TodoItem records to the database. The data service is called from the client side JavaScript code as you will see later.

ViewModel

The ViewModel class for the TodoItem data model is created automatically for you and is placed in the Scripts folder.
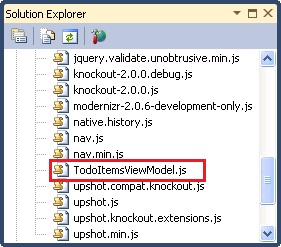
As you can see TodoItemsViewModel.js file is placed in the Scripts folder. This ViewModel is developed using Knockout and a part of it is shown below:

// TodoItem class
var entityType = "TodoItem:#SPADefaultDemo.Models";
MyApp.TodoItem = function (data) {
    var self = this;
    // Underlying data
    self.TodoItemId = ko.observable(data.TodoItemId);
    self.Title = ko.observable(data.Title);
    self.IsDone = ko.observable(data.IsDone);
    upshot.addEntityProperties(self, entityType);
}
...

As you can see the TodoItem ViewModel class contains the same properties as the server side data model. These properties are observable properties as indicated by ko.observable() syntax. Knockout synchronizes the data between views and ViewModel. The communication between the ViewModel and the server side data happens through Upshot.js.

View

The Index.cshtml file represents the main view of the application. Three partial views are also created viz. _Grid, _Editor and _Paging that provide the user interface for list, insert/update and paging respectively. Depending on the operation selected by the user the appropriate partial view is rendered. The following markup shows a fragment from the Index.cshtml.

@{
    ViewBag.Title = "TodoItems";
    Layout = "~/Views/Shared/_SpaLayout.cshtml";


<div data-bind="visible: editingTodoItem">
    @Html.Partial("_Editor")
</div> 

<div data-bind="visible: !editingTodoItem()">
    @Html.Partial("_Grid")
</div> 

<div class="message-info message-success" data-bind="flash: { text: successMessage, duration: 5000
}"></div>
<div class="message-info message-error" data-bind="flash: { text: errorMessage, duration: 20000 }"></div>

<script type="text/javascript" src="@Url.Content("~/Scripts/TodoItemsViewModel.js")"></script>
<script type="text/javascript">
    $(function () {
        upshot.metadata(@(Html.Metadata<SPADefaultDemo.Controllers.SPADefaultDemoController>())); 

        var viewModel = new MyApp.TodoItemsViewModel({
            serviceUrl: "@Url.Content("~/api/SPADefaultDemo")"
        });
        ko.applyBindings(viewModel);
    });
</script>

Notice that data service URL is specified as ~/api/SPADefaultDemo. The Html.Metadata() method provides the metadata of the types to the Upshot. The binding between View and ViewModel is provided by the applyBindings() method of Knockout.

If you run the application and navigate to http://localhost:1275/todo (change the port no. as per your setup) you will see something similar to the following figure.
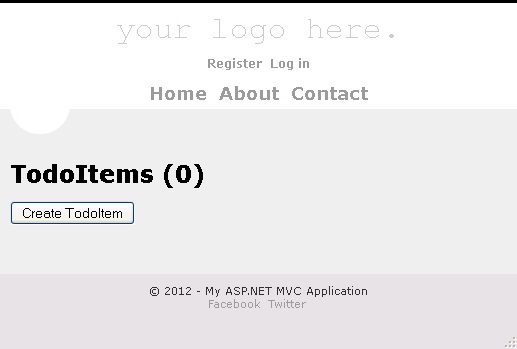
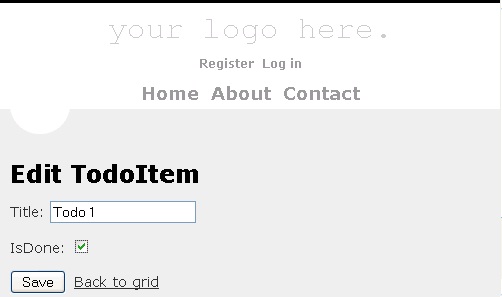
You can click on the "Create TodoItem" button to add a few records. You can then modify or delete them. The following figure shows the view in edit mode.
Database

At this stage the sample "To do" application is able to store and retrieve the data but you might be wondering where the actual data is. Since SPA uses Code First approach to database operations, the database is automatically created for you when you run the application for the first time. The subsequent runs use the previously created database. Have a look at the following figure that shows a sample database generated under local installation of SQL Express.

As you can see, by default the database name is the same as the fully qualified name of the DbContext class. Inside there is a TodoItems table that stores the application data.


About HostForLIFE

HostForLIFE is European Windows Hosting Provider which focuses on Windows Platform only. We deliver on-demand hosting solutions including Shared hosting, Reseller Hosting, Cloud Hosting, Dedicated Servers, and IT as a Service for companies of all sizes.

We have offered the latest Windows 2019 Hosting, ASP.NET 5 Hosting, ASP.NET MVC 6 Hosting and SQL 2019 Hosting.


Month List

Tag cloud

Sign in