Many times we need to create a menu for a simple application. We ususally get stuck on how to bind the menu. Here in this article we you will learn how to bind menu and sub menu dynamically in ASP.NET MVC from database using linq.

Step 1
I am going to create a database which contains the following fields as well as some dummy data which contains parent & child relationship.
Use the below script to create table & insert query,
USE [Dynamic_Menu]
GO
SET ANSI_NULLS ON
GO
SET QUOTED_IDENTIFIER ON
GO
SET ANSI_PADDING ON
GO
CREATE TABLE [dbo].[Menu_List](
[M_ID] [int] IDENTITY(1,1) NOT NULL,
[M_P_ID] [int] NULL,
[M_NAME] [varchar](50) NULL,
[CONTROLLER_NAME] [varchar](50) NULL,
[ACTION_NAME] [varchar](50) NULL,
CONSTRAINT [PK_Menu_List] PRIMARY KEY CLUSTERED
(
[M_ID] ASC
)WITH (PAD_INDEX = OFF, STATISTICS_NORECOMPUTE = OFF, IGNORE_DUP_KEY = OFF, ALLOW_ROW_LOCKS = ON, ALLOW_PAGE_LOCKS = ON) ON [PRIMARY]
) ON [PRIMARY]
GO
SET ANSI_PADDING OFF
GO
SET IDENTITY_INSERT [dbo].[Menu_List] ON
INSERT [dbo].[Menu_List] ([M_ID], [M_P_ID], [M_NAME], [CONTROLLER_NAME], [ACTION_NAME]) VALUES (1, 0, N'My Menu', NULL, NULL)
INSERT [dbo].[Menu_List] ([M_ID], [M_P_ID], [M_NAME], [CONTROLLER_NAME], [ACTION_NAME]) VALUES (2, 1, N'BCS', N'Menu', N'BCS_Action')
INSERT [dbo].[Menu_List] ([M_ID], [M_P_ID], [M_NAME], [CONTROLLER_NAME], [ACTION_NAME]) VALUES (3, 2, N'Computer', N'Menu', N'Computer_Action')
INSERT [dbo].[Menu_List] ([M_ID], [M_P_ID], [M_NAME], [CONTROLLER_NAME], [ACTION_NAME]) VALUES (4, 1, N'MCS', N'Menu', N'MCS_Action')
INSERT [dbo].[Menu_List] ([M_ID], [M_P_ID], [M_NAME], [CONTROLLER_NAME], [ACTION_NAME]) VALUES (5, 2, N'Maths', N'Menu', N'Maths_Action')
INSERT [dbo].[Menu_List] ([M_ID], [M_P_ID], [M_NAME], [CONTROLLER_NAME], [ACTION_NAME]) VALUES (6, 4, N'Marketing', N'Menu', N'Marketing_Action')
INSERT [dbo].[Menu_List] ([M_ID], [M_P_ID], [M_NAME], [CONTROLLER_NAME], [ACTION_NAME]) VALUES (7, 4, N'Finiance', N'Menu', N'Finiance_Action')
SET IDENTITY_INSERT [dbo].[Menu_List] OFF
Step 2
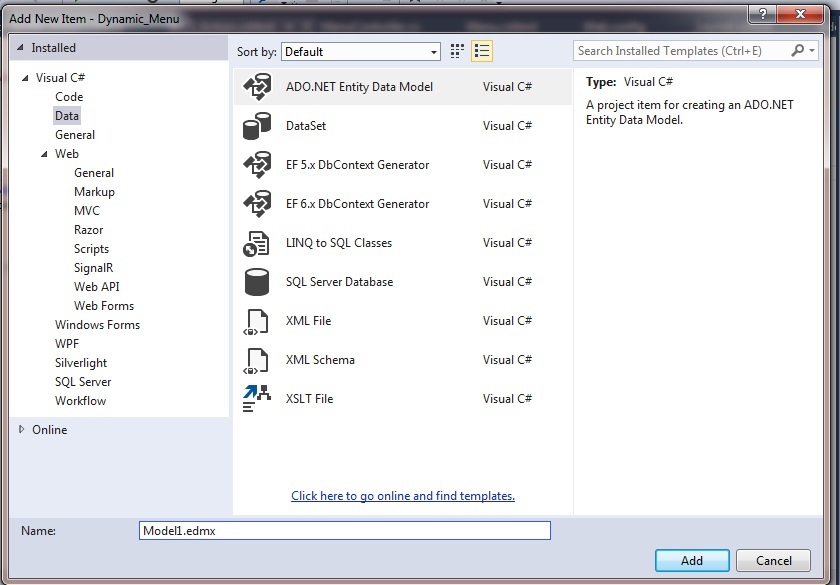
Now create simple MVC appliation using visual studio. After creating project add edmx file by right clicking on project go to Add => New Item => (from right side templates) select Data => Select ADO.NET Entity Data Model => Give proper name to it and click on add button.
Then select your table from database & create .edmx file into your ptoject. After adding the file autmatically connection string will get added into web config file.
Step 3
Now create model as below and add some properties; this model will be used into a controller & view.
using System;
using System.Collections.Generic;
using System.Linq;
using System.Web;
namespace Dynamic_Menu.Models
{
public class Menu_List
{
public int M_ID { get; set; }
public int? M_P_ID { get; set; }
public string M_NAME { get; set; }
public string CONTROLLER_NAME { get; set; }
public string ACTION_NAME { get; set; }
}
}
Step 4
Now add controller into our application and write below code into it. From action method GetMenuList() we will get data from our database using linq query.
using System;
using System.Collections.Generic;
using System.Linq;
using System.Web;
using System.Web.Mvc;
namespace Dynamic_Menu.Controllers
{
public class HomeController : Controller
{
MenuEntities objEntity = new MenuEntities();
public ActionResult Index()
{
return View();
}
public ActionResult GetMenuList()
{
try
{
var result = (from m in objEntity.Menu_Tree
select new Dynamic_Menu.Models.Menu_List
{
M_ID = m.M_ID,
M_P_ID = m.M_P_ID,
M_NAME = m.M_NAME,
CONTROLLER_NAME = CONTROLLER_NAME,
ACTION_NAME = ACTION_NAME,
}).ToList();
return View("Menu", result);
}
catch (Exception ex)
{
var error = ex.Message.ToString();
return Content("Error");
}
}
}
}
Step 5
Now create a view for Index action method as like.
@{
ViewBag.Title = "Index";
Layout = "~/Views/Shared/_Layout.cshtml";
}
<h2>Index</h2>
Now create layout view for our application. Also create one partial view (name Menu.cshtml) as brlow, which will render menu tree list when we are going to call action method from our layout page. In this partial view we are getting data into a IEnumerable list format and we are applying some logic as below,
Note
This is just demo / sample application, according to your requirement you can add foreach loop for more hierarchy levels. This is only a two level menu tree strucure.
_Layout.cshtml =>
<!DOCTYPE html>
<html>
<head>
<meta name="viewport" content="width=device-width" />
<title>@ViewBag.Title</title>
@Html.Action("GetMenuList", "Home")
</head>
<body>
<div>
@RenderBody()
</div>
</body>
</html>
Menu.cshtml =>
@model IEnumerable<Dynamic_Menu.Models.Menu_List>
<div>
<ul>
@{foreach (var item in Model.Where(s => s.M_P_ID == 0).GroupBy(Obj => new { Obj.M_ID }).Distinct().ToList())
{
<li>
<a href="#">
@item.FirstOrDefault().M_NAME
</a>
<ul>
@{foreach (var firstItem in (Model.Where(s => s.M_P_ID == item.FirstOrDefault().M_ID).ToList()))
{
<li>
<a href="#">
@firstItem.M_NAME
</a>
<ul>
@foreach (var secondItem in (Model.Where(s => s.M_P_ID == firstItem.M_ID).ToList()))
{
<li>
<a href="/@secondItem.CONTROLLER_NAME/@secondItem.ACTION_NAME">
@secondItem.M_NAME
</a>
</li>
}
</ul>
</li>
}
}
</ul>
</li>
}
}
</ul>
</div>
Step 5
Now create another controller to render views whenever we are clicking on hyper links from menu, it will redirect to that view by using controller name & action name
namespace Dynamic_Menu.Controllers
{
public class MenuController : Controller
{
public ActionResult Computer_Action()
{
return View();
}
public ActionResult Maths_Action()
{
return View();
}
public ActionResult Marketing_Action()
{
return View();
}
public ActionResult Finiance_Action()
{
return View();
}
}
}
Create some views for above action as like
View For Computer_Action as,
@{
Layout = "~/Views/Shared/_Layout.cshtml";
}
<!DOCTYPE html>
<html>
<head>
<meta name="viewport" content="width=device-width" />
<title>Computer_Action</title>
</head>
<body>
<div>
<h2>Welcome To Computer View</h2>
</div>
</body>
</html>
View For MCS_Action as
@{
Layout = "~/Views/Shared/_Layout.cshtml";
}
<!DOCTYPE html>
<html>
<head>
<meta name="viewport" content="width=device-width" />
<title>MCS_Action</title>
</head>
<body>
<div>
<h2>Welcome To MCS View</h2>
</div>
</body>
</html>
Step 6
Now run the application.
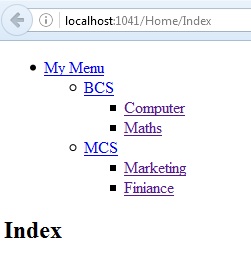
Index view after running the application into a browser.
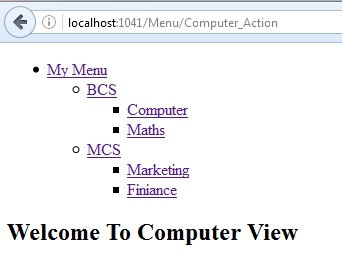
If we click on menu then our output will be:
In this article, you learned how to bind menu and sub menu dynamically in ASP.NET MVC from database using linq.