European ASP.NET MVC Hosting

BLOG about Latest ASP.NET MVC Hosting and Its Technology - Dedicated to European Windows Hosting Customer

ASP.NET MVC 6 Hosting - HostForLIFE.eu :: How to Add an Area to Your Project

clock April 13, 2015 06:18 by author Rebecca

In Visual Studio 2013, what you have to do if you wanted to add area to your project is right click then selected “Add” and then “Area”, typed in the name for the Area and then Visual Studio would scaffold this. The output would be a new folder called Area, then within this you would have your standard MVC folders (Controllers, Models, Views) along with some other files that would automagically register the area within the project.


But in Visual Studio 2015 Preview, this Add > Area option is currently not there. I am not sure if it will be added in at some point, but for now the process is more manual but very very simple.

Here an the steps to add an Area to your project:

Assuming you have created a new Asp.Net 5 Web Application, and can see all the lovely new file types like bower.json, config.json, project.json along with the new folder structure that includes the new wwwroot folder.

Step 1

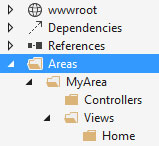
Right click on your MVC project and add a new Folder named “Areas”, then right click on this new folder and create a new folder to match the name of your area, e.g. “MyArea”. Right click again on this new folder and add a Controllers and Views folder. You want to end up with this:
Step 2

Add a new MVC Controller Class to your Controllers folder named HomeController. By default VS will add the basic code for your controller + and Index view. Now once you have this, decorate the HomeController class with a new Attribute called Area. Name this after your area which in this case is “MyArea”.

[Area("MyArea")]
public class HomeController : Controller
{
    // GET: /<controller>/
    public IActionResult Index()
    {
        return View();
    }
}

Step 3

You will now need to tell your MVC app to use a new Area route similar to AreaRegistration in MVC 4/5 but much simpler. Open up the Startup.cs file and then Map a new route within the existing app.UseMvc(routes => code.

// Add MVC to the request pipeline.
app.UseMvc(routes =>
{

    // add the new route here.
    routes.MapRoute(name: "areaRoute",
        template: "{area:exists}/{controller}/{action}",
        defaults: new { controller = "Home", action = "Index" });

    routes.MapRoute(
        name: "default",
        template: "{controller}/{action}/{id?}",
        defaults: new { controller = "Home", action = "Index" });

});

Your new route will work exactly the same as the “default” route with the addition of the area. So if you now create an Index view for your HomeController and navigate to /MyArea/Home or /MyArea/Home/Index you will see your index view.

Yes, it's done!

HostForLIFE.eu ASP.NET MVC 6 Hosting
HostForLIFE.eu is European Windows Hosting Provider which focuses on Windows Platform only. We deliver on-demand hosting solutions including Shared hosting, Reseller Hosting, Cloud Hosting, Dedicated Servers, and IT as a Service for companies of all sizes. We have customers from around the globe, spread across every continent. We serve the hosting needs of the business and professional, government and nonprofit, entertainment and personal use market segments.


ASP.NET MVC 5 Hosting France - HostForLIFE.eu :: Using Fluent Validation in ASP.NET MVC 5

clock April 10, 2015 06:22 by author Rebecca

In this article, i help you to learn how to use Fluent Validation in ASP.NET MVC 5 implementation. Fluent validation is one way to set up dedicated validator objects, that you would use when you want to separate validation logic from business logic. Fluent validation contains a small validation library for .NET that uses a Fluent interface and lambda expressions for building validation rules for our business objects.

So, let's start using Fluent Validation!

Step 1:  Create a ASP.NET Application using MVC Template

First, click on "Tools" , choose "Library Package Manager" then "Package Manager Console" and type this following command:

install-package FluentValidation

Step 2: Lets create a Model class with the properties

namespace samplefluentvalidation.Models
{
    public class Products
    {
        public int ProductID { get; set; }
        public string ProductName { get; set; }
        public string ProductManufacturer { get; set; }
    }
}

Step 3:  Now lets Create a controller

using FluentValidation.Results;
using samplefluentvalidation.Models;
using samplefluentvalidation.Models.Validations;
using System.Web.Mvc;

namespace samplefluentvalidation.Controllers
{
    public class ProductsController : Controller
    {
        //
        // GET: /Products/
        public ActionResult Index()
        {
            return View();
        }
        [AcceptVerbs(HttpVerbs.Post)]
        public ActionResult Index(Products model)
        {
            ProductValidator validator = new ProductValidator();
            ValidationResult result = validator.Validate(model);
            if (result.IsValid)
            {
                ViewBag.ProductName = model.ProductName;
                ViewBag.ProductManufacturer = model.ProductManufacturer;
              
            }
            else
            {
                foreach (ValidationFailure failer in result.Errors)
                {
                    ModelState.AddModelError(failer.PropertyName, failer.ErrorMessage);
                }
            }
            return View(model);
        }
    }
}

Step 4:  Now create a folder named products in views

Add a view named Index and add the below lines:

@model samplefluentvalidation.Models.Products
@{
    ViewBag.Title = "Index";
}
@if (ViewData.ModelState.IsValid)
{
    <b>
       Product Name : @ViewBag.ProductName<br />
       Product Manufacturer : @ViewBag.ProductManufacturer
    </b>
}
@using (Html.BeginForm())
{
    <fieldset>
        <legend>Products</legend>
        <div class="editor-label">
            @Html.LabelFor(model => model.ProductName)
        </div>
        <div class="editor-field">
            @Html.EditorFor(model => model.ProductName)
            @Html.ValidationMessageFor(model => model.ProductName)
        </div>
        <div class="editor-label">
            @Html.LabelFor(model => model.ProductManufacturer)
        </div>
        <div class="editor-field">
            @Html.EditorFor(model => model.ProductManufacturer)
            @Html.ValidationMessageFor(model => model.ProductManufacturer)
        </div>
        <p>
            <input type="submit" value="Create" />
        </p>
    </fieldset>
}
@section Scripts {
    @Scripts.Render("~/bundles/jqueryval")
}

Now, we have created all the model controller. This view shows the index page and the validation check.

HostForLIFE.eu ASP.NET MVC 5.0 Hosting
HostForLIFE.eu is European Windows Hosting Provider which focuses on Windows Platform only. We deliver on-demand hosting solutions including Shared hosting, Reseller Hosting, Cloud Hosting, Dedicated Servers, and IT as a Service for companies of all sizes. We have customers from around the globe, spread across every continent. We serve the hosting needs of the business and professional, government and nonprofit, entertainment and personal use market segments.


ASP.NET 5 Hosting - HostForLIFE.eu :: How to Use Ninject in ASP.NET MVC 5 and WEB API 2

clock April 6, 2015 11:57 by author Rebecca

Dependency injection frameworks are becoming a common place in all modern code bases. One of the most popular dependency injection framework in the .NET world is Ninject. This post will show a very simple example of how you can get started with Ninject.

Step 1:
Create any empty ASP.NET web application and choose the WEB API template.

Step 2:
Create a folder called Services where you will put your business logic classes.

Step 3:
Lets create a simple service called TaxService.cs like below:

namespace Ninjectsample.Services 
{
    public class TaxService : ITaxService
    {
        public double GetTaxRate()
        {
            return 0.7;
        }
    }

}
namespace Ninjectsample.Services 
{
    public interface ITaxService
    {
        double GetTaxRate();
    }
}

Step 4:
If we want to pass business logic into the HomeController, we can do it like this:

using Ninjectsample.Services; 
using System.Web.Mvc; 
namespace Ninjectsample.Controllers 
{
    public class HomeController : Controller
    {
        ITaxService _taxService;
        public HomeController(ITaxService taxService)
        {
            _taxService = taxService;
        }

        public ActionResult Index()
        {
            var rate = _taxService.GetTaxRate();

            return View(rate);
        }
    }
}

Then, I modified Index.cshtml to be simple like:
@model double
@Model

Step 5:
At this point if you run it, ASP.NET will complain because no one is giving the controller an instance of ITaxService. That's where you can use dependency injection frameworks like Ninject. You can install Nuget package called Ninject.MVC3. Don't worry, it will work even on MVC5!

Now, in the App_Start folder you will have a new file called NinjectWebCommon.cs.

Then, find and modify the RegisterServices method like below, don't forget to include your namespaces:
private static void RegisterServices(IKernel kernel) 
{
    kernel.Bind<ITaxService>().To<TaxService>();
}
Now, when you go to /Home/Index you will see the tax rate.

Step 6:
Similarly, you also inject business logic into a WEB API controller like below:

using Ninjectsample.Services; 
using System.Web.Http; 
namespace Ninjectsample.Controllers 
{
    public class ValuesController : ApiController
    {
        ITaxService _taxService;
        public ValuesController(ITaxService taxService)
        {
            _taxService = taxService;
        }

        public string Get()
        {
            return _taxService.GetTaxRate().ToString();
        }
    }
}

However, you need to install a Nuget package called Ninject.Web.WebApi.

Now, when you access /api/values you will see the desired result.

HostForLIFE.eu ASP.NET MVC 5.0 Hosting
HostForLIFE.eu is European Windows Hosting Provider which focuses on Windows Platform only. We deliver on-demand hosting solutions including Shared hosting, Reseller Hosting, Cloud Hosting, Dedicated Servers, and IT as a Service for companies of all sizes. We have customers from around the globe, spread across every continent. We serve the hosting needs of the business and professional, government and nonprofit, entertainment and personal use market segments.


ASP.NET MVC 5.2 Hosting - HostForLIFE.eu :: How to Get TextBoxes Values Created by JQuery

clock March 31, 2015 07:31 by author Rebecca

While creating a Html TextBox or Dropdown list using jQuery, it would define the ID and Name attributes of an Html TextBox or Dropdown list. First, let's us understand what is ID and Name attribute of Html controls. ID attribute of an input html control is responsible for uniquely identified a control on the html page. We use ID for getting an input html control's value using jQuery at client side or for applying some CSS to that control. And Name attribute of an input html control is responsible for posting that control values on server side.

When you will not defined the Name attributes of an Html TextBox or Dropdown list then form will not post the TextBox or Dropdown list values to the server. It means at controller's action result, you will not find the Html TextBox or Dropdown list. Then, you need to select no of customers from drop down list as shown below:

Also, Textboxes for entering customers full name are created by jQuery as shown below:


When you will submit the form you will get the Textboxes created by jQuery at controller side as shown below:

Here's the view code:

    <script src="~/Scripts/jquery-1.8.2.js"></script>
    <script>
    $(document).ready(function () {
    $("#ddl").change(function () {
    var i = $("#ddl :selected").val();
    var str = "";
    for (var j = 1; j <= i; j++) {
    var id = "txtCustomer" + j;
    //Remember to add name attribute to get values at server side
    str = str + "<span>Customer " + j + " Full Name: </span><input type='text' id='" + id + "' name='" + id + "'/><br/>";
    }
    $("#content").html(str);
    });
    });
    </script>
    
    <br />
    @using (Html.BeginForm())
    {
    <h2>Get TextBoxes Values Created by jQuery</h2>
    <span>Select No. of Customers </span>
    <select id="ddl" name="ddl">
    <option>Select</option>
    <option>1</option>
    <option>2</option>
    <option>3</option>
    <option>4</option>
    </select>
    <br />
    <div id="content">
    </div>
    <br />
    <div align="center">
    <input type="submit" id="btnSave" value="Save" />
    </div>
    }

And you can get the Html TextBox or Dropdown list values created by jQuery by two method: Get Values Using FormCollection and Get Values Using Request.Form.

Method 1: Get Values Using FormCollection

    public ActionResult Index()
    {
    return View();
    }
    
    [HttpPost]
    public ActionResult Index(FormCollection form, string ddl)
    {
    for (int i = 1; i <= Convert.ToInt32(ddl); i++)
    {
    string id = "txtCustomer" + i;
    string customer = form[id];
    }
    return View();
    }

Method 2: Get Values Using Request.Form

  public ActionResult Index()
    {
    return View();
    }
    
    [HttpPost]
    public ActionResult Index(string ddl)
    {
    for (int i = 1; i <= Convert.ToInt32(ddl); i++)
    {
    string id = "txtCustomer" + i;
    string customer = Request.Form[id];
    }
    return View();
    }

Hope you will enjoy this tutorial!

HostForLIFE.eu ASP.NET MVC 5.2 Hosting
HostForLIFE.eu is European Windows Hosting Provider which focuses on Windows Platform only. We deliver on-demand hosting solutions including Shared hosting, Reseller Hosting, Cloud Hosting, Dedicated Servers, and IT as a Service for companies of all sizes. We have customers from around the globe, spread across every continent. We serve the hosting needs of the business and professional, government and nonprofit, entertainment and personal use market segments.


About HostForLIFE

HostForLIFE is European Windows Hosting Provider which focuses on Windows Platform only. We deliver on-demand hosting solutions including Shared hosting, Reseller Hosting, Cloud Hosting, Dedicated Servers, and IT as a Service for companies of all sizes.

We have offered the latest Windows 2019 Hosting, ASP.NET 5 Hosting, ASP.NET MVC 6 Hosting and SQL 2019 Hosting.


Month List

Tag cloud

Sign in