In Visual Studio 2013, what you have to do if you wanted to add area to your project is right click then selected “Add” and then “Area”, typed in the name for the Area and then Visual Studio would scaffold this. The output would be a new folder called Area, then within this you would have your standard MVC folders (Controllers, Models, Views) along with some other files that would automagically register the area within the project.

But in Visual Studio 2015 Preview, this Add > Area option is currently not there. I am not sure if it will be added in at some point, but for now the process is more manual but very very simple.
Here an the steps to add an Area to your project:
Assuming you have created a new Asp.Net 5 Web Application, and can see all the lovely new file types like bower.json, config.json, project.json along with the new folder structure that includes the new wwwroot folder.
Step 1
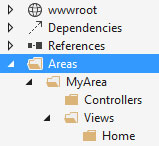
Right click on your MVC project and add a new Folder named “Areas”, then right click on this new folder and create a new folder to match the name of your area, e.g. “MyArea”. Right click again on this new folder and add a Controllers and Views folder. You want to end up with this:

Step 2
Add a new MVC Controller Class to your Controllers folder named HomeController. By default VS will add the basic code for your controller + and Index view. Now once you have this, decorate the HomeController class with a new Attribute called Area. Name this after your area which in this case is “MyArea”.
[Area("MyArea")]
public class HomeController : Controller
{
// GET: /<controller>/
public IActionResult Index()
{
return View();
}
}
Step 3
You will now need to tell your MVC app to use a new Area route similar to AreaRegistration in MVC 4/5 but much simpler. Open up the Startup.cs file and then Map a new route within the existing app.UseMvc(routes => code.
// Add MVC to the request pipeline.
app.UseMvc(routes =>
{
// add the new route here.
routes.MapRoute(name: "areaRoute",
template: "{area:exists}/{controller}/{action}",
defaults: new { controller = "Home", action = "Index" });
routes.MapRoute(
name: "default",
template: "{controller}/{action}/{id?}",
defaults: new { controller = "Home", action = "Index" });
});
Your new route will work exactly the same as the “default” route with the addition of the area. So if you now create an Index view for your HomeController and navigate to /MyArea/Home or /MyArea/Home/Index you will see your index view.
Yes, it's done!
HostForLIFE.eu ASP.NET MVC 6 Hosting
HostForLIFE.eu is European Windows Hosting Provider which focuses on Windows Platform only. We deliver on-demand hosting solutions including Shared hosting, Reseller Hosting, Cloud Hosting, Dedicated Servers, and IT as a Service for companies of all sizes. We have customers from around the globe, spread across every continent. We serve the hosting needs of the business and professional, government and nonprofit, entertainment and personal use market segments.
