April 30, 2025 08:09 by
 Peter
PeterThis article describes how to utilize transactions in ASP. Net MVC to save records in various database tables by utilizing the entity framework code first method.

What’s the agenda?
Here I will show a simple form, where I will be storing the user's basic information in one table and multiple educational details in another table where the educational table will store the user table reference id.
Here I have used
- ASP.NET MVC 4
- MSSQL 2012 as Database.
- Entity Framework code first approach.
- From nuget I added reference to Entity Framework.
Step 1: Open Visual Studio 2013, click New Project.
Under Installed, Templates, Visual C#, click Web and provide the name and click OK.
Step 2
After this a window will pop up from Template, select Empty and then select MVC.
Step 3
After this point from Solution Explorer, click on Solution, Add, then New Project.
Step 4
After this a window will pop up, click Installed, Visual C#, then Class Library and click OK.
Step 5
Now Rename the Class1 name to User under DbEntity and write the following code:
using System;
using System.Collections.Generic;
using System.ComponentModel.DataAnnotations;
using System.ComponentModel.DataAnnotations.Schema;
namespace DbEntity
{
[Table("tblUser")]
public class User
{
[Key]
public int RefUserID { get; set; }
public string EmplCode { get; set; }
public string EmplName { get; set; }
public string CreatedBy { get; set; }
public DateTime? CreatedDate { get; set; }
public bool IsDeleted { get; set; }
public string DeletedBy { get; set; }
public DateTime? DeletedDate { get; set; }
public List<UserEducation> objUsrEducation { get; set; }
}
}
Step 6
Now add another class and name it UserEducation User under DbEntity and write the following code:
using System;
using System.ComponentModel.DataAnnotations;
using System.ComponentModel.DataAnnotations.Schema;
namespace DbEntity
{
[Table("tblUsrEducationDetail")]
public class UserEducation
{
[Key]
public int ID { get; set; }
public int RefUserID { get; set; }
public string InstitutionName { get; set; }
public string InstitutionType { get; set; }
public string CreatedBy { get; set; }
public DateTime? CreatedDate { get; set; }
public bool IsDeleted { get; set; }
public string DeletedBy { get; set; }
public DateTime? DeletedDate { get; set; }
}
}
Step 7
Create a dbContext class as follows. Before creating this class install Entity Framework from NuGet Packages.
using System.Data.Entity;
namespace DbEntity.Constent
{
public class MultiFileDbContext : DbContext
{
public DbSet<User> ObjUserData { get; set; }
public DbSet<UserEducation> objUserEducation { get; set; }
}
}
Step 8
Changing Web.Config File,
<connectionStrings>
<add name="MultiFileDbContext" connectionString="Data Source=PDM-SABYASA-LA\SQLEXPRESS;Initial Catalog=DemoMultiFileUserDb;User ID=sa;Password=Admin@1234;" providerName="System.Data.SqlClient" />
</connectionStrings>
After this the database with name DemoMultiFileUserDb and tables tblUser and tblUsrEducationDetail with columns as per class parameters will be created after doing an Insert/Update/Delete operation.
Step 9
I have created a Controller for storing user details as per the following codes,
public ActionResult Index()
{
return View();
}
[ValidateAntiForgeryToken]
[HttpPost]
public ActionResult Index(User ObjUserData)
{
using (var context = new MultiFileDbContext())
{
using (DbContextTransaction dbTran = context.Database.BeginTransaction())
{
try
{
User pd = new User()
{
EmplCode = ObjUserData.EmplCode,
EmplName = ObjUserData.EmplName
};
context.ObjUserData.Add(pd);
context.SaveChanges();
var id = pd.RefUserID;
var usrFile = ObjUserData.objUsrEducation;
if (usrFile != null)
{
foreach (var item in usrFile)
{
item.RefUserID = id;
context.objUserEducation.Add(item);
}
}
context.SaveChanges();
dbTran.Commit();
}
catch (DbEntityValidationException ex)
{
dbTran.Rollback();
throw;
}
}
}
return View();
}
Step 10
I have created view as per the controller action,
@{
ViewBag.Title = "Index";
}
<style>
body {
font-family: arial;
font-size: 12px;
margin: 20px;
}
table {
border-top: 2px solid #708cb7;
}
table td {
font-size: 12px;
padding: 5px 20px;
border: 1px solid #e1eaf9;
}
</style>
@using (Html.BeginForm("Index", "Home", FormMethod.Post, new { enctype = "multipart/form-data" }))
{
@Html.AntiForgeryToken()
<table>
<tr>
<td>Emp Code: </td>
<td><input id="txtEmpCode" type="text" name="EmplCode" placeholder="Employee Code"></td>
</tr>
<tr>
<td>Emp Name:</td>
<td><input id="txtEmpName" type="text" name="EmplName" placeholder="Employee Name"></td>
</tr>
</table>
<br />
<table>
<tbody id="_qualification">
</tbody>
<tfoot>
<tr>
<td colspan="7">
<input id="btnAddCertificate" type="button" value="+">
</td>
</tr>
</tfoot>
</table>
<br/>
<button type="submit">SUBMIT</button>
}
<script type="text/javascript">
$(document).on('click', '#btnAddCertificate', function () {
$.get("../content/Repeater/rptData.html", function (data) {
$('#_qualification').append(data);
});
var _time = 1000;
setTimeout(function () {
var i = 0;
$('._repeatExp').each(function () {
$(this).find('.txtInstName').attr('name', "objUsrEducation[" + (i) + "].InstitutionName");
$(this).find('.ddlEducationType').attr('name', "objUsrEducation[" + (i) + "].InstitutionType");
i++;
});
}, _time);
});
</script>
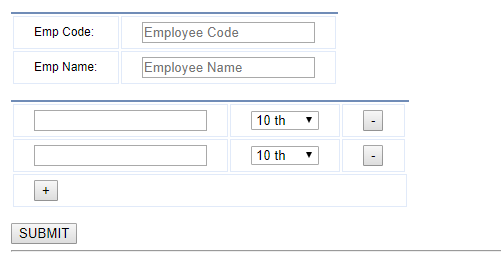
Step 11
I have also added some js and css along with J query to add and remove more records. You can find all in the attached project files. The view will look like this.