European ASP.NET MVC Hosting

BLOG about Latest ASP.NET MVC Hosting and Its Technology - Dedicated to European Windows Hosting Customer

ASP.NET MVC Hosting - HostForLIFEASP.NET :: How to Implement Multiselect Checkboxes in ASP.NET MVC Using AJAX?

clock August 4, 2023 07:17 by author Peter

We will explore how to implement a dynamic form with multiselect checkboxes in an ASP.NET MVC application. We'll focus on using jQuery AJAX to handle the form submission, retrieve the selected checkboxes, and save the data to the database. The provided code includes a complete example of how to create a user-friendly student data management system with the ability to select multiple languages for each student.


Before proceeding, you should have a basic understanding of ASP.NET MVC, C#, jQuery, and Entity Framework.
How to create the Multiselect Checkbox Form?

In the "Index.chtml" file, we have designed a form to collect student data, including a section to select multiple languages for each student using checkboxes.
<!-- Index.chtml -->
<!-- ... (existing code) ... -->
<div class="text-light text-center my-3">
    <div class="d-flex justify-content-center">
        <h5 class="text-warning">Languages:</h5>
        <div id="languagesSection">
            @for (int i = 0; i < Model.Languages.Count; i++)
            {
                <label>@Model.Languages[i].LanguageName</label>
                @Html.CheckBoxFor(model => model.Languages[i].IsChecked)
                @Html.HiddenFor(model => model.Languages[i].ID)
                @Html.HiddenFor(model => model.Languages[i].LanguageName)
            }
        </div>
    </div>
</div>
<!-- ... (existing code) ... -->

Implementing AJAX for Adding Data to Database
In the JavaScript section, we've implemented an AJAX function to handle the form submission and add student data to the database.
// AJAX for Adding Data to Database
$("#SumbitButton").click(function () {
    var selected = []; // initialize array
    $('div#languagesSection2 input[type=checkbox]').each(function () {
        if ($(this).is(":checked")) {
            selected.push($(this).attr("id"));
        }
    });

    $("#Languages").val(selected);
    var studentData = $("#studentInputForm").serialize();

    if (!$('#studentInputForm').valid()) {
        return false;
    }

    $.ajax({
        url: "/Home/SaveStudent",
        type: "POST",
        data: studentData,
        success: function (data) {
            $('#studentInputForm').find(':input').val('');
            $('input[type=checkbox]').prop('checked', false);
        },
        error: function (errormessage) {
            console.log("error message");
        }
    });
});

Handling the AJAX Request in the Controller
In the "HomeController," we've added two action methods, one for saving student data and the other for handling the edit functionality.
public class HomeController : Controller
{
    OperationRepositery repo = null;
    public HomeController()
    {
        repo = new OperationRepositery();
    }

    public ActionResult Index()
        {
            StudentModel model = new StudentModel();
            model.Languages = db.LanguagesTable.Select(lang => new LanguagesModel
            {
                ID = lang.ID,
                LanguageName = lang.LanguagesName,
            }).ToList();
            return View(model);
        }

    // Action method for adding student data
    public ActionResult SaveStudent(StudentModel model)
    {
        var result = repo.AddData(model);
        return Json(new { result = true }, JsonRequestBehavior.AllowGet);
    }

    // Action method for handling the edit functionality
    public ActionResult EditStudent(int ID)
    {
        var result = repo.EditFunction(ID);
        var languageIdList = result.LanguageIds.Split(',').Select(x => Convert.ToInt32(x)).ToList();
        result.Languages = db.LanguagesTable.Select(x => new LanguagesModel
        {
            ID = x.ID,
            LanguageName = x.LanguagesName,
            IsChecked = languageIdList.Contains(x.ID)
        }).ToList();
        return View(result);
    }
}


Happy coding!


ASP.NET MVC Hosting - HostForLIFEASP.NET :: MVC Crud Using Generic Repository And jQuery

clock June 28, 2023 10:46 by author Peter

It’s good idea to stay on the same page while performing create, update, and delete operations. There are many ways to do it such as making them partial views, using Bootstrap’s model popup, loading partial views, using AJAX etc. However, In this post, we will learn how to do it, using jQuery, Generic Repository Pattern, and Entity Framework code first migration.


Repository Pattern
Repository mediates between the domain and the data mapping layers, using a collection-like interface to access the domain objects.

Getting started,

Step 1 Create MVC Application
Open Visual Studio to create a new project, followed by selecting ASP.NET Web Application and name mvc_crud and click OK. In the templatesSelectMvc template and keep the authentication off.

Step 2
Install Entity Framework and fluent validation through NuGet Package.

Step 3 Add Model Class
Now, add new class under models and name it as employee class.
    namespacemvc_CRUD.Models {  
        publicclassEmployee {  
            publicint Id {  
                get;  
                set;  
            }  
            publicstring Phone {  
                get;  
                set;  
            }  
            publicstringFirstName {  
                get;  
                set;  
            }  
            publicstringLastName {  
                get;  
                set;  
            }  
            publicstring Email {  
                get;  
                set;  
            }  
            publicDepartmentDepartment {  
                get;  
                set;  
            }  
            publicGenderGender {  
                get;  
                set;  
            }  
            publicboolIsActive {  
                get;  
                set;  
            }  
        }  
    }  
    publicenumDepartment {  
        Sales,  
        Management,  
        Security  
    }  
    publicenumGender {  
        Male,  
        Female  
    }  

Step 4 Create validation class
Create new folder validation. Afterwards, right click on validation folder and add new class, name it EmployeeValidation.
    publicclassEmployeeValidation AbstractValidator < Employee > {  
        publicEmployeeValidation() {  
            RuleFor(e => e.FirstName).NotEmpty().Length(0, 8);  
            RuleFor(e => e.LastName).NotEmpty().Length(0, 8);  
            RuleFor(e => e.Phone).Length(10).WithMessage("Enter valid number");  
            RuleFor(s => s.Email).NotEmpty().WithMessage("Email address is required").EmailAddress().WithMessage("A valid email is required");  
        }  
    }  


Step 5 Create DbContext class
Now, let’s create a new folder, DAL. Afterwards, add new class, which is derived from DbContext and name it EmployeeContext.
    publicclassEmployeeContext DbContext {  
        publicEmployeeContext()  
        base("EmployeeDB") {}  
        publicDbSet < Employee > Empoyees {  
            get;  
            set;  
        }  
    }  

Step 6 Create Repository Interface class
Now, let’s add a new generic interface, IRepositoryunder abstract folder .
    publicinterfaceIRepository < T > whereT class {  
        IEnumerable < T > GetAll();  
        TFindBy(object id);  
        void Add(Tobj);  
        void Update(Tobj);  
        void Delete(object id);  
        void Save();  
    }  

Step 7 Create Repository Base class

Now, we are going to add an abstract class RepositoryBase, which has virtual implementation on IRepositary interface. For every other Repository, we will add later, which will inherit this abstract class by overriding the virtual methods.
    publicabstractclassRepositoryBase < T > whereT class {  
        protectedEmployeeContext _context;  
        protectedDbSet < T > dbSet;  
        publicRepositoryBase() {  
            this._context = newEmployeeContext();  
            dbSet = _context.Set < T > ();  
        }  
        publicRepositoryBase(EmployeeContext _dataContext) {  
            this._context = _dataContext;  
            dbSet = _dataContext.Set < T > ();  
        }  
        publicvirtualIEnumerable < T > GetAll() {  
            returndbSet.ToList();  
        }  
        publicTFindBy(object id) {  
            returndbSet.Find(id);  
        }  
        publicvirtualvoid Add(Tobj) {  
            dbSet.Add(obj);  
        }  
        publicvirtualvoid Update(Tobj) {  
            dbSet.Attach(obj);  
            _context.Entry(obj).State = EntityState.Modified;  
        }  
        publicvirtualvoid Delete(object id) {  
            T existing = dbSet.Find(id);  
            dbSet.Remove(existing);  
        }  
        publicvirtualvoid Save() {  
            _context.SaveChanges();  
        }  
    }  


Step 8 Create Repository class
Now, let’s create a new folder repository. Afterwards, add new class EmployeeRepository class, which will inherit from Abstract but with a generic repository base andIEmployeeRepository interface.
    namespacemvc_CRUD.Repository {  
        publicclassEmployeeRepository RepositoryBase < Employee > , IEmployeeRepository {}  
        publicinterfaceIEmployeeRepository IRepository < Employee > {}  
    }  

Step 9 Add connection string
Now, add the connection string in web.config file.
    <connectionStrings>  
        <addname="EmployeeDB" connectionString="Data Source=.\SQLEXPRESS;InitialCatalog=EmployeeDB;Integrated Security=True;MultipleActiveResultSets=true" providerName="System.Data.SqlClient" /> </connectionStrings>  


Step 10
In the packet manager console, run the commands given below.
enable-migrations

add-migration "initial-migration"

update-database -verbose

Step 11 Add Controller class
Now, let’s EditHomeController and add the code given below.
    publicclassHomeController Controller {  
        publicreadonlyIEmployeeRepository _employeeRepository;  
        publicHomeController(IEmployeeRepository _employeeRepository) {  
            this._employeeRepository = _employeeRepository;  
        }  
        publicActionResult Index() {  
            varemp = _employeeRepository.GetAll();  
            return View(emp);  
        }  
        publicActionResult Create() {  
                return View();  
            }  
            [HttpPost]  
        publicActionResult Create(Employeeobj) {  
                EmployeeValidationval = newEmployeeValidation();  
                ValidationResult model = val.Validate(obj);  
                if (model.IsValid) {  
                    _employeeRepository.Add(obj);  
                    _employeeRepository.Save();  
                } else {  
                    foreach(ValidationFailure _error inmodel.Errors) {  
                        ModelState.AddModelError(_error.PropertyName, _error.ErrorMessage);  
                    }  
                }  
                return View(obj);  
            }  
            // GET Employees/Edit/5  
        publicActionResult Update(int id) {  
                varemp = _employeeRepository.FindBy(id);  
                return View(emp);  
            }  
            [HttpPost]  
            [ValidateAntiForgeryToken]  
        publicActionResult Update(Employeeemp) {  
                if (ModelState.IsValid) {  
                    _employeeRepository.Update(emp);  
                    _employeeRepository.Save();  
                    returnRedirectToAction("Index");  
                }  
                return View(emp);  
            }  
            // GET Employees/Delete/5  
        publicActionResult Delete(int id) {  
                varemp = _employeeRepository.FindBy(id);  
                return View(emp);  
            }  
            [HttpPost, ActionName("Delete")]  
            [ValidateAntiForgeryToken]  
        publicActionResultDeleteConfirmed(int id) {  
            _employeeRepository.Delete(id);  
            _employeeRepository.Save();  
            returnRedirectToAction("Index");  
        }  
    }  

Step 12 Add Dependency Container
Before we generate views, let’s add a Dependency container. Install UnityMvc5 through NuGet Package and edit the unityConfig class in the App_Start folder.
    publicstaticclassUnityConfig {  
        publicstaticvoidRegisterComponents() {  
            var container = newUnityContainer();  
            // register all your components with the container here  
            // it is NOT necessary to register your controllers  
            // e.g. container.RegisterType<ITestService, TestService>();  
            container.RegisterType < IEmployeeRepository, EmployeeRepository > ();  
            DependencyResolver.SetResolver(newUnityDependencyResolver(container));  
        }  
    }  


Register in the global.asax file
    UnityConfig.RegisterComponents();  

Step 13 Add Index view
Now, let’s add Index view. Right click inside the action method and then click add view, followed by selecting the create strongly-typed view.

We will use the index to load the other pages, using jQuery but before it, lets get jqueryreveal. Here, we need the jqueryreveal.js and reveal.css files to render in the layout. Afterwards, add the create, update, and delete views.
    @model IEnumerable<mvc_CRUD.Models.Employee>  
    @{  
        ViewBag.Title = "Index";  
    }  
    <div id="main_div" class="panel panel-primary">  <div class="panel-heading">Employee List</div>  
        <div class="panel-body">  
            <div class="col-md-6"><a href="#" data-reveal-id="Create" class="CreateBtn"><i class="glyphicon glyphicon-file">Add</i></a><br />         </div>  
            <div class="table table-responsive">  
                <table class="table table-striped table-condensed flip-content">  
                    <thead class="flip-content">  
                        <tr>  
                            <th>Phone</th>  
                            <th>First name</th>  
                            <th>Last name</th>  
                            <th>Email</th>  
                            <th>Department</th>  
                            <th>Gender</th>  
                            <th>Is Active</th>  
                            <th></th>  
                        </tr>  
                    </thead>  
                    <tbody>  
                        @foreach (var item in Model)  
                        {  
                           <tr>  
                                <td> @Html.DisplayFor(modelItem => item.Phone) </td>  
                                <td> @Html.DisplayFor(modelItem => item.FirstName) </td>  
                                <td> @Html.DisplayFor(modelItem => item.LastName) </td>  
                                <td> @Html.DisplayFor(modelItem => item.Email)</td>  
                                <td>@Html.DisplayFor(modelItem => item.Department) </td>  
                                <td> @Html.DisplayFor(modelItem => item.Gender) </td>  
                                <td> @Html.DisplayFor(modelItem => item.IsActive)</td>  
                             <td>  
                          <a href="#" id="@item.Id" data-reveal-id="Update" class="UpdateBtn"><i class="glyphicon glyphicon-edit"></i</a>  
                          <a href="#" id="@item.Id" data-reveal-id="Delete" class="DeleteBtn"><i class="glyphicon glyphicon-remove"></i></a>  
                            </td>  
                         </tr>  
                        }  
                    </tbody>  
                </table>  
            </div>  
        </div>  
    </div>  
    <div id="Update" class="reveal-modal"></div>  
    <div id="Delete" class="reveal-modal"></div>  
    <a href="#" id="Create" class="reveal-modal"></a>  


Add the following  jQuery in the script section at the bottom of the index view to load other views.
    @section Scripts{  
        <script type="text/javascript">  
            $(document).ready(function () {  
                $('.UpdateBtn').click(function () {  
                    var url = '@Url.Action("Update","Home")';  
                    url = url + "?Id=" + this.id;  
                    $('#Update').load(url);  
                });  
            });  
        </script>  
        <script type="text/javascript">  
            $(document).ready(function () {  
                $('.DeleteBtn').click(function () {  
                    var url = '@Url.Action("Delete","Home")';  
                    url = url + "?Id=" + this.id;  
                    $('#Delete').load(url);  
                });  
            });  
        </script>  
        <script type="text/javascript">  
            $(document).ready(function () {  
                $('.CreateBtn').click(function () {  
                    var url = '@Url.Action("Create","Home")';  
                    $('#Create').load(url);  
                });  
            });  
        </script>  
    }  


Step 14
Now, run the application.

Update view

Delete view

Thank you so much for your reading. I hope the article is useful for all the readers. If you have any complaint or suggestion about the code or the article, please let me know. Don't forget to leave your opinion in the comments section bellow. 


ASP.NET MVC Hosting - HostForLIFEASP.NET :: DataTables Grid Integration with ASP.NET MVC

clock June 22, 2023 09:11 by author Peter

What exactly is DataTables?
DataTables is a jQuery Javascript library plug-in. It is a highly flexible tool that adds advanced interaction controls to any HTML table. It is founded on the principles of progressive enhancement.


Let's begin with the database section.

Database Part

I've created a database called "Northwind" that contains a "Customers" entity.
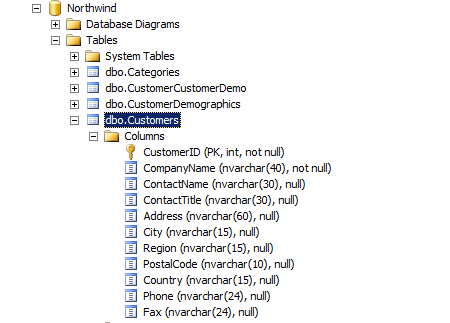
Next, we are going to create an ASP.NET MVC5 Web application.

Creating ASP.NET MVC5 Web Application
Open New Visual Studio 2015 IDE.
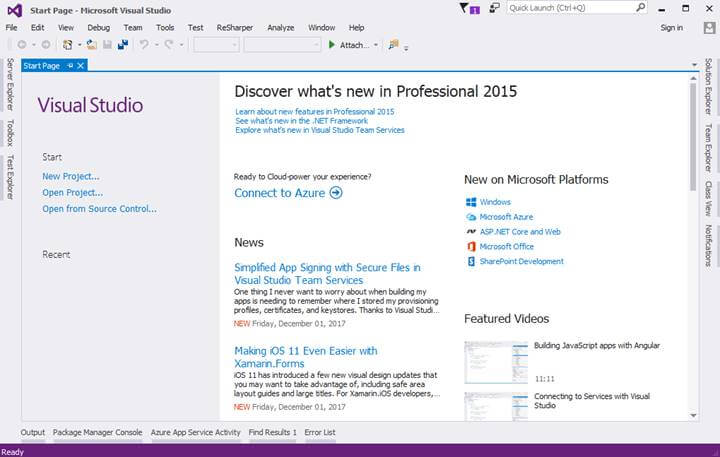

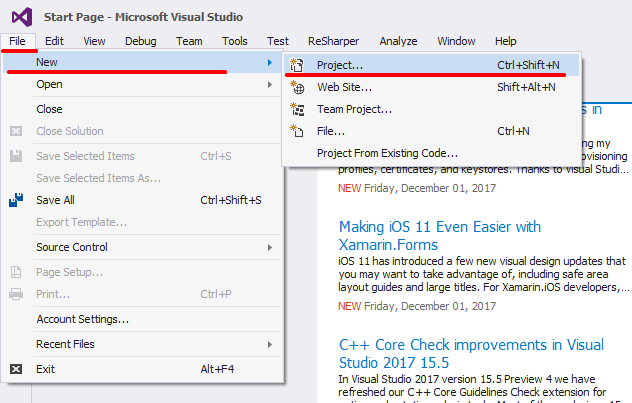
After opening IDE just, next we are going to create MVC project for doing that just click File - inside that New - Project.
After choosing a project, a new dialog will pop up with the name “New Project”. In that, we are going to choose Visual C# Project Templates - Web - ASP.NET Web Application. Then, we are going to name the project as “DemoDatatables”.
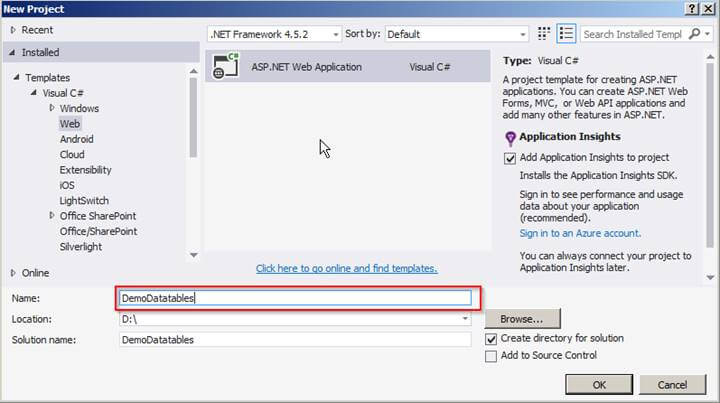
After naming the project we are going click on OK button to create a project.
A new dialog will pop up for choosing templates for Creating “ASP.NET Web Application;” in that template, we are going to Create MVC application. That's why we are going to choose “MVC template” and next click on OK button to create a project.
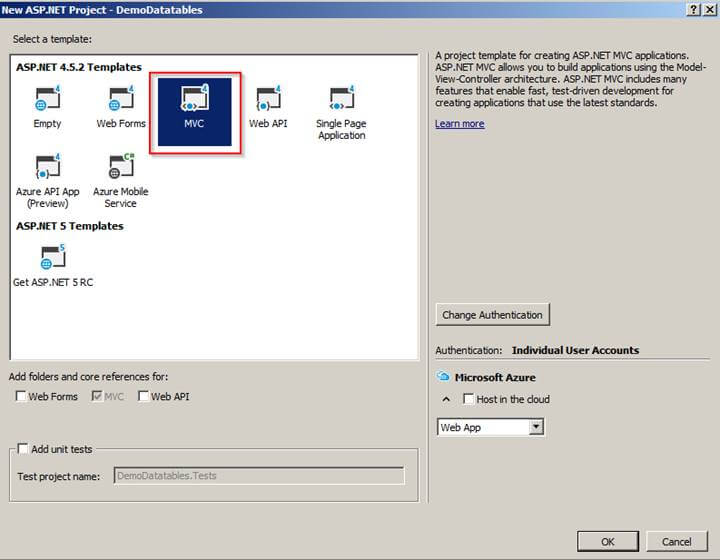
After clicking on OK button it will start to create a project.

Project Structure
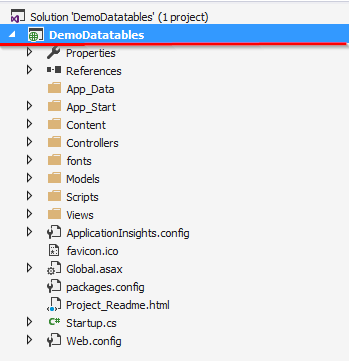
After creating project next, we are going to create Model.

Creating Customer Model
We are going to add Customer Model to the Models folder.
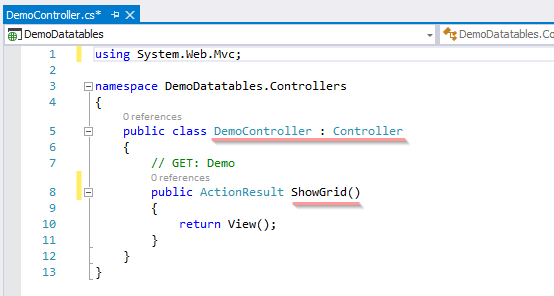
After adding Action Method now let add View with name “ShowGrid”.
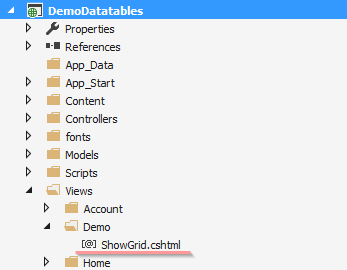

Adding DataTables Grid Scripts and Css on ShowGrid View

In first step we are going to add Script and Css reference.
    <script src="//ajax.googleapis.com/ajax/libs/jquery/1.11.1/jquery.min.js"></script>  
    <link href="~/Content/bootstrap.css" rel="stylesheet" />  
      
    <link href="https://cdn.datatables.net/1.10.15/css/dataTables.bootstrap.min.css" rel="stylesheet" />  
    <link href="https://cdn.datatables.net/responsive/2.1.1/css/responsive.bootstrap.min.css" rel="stylesheet" />  
      
    <script src="https://cdn.datatables.net/1.10.15/js/jquery.dataTables.min.js"></script>  
    <script src="https://cdn.datatables.net/1.10.15/js/dataTables.bootstrap4.min.js "></script>  

After adding Script and CSS reference next we are going to add DataTables Markup.

Adding DataTables Markup
It is simple Html Table in that we are going to add columns headers (“<th>”) with all the columns names which we want to display on the grid.

After adding Markup next, we are going to add DataTables function to Create DataTables.

    <div class="container">  
            <br />  
            <div style="width:90%; margin:0 auto;">  
                <table id="demoGrid" class="table table-striped table-bordered dt-responsive nowrap" width="100%" cellspacing="0">  
                    <thead>  
                  <tr>  
                    <th>CustomerID</th>  
                    <th>CompanyName</th>      
                    <th>ContactName</th>  
                    <th>ContactTitle</th>  
                    <th>City</th>  
                    <th>PostalCode</th>  
                    <th>Country</th>  
                    <th>Phone</th>  
                    <th>Edit</th>  
                    <th>Delete</th>  
                </tr>  
                    </thead>  
                </table>  
            </div>  
        </div>  


Adding DataTables Function to create DataTables
Code Snippet
    <script>  
      
        $('#demoGrid').dataTable({  
        });  
    </script>  

DataTables Options

  • Processing - Enable or disable the display of a 'processing' indicator when the table is being processed (e.g. a sort).
  • server Side - Server-side processing - where filtering, paging, and sorting calculations are all performed by a server.
  • Filter - this option is used for enabling and disabling of search box
  • orderMulti - When ordering is enabled (ordering), by default DataTables allows users to sort multiple columns by shift-clicking upon the header cell for each column. Although this can be quite useful for users, it can also increase the complexity of the order, potentiality increasing the processing time of ordering the data. Therefore, this option is provided to allow this shift-click multiple column abilities
  • Ajax - Ajax request is made to get data to DataTables.
  • columnDefs - Set column definition initialisation properties.
  • Columns - Set column specific initialisation properties.


After completing with an understanding of options or properties next we are going to set it.

We are going to set “processing” option to true to display processing bar, after that, we are going to set the “serverSide” option to true because we are going to do paging and filtering at serverSide.

Next options after “serverSide” option are “filter.” We are going to use the search box; that's why we have set this property to true, “orderMulti” is also set to false because we do not want to sort multiple columns at once.

DataTables Options snapshot

Ajax Option
And the main option is Ajax which we are going to use for calling an Action Method for getting data to bind DataTables Grid the data is in Json format. For that we are going to pass URL: -"/Demo/LoadData”, this request is Post request. And data type we are going to set as Json.

We are going to call LoadData Action Method which is under Demo Controller which I will explain in upcoming steps.

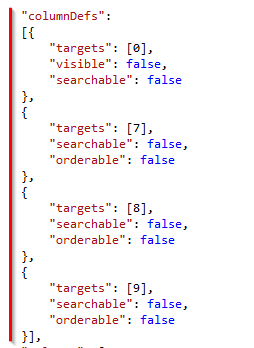
columnDefs Option
After setting Ajax we have a “columnDefs” option which I have used for hiding Primary key of the table (“CustomerID”) and which should also be not searchable.
columns Option
Finally, the second to last option is columns which are used for initialization of DataTables grid. Add that property which you need to render on the grid, which must be defined in this columns option.

Finally, on click of the delete button, we can call a custom function to delete data as I have created “DeleteData” function.
Complete code Snippet of ShowGrid View
    @{  
        Layout = null;  
    }  
      
    <!DOCTYPE html>  
    <html>  
    <head>  
        <meta name="viewport" content="width=device-width" />  
        <title>ShowGrid</title>  
        <script src="//ajax.googleapis.com/ajax/libs/jquery/1.11.1/jquery.min.js"></script>  
        <link href="~/Content/bootstrap.css" rel="stylesheet" />  
      
        <link href="https://cdn.datatables.net/1.10.15/css/dataTables.bootstrap.min.css" rel="stylesheet" />  
        <link href="https://cdn.datatables.net/responsive/2.1.1/css/responsive.bootstrap.min.css" rel="stylesheet" />  
      
        <script src="https://cdn.datatables.net/1.10.15/js/jquery.dataTables.min.js"></script>  
        <script src="https://cdn.datatables.net/1.10.15/js/dataTables.bootstrap4.min.js "></script>  
      
        <script>  
            $(document).ready(function () {  
                $("#demoGrid").DataTable({  
      
                    "processing": true, // for show progress bar  
                    "serverSide": true, // for process server side  
                    "filter": true, // this is for disable filter (search box)  
                    "orderMulti": false, // for disable multiple column at once  
                    "pageLength": 5,  
      
                    "ajax": {  
                        "url": "/Demo/LoadData",  
                        "type": "POST",  
                        "datatype": "json"  
                    },  
      
                    "columnDefs":  
                    [{  
                        "targets": [0],  
                        "visible": false,  
                        "searchable": false  
                    },  
                    {  
                        "targets": [7],  
                        "searchable": false,  
                        "orderable": false  
                    },  
                    {  
                        "targets": [8],  
                        "searchable": false,  
                        "orderable": false  
                    },  
                    {  
                        "targets": [9],  
                        "searchable": false,  
                        "orderable": false  
                    }],  
      
                    "columns": [  
                          { "data": "CustomerID", "name": "CustomerID", "autoWidth": true },  
                          { "data": "CompanyName", "name": "CompanyName", "autoWidth": true },  
                          { "data": "ContactName", "title": "ContactName", "name": "ContactName", "autoWidth": true },  
                          { "data": "ContactTitle", "name": "ContactTitle", "autoWidth": true },  
                          { "data": "City", "name": "City", "autoWidth": true },  
                          { "data": "PostalCode", "name": "PostalCode", "autoWidth": true },  
                          { "data": "Country", "name": "Country", "autoWidth": true },  
                          { "data": "Phone", "name": "Phone", "title": "Status", "autoWidth": true },  
                          {  
                              "render": function (data, type, full, meta)  
                              { return '<a class="btn btn-info" href="/Demo/Edit/' + full.CustomerID + '">Edit</a>'; }  
                          },  
                           {  
                               data: null, render: function (data, type, row) {  
                                   return "<a href='#' class='btn btn-danger' onclick=DeleteData('" + row.CustomerID + "'); >Delete</a>";  
                               }  
                           },  
      
                    ]  
      
                });  
            });  
        </script>  
      
    </head>  
    <body>  
        <div class="container">  
            <br />  
            <div style="width:90%; margin:0 auto;">  
                <table id="demoGrid" class="table table-striped table-bordered dt-responsive nowrap" width="100%" cellspacing="0">  
                    <thead>  
                        <tr>  
                            <th>CustomerID</th>  
                            <th>CompanyName</th>  
                            <th>ContactName</th>  
                            <th>ContactTitle</th>  
                            <th>City</th>  
                            <th>PostalCode</th>  
                            <th>Country</th>  
                            <th>Phone</th>  
                            <th>Edit</th>  
                            <th>Delete</th>  
                        </tr>  
                    </thead>  
                </table>  
            </div>  
        </div>  
    </body>  
    </html>  

After completing with initialization of DataTables grid next we are going to create LoadData Action Method.

Adding LoadData Action Method to Demo Controller
Here we are going to Add Action Method with name LoadData. In this action method, we are going to get all Customer records from the database to display and on the basis of the parameter we are going sort data, and do paging with data.

We are doing paging and filtering of data on the server side; that why we are using IQueryable which will execute queries with filters on the server side.

Render buttons in Columns
At last, we need to render button in the grid for editing data and deleting data.


    @{  
        Layout = null;  
    }  
      
    <!DOCTYPE html>  
    <html>  
    <head>  
        <meta name="viewport" content="width=device-width" />  
        <title>ShowGrid</title>  
        <script src="//ajax.googleapis.com/ajax/libs/jquery/1.11.1/jquery.min.js"></script>  
        <link href="~/Content/bootstrap.css" rel="stylesheet" />  
      
        <link href="https://cdn.datatables.net/1.10.15/css/dataTables.bootstrap.min.css" rel="stylesheet" />  
        <link href="https://cdn.datatables.net/responsive/2.1.1/css/responsive.bootstrap.min.css" rel="stylesheet" />  
      
        <script src="https://cdn.datatables.net/1.10.15/js/jquery.dataTables.min.js"></script>  
        <script src="https://cdn.datatables.net/1.10.15/js/dataTables.bootstrap4.min.js "></script>  
      
        <script>  
            $(document).ready(function () {  
                $("#demoGrid").DataTable({  
      
                    "processing": true, // for show progress bar  
                    "serverSide": true, // for process server side  
                    "filter": true, // this is for disable filter (search box)  
                    "orderMulti": false, // for disable multiple column at once  
                    "pageLength": 5,  
      
                    "ajax": {  
                        "url": "/Demo/LoadData",  
                        "type": "POST",  
                        "datatype": "json"  
                    },  
      
                    "columnDefs":  
                    [{  
                        "targets": [0],  
                        "visible": false,  
                        "searchable": false  
                    },  
                    {  
                        "targets": [7],  
                        "searchable": false,  
                        "orderable": false  
                    },  
                    {  
                        "targets": [8],  
                        "searchable": false,  
                        "orderable": false  
                    },  
                    {  
                        "targets": [9],  
                        "searchable": false,  
                        "orderable": false  
                    }],  
      
                    "columns": [  
                          { "data": "CustomerID", "name": "CustomerID", "autoWidth": true },  
                          { "data": "CompanyName", "name": "CompanyName", "autoWidth": true },  
                          { "data": "ContactName", "title": "ContactName", "name": "ContactName", "autoWidth": true },  
                          { "data": "ContactTitle", "name": "ContactTitle", "autoWidth": true },  
                          { "data": "City", "name": "City", "autoWidth": true },  
                          { "data": "PostalCode", "name": "PostalCode", "autoWidth": true },  
                          { "data": "Country", "name": "Country", "autoWidth": true },  
                          { "data": "Phone", "name": "Phone", "title": "Status", "autoWidth": true },  
                          {  
                              "render": function (data, type, full, meta)  
                              { return '<a class="btn btn-info" href="/Demo/Edit/' + full.CustomerID + '">Edit</a>'; }  
                          },  
                           {  
                               data: null, render: function (data, type, row) {  
                                   return "<a href='#' class='btn btn-danger' onclick=DeleteData('" + row.CustomerID + "'); >Delete</a>";  
                               }  
                           },  
      
                    ]  
      
                });  
            });  
        </script>  
      
    </head>  
    <body>  
        <div class="container">  
            <br />  
            <div style="width:90%; margin:0 auto;">  
                <table id="demoGrid" class="table table-striped table-bordered dt-responsive nowrap" width="100%" cellspacing="0">  
                    <thead>  
                        <tr>  
                            <th>CustomerID</th>  
                            <th>CompanyName</th>  
                            <th>ContactName</th>  
                            <th>ContactTitle</th>  
                            <th>City</th>  
                            <th>PostalCode</th>  
                            <th>Country</th>  
                            <th>Phone</th>  
                            <th>Edit</th>  
                            <th>Delete</th>  
                        </tr>  
                    </thead>  
                </table>  
            </div>  
        </div>  
    </body>  
    </html>  

After completing with initialization of DataTables grid next we are going to create LoadData Action Method.

Adding LoadData Action Method to Demo Controller
Here we are going to Add Action Method with name LoadData. In this action method, we are going to get all Customer records from the database to display and on the basis of the parameter we are going sort data, and do paging with data.

We are doing paging and filtering of data on the server side; that why we are using IQueryable which will execute queries with filters on the server side.

For using OrderBy in the query we need to install System.Linq.Dynamic package from NuGet packages.

Snapshot while adding System.Linq.Dynamic package from NuGet packages
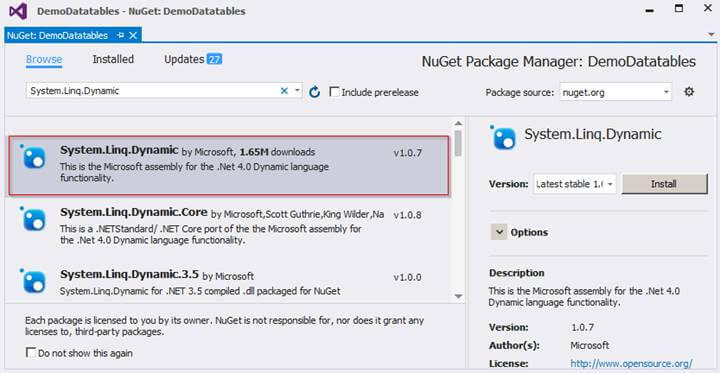
After adding the package, next, we see the complete code snippet and how to get data and do paging and filtering with it.

Complete code Snippet of LoadData Action Method
All processes are step by step with comments; so it's easy to understand.

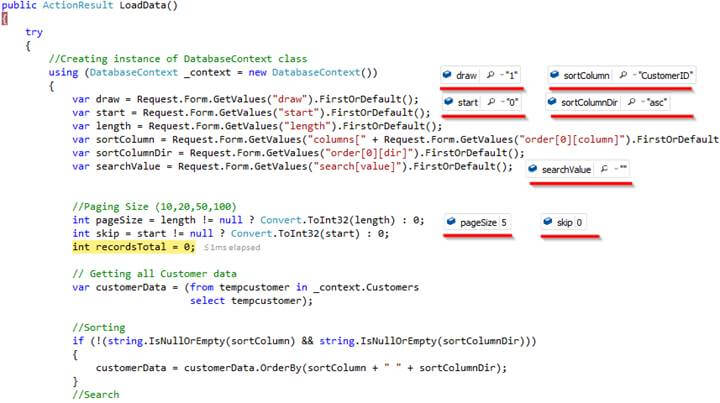
All Request.Form.GetValues parameters value will get populated when AJAX post method gets called on a load of if you do paging or sorting and search.
Code Snippet
    public ActionResult LoadData()  
    {  
        try  
        {  
            var draw = Request.Form.GetValues("draw").FirstOrDefault();  
            var start = Request.Form.GetValues("start").FirstOrDefault();  
            var length = Request.Form.GetValues("length").FirstOrDefault();  
            var sortColumn = Request.Form.GetValues("columns[" + Request.Form.GetValues("order[0][column]").FirstOrDefault() + "][name]").FirstOrDefault();  
            var sortColumnDir = Request.Form.GetValues("order[0][dir]").FirstOrDefault();  
            var searchValue = Request.Form.GetValues("search[value]").FirstOrDefault();  
      
      
            //Paging Size (10,20,50,100)    
            int pageSize = length != null ? Convert.ToInt32(length) : 0;  
            int skip = start != null ? Convert.ToInt32(start) : 0;  
            int recordsTotal = 0;  
      
            // Getting all Customer data    
            var customerData = (from tempcustomer in _context.Customers  
                                select tempcustomer);  
      
            //Sorting    
            if (!(string.IsNullOrEmpty(sortColumn) && string.IsNullOrEmpty(sortColumnDir)))  
            {  
                customerData = customerData.OrderBy(sortColumn + " " + sortColumnDir);  
            }  
            //Search    
            if (!string.IsNullOrEmpty(searchValue))  
            {  
                customerData = customerData.Where(m => m.CompanyName == searchValue);  
            }  
      
            //total number of rows count     
            recordsTotal = customerData.Count();  
            //Paging     
            var data = customerData.Skip(skip).Take(pageSize).ToList();  
            //Returning Json Data    
            return Json(new { draw = draw, recordsFiltered = recordsTotal, recordsTotal = recordsTotal, data = data });  
      
        }  
        catch (Exception)  
        {  
            throw;  
        }  
      
    }  


Complete code Snippet of DemoController
    using DemoDatatables.Models;  
    using System;  
    using System.Linq;  
    using System.Web.Mvc;  
    using System.Linq.Dynamic;  
    using System.Data.Entity;  
      
    namespace DemoDatatables.Controllers  
    {  
        public class DemoController : Controller  
        {  
            // GET: Demo  
            public ActionResult ShowGrid()  
            {  
                return View();  
            }  
      
            public ActionResult LoadData()  
            {  
                try  
                {  
                    //Creating instance of DatabaseContext class  
                    using (DatabaseContext _context = new DatabaseContext())  
                    {  
                        var draw = Request.Form.GetValues("draw").FirstOrDefault();  
                        var start = Request.Form.GetValues("start").FirstOrDefault();  
                        var length = Request.Form.GetValues("length").FirstOrDefault();  
                        var sortColumn = Request.Form.GetValues("columns[" + Request.Form.GetValues("order[0][column]").FirstOrDefault() + "][name]").FirstOrDefault();  
                        var sortColumnDir = Request.Form.GetValues("order[0][dir]").FirstOrDefault();  
                        var searchValue = Request.Form.GetValues("search[value]").FirstOrDefault();  
      
      
                        //Paging Size (10,20,50,100)    
                        int pageSize = length != null ? Convert.ToInt32(length) : 0;  
                        int skip = start != null ? Convert.ToInt32(start) : 0;  
                        int recordsTotal = 0;  
      
                        // Getting all Customer data    
                        var customerData = (from tempcustomer in _context.Customers  
                                            select tempcustomer);  
      
                        //Sorting    
                        if (!(string.IsNullOrEmpty(sortColumn) && string.IsNullOrEmpty(sortColumnDir)))  
                        {  
                            customerData = customerData.OrderBy(sortColumn + " " + sortColumnDir);  
                        }  
                        //Search    
                        if (!string.IsNullOrEmpty(searchValue))  
                        {  
                            customerData = customerData.Where(m => m.CompanyName == searchValue);  
                        }  
      
                        //total number of rows count     
                        recordsTotal = customerData.Count();  
                        //Paging     
                        var data = customerData.Skip(skip).Take(pageSize).ToList();  
                        //Returning Json Data    
                        return Json(new { draw = draw, recordsFiltered = recordsTotal, recordsTotal = recordsTotal, data = data });  
                    }  
                }  
                catch (Exception)  
                {  
                    throw;  
                }  
      
            }  
         
        }  
    }  

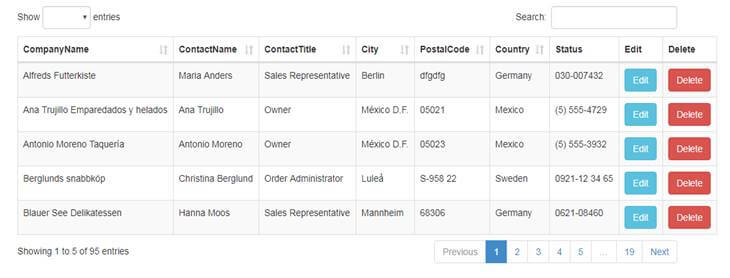
Save the entire Source code and run the application.

Run Application
To access the application, enter URL - http://localhost:#####/demo/showgrid .

“#####” is localhost port number.
Real-time Debugging Snapshot
In this section, you can see what values are populated when post method gets called.
Search with DataTables grid
In this section we have implemented a search for only Companyname column, if you want to add another column just use or condition (“||”) with it.


Adding more columns to search

Debugging View of Search
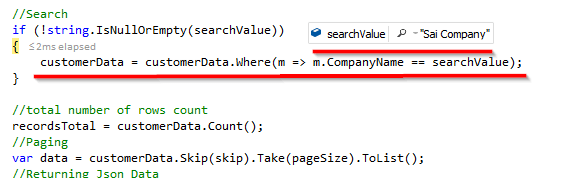
After completing with search Implementation next we are going to work on Edit Button of DataTables Grid.

Edit Event in DataTables grid
In this section first we are going add Edit Action Method in Demo Controller which will handle edit request and it will take Customer ID as input from which we are going to get details of that customer.

Code Snippet of Edit Action Method
    [HttpGet]  
    public ActionResult Edit(int? ID)  
    {     
        try  
        {  
            using (DatabaseContext _context = new DatabaseContext())  
            {  
                var Customer = (from customer in _context.Customers  
                                where customer.CustomerID == ID  
                                select customer).FirstOrDefault();  
      
                return View(Customer);  
            }  
        }  
        catch (Exception)  
        {  
            throw;  
        }     
    }  


After having a look on Edit action method next let’s see how to render Edit link (button).

Below is syntax for rendering Edit button

Finally, you can see Edit View.

After completing with Edit part next we are going to have a look at delete part.

Delete Event in DataTables grid
In this section first we are going add DeleteCustomer Action Method in DemoController which will handle delete request and it will take Customer ID (“ID”) as input from which we are going to delete customer data.

Code Snippet of DeleteCustomer
    [HttpPost]  
    public JsonResult DeleteCustomer(int? ID)  
    {  
        using (DatabaseContext _context = new DatabaseContext())  
        {  
            var customer = _context.Customers.Find(ID);  
            if (ID == null)  
                return Json(data: "Not Deleted", behavior: JsonRequestBehavior.AllowGet);  
            _context.Customers.Remove(customer);  
            _context.SaveChanges();  
      
            return Json(data: "Deleted", behavior: JsonRequestBehavior.AllowGet);  
        }  
    }  


After having a look on DeleteCustomer action method next let’s see how to render delete link (button).

Below is syntax for rendering Delete button

Now you can see that we are generating simple href button and on that button, we have added an onclick event to call DeleteData function which we have not created yet, so  let’s create DeleteData function.

Code Snippet
In this part when user clicks on Delete button DeleteData function will get called and first thing it will show is confirmation alert ("Are you sure you want to delete ...?") if you click on ok (confirm) button then it will call Delete function. This function takes CustomerID as input, next we are generating URL of DeleteCustomer Action Method and passing it as ajax post request and along with it we are passing Customer ID as parameter.

If data is deleted, then we are going to get “Deleted” as a response from Deletecustomer Action Method, finally, we show alert to the user and reload grid.
    <script>  
      
        function DeleteData(CustomerID) {  
            if (confirm("Are you sure you want to delete ...?")) {  
                Delete(CustomerID);  
            }  
            else {  
                return false;  
            }  
        }  
      
      
        function Delete(CustomerID) {  
            var url = '@Url.Content("~/")' + "Demo/DeleteCustomer";  
            $.post(url, { ID: CustomerID }, function (data) {  
                if (data == "Deleted") {  
                    alert("Delete Customer !");  
                    oTable = $('#demoGrid').DataTable();  
                    oTable.draw();  
                }  
                else {  
                    alert("Something Went Wrong!");  
                }  
            });  
        }  
    </script>  

Debugging View while deleting customer
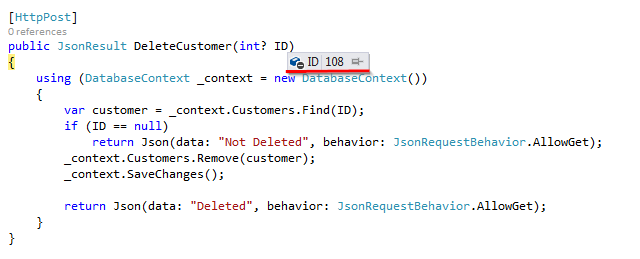
Finally, we have learned how to use jQuery DataTables Grid with ASP.NET CORE MVC. I hope you enjoyed the article.


ASP.NET MVC Hosting - HostForLIFEASP.NET :: Action Filter In MVC

clock June 16, 2023 07:32 by author Peter

Action filter in MVC allows us to manage situations in which we wish to perform an operation prior to and following the execution of a controller action. We create a custom class that inherits the FilterAttribute class and implements the IActionFilter interface for this purpose. After creating the filter, we merely assign the class name to the controller as an attribute.

In this case, the FilterAttribute class allows the class to be used as an attribute, and the IActionFilter interface contains two methods titled OnActionExecuting and OnActionExecuted. OnActionExecuting is executed before the controller method, while OnActionExecuted is summoned after the controller method has been executed. This technique is extremely useful for archiving purposes. So let's examine how we can utilize this filter.
 
Let's begin by adding the MyActionFilter.cs class. Derive this class now from the FilterAttribute and the IActionFilter interfaces. Incorporate your custom logic within the OnActionExecuting and OnActionExecuted methods.Consequently, the code will appear as shown below. 

    public class MyActionFilter : FilterAttribute, IActionFilter  
    {  
        public void OnActionExecuted(ActionExecutedContext filterContext)  
        {  
            //Fires after the method is executed  
        }  
      
        public void OnActionExecuting(ActionExecutingContext filterContext)  
        {  
            //Fires before the action is executed  
        }  
    }  


Simply, apply the class as an attribute on the controller. Add debuggers on both the methods as well as the controller method.
    public class HomeController : Controller  
    {  
        [MyActionFilter]  
        public ActionResult Index()  
        {  
            return View();  
        }  
      
        public ActionResult About()  
        {  
            ViewBag.Message = "Your application description page.";  
            return View();  
        }  
      
        public ActionResult Contact()  
        {  
            ViewBag.Message = "Your contact page.";  
            return View();  
        }  
    }  


Run the Application and debug step by step to see the order of execution of the methods. First, the OnActionExecuting will be executed, then the controller method and finally the OnActionExecuted method.

I hope you enjoyed reading it. Happy coding.


ASP.NET MVC Hosting - HostForLIFEASP.NET :: Performance Check With MiniProfiler In ASP.NET MVC

clock June 7, 2023 10:05 by author Peter

MiniProfiler is an open source profiling library that monitors a.NET application's performance. It is extremely lightweight and quick. Using this, we can readily identify an application performance issue. It was created by members of the Stack Overflow Team.

Why is MiniProfiler advantageous?
Developing a high-performance application is not a simple endeavor. Our application becomes too slow due to complex logic, mapping entities, multiple libraries, substantial quantities of HTML, CSS, and JS code, Database logic, connectivity, and server response time, etc. And it becomes exceedingly difficult to pinpoint the precise causes of our application's slowness.

MiniProfiler is an excellent instrument for determining how much time each application component requires to process. Using MiniProfiler, we can readily determine how much time our database logic and server response take, among other things.  MiniProfiler essentially enables us to determine who is slowing down our application so that we can optimize that component and make the application quicker.

MiniProfiler configuration with Asp.Net MVC application
Create an application in ASP.NET MVC 4, right-click the project, and select "Manage NuGet Packages.." to install MiniProfiler for the ASP.NET MVC application. As shown in the screenshot below, we have conducted a search for MiniProfiler.MVC and will install the second result, "MiniProfiler.MVC4". MiniProfiler was designed for ASP.NET MVC 4+ websites, as stated in MiniProfiler's product description. Therefore, let's install this by selecting "Install" in the right pane.

After MiniProfiler installation, we will find two references inside the Project Reference section - “MiniProfiler” and “MiniProfiler.Mvc”. Now, it's time to configure when MiniProfiler will start profiling to the application. So, make the following entries inside the Global.asax file.
    using StackExchange.Profiling;  
    using System.Web.Mvc;  
    using System.Web.Optimization;  
    using System.Web.Routing;  
      
    namespace MiniProfilerTest  
    {  
        public class MvcApplication : System.Web.HttpApplication  
        {  
            protected void Application_Start()  
            {  
                AreaRegistration.RegisterAllAreas();  
                FilterConfig.RegisterGlobalFilters(GlobalFilters.Filters);  
                RouteConfig.RegisterRoutes(RouteTable.Routes);  
                BundleConfig.RegisterBundles(BundleTable.Bundles);  
            }  
            protected void Application_BeginRequest()  
            {  
                if (Request.IsLocal)  
                {  
                    //MiniProfiler will start at the begining of the request.  
                    MiniProfiler.Start();  
                }  
            }  
      
            protected void Application_EndRequest()  
            {  
                //MiniProfiler will stop at the begining of the request.  
                MiniProfiler.Stop();  
            }  
        }  
    }  

As we have configured with the above code, MiniProfiler should start profiling once a new request gets the process; and stop profiling at the end of the request.

Now, move to the View and configure MiniProfiler so that the profiling data will get inside the HTML portion at the top left corner. To do that, we have to add “@MiniProfiler.RenderIncludes()” code with Layout page. We have chosen layout page because we would like to profile each request that is using this layout page.
    @using StackExchange.Profiling  
      
    <!DOCTYPE html>  
    <html>  
    <head>  
        <meta charset="utf-8" />  
        <meta name="viewport" content="width=device-width, initial-scale=1.0">  
        <title>@ViewBag.Title - My ASP.NET Application</title>  
        @Styles.Render("~/Content/css")  
        @Scripts.Render("~/bundles/modernizr")     
    </head>  
    <body>  
        <div class="navbar navbar-inverse navbar-fixed-top">  
            <div class="container">  
                <div class="navbar-header">  
                    <button type="button" class="navbar-toggle" data-toggle="collapse" data-target=".navbar-collapse">  
                        <span class="icon-bar"></span>  
                        <span class="icon-bar"></span>  
                        <span class="icon-bar"></span>  
                    </button>  
                    @Html.ActionLink("Application name", "Index", "Home", new { area = "" }, new { @class = "navbar-brand" })  
                </div>  
                <div class="navbar-collapse collapse">  
                    <ul class="nav navbar-nav">  
                        <li>@Html.ActionLink("Home", "Index", "Home")</li>  
                        <li>@Html.ActionLink("About", "About", "Home")</li>  
                        <li>@Html.ActionLink("Contact", "Contact", "Home")</li>  
                    </ul>  
                </div>  
            </div>  
        </div>  
        <div class="container body-content">  
            @RenderBody()  
            <hr />  
            <footer>  
                <p>© @DateTime.Now.Year - My ASP.NET Application</p>  
            </footer>  
        </div>  
        @Scripts.Render("~/bundles/jquery")  
        @Scripts.Render("~/bundles/bootstrap")  
        @RenderSection("scripts", required: false)  
      
        @MiniProfiler.RenderIncludes()  
    </body>  
    </html>  


DO NOT DO
Don’t install “MiniProfiler” and then “MiniProfiler.Mvc4” or “MiniProfiler.Mvc3” one by one with ASP.NET MVC application. It will create an issue with the MVC application; the MiniProfiler will not work and you will get the following issue.

“localhost:port/mini-profiler-resources/results”  Not Found [404].

WHAT TO DO
Always install a specific version when working with ASP.NET MVC application. For example, if working with ASP.NET MVC 4, then choose “MiniProfiler.Mvc4” from NuGet and install it or if working with ASP.NET MVC 3, then choose “MiniProfiler.Mvc3” from NuGet and install it.

If you get an error after running the application with MiniProfiler.Mvc4 or MiniProfiler.Mvc3, which states “/mini-profiler-resources/includes.js 404 not found”, then simply add the following line of code in Web.Config inside Web Server section.
        <system.webServer>  
            <handlers>  
              <add name="MiniProfiler" path="mini-profiler-resources/*"  
                       verb="*" type="System.Web.Routing.UrlRoutingModule"  
                       resourceType="Unspecified" preCondition="integratedMode" />  
            </handlers>     
        </system.webServer>  


Finally, we have done all the installation and settings to configure MiniProfiler with ASP.NET MVC application. Now, we can run the application. To run, press F5 and the application will be populated as follows with MiniProfiler Data at the top left corner of the application. The output will be like in the below image. Here, we can see clearly how much time each event has taken to process.

If we view the “page source”, we will find the following scripting code which is auto generated and added with the View to display the profiling data.
<script async type="text/javascript" id="mini-profiler" src="/mini-profiler-resources/includes.js?v=sudYtmATCtlvvgsiJ+ijDWT8sy88Fx31VI8aPQ/CYM8=" data-version="sudYtmATCtlvvgsiJ+ijDWT8sy88Fx31VI8aPQ/CYM8=" data-path="/mini-profiler-resources/" data-current-id="bd11c448-99dd-4c44-a49a-e248cc52bb83" data-ids="bd11c448-99dd-4c44-a49a-e248cc52bb83" data-position="left" data-trivial="false" data-children="false" data-max-traces="15" data-controls="false" data-authorized="true" data-toggle-shortcut="Alt+P" data-start-hidden="false" data-trivial-milliseconds="2"></script>  

Now, let us move on to  see how MiniProfiler works with actual data. To complete this demonstration, we are going to create some dummy blog post data in one step and in the next step  we are going to modify the actual username.

Note
I am creating dummy data inside the controller itself. Instead of this, we can get actual data from API.

We can define our own steps to see which process takes how much time. So, basically, STEPs in MiniProfiler are used to see the performance of each process, like getting data from the server, updating data on the server or posting data in Database etc.  Here I am going to create a list for Blog Posts and define it inside one STEP.  Another STEP will be defined to update the Username for Blog Post as in the below code shown.

So, first, let's create a model class for a blog post which has a few properties to define the blog data. Just create a class inside the Model folder with the name “BlogPost”.
    using System;  
    using System.Collections.Generic;  
    using System.Linq;  
    using System.Web;  
      
    namespace MiniProfilerTest.Models  
    {  
        public class BlogPost  
        {  
            public int PostId { get; set; }  
            public string Title { get; set; }  
            public string Category { get; set; }  
            public string Content { get; set; }  
            public string UserName { get; set; }  
        }  
    }  

Now, move to the home controller and define steps. The first step will be defined to“Get Blog Post Data”. Here, we are creating dummy details for the blog post to show on View but instead of this, we can also get the actual data from our services or APIs. With the next step “Update User Info”, we are modifying the username based on a certain condition. Once the Model is defined, it will be passed to View to render the data on the View in a tabular format.
    using MiniProfilerTest.Models;  
    using StackExchange.Profiling;  
    using System;  
    using System.Collections.Generic;  
    using System.Linq;  
    using System.Web;  
    using System.Web.Mvc;  
      
    namespace MiniProfilerTest.Controllers  
    {  
        public class HomeController : Controller  
        {  
            public ActionResult Index()  
            {  
                var miniProfiler = MiniProfiler.Current;  
                List<BlogPost> post = new List<BlogPost>();  
      
                //Suppose getting blog post data form API call.  
                using (miniProfiler.Step("Get Blog Post Data", ProfileLevel.Info))  
                {  
                    post.Add(new BlogPost() { PostId = 1, Title = "Blog Post Title 1", Category = "Category 1", Content = "Content for Blog Post 1" });  
                    post.Add(new BlogPost() { PostId = 2, Title = "Blog Post Title 2", Category = "Category 2", Content = "Content for Blog Post 2" });  
                    post.Add(new BlogPost() { PostId = 3, Title = "Blog Post Title 3", Category = "Category 1", Content = "Content for Blog Post 3" });  
                    post.Add(new BlogPost() { PostId = 4, Title = "Blog Post Title 4", Category = "Category 2", Content = "Content for Blog Post 4" });  
                    post.Add(new BlogPost() { PostId = 5, Title = "Blog Post Title 5", Category = "Category 1", Content = "Content for Blog Post 5" });  
                }  
      
                using (miniProfiler.Step("Update User Info", ProfileLevel.Info))  
                {  
                    //Suppose updating user name form API call update here.  
                    foreach (var item in post)  
                    {  
                        if (item.PostId < 3)  
                        {  
                            item.UserName = "Peter";  
                        }  
                        else  
                        {  
                            item.UserName = "Admin";  
                        }  
                    }  
                }  
      
                return View(post);  
            }  
      
            public ActionResult About()  
            {  
                ViewBag.Message = "Your application description page.";  
      
                return View();  
            }  
      
            public ActionResult Contact()  
            {  
                ViewBag.Message = "Your contact page.";  
      
                return View();  
            }  
        }  
      
    }  

It's time to render the data on Index.cshtml View. So, make iteration on Model data and fill in the table as below.
    @model IEnumerable<MiniProfilerTest.Models.BlogPost>  
      
    @{  
        ViewBag.Title = "Home Page";  
    }  
      
    <div class="pull-right" style="width:600px;">  
        <h3>MiniProfiler Test Data</h3>  
        <table style="border:3px solid #808080;">  
            <tr>  
                <th>ID</th>  
                <th>Title</th>  
                <th>Category</th>  
                <th>Content</th>  
                <th>User</th>  
            </tr>  
            @foreach (var post in Model)  
            {  
                <tr style="border:1px solid #808080">  
                    <td>@post.PostId</td>  
                    <td>@post.Title</td>  
                    <td>@post.Category</td>  
                    <td>@post.Content</td>  
                    <td>@post.UserName</td>  
                </tr>  
            }  
        </table>  
      
    </div>  


Now, we have set up the steps, let's run the application to see what happens. If we run the application, we will see the output as following where we can see the actual data in Table format along with profiling data created by MiniProfiler.

We can clearly see the STEPs [Blue Circled with Image] which we have defined at the time of creating dummy data “Get Blog Post Data” and “Update User Info”. Here, we can see how much time this application has taken to “Get Blog Post Data” and how much time is consumed to “Update User Info”.

So, based on this profiling report, we can modify our logic so that our application will get, post, update, or delete the data in minimal time.

Conclusion
Thus, we saw how to implement MiniProfiler with ASP.NET MVC application and how it can help us to know the actual time taken by each process. I hope this post will help you. Please put your feedback using comments which help me to improve myself for the next post. If you have any doubts, please ask; and if you like this post, please share it with your friends.


ASP.NET MVC Hosting - HostForLIFEASP.NET :: Implement Cascading Dropdown In ASP.NET Core MVC Application Using InMemory DB

clock May 17, 2023 10:15 by author Peter

Today, this article will discuss how we can design or develop any dependent or cascading dropdown control in Asp.net Core MVC Application. While developing any application using any language, sometimes we must define dropdown control that populates data from the backend part, i.e., from the database section. So, control directly fetches data from the database by using APIs and displays it in the dropdown control. But, sometimes, we need to implement the dependent dropdown control. It means the value of the dependent dropdown control depends on another. So, as per the selected value of the first dropdown control, we need to pass that value to the database side with the help of a parameter, and then as per that value, it will return the corresponding values to bind the second control. In this article, we will demonstrate this function with the help of the Asp.Net Core MVC Application.


Pre-Requisites
We must create a sample application using Asp.Net Core to demonstrate the functionality. For that purpose, we will use the .Net 7.0 framework. So, we need the below tools as a pre-requisite.
    Visual Studio 2022 Community Edition / Visual Studio Code
    .Net 7.0 SDK (only required if we use Visual Studio Code as Code Editor).

Also, we are not using any database tools for the database-related part. For the time-saving part, we are using the In-Memory database features of the Asp.Net Core application. We must use database tools like SQL, Oracle, MySQL, etc. In that case, we can need to replace the In-Memory database connection part with the actual database connection details.

In this example, we will use two models: Category and Product. Every product information is tagged with an existing category. So, finally, in the view part, once we select any Category value from the dropdown, it will populate related product items accordingly.
Steps to Develop Cascading Dropdown in Asp.Net Core MVC

Step 1
Open Visual Studio 2022 and click on Create New Project with the template "Asp.Net Core Web App (Model-View-Controller)."

Step 2
Then click on the Next Button and provide the Project Name.

Step 3
Then click on the Next Button and select .Net 7.0 as the Framework version. (If anyone is using VS 2019, then also select .Net 5.0 or .Net 6.0)

Step 6
Select the Model folder, create a new class file called Category.cs, and add the code below.
public class Category {
    public int Id {
        get;
        set;
    }
    public string Name {
        get;
        set;
    }
    public virtual List < Product > Products {
        get;
        set;
    }
}

Step 7
Again, add another new file called Product.cs and add the below code –
public class Product {
    public int Id {
        get;
        set;
    }
    public string Code {
        get;
        set;
    }
    [Required]
    public string Name {
        get;
        set;
    }
    [MaxLength(255)]
    public string ? Description {
        get;
        set;
    }
    public decimal Price {
        get;
        set;
    }
    public bool IsAvailable {
        get;
        set;
    }
    public int CategoryId {
        get;
        set;
    }
    [JsonIgnore]
    public virtual Category Category {
        get;
        set;
    }
}


Step 8

Now, we need to create the DBContext File. So, we need to add a new file called InMemoryDBContext.cs file and the below code in that file.
public class InMemoryDBContext: DbContext {
    public InMemoryDBContext(DbContextOptions < InMemoryDBContext > options): base(options) {}
    protected override void OnModelCreating(ModelBuilder modelBuilder) {
        modelBuilder.Entity < Category > ().HasMany(c => c.Products).WithOne(a => a.Category).HasForeignKey(a => a.CategoryId);
        modelBuilder.Seed();
    }
    public DbSet < Product > Products {
        get;
        set;
    }
    public DbSet < Category > Categories {
        get;
        set;
    }
}

Step 9
In the above code, we invoke the Seed() of the ModelBuilder. This method is responsible for initiating the base data related to the Category and Product. For that purpose, we have created a static call called ModelBuilderExtensions and implemented the Seed() method in that class with some sample data. So, we call the Category or Product list from the View Part; it populates the data from this list.

Step 10
After that, we need to open the Program.cs File and add the below code in that File.
builder.Services.AddDbContext<InMemoryDBContext>(options => options.UseInMemoryDatabase("Shop"));
builder.Services.AddControllers()
.ConfigureApiBehaviorOptions(options =>
{
    // options.SuppressModelStateInvalidFilter = true;
  }
);


Step 11

Now, we can perform the scaffold function of the Asp.Net Core MVC Application to generate the entire View & Controller layer related to the Category and Products. Once the scaffold files are created, we can execute the application and display just like below for both category and product parts.


Step 12
Now, open the Index.cshtml view under the Home folder. There add the below code to populate two different dropdown control related to the Category and Product list.
@{
    ViewData["Title"] = "Home Page";
    var baseurl = ViewBag.BaseUrl;
}

<div class="text-center">
    <h2>Cascading Dropdown Demo</h2>

    <div class="row form-group">
        <div class="col-md-2">
            <label asp-for="CategoryId" class="control-label"></label>
        </div>
        <div class="col-md-4">
            <select asp-for="CategoryId" class="form-control"
                    asp-items="ViewBag.CategoryData"
                    id="CategoryId"></select>
        </div>
        <div class="col-md-2">
            <label asp-for="ProductId" class="control-label"></label>
        </div>
        <div class="col-md-4">
            <select asp-for="ProductId" class="form-control" asp-items="ViewBag.ProductData" id="ddlProductId"></select>
        </div>
    </div>
</div>


Step 13
Now, open the HomeController.cs file under the controller folder and add the below code in the Index Action method. This code will fetch the Category and the Product list and return it as a view bag object. Initially, it does not produce any list value of the Product, as it will only populate if we pass any category id value to filter the product list.
public class HomeController: Controller {
    private readonly ILogger < HomeController > _logger;
    private readonly InMemoryDBContext _context;
    public HomeController(ILogger < HomeController > logger, InMemoryDBContext context) {
        _logger = logger;
        _context = context;
        _context.Database.EnsureCreated();
    }
    public IActionResult Index() {
        var _categories = _context.Categories.ToList();
        var _products = new List < Product > ();
        _categories.Add(new Category() {
            Id = 0, Name = "--Select Category--"
        });
        _products.Add(new Product() {
            Id = 0, Name = "--Select Product--"
        });
        ViewData["CategoryData"] = new SelectList(_categories.OrderBy(s => s.Id), "Id", "Name");
        ViewData["ProductData"] = new SelectList(_products.OrderBy(s => s.Id), "Id", "Name");
        string host = $ "{Request.Scheme}://{Request.Host}{Request.PathBase}/";
        ViewData["BaseUrl"] = host;
        return View();
    }
    public IActionResult Privacy() {
            return View();
        }
        [ResponseCache(Duration = 0, Location = ResponseCacheLocation.None, NoStore = true)]
    public IActionResult Error() {
        return View(new ErrorViewModel {
            RequestId = Activity.Current?.Id ?? HttpContext.TraceIdentifier
        });
    }
}


Step 14
Now, we can run the application and check that the category dropdown already binds with the existing category data. But, the product dropdown does secure any data.

Step 15
We need to add a new action method to return the filtered product list as per the selected category id. This method accepts one input value called categoryId from the View part, and as per that categoryId, it will filter the product list and return the data in a JSON format. For that, open the ProductController.cs file and add the code below.
[HttpPost, ActionName("GetProductsByCategoryId")]
public JsonResult GetProductsByCategoryId(string categoryId) {
    int catId;
    List < Product > productLists = new List < Product > ();
    if (!string.IsNullOrEmpty(categoryId)) {
        catId = Convert.ToInt32(categoryId);
        productLists = _context.Products.Where(s => s.CategoryId.Equals(catId)).ToList();
    }
    return Json(productLists);
}

Step 16
We must consume the above action method from the view to retrieve the JSON data and bind it with the product dropdown. For that, we will take the help of JQuery code. Now, return to the Index.cshtml file under the home folder and add the below code there under script sections –
@section scripts
    {
    <script type="text/javascript">
        $(document).ready(function () {
            var a = 0;
        });
        function loadProduct(obj) {
            var value = obj.value;
            var url = "@baseurl";
            $.post(url + "Products/GetProductsByCategoryId", { categoryId: value }, function (data) {
                debugger;
                PopulateDropDown("#ddlProductId", data);
            });
        }
        function PopulateDropDown(dropDownId, list, selectedId) {
            $(dropDownId).empty();
            $(dropDownId).append("<option>--Please Product--</option>")
            $.each(list, function (index, row) {
                $(dropDownId).append("<option value='" + row.id + "'>" + row.name + "</option>")
            });
        }
    </script>
}


Step 17    
Now, invoke the loadProduct() method from the HTML part related to the Product dropdown. For that, change the code related to the product dropdown as below –
<select asp-for="CategoryId" class="form-control"
                   asp-items="ViewBag.CategoryData"
                   id="CategoryId" onchange="loadProduct(this)"></select>

Step 18
Now, run the application, select any category from the dropdown, and check related products populated within the product dropdown.


This article discusses cascading dropdown generation using the Asp.Net Core MVC application. Also, we discussed the steps related to implementing the In-Memory database concept. Any suggestions, feedback, or queries related to this article are appreciated.


ASP.NET MVC Hosting - HostForLIFEASP.NET :: Remote Validation in MVC

clock May 12, 2023 09:07 by author Peter

Hello everyone, in this post I'll describe how to integrate remote validation into MVC. Remote validation is the technique by which we verify particular data before publishing it to a server without posting the complete form's data. Let's look at a real-world example. In one of my projects, I had to verify that an email address didn't already exist in the database.

Remote validation was helpful in that regard because it allowed us to validate simply the user-supplied email address without submitting the rest of the data.Explanation in PracticeLet's create an MVC project and give it the appropriate name—for me, "TestingRemoteValidation"—then proceed. Let's create a model called UserModel once the project has been built. Its design will be as follows:
    public class UserModel  
    {
        [Required]
        public string UserName { get; set; }
        [Remote("CheckExistingEmail","Home",ErrorMessage = "Email already exists!")]
        public string UserEmailAddress { get; set; }
    }

Let's get some understanding of the remote attribute used, so the very first parameter “CheckExistingEmail” is the name of the action. The second parameter “Home” is referred to as controller so to validate the input for the UserEmailAddress the “CheckExistingEmail” action of the “Home” controller is called and the third parameter is the error message. Let's implement the “CheckExistingEmail” action result in our home controller.
    public ActionResult CheckExistingEmail(string UserEmailAddress)
    {
        bool ifEmailExist = false;
        try
        {
            ifEmailExist = UserEmailAddress.Equals("[email protected]") ? true : false;
            return Json(!ifEmailExist, JsonRequestBehavior.AllowGet);
        }
        catch (Exception ex)
        {
            return Json(false, JsonRequestBehavior.AllowGet);
        }
    }


For simplicity I am just validating the user input with a hard-coded value but we can call the database and determine whether or not the given input exists in the database.

Let's create the view using the defined “UserModel” and using the create scaffold template; the UI will look like:

We will get the following output if we use “[email protected]” as UserEmailAddress:


ASP.NET MVC Hosting - HostForLIFEASP.NET :: Three Different Ways to Upload a File in ASP.NET MVC

clock May 5, 2023 08:41 by author Peter

There are a few things that all web applications have in common. File Upload is one of the most common things that all web applications have. This is used to move data, upload large amounts of data, upload pictures, videos, etc.


I've mostly seen three ways to share a file while working on different web apps and products, especially in ASP.NET MVC. We will look at it in depth.

1. File Control with Html.BeginForm
When we submit the form, we can post our selected file to the server and read it. Below is the code to bind the File control
@Html.TextBoxFor(model =>
       model.DocumentFile, new {
                type = "file",
                @id = "documentFile"

})


And the type of DocumentFile property is as below.
public HttpPostedFileBase DocumentFile { get; set; }

To save this file, we created one folder and added the path of the folder in the config. We are accessing the folder location as below
var path = ConfigurationManager.AppSettings["CustomerDocuments"].ToString();


Now we need to save the file in the folder and insert the path of the file in the database

if (objGroup.GSTDocumentFile != null)
{
     using (Stream inputStream = objGroup.GSTDocumentFile.InputStream)
     {
         byte[] data;
         using (MemoryStream ms = new MemoryStream())
         {
             inputStream.CopyTo(ms);
             data = ms.ToArray();
         }
         System.IO.File.WriteAllBytes(Path.Combine(ClientFolder, objGroup.GSTDocumentFile.FileName), data);
     }
        objGroup.Document = objGroup.DocumentFile.FileName;
}


2. File upload using AJAX - Base64 as a parameter
When we select a file using file upload on the browser, we need to fire an event to capture the file like below
document.getElementById("uploadfile").addEventListener('change', handleFileSelect, false);

Using this event listener, we execute the function on selection of file and capture the file as below
function handleFileSelect(evt) {

     const id = evt.currentTarget.id;
     const f = evt.target.files[0];
     const Name = evt.target.files[0].name;
     const reader = new FileReader();

     reader.onload = (function(theFile) {

          return function(e) {

               const binaryData = e.target.result;
               const base64String = window.btoa(binaryData);

               $("#uploadDocBase64").val(base64String);
               $("#uploadFileName").val(Name);

          };

     })(f);

     reader.readAsBinaryString(f);

}


Here we capture the  file as well as the file name, and using AJAX, we can send this file to the server
try {

  const response = await fetch('@Url.Action("FileUpload", "Upload")', {
    method: 'POST',
    body: JSON.stringify({ fileStr: $("#uploadDocBase64").val() }),
    headers: {
      'Content-Type': 'application/json; charset=utf-8'
    }
  });

  const result = await response.json();

  alert('Success');

} catch (error) {

  alert('Failure');
  console.error(error);

}


System.IO.File.WriteAllBytes(path, Convert.FromBase64String(Convert.ToString(fileStr)));

3. File Upload using Fetch with FileData

There is an issue with option no 2. Big files are not getting uploaded as it is going in the parameter. To overcome this, we can add all the parameters and files in fileData and upload a file.
try {

  const fileData = new FormData();

  fileData.append("File", $("#uploadDocBase64").val());

  const response = await fetch('@Url.Action("UpdateStatusAndDiscussion", "Discussion")', {
    method: 'POST',
    body: fileData,
  });

  if (response.ok) {
    alert("Success");
  } else {
    alert("Failure");
  }

} catch (error) {
  console.error(error);
}


Now you can capture the file in the controller
byte[] imageBytes = Convert.FromBase64String(File);
MemoryStream ms = new MemoryStream(imageBytes, 0, imageBytes.Length);
ms.Write(imageBytes, 0, imageBytes.Length);
path = HttpContext.Current.Server.MapPath("~/FileUpload/" + _GroupName + "/" + DoneFileName);
FileStream fileNew = new FileStream(path, FileMode.Create, FileAccess.Write);
ms.WriteTo(fileNew);
fileNew.Close();
ms.Close();


These are the ways to upload files to the server using ASP.NET MVC.


ASP.NET MVC Hosting - HostForLIFEASP.NET :: How to consume multiple GET API in one view in MVC?

clock April 17, 2023 09:17 by author Peter

In this article, we'll look at how to use MVC to consume several GET APIs in a single view. We'll go over how to create a Model to store the data, a Controller action to contact the APIs and fill the Model, and a View to display the data.


The Controller in the Model-View-Controller (MVC) architecture processes data, receives user input, and returns views. It is typical for web app developers to need several APIs to retrieve data for a single view. In this situation, we may design a Controller action that queries several APIs and then sends a ViewModel to the View, which can render the retrieved information understandable.

The following steps must be followed to use multiple GET APIs in a single MVC view.

Step 1
The initial step is to create a model to store the information collected from the APIs. AclassThe Model's properties must align with the information the APIs have returned. A new or existing class can be created to represent this Model.
public class ProjectCol
    {
        public List<master> master { get; set; }
        public List<Project> projects { get; set; }
        public List<User> users { get; set; }

    }
public class master
    {
            public int Id { get; set; }
            public string RoleName { get; set; }
    }
 public class Project
    {
        public int Id { get; set; }

        public string ProjectName { get; set; }
    }
public class User
    {
        public string UserId { get; set; }
        public string Name { get; set; }
    }
Step2
Creating a Controller action to make API calls and add data to the Model comes next. GET queries to the appropriate APIs can be sent this way using the HTTPClient or WebClient libraries.
public async Task<ActionResult> ProjectTest(ProjectCol projectallot)
 {
     string url = configuration.GetValue<string>("Projectapi:BaseApi");
     ProjectCol projectAllotment = new ProjectCol();

     List<master> _master = new List<master>();
     var baseurl = ServicesEndPonit.usermanagement.Getallrole(url);
     HttpResponseMessage Res = await httpClient.GetAsync(baseurl);
     if (Res.IsSuccessStatusCode)
     {
         var data = Res.Content.ReadAsStringAsync().Result;
         _master = JsonConvert.DeserializeObject<List<master>>(data);
     }
     List<User> user = new List<User>();
     var baseurl_ = ServicesEndPonit.usermanagement.GetUsers(url);
     HttpResponseMessage Res_ = await httpClient.GetAsync(baseurl_);
     if (Res_.IsSuccessStatusCode)
     {
         var data_ = Res_.Content.ReadAsStringAsync().Result;
         user = JsonConvert.DeserializeObject<List<User>>(data_);
     }
     List<Project> projects = new List<Project>();
     var baseurl_pro = ServicesEndPonit.ProjectManagement.GetProjects(url);
     HttpResponseMessage Res_pro = await httpClient.GetAsync(baseurl_pro);
     if (Res_pro.IsSuccessStatusCode)
     {
         var data_pro = Res_pro.Content.ReadAsStringAsync().Result;
         projects = JsonConvert.DeserializeObject<List<Project>>(data_pro);
     }
     projectAllotment.projects = projects;
     projectAllotment.users = user;
     projectAllotment.master = _master;
     return View(projectAllotment);
 }


Step 3
We can provide the Model to the view after populating it with data from the APIs. The data from each API model can then be displayed in the view using the Model attributes. The view's Razor syntax can be used to accomplish this.
<div class="row">
    <div class="col-sm-4">
        <label> User</label>
        <select class="form-select" required name="AssignedTo" id="ddlAllmember">
            <option value="hidden">Select AssginTo </option>
            @foreach (var item in Model.users)
            {
                <option value="@item.UserId">@item.Name</option>
            }

        </select>
</div>
    <div class="col-sm-4">
        <label>Job Role</label>
        <select class="form-select" required name="RoleID" id="ddlJobroleId">
            <option value="hidden">Select Job role </option>
            @foreach (var item in Model.master)
            {
                <option value="@item.Id">@item.RoleName</option>
            }
        </select>
    </div>
    <div class="col-sm-4">
        <label>Project </label>
        <select class="form-select" required name="ProjectID" id="ddlProjectName">
            <option value="hidden">Select ProjectCode </option>
            @foreach (var item in Model.projects)
            {
                <option value="@item.Id">@item.ProjectName</option>
            }
        </select>
    </div>

</div>

MVC can make consuming several GET APIs in a single view difficult. Still, it is possible by defining API models, creating a Model, using the APIs in the controller, and finally providing the Model to the view.

Follow C# Corner to learn more new and amazing things about  ASP.NET MVC or to explore more technologies. If you have any queries/suggestions on the article, please leave your questions and thoughts in the comment section below. Thanks for reading, and I hope you like it.


ASP.NET MVC Hosting - HostForLIFEASP.NET :: Authentication And Authorization In ASP.NET Core MVC Using Cookie

clock April 11, 2023 10:25 by author Peter

Authentication and Authorization are two major aspects while thinking about securing your application. Security is the main concern of modern applications because anyone can steal your data if it is not secured. So, if you are going to create an application where the data security is a primary concern, then think about Authentication and Authorization.


Authentication is the process to validate an anonymous user based on some credentials and Authorization process happens just after that and grants resources to this validated user. So, we can say, it's two-step validating process before providing the access of the resources or data.

We have many techniques to validate the users, like Windows Authentication, JWT Authentication, and Cookie Authentication etc. Today, we will learn how to implement and make ASP.NET Core MVC applications more secure using Cookie-based authentication and authorization. So, let's start the demonstration and create a fresh ASP.NET Core MVC project. You can refer to the following for the step by step process of creating an ASP.NET Core MVC application.

Be sure that while creating the project, your template should be Web Application (Model-View-Controller) and change the authentication as ‘No Authentication’.
You can download the code from here.

Here, you can choose the inbuilt Authentication functionality instead of ‘No Authentication’ and it will provide the readymade code. But we are choosing ‘No Authentication’ here because we are going to add our own Cookie-based authentication functionality in this demo and you will learn how to implement the Authentication and Authorization system from scratch.


We are choosing MVC template because we would like to see some Login and Logout functionality on UI along with Authentication and Authorization using Cookies. Now, click OK and it will take a few seconds and the project will be ready. Run it for checking if everything is working fine or not. Once everything is OK, you are ready to go.

Let’s move to the starting point of the ASP.NET Core application file which is “Startup.cs” where we configure the setting for the application like configuring the required services and configuring the middleware services etc. So, implementing the Authentication features, first, we have to add the authentication and then use it. So, let’s move to Startup.cs’s ConfigureService method and add the authentication feature using the following line of code, it will be just above services.AddMvc().
services.AddAuthentication(CookieAuthenticationDefaults.AuthenticationScheme).AddCookie();  

Now move to Configure in the startup.cs method and use the authentication features using the following line of code, it will be just above  routing.
app.UseAuthentication();  

Following is the whole code for adding the Authentication and using it.
    using Microsoft.AspNetCore.Authentication.Cookies;  
    using Microsoft.AspNetCore.Builder;  
    using Microsoft.AspNetCore.Hosting;  
    using Microsoft.AspNetCore.Http;  
    using Microsoft.AspNetCore.Mvc;  
    using Microsoft.Extensions.Configuration;  
    using Microsoft.Extensions.DependencyInjection;  
      
    namespace CookieDemo  
    {  
        public class Startup  
        {  
            public Startup(IConfiguration configuration)  
            {  
                Configuration = configuration;  
            }  
      
            public IConfiguration Configuration { get; }  
      
            // This method gets called by the runtime. Use this method to add services to the container.  
            public void ConfigureServices(IServiceCollection services)  
            {  
                services.Configure<CookiePolicyOptions>(options =>  
                {  
                    // This lambda determines whether user consent for non-essential cookies is needed for a given request.  
                    options.CheckConsentNeeded = context => true;  
                    options.MinimumSameSitePolicy = SameSiteMode.None;  
                });  
      
                services.AddAuthentication(CookieAuthenticationDefaults.AuthenticationScheme).AddCookie();  
                services.AddMvc().SetCompatibilityVersion(CompatibilityVersion.Version_2_1);  
            }  
      
            // This method gets called by the runtime. Use this method to configure the HTTP request pipeline.  
            public void Configure(IApplicationBuilder app, IHostingEnvironment env)  
            {  
                if (env.IsDevelopment())  
                {  
                    app.UseDeveloperExceptionPage();  
                }  
                else  
                {  
                    app.UseExceptionHandler("/Home/Error");  
                }  
      
                app.UseStaticFiles();  
                app.UseCookiePolicy();  
                app.UseAuthentication();  
                app.UseMvc(routes =>  
                {  
                    routes.MapRoute(  
                        name: "default",  
                        template: "{controller=Home}/{action=Index}/{id?}");  
                });  
            }  
        }  
    }  

We can implement Authentication through Login feature. In most of the applications today, Authorization is decided internally based on your role. So, now we are going to create account login and logout feature, so just create one more controller as ‘AccountController.cs’ inside the controllers folder and add two action methods, one for rendering the Login View and  the other one for posting user credentials data for logging in to the system. Here is the code for AccountController where we have implemented Login functionality.
    using System;  
    using System.Collections.Generic;  
    using System.Linq;  
    using System.Security.Claims;  
    using System.Threading.Tasks;  
    using Microsoft.AspNetCore.Authentication;  
    using Microsoft.AspNetCore.Authentication.Cookies;  
    using Microsoft.AspNetCore.Mvc;  
      
    namespace CookieDemo.Controllers  
    {  
        public class AccountController : Controller  
        {  
            public IActionResult Login()  
            {  
                return View();  
            }  
      
            [HttpPost]  
            public IActionResult Login(string userName, string password)  
            {  
                if(!string.IsNullOrEmpty(userName) && string.IsNullOrEmpty(password))  
                {  
                    return RedirectToAction("Login");  
                }  
      
                //Check the user name and password  
                //Here can be implemented checking logic from the database  
      
                if(userName=="Admin" && password == "password"){  
      
                    //Create the identity for the user  
                    var identity = new ClaimsIdentity(new[] {  
                        new Claim(ClaimTypes.Name, userName)  
                    }, CookieAuthenticationDefaults.AuthenticationScheme);  
      
                    var principal = new ClaimsPrincipal(identity);  
      
                    var login = HttpContext.SignInAsync(CookieAuthenticationDefaults.AuthenticationScheme, principal);  
      
                    return RedirectToAction("Index", "Home");  
                }  
      
                return View();  
            }  
        }  
    }  


The first login action method is rendering the UI for login page and once you fill the data required for Login as username and password then the second action method as Login will work and send the Post request to the server.

In this method, first, we will check whether username and password should not be empty then we will validate the username and password. Here, in this demonstration, we are checking the username and password with some dummy data. You can implement database login instead of this.

After validating the user information, if everything is correct then we create Identity for that user and create the cookie information for it. Based on this principal data, we try to Sign In using a generic function called "SignInAsync" and if everything goes in the right direction then we redirect to the Home page.

Now, let's create the Login view page from where we can give the functionality to the user to enter the username and password. So, right click on the Login action method and add view without a model. It will automatically create the Account folder inside the Views under that will create “login.cshtml” file. Just open it and create a container and add a form tag along with two textboxes for entering the username and password. Apart from this, create two separate buttons as “Submit” and “Reset”. Once you fill the data and click on the submit button, it will call to Login action method defined in Account Controller using POST call. So, modify the code of “login.cshtml” as follows.
    @{  
        ViewData["Title"] = "Login";  
    }  
      
    <div class="container">  
        <div class="row">          
            <div class="col-md-3">  
                <h2><strong>Login Page </strong></h2><br />  
                <form asp-action="login" method="post">  
                    <div class="form-group">  
                        <label>User Name</label>  
                        <input type="text" class="form-control" id="userName" name="userName" placeholder="Enter user name">  
                    </div>  
                    <div class="form-group">  
                        <label>Password</label>  
                        <input type="password" class="form-control" name="password" id="password" placeholder="Password">  
                    </div>  
                    <div class="form-check">  
                        <button class="btn btn-info" type="reset">Reset</button>  
                        <button type="submit" class="btn btn-primary">Submit</button>  
                    </div>  
                </form>  
            </div>  
        </div>  
    </div>  


So far we have implemented the Cookie-based Authentication functionality in Asp.Net Core MVC project. But what about Authorization. Authorization means, providing access to the authenticated user to access a resource based on role.

So, let's first understand how we can implement the Authorization in Asp.Net Core MVC. For now, if you will try to access the HOME page without sign in, you can access it. So, let’s prevent the anonymous user from accessing the HOME page directly, if someone wants to access the HOME page then they should have to go through the Authentication process and then they will be able to access it.

So, to accomplish this, let’s open the Home Controller and put the [Authorize] attribute just above to controller. You can place it at action level but here we would like to block the whole home controller functionality and if we want to access, just go and log in. So, just do something like below.
    using CookieDemo.Models;  
    using Microsoft.AspNetCore.Authorization;  
    using Microsoft.AspNetCore.Mvc;  
    using System.Diagnostics;  
      
    namespace CookieDemo.Controllers  
    {  
      
        [Authorize]  
        public class HomeController : Controller  
        {          
            public IActionResult Index()  
            {  
                return View();  
            }  
      
            public IActionResult About()  
            {  
                ViewData["Message"] = "Your application description page.";  
      
                return View();  
            }  
      
            public IActionResult Contact()  
            {  
                ViewData["Message"] = "Your contact page.";  
      
                return View();  
            }  
      
            public IActionResult Privacy()  
            {  
                return View();  
            }  
      
            [ResponseCache(Duration = 0, Location = ResponseCacheLocation.None, NoStore = true)]  
            public IActionResult Error()  
            {  
                return View(new ErrorViewModel { RequestId = Activity.Current?.Id ?? HttpContext.TraceIdentifier });  
            }  
        }  
    }  


Note
Be sure you have cleared all cookies which have been  created based on your previous login. If you will not do this, you will be accessing the HOME page, it is because authenticated user cookie is available in browser memory.

So, let's check how it works. Run the application and try to access the Home page. You will see here that your application automatically redirects to Login page. Now let's try to provide the user information as username = "Admin" and password =" password". Once you will pass the correct credentials and login then you will redirect to HOME page. So, let'sadd the feature that shows the logged in username along with a logout button. If you click to the log out button, your cookie value will be deleted and you will redirect to login page.

So, let's open the Account Controller and add the following logout action method.
    [HttpPost]  
    public IActionResult Logout()  
    {  
          var login = HttpContext.SignOutAsync(CookieAuthenticationDefaults.AuthenticationScheme);  
          return RedirectToAction("Login");  
    }  


And now open the Index.cshtml file from the Home folder inside the Views and modify the code as follows. Here, first of all, we are trying to show the Logged In username using @User.Identity.Name and apart from this adding a link for logout.
    @{  
        ViewData["Title"] = "Home Page";  
    }  
      
    <div class="container">  
        <div class="row">  
            <div class="col-md-12">  
                <h2><strong>Home Page </strong></h2><br /><br />  
                Hello @User.Identity.Name  
                <a asp-action="logout" asp-controller="account">  
                    Logout  
                </a>  
                <br />  
                <br />  
                <h4>Welcome to Asp.Net Core Authentication and Authorization Demo!!</h4>  
            </div>  
        </div>  
    </div>  


So far, we are able to understand how to implement Authentication in Asp.Net Core MVC and how to implement Authorization and give access to validate the users. Now, let's understand how to work with multiple roles. Here we are doing everything manually with some static value, but you can change the logic and connect to the database for validating the user. So, just modify the Login method as follows where we are providing two different kinds of roles; one is Admin role and another is User role. Based on these roles, we will provide access to some of the pages.
    [HttpPost]  
    public IActionResult Login(string userName, string password)  
    {  
        if (!string.IsNullOrEmpty(userName) && string.IsNullOrEmpty(password))  
        {  
            return RedirectToAction("Login");  
        }  
      
        //Check the user name and password  
        //Here can be implemented checking logic from the database  
        ClaimsIdentity identity = null;  
        bool isAuthenticated = false;  
      
        if (userName == "Admin" && password == "password")  
        {  
      
            //Create the identity for the user  
            identity = new ClaimsIdentity(new[] {  
                        new Claim(ClaimTypes.Name, userName),  
                        new Claim(ClaimTypes.Role, "Admin")  
                    }, CookieAuthenticationDefaults.AuthenticationScheme);  
      
            isAuthenticated = true;  
        }  
      
        if (userName == "Peter" && password == "password")  
        {  
            //Create the identity for the user  
            identity = new ClaimsIdentity(new[] {  
                        new Claim(ClaimTypes.Name, userName),  
                        new Claim(ClaimTypes.Role, "User")  
                    }, CookieAuthenticationDefaults.AuthenticationScheme);  
      
            isAuthenticated = true;  
        }  
      
        if (isAuthenticated)  
        {  
            var principal = new ClaimsPrincipal(identity);  
      
            var login = HttpContext.SignInAsync(CookieAuthenticationDefaults.AuthenticationScheme, principal);  
      
            return RedirectToAction("Index", "Home");  
        }  
        return View();  
    }  


Now let's move to HomeController and remove the [Authorize] attribute from the class level and put it in action level as follows. Here we have two different action methods which point to two different views. One is pointing to Index view and another one is pointing to the Setting page. Index page can be accessible to both type of roles, either it is Admin or User but the Setting page can be accessed only by Admin role.
    public class HomeController : Controller  
    {  
            [Authorize(Roles ="Admin, User")]  
            public IActionResult Index()  
            {  
                return View();  
            }  
      
            [Authorize(Roles ="Admin")]  
            public IActionResult Setting()  
            {  
                return View();  
      
            }  


Now modify the Index.cshtml file and add one thing as Role, just modify the code as follows.
    @{  
        ViewData["Title"] = "Setting Page";  
    }  
      
    <div class="container">  
        <div class="row">  
            <div class="col-md-12">  
                <h2><strong>Setting Page </strong></h2><br /><br />  
                Hello @User.Identity.Name !, Role @User.FindFirst(claim=>claim.Type==System.Security.Claims.ClaimTypes.Role)?.Value  
                <a asp-action="logout" asp-controller="account">  
                    Logout  
                </a>  
                <br />  
                <br />  
                <h4>Admin role user can only access this page!!</h4>  
            </div>  
        </div>  
    </div>  


Now, we have added everything and it's time to run the application. So, just press F5 and it will run your application. First, go to "Login" page and login with "User" role.

Once you will log in as a User role, definitely you will be redirected to the home page because the home page is accessible to both types  the roles.

Now, let's try to access the settings page, here you will get some Access Denied error. It is because "User" role member does not allow you to access the settings page. By default, you will get the following error as per the browser. But you can customize your error and page as well. It totally depends on you.

Now, let log out of the application for the "User" role and try to log in for Admin role. As follows, you can see, we are able to access the home page.

But let try to access the setting page for "Admin" role and yes, you will be accessed the setting page.

Lastly, let me show how you can see the cookie information. For this demo, I am using the Microsoft Edge browser, you can use any other as per your choice. But cookie information saves almost in the same place for every browser. So, just go to Network tab and then Cookie tab. Here you can see all the listed Cookies.


About HostForLIFE

HostForLIFE is European Windows Hosting Provider which focuses on Windows Platform only. We deliver on-demand hosting solutions including Shared hosting, Reseller Hosting, Cloud Hosting, Dedicated Servers, and IT as a Service for companies of all sizes.

We have offered the latest Windows 2019 Hosting, ASP.NET 5 Hosting, ASP.NET MVC 6 Hosting and SQL 2019 Hosting.


Month List

Tag cloud

Sign in