European ASP.NET MVC Hosting

BLOG about Latest ASP.NET MVC Hosting and Its Technology - Dedicated to European Windows Hosting Customer

ASP.NET MVC Hosting - HostForLIFEASP.NET :: ASP.NET MVC 5 With Entity Framework And MySQL

clock January 17, 2023 07:46 by author Peter

We know how to use Code First Migration in SQL Server. But in most cases, a customer will think we can use it for the open source database. So that’s the reason we pick the “MySQL” database, and we can follow the same steps we follow in the “SQL” database. In this article, we are going to explain Code First Migration in ASP.NET MVC 5 with Entity FrameWork & MySQL.

Create a Web Application using MVC 5
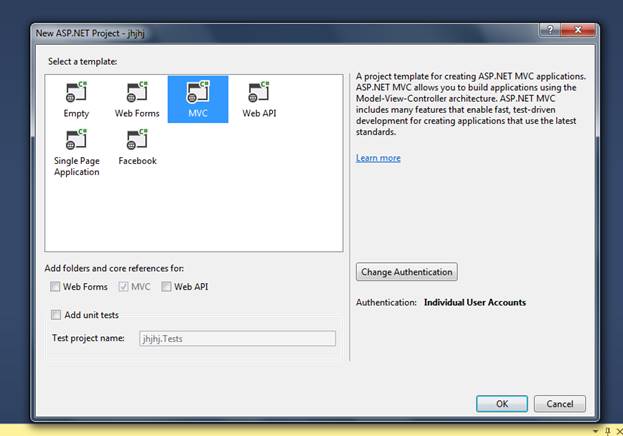
Click on File -> New -> Project -> Visual C# -> Web -> ASP.Net Web Application ( .Net Framework ).


Click on “OK” then click on “MVC”.
 
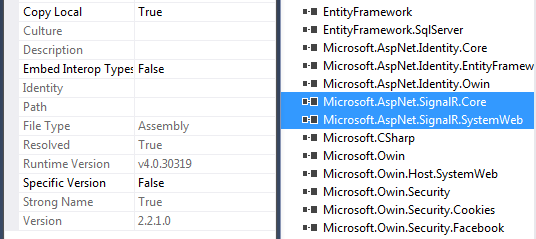
Install Entity Framework & MySQL Entity
Go to Visual Studio “Tools -> NuGet Package Manager -> Manage Nuget Packages for Solution” or right click on your web application then click on “Manage NuGet Packages”.
 
EntityFramework
Search EntityFramework in the “Browse” Section.

Once we installed EntityFramework & MySql Entity in our application then it will generate a SQL and MySQL Provider inside the EntityFramework Section in Web.Config.
    <entityFramework> 
        <defaultConnectionFactory type="System.Data.Entity.Infrastructure.SqlConnectionFactory, EntityFramework" /> 
        <providers> 
          <provider invariantName="System.Data.SqlClient" type="System.Data.Entity.SqlServer.SqlProviderServices, EntityFramework.SqlServer" /> 
          <provider invariantName="MySql.Data.MySqlClient" type="MySql.Data.MySqlClient.MySqlProviderServices, MySql.Data.Entity.EF6, Version=6.8.8.0, Culture=neutral, PublicKeyToken=c5687fc88969c44d"></provider></providers>   
      </entityFramework> 

Model Class
We just created a sample model class for demo purposes.
    using System; 
    using System.Collections.Generic; 
    using System.Linq; 
    using System.Web; 
      
    namespace WebAppWithMySql.Models 
    { 
        public class Student 
        { 
            public int Id { get; set; } 
      
            public string Name { get; set; } 
      
            public string Password { get; set; } 
        } 
    } 


Creation of DBContext

Create a db context class in our application. The following dbcontext will point out our connection string in WebConfig.
    using MySql.Data.Entity; 
    using System.Data.Entity; 
    using WebAppWithMySql.Models; 
      
    namespace WebAppWithMySql 
    { 
        [DbConfigurationType(typeof(MySqlEFConfiguration))] 
        public class WebAppContext : DbContext 
        { 
            public DbSet<Student> Products 
            { 
                get; 
                set; 
            } 
            public WebAppContext() 
                //Reference the name of your connection string ( WebAppCon ) 
                : base("WebAppCon") { } 
        } 
    } 


Connection String
We added the same connection string name that we added in the dbcontext class. The following connection string represents “MySql” Db.
    <connectionStrings> 
        <add name="WebAppCon" providerName="MySql.Data.MySqlClient" connectionString="server=localhost;userid=root;password=peter123;database=WebAppMySql;persistsecurityinfo=True" /> 
      </connectionStrings> 


Migration Steps

Go to Visual Studio "Tools -> NuGet Package Manager -> Package Manager Console". Then execute the following command.
    Enable-Migrations – ( We need to enable the migration, only then can we do the EF Code First Migration ).
    Add-Migration IntialDb (migration name) – ( Add a migration name and run the command ).
    Update-Database -Verbose — if it is successful then we can see this message (Running Seed method).

Once Migration is done; then, we can see that the respective files are auto-generated under the “Migrations” folder.

Output


ASP.NET MVC Hosting - HostForLIFEASP.NET :: Custom Error Page in ASP.NET MVC

clock November 8, 2022 09:29 by author Peter

Procedure
    First add an Error.cshtml page (View Page) to the Shared Folder if it does not already exist.
    Add or modify the Web.config file and set the Custom Error Element to On.
    Add a specific Action Controller and View for showing the HTTP Status Code.
    Add an [HandleError] attribute to the Targeted Action Method.

Note: When we are working on an internet application, by default it contains an Error.cshtml file.
Add a View Page. Right-click Solution Explorer, click View Folder, go to Shared Folder and name it Error.cshtml.


Then design the Error Page depending on your requirements, if it already exists then modify it to suit your needs.

Error.cshtml
    @model System.Web.Mvc.HandleErrorInfo  
      
    @{  
        ViewBag.Title = "Error";  
    }  
      
    <div style="background-color: #A52A2A; color: White; height: 10px;">  
    </div>  
    <div style="background-color: #F5F5DC; color: White; height: 170px;">  
        <div style=" padding:20px;">  
            <h3>  
                Application Error:</h3>  
            <h4>  
                Sorry, an error occurred while processing your request.  
            </h4>  
            <h6>@Html.ActionLink("Go Back To Home Page", "Index", "Home")</h6>  
            <br />  
            <br />  
        </div>  
    </div>  
    <div style="background-color: #A52A2A; color: White; height: 20px;">  
    </div> 


Go to Web.config file


    There are two Web.config files in an ASP.NET MVC Project.
    Go to Web.config file at the root directory.

    Go to Root Directory, Web.config, then System.Web, and click CustomError.
    Set it to On.

    Add this line.
        <customErrors mode="On">  
        </customErrors>  
    Run the application and search for anything, or Link that is not available.

As example:
    Try any Link or try to navigate to any View that is available.


    Then again try another link that is not available or modify the preceding link and watch the difference.
    This will show you your Customized Error page rather than a default page.

Step: Try to run or Browse for a View Page that is not available (A Controller whose View is not added.).
But before that, add this Attribute to the Controller.

At the Controller:
    [HandleError]  
    public ActionResult Index()  
    {  
       return View();  
    } 


Repeat Step: Try to run or Browse for a View Page that is not available (A Controller whose View is not added.).

If you add the Attributes [HandleError] to any Action Method, you will be shown your own Customized Error page written now, rather than the default Error Page.
Now add specific error pages based on the HTTP Status Code.
Such as one specific Error Page to show when the HTTP Status Code is 404.
Add a Controller to the Controller Folder and name it Error.


Add some action method to the Controller.

    Error Controller
        using System;  
        using System.Collections.Generic;  
        using System.Linq;  
        using System.Web;  
        using System.Web.Mvc;  
          
        namespace MvcApplication3.Controllers  
        {  
            public class ErrorController : Controller  
            {  
                //  
                // GET: /Error/  
          
                public ActionResult Index()  
                {  
                    return View();  
                }  
          
                public ActionResult NotFound()  
                {  
                    return View();  
                }  
            }  
        }  


Add a View Named NotFound to the Shared Folder like, as you have done earlier.
Note: We are adding this View to the Shared Folder, because Views inside Shared Folder is available to the complete application.
Right-click then select View, then go to Shared Folder and Add a View named NotFound.


And Design the View depending on your requirements.

Not Found.cshtml
    @{  
        ViewBag.Title = "NotFound";  
    }  
      
    <div style="background-color: #A52A2A; color: White; height: 10px;">  
    </div>  
    <div style="background-color: #F5F5DC; color: White; height: 170px;">  
        <div style=" padding:20px;">  
            <h3>  
                Application Error:</h3>  
            <h4>  
                Sorry, The Page, You are Looking for is not found.  
            </h4>  
            <h6>@Html.ActionLink("Go Back To Home Page", "Index", "Home")</h6>  
            <br />  
            <br />  
        </div>  
    </div>  
    <div style="background-color: #A52A2A; color: White; height: 20px;">  
    </div>  


Again go to the Root folder, then Web.config file. Go inside System.web and modify it.
    <customErrors mode="On">  
       <error statusCode="404" redirect="~/Error/NotFound"/>  
    </customErrors>  


Explanation

Now run the application, try to navigate to an unavailable View and you will see the Customized Error Page rather than the default Error Page.

Default Error Page: Example


Now, if any error occurs then the Customized Error Page will be shown.
This was all about how to display a custom error page in ASP.NET MVC.

Similarly, design all other Custom Error page depending on HTTP Status Code.

Note: The preceding information is gathered by me depending on the results of studying, experience, Internet Browsing, and Video Tutorials.


ASP.NET MVC Hosting - HostForLIFE.eu :: ASP.NET MVC 5 Create Shared Razor Layout And ViewStart

clock October 25, 2019 09:18 by author Peter

In article, I have shared a way to create a Layout Razor and ViewStart in ASP.NET MVC 5.
 
Views/Shared
You need to create a shared folder, "Shared" in the Views directory.
 
Go Views/Shared directory and create new _LayoutPage1.cshtml file and write the following below code.
    <!DOCTYPE html> 
     
    <html> 
    <head> 
        <meta name="viewport" content="width=device-width" /> 
        <title>@ViewBag.Title</title> 
    </head> 
    <body> 
        <div> 
            @RenderBody() 
        </div> 
    </body> 
    </html> 


The @RenderBody()
Use display content in multiple controllers to View.

Example you can have a fixed header and footer in the page. Only change will be the content of the RenderBody() called in the code.
    <html> 
    <head> 
        <meta name="viewport" content="width=device-width" /> 
        <title>@ViewBag.Title</title> 
    </head> 
    <body> 
        <div class="header"> 
            <!--code header fixed--> 
        </div> 
        <div> 
            @RenderBody() 
        </div> 
        <div class="footer"> 
            <!--code footer fixed--> 
        </div> 
    </body> 
    </html> 


So you have fixed the (header/footer) for the website.
 
Okay, you need using _LayoutPage1.cshtml, so you to Views/Home/index.cshtml. Open it, pass the following below code.
    @{ 
        ViewBag.Title = "Index"; 
        Layout = "~/Views/Shared/_LayoutPage1.cshtml"; 
    } 


_ViewStart.cshtml used to define the layout for the website. You can set the layout settings as well, if HomeController is using Layout.
 
_LayoutHome.cshtml or AdminController is _LayoutAdmin.cshtml
    //Views/ViewStart.cshtml 
    @{ 
        Layout = "~/Views/Shared/_LayoutPage1.cshtml"; 
    } 


You can configuration _ViewStart.cshtml the following below code.
    @{ 
     
        string CurrentName = Convert.ToString(HttpContext.Current.Request.RequestContext.RouteData.Values["Controller"]); 
        string clayout = ""; 
        switch (CurrentName) 
        { 
            case "Home": 
                clayout = "~/Views/Shared/_LayoutHome.cshtml"; 
                break; 
            default: 
                //Admin layout   
                clayout = "~/Views/Shared/_LayoutAdmin.cshtml"; 
                break; 
        } 
        Layout = clayout; 
     
    } 

This gives you an idea, how to use a Razor layout in various pages.


ASP.NET MVC Hosting - HostForLIFE.eu :: Preventing Cross Site Request Forgery In MVC

clock September 26, 2019 11:14 by author Peter

What is Cross-Site Request Forgery
Cross-Site Request Forgery (CSRF) is a process in which a user first signs on to a genuine website (e.g. facebook.com) and after successful login, the user opens another website (malicious website) in the same browser.
 
Both websites are opened in the same browser. Malicious website will display some links to the user and asks the user to click on those links. User clicks on the links displayed on a malicious website, the malicious website sends a request using the existing session of genuine website. Web server of genuine website treats this request as a valid request and assumes that it is coming from a valid user so it executes the request and provides a proper response. A malicious website can perform harmful operations on genuine website.
 
In order to solve this problem, we expect the Action Method of genuine website to recognize the source of the request, whether the request is coming from genuine website or from a malicious website. This can be achieved by using the [ValidateAntiForgeryToken] attribute in ASP.Net MVC.
 
How to Implement CSRF Security in MVC
In order to implement CSRF security in MVC, first, we need to use HTML helper @Html.AntiForgeryToken() in view. It should be placed inside the BeginForm() method in view.
 
Next, we need to add [ValidateAntiForgeryToken] attribute on the action method which will accept HTTP post request. We need to do only these 2 changes and now MVC will prevent CSRF attacks.
 
How ValidateAntiForgeryToken works
How ValidateAntiForgeryToken prevents CSRF attacks?


First, the user will open genuine website in the browser. User login to genuine website. After login, genuine website sends Authentication cookie and Verification token. Verification token has randomly generated alphanumeric values. The verification token is stored in the cookie as well as in hidden field on client-side. When HTML form is submitted to the server, the verification token is submitted as a cookie as well as a hidden field. On the server-side, both are checked if they are same or not? If both are same then request is valid. If they are different or one of them is missing then request is treated as invalid request and will be rejected automatically by MVC.
 
When a user opens a malicious website in a new tab of the same browser, the malicious website will display some links and ask the user to click on those links. This website already has a script to send the request to genuine website. When the user clicks on links, the malicious website sends a request to genuine website. Since request is being sent to genuine website, the browser automatically submits Authentication cookie to Action method of genuine website but here, the hidden field is missing. The Action method has [ValidateAntiForgeryToken] attribute so it checks whether Authentication cookie and hidden field has same value but here, the hidden field is missing so the request is treated as invalid and it is rejected by MVC.
 
Practical Implementation
Wherever you have a Form, use @Html.AntiForgeryToken() inside the form and action method for accepting the HTTP Post should have ValidateAntiForgeryToken attribute. These are the only change, the rest of the process will be taken care of by ASP.Net MVC.
 
Please see the below HTML view where I have [email protected]()
    @using (Html.BeginForm("Create", "Products", FormMethod.Post, new { enctype = "multipart/form-data" })) 
    { 
       @Html.AntiForgeryToken() 
       <div class="form-row"> 
       <div class="form-group col-md-6"> 
          @Html.LabelFor(temp => temp.ProductName) 
          @Html.TextBoxFor(temp => temp.ProductName, new { placeholder = "Product Name", @class = "form-control" }) 
          @Html.ValidationMessageFor(temp => temp.ProductName) 
       </div> 
    <div class="form-group col-md-6"> 
       @Html.LabelFor(temp=>temp.Price) 
       @Html.TextBoxFor(temp=>temp.Price,new { @class="form-control",placeholder="Price"}) 
    </div> 
    </div> 
    @Html.ValidationSummary() 
       <button type="submit" class="btn btn-success">Create</button> 
       <a class="btn btn-danger" href="/products/index">Cancel</a> 
    } 

Below is the action method where I have added [ValidateAntiForgeryToken] attribute.
    [HttpPost] 
    [ValidateAntiForgeryToken] 
    public ActionResult Create(Product p) 
       { 
       ProductDBContext db = new ProductDBContext(); 
       if (ModelState.IsValid) 
       { 
          db.Products.Add(p); 
          db.SaveChanges(); 
          return RedirectToAction("Index"); 
       } 
       else 
       { 
          return View(); 
    } 
    } 

Summary
In this blog, I have explained Cross-Site Request Forgery(CSRF), its steps and what changes we need to do in MVC application to prevent CSRF attacks.


ASP.NET MVC 5 Hosting - HostForLIFE.eu :: Bootstrap Tab Strip in ASP.NET MVC

clock September 18, 2019 12:47 by author Peter

In this post, we will see how to render given below bootstrap Tab script in Asp.net MVC 5 view.

Here the number of tabs displayed in view would depend on count of members in the list.

1. Create ASP.NET MVC 5 project.
 
2. Define Member class as follows in “Member.cs” file
    public class Member 
    { 
    public int Id { get; set; } 
    public string Name { get; set; } 
    } 

3. Add view to create action method and pass a list of members from controller Action method to razor view file. i.e. “create.cshtml”
    public ActionResult Create() 
    { 
    List<Member> members = new List<Member>(); 
    members = GetMemberList(); 
    return View(members); 
    } 
    private List<Member> GetMemberList() 
    { 
    List<Member> members = new List<Member>(); 
    members.Add(new Member{ Name = "member1" }); 
    members.Add(new Member { Name = "member2" }); 
    members.Add(new Member { Name = "member3" }); 
    members.Add(new Member { Name = "member4" }); 
    members.Add(new Member { Name = "member5" }); 
    return members; 
    } 


4. Using CSS classes, we can create a tabscript in our “create.cshtml” as shown below:
    @model IEnumerable<Member> 
    <div class="container"> 
    @if (Model.ToList().Count > 0) 
    { 
    <ul class="nav nav-tabs" role="tablist"> 
    @{int i = 0; 
    foreach (var item in Model) 
    { 
    if (i == 0) 
    { 
    <li class="nav-item"> 
    <a class="nav-link active" data-toggle="tab" href="#@item.Name">@item.Name</a> 
    </li> 
    } 
    else 
    { 
    <li class="nav-item"> 
    <a class="nav-link" data-toggle="tab" href="#@item.Name">@item.Name</a> 
    </li> 
    } 
    i++; 
    } 
    } 
    </ul> 
    <div class="tab-content"> 
    @foreach (var item in Model) 
    { 
    <div id="@item.Name" class="container tab-pane active"> 
    <br> 
    <h3>@item.Name 's Tab Area </h3> 
    </div> 
    } 
    </div> 
    } 
    </div> 
    <script src="https://ajax.googleapis.com/ajax/libs/jquery/3.4.1/jquery.min.js"></script> 
    <script src="https://cdnjs.cloudflare.com/ajax/libs/popper.js/1.14.7/umd/popper.min.js"></script> 
    <script src="https://maxcdn.bootstrapcdn.com/bootstrap/4.3.1/js/bootstrap.min.js"></script> 


ASP.NET MVC 5 Hosting - HostForLIFE.eu :: Friendly Errors In MVC 5

clock July 20, 2018 08:51 by author Peter

In this article, I will be explaining 3 different ways to handle exceptions and display a friendly error page to the end user. Friendly Error Pages are the pages that you design to show the end user when any kind of not handled exception happens in your application and your expected result is not achieved. So, instead of presenting your end user with technical information regarding the exception, you show him a friend page. Also, presenting your end user with technical information is not a security best practice.

So, let's see the three ways.

Method 1: Custom Exception Filter
Custom Exception Filter

It is a filter that is called every time an exception occurs in the applied methods.

Why would I use a custom exception filter?


Because with a custom exception filter, you can handle in a generic way every kind of exception thrown by your actions and/or controllers. You may use custom exception filters to log your exceptions.

Steps to achieve this:
Step 1

Create a new class named CustomExceptionFilter.
public class CustomExceptionFilter : FilterAttribute, IExceptionFilter   
{   
    public void OnException( ExceptionContext filterContext )   
    {   
        filterContext.Result = new RedirectResult( "Home/About" );   
        filterContext.ExceptionHandled = true;   
    }   
}   

What this custom exception does is to redirect to your About action in your Home Controller. Do not forget to set the ExceptionHandled equal to true; otherwise it will not take effect.

Step 2
Apply your custom exception filter to your controller/action.
public class HomeController : Controller 

    [CustomExceptionFilter] 
    public ActionResult Index() 
    { 
        throw new Exception(); 
        return View(); 
    } 
 
    public ActionResult About() 
    { 
        ViewBag.Message = "Your application thrown an exception"; 
 
        return View(); 
    } 
 
    public ActionResult Contact() 
    { 
        ViewBag.Message = "Your contact page."; 
        throw new Exception(); 
        return View(); 
    } 


You can see that the exception filter is applied only to your Index Action so if you access your Contact action, you will be able to see the non-handled exception page.

Method 2: Web.Config configuration
Why would I handle an exception by web.config configuration?

It is easy to configure and useful when you do not need to log or work on the exception.

Steps to achieve this:

Step 1
Include this in your web.config inside the system.web tag.
<customErrors defaultRedirect="Error.cshtml" mode="On"></customErrors> 

Step 2
Update your Controller.
public class HomeController : Controller 

    [HandleError] 
    public ActionResult Index() 
    { 
        throw new Exception(); 
        return View(); 
    } 
 
    public ActionResult About() 
    { 
        ViewBag.Message = "Your application description page."; 
 
        return View(); 
    } 
 
    public ActionResult Contact() 
    { 
        ViewBag.Message = "Your contact page."; 
        throw new Exception();
        return View(); 
    } 


Observation - Like the custom exception filter, you may choose if you want to handle the exceptions at the Controller or Action level. Also, here, the handled exception is applied only to your Index action, you may see the non-handled error in the Contact View.

Method 3: Global.Asax Application_error
What is the Application_error?

It is to override the global exception handler of the application.

Why would I handle an exception by global.asax Application_error?
You do not need to set the places that you would like to handle the errors like before where you had to set the actions and controllers to be handled. Here, every exception will hit and be handled.

Steps to Achieve this:

Step 1
Update  your global.asax.
protected void Application_Error( object sender, EventArgs e ) 
  { 
      Exception exception = Server.GetLastError(); 
      Server.ClearError(); 
      Response.Redirect( "/Home/About" ); 
  } 


Like the custom exception handlers, it is very important to ClearError() in the Server. What is done here is the redirection of non-handled exceptions to the About action in the Home Controller. Congratulation, you just learned three good ways of handling exceptions in your application and presenting friendly error pages to your end users.


ASP.NET MVC 5 Hosting - HostForLIFE.eu :: List Of Users With Roles In ASP.NET MVC Identity

clock July 13, 2018 11:21 by author Peter

In this article, we will learn how to list all users with Associated Roles in ASP.NET MVC 5 using Identity. ASP.NET MVC 5 does not come with an inbuilt feature to list users with associated roles by default. However ASP.NET MVC have inbuilt UserManager, SignManager and RoleManager to assist this.

We need this feature in each of our applications as users are to be maintained along with their associated roles. We can apply a number of ideas to do this. In this article, we will learn a very simple way to list users with their associated RoleName as in the figure below.

Step 1
Create a View Model as Users-in-Role_ViewModel
public class Users_in_Role_ViewModel 
    { 
        public string UserId { get; set; } 
        public string Username { get; set; } 
        public string Email { get; set; } 
        public string Role { get; set; } 
    } 


Step 2
Add a new method called UsersWithRoles inside ManageUsersController and add the following codes.
public ActionResult UsersWithRoles() 
        { 
            var usersWithRoles = (from user in context.Users 
                                  select new 
                                  { 
                                      UserId = user.Id,                                       
                                      Username = user.UserName, 
                                      Email = user.Email, 
                                      RoleNames = (from userRole in user.Roles 
                                                   join role in context.Roles on userRole.RoleId  
                                                   equals role.Id 
                                                   select role.Name).ToList() 
                                  }).ToList().Select(p => new Users_in_Role_ViewModel() 
  
                                  { 
                                      UserId = p.UserId, 
                                      Username = p.Username, 
                                      Email = p.Email, 
                                      Role = string.Join(",", p.RoleNames) 
                                  }); 
  
  
            return View(usersWithRoles); 
        } 


Note - context.Users represents the table AspNetUsers which has navigation property roles which represent the AspNetUserInRoles table.

Step 3
Now, let’s add a View of UsersWithRoles method of ManageUsersController.
@model IEnumerable<MVC5Demo.UI.ViewModels.Users_in_Role_ViewModel> 
@{ 
    ViewBag.Title = "Users With Roles"; 
    Layout = "~/Views/Shared/_Layout.cshtml"; 

  
<div class="panel panel-primary"> 
    <div class="panel-heading"> 
        <h3 class="box-title"> 
            <b>Users with Roles</b> 
        </h3> 
    </div> 
    <!-- /.box-header --> 
    <div class="panel-body"> 
        <table class="table table-hover table-bordered table-condensed" id="UsersWithRoles"> 
            <thead> 
                <tr> 
                    <td><b>Username</b></td> 
                    <td><b>Email</b></td> 
                    <td><b>Roles</b></td> 
                </tr> 
            </thead> 
            @foreach (var user in Model) 
            { 
                <tr> 
                    <td>@user.Username</td> 
                    <td>@user.Email</td> 
                    <td>@user.Role</td> 
                     
                </tr> 
            } 
        </table> 
    </div> 
  
    <div class="panel-footer"> 
        <p class="box-title"><b>Total Users till @String.Format("{0 : dddd, MMMM d, yyyy}", DateTime.Now)  : </b><span class="label label-primary">@Model.Count()</span></p> 
    </div> 
</div> 
  
  
@section scripts{ 
    <script> 
        $(function () { 
            $('#UsersWithRoles').DataTable({ 
                "paging": true, 
                "lengthChange": true, 
                "searching": true, 
                "ordering": true, 
                "info": true, 
                "autoWidth": true 
            }); 
        }); 
    </script> 


Now, the above method and View will return the users to their roles.

n


ASP.NET MVC Hosting - HostForLIFE.eu :: Using Ajax in MVC Application

clock June 21, 2016 00:16 by author Anthony

In asp.net web form application, if we need ajax service, we will need to create wcf services on server side to serve ajax calls, while in MVC web application, no wcf is needed, a controller will do.

Here are two examples (GET and POST) of how to use ajax in mvc application

Http Get example: ajax consumer in view

<script type="text/javascript">
  var user = {
                'id': 1
            };
    $.get(
                'home/getUser',
                user,
                function (data) {
                    alert(data.name);
                }
    );
</script>


Http Get example: ajax server in home controller

public class HomeController : Controller
{
    // data GET service
     public JsonResult getUser(int id)
     {
            User user = db.Users.where(u=>u.id==id)
            return Json(user,JsonRequestBehavior.AllowGet);     }
}

A few points:


Controller must return JsonResult rather than ActionResult as a normal controller does as we would want the data to be returnd as json data, and it does not have a ‘d’ wrapper

JsonRequestBehavior.AllowGet must be set in Json()call, otherwise you will get:

500 internal server error with message like

This request has been blocked because sensitive information could be disclosed to third party web sites when this is used in a GET request. To allow GET requests, set JsonRequestBehavior to AllowGet

You only need to set this parameter for GET and returning JSON array to avoid JSON hijacking, no need for POST requests.
Http POST example: ajax consumer in view


<script type="text/javascript">
var user={
            'name':’TheUser’,
            'age':30
        };
 $.post(
            'home/SaveUser',
            user,
            function (data) {
                if (data === true) {
                   alert('User is saved');
                }
                else {

                    alert('Failed to save the user');
                }
            },
            'json'
        );
</script>


Http POST example: ajax server in home controller

public class HomeController : Controller
{
    // data POST service
  [AcceptVerbs(HttpVerbs.Post)]
   public JsonResult SaveUser (string name, int age)
   {
        return Json(true);    }
}

A few points:

Have to decorate the controller with ‘POST’

Datatype in $.post in example is set to json, but it is not necessary to be so, if you just pass data in fields rather than in complex object. When it is not set to json it will use application/x-www-form-urlencoded as a way to pass data in standard post.


Summary:
In asp.net MVC you can use controller as ajax server without having to use wcf, compared with wcf, no configuration is needed


HostForLIFE.eu ASP.NET MVC Hosting
HostForLIFE.eu is European Windows Hosting Provider which focuses on Windows Platform only. We deliver on-demand hosting solutions including Shared hosting, Reseller Hosting, Cloud Hosting, Dedicated Servers, and IT as a Service for companies of all sizes. We have customers from around the globe, spread across every continent. We serve the hosting needs of the business and professional, government and nonprofit, entertainment and personal use market segments.


ASP.NET MVC Hosting - HostForLIFE.eu :: Configuring ELMAH In ASP.NET MVC

clock June 13, 2016 21:35 by author Anthony

In this article, I will integrate and setup ELMAH to asp.net MVC project. I will finish whole article in 5 different steps. ELMAH stands for Error Logging Modules and Handlers providing application wide error logging facilities. ELMAH is pluggable and easy to implement without changing single line of code. ELMAH work as interceptor of unhandled dotnet exceptions, that display over yellow screen of death. As per Author you can dynamically add ELMAH on running asp.net application without recompile or re-deploy whole application.You can download ELMAH binaries from google code or if you are using nuget then visit ELMAH nuget page.

Install

The best way to install any module to Asp.net MVC project is to use Nuget package Console. You can visit ELMAH nuget page for get latest version command.

Configure

After installing ELMAH , it will automatically update Web.Config file. If it's not so you can add following code to Web.Config file.

<configuration>
<configSections>
    <sectionGroup name="elmah">
      <section name="security" requirePermission="false" type="Elmah.SecuritySectionHandler, Elmah" />
      <section name="errorLog" requirePermission="false" type="Elmah.ErrorLogSectionHandler, Elmah" />
      <section name="errorMail" requirePermission="false" type="Elmah.ErrorMailSectionHandler, Elmah" />
      <section name="errorFilter" requirePermission="false" type="Elmah.ErrorFilterSectionHandler, Elmah" />
    </sectionGroup>
</configSections>

<system.web>   
    <httpModules>
      <add name="ErrorLog" type="Elmah.ErrorLogModule, Elmah" />
      <add name="ErrorMail" type="Elmah.ErrorMailModule, Elmah" />
      <add name="ErrorFilter" type="Elmah.ErrorFilterModule, Elmah" />
    </httpModules>
</system.web>

<system.webServer>
<modules>
      <add name="ErrorLog" type="Elmah.ErrorLogModule, Elmah" preCondition="managedHandler" />
      <add name="ErrorMail" type="Elmah.ErrorMailModule, Elmah" preCondition="managedHandler" />
      <add name="ErrorFilter" type="Elmah.ErrorFilterModule, Elmah" preCondition="managedHandler" />
</modules>
</system.webServer>
<elmah>
    <security allowRemoteAccess="false" />
    <errorLog type="Elmah.SqlErrorLog, Elmah" connectionStringName="YourConnectionStringName" />
</elmah>
    <location path="elmah.axd" inheritInChildApplications="false">
    <system.web>
      <httpHandlers>
        <add verb="POST,GET,HEAD" path="elmah.axd" type="Elmah.ErrorLogPageFactory, Elmah" />
      </httpHandlers>
      <!--
      <authorization>
        <allow roles="admin" />
        <deny users="*" /> 
      </authorization>
      --> 
    </system.web>
    <system.webServer>
      <handlers>
        <add name="ELMAH" verb="POST,GET,HEAD" path="elmah.axd" type="Elmah.ErrorLogPageFactory, Elmah" preCondition="integratedMode" />
      </handlers>
    </system.webServer>
  </location>
</configuration>
Usage Now, It's time to use and test elmah for application. Generate exception in Home Controller
public ActionResult Index()
{
   throw new Exception("This is test Exception");
          
   return View();
}


after generating exception check your elmah like http://www.example.com/elmah.axd
Here is our output

integrate-elmah-in-aspnet-mvc

integrate elmah in asp. net mvc

Security

In addition ELMAH provides seamless security feature to prevent unauthorized access. Please read our next article to make your elmah secure.

Filtering

ELMAH identify and store exceptions in different category, you can make or edit ELMAH error screen with different filters which we will discuss in our next ELMAH series.

Notification

You can setup ELMAH email notification when any exception occurs. To unable notification option you must include below code

Add ErrorMail module
<httpModules>
    <add name="ErrorMail" type="Elmah.ErrorMailModule, Elmah"/>
</httpModules>


Add SMTP Setting
<system.net>
    <mailSettings>
        <smtp deliveryMethod="network">
            <network host="..." port="25" userName="..." password="..." />
        </smtp>
    </mailSettings>
</system.net>
 

or
<elmah>
<errorMail from="..." to="..."  async="true" smtpServer="..." smtpPort="25" userName="..." password="..." />
</elmah>


HostForLIFE.eu ASP.NET MVC Hosting
HostForLIFE.eu is European Windows Hosting Provider which focuses on Windows Platform only. We deliver on-demand hosting solutions including Shared hosting, Reseller Hosting, Cloud Hosting, Dedicated Servers, and IT as a Service for companies of all sizes. We have customers from around the globe, spread across every continent. We serve the hosting needs of the business and professional, government and nonprofit, entertainment and personal use market segments.


ASP.NET MVC 5 Hosting - HostForLIFE.eu :: AngularJS Login Page in ASP.NET MVC 5

clock May 17, 2016 23:45 by author Anthony

In this tutorial i am going to explain about how to create a login page using Angular js in MVC 5 application. In this tutorial i used Simple form validation using angular(we will discuss about angular validation in detail in future post).And also a $http angular built in service.

$http: It is a angular JS built in service for communicating with remote servers.In Angular all communications (Request and response) between server and client are handled by services like $http.

Step 1: Create a Data table in Database

1.Here i used Local Database for Table creation (Sql Express).
2.Right click server explorer --> expand Database --> Right click on tables --> Click Add new table.
3.Create a table with  following columns if you want you can add more columns.
4.Here i created following table.

Step 2: Add ADO.NET Entity Data Model

1.Right click on Models --> Add --> New Item -->Select ADO.NET Entity Data Model(Under Data) --> name it -->Add --> select Add from Database (In Entity Data Model wizard) --> Next
2.Select Database --> give name for web.config.
3.Choose your Database objects(tables) and click finish.


Step 3: Add a Model Class to Solution

1.Right click Models --> Add --> Class and name it (I named it as UserModel.cs).
2.These Model objects are useful while we sending data from View to Controller.
3.We bind this Model properties with angular ngModel.(you will see in index.cshtml).
4.replace code with following code

namespace LoginUsingAngular.Models
{
    public class UserModel
    {
        public string Email { get; set; }
        public string Password { get; set; }
    }
}

Step 4: Add New Action Method in HomeController to Check User Data

1.This Action Method gets data from database based on user entered data in form.and returns that data in Json format to angular Controller.
2.Add code in HomeController
getLoginData():

public ActionResult getLoginData(UserModel obj)
        {
            DatabaseEntities db = new DatabaseEntities();
            var user = db.Users.Where(x => x.Email.Equals(obj.Email) && x.Password.Equals(obj.Password)).FirstOrDefault();
            return new JsonResult {Data=user,JsonRequestBehavior=JsonRequestBehavior.AllowGet };
        }

Step 5: Add angular controller for checking Login Form

1.Create angular module in  Module.js file.
(function () {
    var myApp = angular.module("myApp",[]);
})();

2.Now add another script file for angular controller and Factory method.
3.Right click on Scripts folder --> add LoginController.js
4.Replace code in LoginController.js file.

angular.module('myApp').controller('LoginController', function ($scope, LoginService) {
 
        //initilize user data object
        $scope.LoginData = {
            Email: '',
            Password:''
        }
        $scope.msg = "";
        $scope.Submited = false;
        $scope.IsLoggedIn = false;
        $scope.IsFormValid = false;
 
        //Check whether the form is valid or not using $watch
        $scope.$watch("myForm.$valid", function (TrueOrFalse) {
            $scope.IsFormValid = TrueOrFalse;   //returns true if form valid
        });
 
        $scope.LoginForm = function () {
            $scope.Submited = true;
            if ($scope.IsFormValid) {
                LoginService.getUserDetails($scope.UserModel).then(function (d) {
                    debugger;
                    if (d.data.Email != null) {
                        debugger;
                        $scope.IsLoggedIn = true;
                        $scope.msg = "You successfully Loggedin Mr/Ms " +d.data.FullName;
                    }
                    else {
                        alert("Invalid credentials buddy! try again");
                    }
                });
            }
        }
    })
    .factory("LoginService", function ($http) {
        //initilize factory object.
        var fact = {};
        fact.getUserDetails = function (d) {
            debugger;
            return $http({
                url: '/Home/getLoginData',
                method: 'POST',
                data:JSON.stringify(d),
                headers: { 'content-type': 'application/json' }
            });
        };
        return fact;
    });


4.Here,I validated form using $watch in above code.
5.I created a angular service LoginService that gets data from server controller (from HomeController.getLoginData() action).
6.LoginForm() method is initiated when user submits form using ngSubmit as angular attribute.


Step 6: Add View to display Login Form

1.Right click on Index action --> Add View --> add
2.Replace Index.cshtml view code with following code

@{
    ViewBag.Title = "Login Using Angular";
}
<h2>Login Using Angular</h2>

<div ng-controller="LoginController">
    <form name="myForm" novalidate ng-submit="LoginForm()">
        <div style="color:green">{{msg}}</div>
        <table ng-show="!IsLoggedIn" class="table table-horizontal">
            <tr>
                <td>Email/UserName :</td>
                <td>
                    <input type="email" ng-model="UserModel.Email" name="UserEmail" ng-class="Submited?'ng-dirty':''" required autofocus class="form-control"/>
                    <span style="color:red" ng-show="(myForm.UserEmail.$dirty || Submited ) && myForm.UserEmail.$error.required">Please enter Email</span>
                    <span style="color:red" ng-show="myForm.UserEmail.$error.email">Email is not valid</span>
                </td>
            </tr>
            <tr>
                <td>Password :</td>
                <td>
                    <input type="password" ng-model="UserModel.Password" name="UserPassword" ng-class="Submited?'ng-dirty':''" required autofocus class="form-control"/>
                    <span style="color:red" ng-show="(myForm.UserPassword.$dirty || Submited) && myForm.UserPassword.$error.required">Password Required</span>
                </td>
            </tr>
            <tr>
                <td></td>
                <td>
                    <input type="submit" value="submit" class="btn btn-success" />
                </td>
            </tr>
        </table>
    </form>
</div>
@section scripts{
    <script src="~/Scripts/LoginController.js"></script>
}

Add script reference at the end of Index.cshtml page.
Take a look at following things i used in above Index.cshtml view.

ng-Model: ngModel is a angular directive.it is used for two way binding data from view to controller and controller to view.In above example i used it to bind from data to angular controller.

ng-show: ngShow allows to display or hide elements based on the expression provided to ngShow attribute.

ng-submit:  ng-submit prevents the default action of form and binds angular function to onsubmit events. This is invoked when form is submitted.

$dirty: It is angular built in property. It will be true if user interacted with form other wise false.This is one of the angular validation property i used in above example.There are many validation properties in angular like $invalid,$submitted,$pristine,$valid and $error.We will learn about all these these properties in later tutorials.


About HostForLIFE

HostForLIFE is European Windows Hosting Provider which focuses on Windows Platform only. We deliver on-demand hosting solutions including Shared hosting, Reseller Hosting, Cloud Hosting, Dedicated Servers, and IT as a Service for companies of all sizes.

We have offered the latest Windows 2019 Hosting, ASP.NET 5 Hosting, ASP.NET MVC 6 Hosting and SQL 2019 Hosting.


Month List

Tag cloud

Sign in