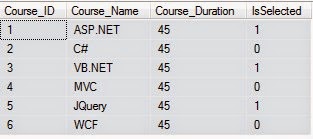
In this article I will explain you about How to bind the Checkboxlist from the database. Let’s try to understand this with an example. We will be using Courses table in this example as shown in the following picture.
Write the following SQL scripts for creating Courses table and inserting data into it.
CREATE TABLE Courses (
Course_ID int IDENTITY (1, 1) PRIMARY KEY,
Course_Name varchar(50),
Course_Duration int,
IsSelected bit
)
INSERT INTO Courses (Course_Name, Course_Duration, IsSelected)
VALUES ('ASP.NET', 45, 1)
INSERT INTO Courses (Course_Name, Course_Duration, IsSelected)
VALUES ('C#', 45, 0)
INSERT INTO Courses (Course_Name, Course_Duration, IsSelected)
VALUES ('VB.NET', 45, 1)
INSERT INTO Courses (Course_Name, Course_Duration, IsSelected)
VALUES ('MVC', 45, 0)
INSERT INTO Courses (Course_Name, Course_Duration, IsSelected)
VALUES ('JQuery', 45, 1)
INSERT INTO Courses (Course_Name, Course_Duration, IsSelected)
VALUES ('WCF', 45, 0)

Now, add your connectionstring with name="con" in the web.config file.
Write the below code in the Model class.
Model(Users.cs):
using System;
using System.Collections.Generic;
using System.Linq;
using System.Web;
using System.Web.Mvc;
using System.Data.SqlClient;
using System.Data;
using System.Configuration;
namespace MvcCheckBoxList.Models
{
public class Users
{
public int Course_ID { get; set; }
public string Course_Name { get; set; }
public int Course_Duration { get; set; }
public bool IsSelected { get; set; }
public static List<Users> getUsers()
{
SqlConnection con = new SqlConnection(ConfigurationManager.ConnectionStrings["con"].ConnectionString);
SqlCommand cmd = new SqlCommand("select * from Courses", con);
SqlDataAdapter da = new SqlDataAdapter(cmd);
DataSet ds = new DataSet();
da.Fill(ds);
var users = new List<Users>(ds.Tables[0].Rows.Count);
foreach (DataRow row in ds.Tables[0].Rows)
{
var values = row.ItemArray;
var user = new Users()
{
Course_ID = (int)values[0],
Course_Name = (string)values[1],
Course_Duration=(int)values[2],
IsSelected = (bool)values[3]
};
users.Add(user);
}
return users;
}
}
}
Write the following code in the Controller class.
Controller(UserController.cs):
using System;
using System.Collections.Generic;
using System.Linq;
using System.Web;
using System.Web.Mvc;
using MvcCheckBoxList.Models;
using System.Data;
using System.Text;
namespace MvcCheckBoxList.Controllers
{
public class UserController : Controller
{
public ActionResult UsersIndex()
{
List<Users> model = new List<Users>();
model = Users.getUsers();
return View(model);
}
[HttpPost]
public ActionResult UsersIndex(List<Users> user)
{
if (user.Count(x => x.IsSelected) == 0)
{
ViewBag.msg = "You have not selected any Course";
return View();
}
else
{
StringBuilder sb = new StringBuilder();
sb.Append("You have selected – ");
foreach (Users usr in user)
{
if (usr.IsSelected)
{
sb.Append(usr.Course_Name + ",");
}
}
sb.Remove(sb.ToString().LastIndexOf(","), 1);
sb.Append(" Courses");
ViewBag.msg = sb.ToString();
return View(user);
}
}
}
}
Write the following code in the View:
View(UsersIndex.cshtml):
@model List<MvcCheckBoxList.Models.Users>
@{
ViewBag.Title = "Index";
}
<h5 style="color:Red">@ViewBag.msg</h5>
@if (string.IsNullOrEmpty(ViewBag.msg))
{
using (Html.BeginForm("UsersIndex", "User", FormMethod.Post))
{
for (int i = 0; i < Model.Count; i++)
{
@Html.CheckBoxFor(m => m[i].IsSelected)
@Html.Label(Model[i].Course_Name);
@Html.HiddenFor(m => m[i].Course_Name);
@Html.HiddenFor(m => m[i].Course_ID)
<br />
}
<div> <input type="submit" value="Submit!" /></div>
}
}
And here is the output:
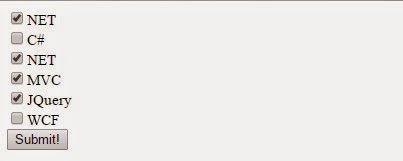
When you click on Submit button then corresponding selected items will show.

HostForLIFE.eu ASP.NET MVC 6 Hosting
HostForLIFE.eu is European Windows Hosting Provider which focuses on Windows Platform only. We deliver on-demand hosting solutions including Shared hosting, Reseller Hosting, Cloud Hosting, Dedicated Servers, and IT as a Service for companies of all sizes. We have customers from around the globe, spread across every continent. We serve the hosting needs of the business and professional, government and nonprofit, entertainment and personal use market segments.
