The construction of ASP.NET Core MVC web applications using controllers and views is covered in this lesson. There are various phases involved in implementing a star rating system using Dapper in.NET Core. To save ratings, you must first configure your database schema. Next, in order to communicate with the database, you'll need to establish the Dapper repository and the required model classes.

What is Rate Yo?
Rate Yo is a free, tiny, and flexible jQuery star rating plugin, it uses SVG to generate an image and render rating, so no images are required.
Prerequisites
- Visual Studio is the latest version with the ASP.NET and web development workload.
- .NET SDK latest version (.NET 8.0)
- SQL SERVER latest
Making a table in a database
Start SQL Server, choose Database, then click Create New Database.
CREATE TABLE [dbo].[t_company_rating]
(
[f_uid] UNIQUEIDENTIFIER PRIMARY KEY NOT NULL,
[f_iid] INT IDENTITY (1, 1) NOT NULL,
[f_company_name] NVARCHAR (100) NULL,
[f_company_location] NVARCHAR (100) NULL,
[f_country] NVARCHAR (100) NULL,
[f_glassdoor_rating] FLOAT (53) NULL,
)
Starting a New Visual Studio Project
Open Visual Studio, then choose File > New Project.
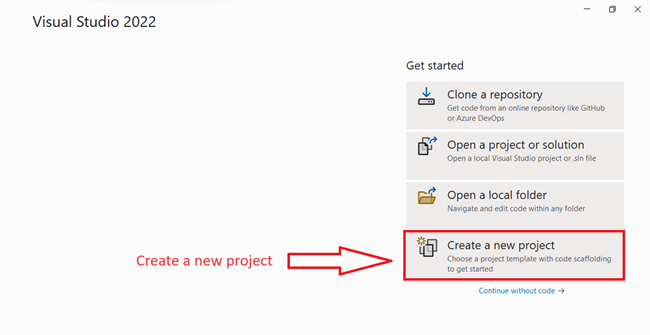
Make a Web Application
- Launch Visual Studio, then choose File > New Project
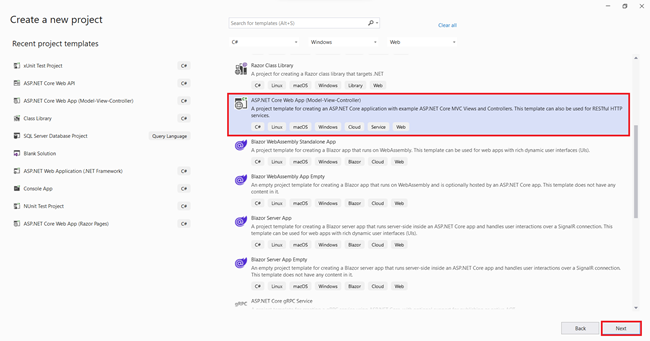
- Select the ASP.NET Core Web App (Model-View-Controller) > Next option from the Create a new project dialog box
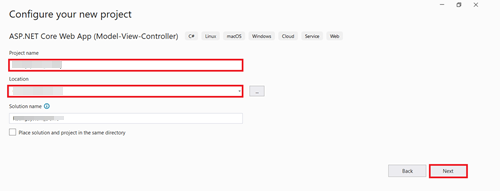
Setting Up Your New Project
Enter RatingSystem_Demo as the project name in the Configure your new project dialog.
- The project should be named RatingSystem_Demo. When copying code, capitalization must match each namespace.
- Select a place to work on your project.
- Name the solution.
- Click on Next.
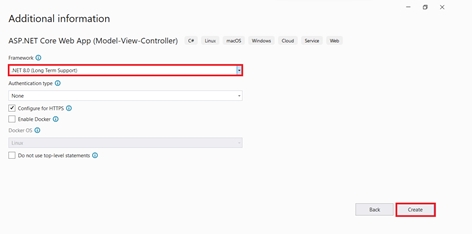
Additional information
In the Additional information dialog.
- Select .NET 8.0 (Long Term Support).
- Verify that Do not use top-level statements is unchecked.
- Select Create.
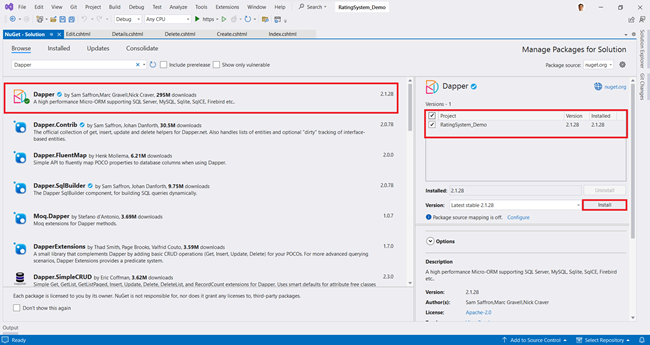
Option 1. Install the Dapper, Microsoft.Data.SqlClient Library through NuGet Package Manager
- Go to Project > Manage NuGet Packages.
- On the NuGet Package Manager page, select nuget.org as the Package source.
- Under the Browse tab, search for Dapper, then choose Dapper from the list and select Install.
- If prompted to verify the installation, click OK.
Option 2: Using the Visual Studio Command Line to install the Dapper Library
Go to Tools > NuGet Package Manager > Package Manager Console in Visual Studio.
Under the Package Manager Console tab, type the following command.
Install-Package Dapper
Add RateYo library files
Library files can be added to an ASP.NET Core project in two different ways.
- Use the Add Client-Side Library dialog
- Manually configure LibMan manifest file entries
Use the Add Client-Side Library dialog
Follow these steps to install a client-side library.
In Solution Explorer, right-click the project folder in which the files should be added. Choose Add > Client-Side Library. The Add Client-Side Library dialog appears.
Add Client-side Library

.png)
The suggested Target Location folder is based on the location from which the dialog is launched.
If launched from the project root.
- wwwroot/lib is used if wwwroot exists.
- lib is used if wwwroot doesn't exist.
- If launched from a project folder, the corresponding folder name is used.
The folder suggestion is suffixed with the library name. The following table illustrates folder suggestions when installing jQuery in a Razor Pages project.
Click the Install button to download the files, per the configuration in libman.json.
Add a data model class
Right-click the Models folder > Add > Class. Name the file CompanyModel.cs.
Replace the Models/CompanyModel.cs file with using c# following code.
The CompanyModel class contains a f_uid field, which is required by the database for the primary key.
CompanyModel.cs
using System.ComponentModel.DataAnnotations;
namespace RatingSystem_Demo.Models
{
public class CompanyModel
{
public Guid f_uid { get; set; }
[Display(Name ="ID")]
public int f_iid { get; set; }
[Display(Name = "Company Name")]
public string f_company_name { get; set; }
[Display(Name = "Location")]
public string f_company_location { get; set; }
[Display(Name = "Country")]
public string f_country { get; set; }
[Display(Name = "Glassdoor Rating")]
public float f_glassdoor_rating { get; set; }
}
}
Adding interfaces
- In Solution Explorer, right-click Add New Folder.
- Rename the folder to Repositories.
- Right-click on the renamed folder and Add the interface name IGenericRepository.cs
IGenericRepository.cs
namespace RatingSystem_Demo.Repositories
{
public interface IGenericRepository<T> where T : class
{
Task<IEnumerable<T>> Get();
Task<T> Find(Guid uid);
Task<T> Add(T model);
Task<T> Update(T model);
Task<T> Remove(T model);
}
}
IUnitOfWork.cs
namespace RatingSystem_Demo.Repositories
{
public interface IUnitOfWork
{
ICompany Companies { get; }
}
}
ICompany.cs
using RatingSystem_Demo.Models;
namespace RatingSystem_Demo.Repositories
{
public interface ICompany:IGenericRepository<CompanyModel>
{
}
}
Interface Implementation
UnitOfWork.cs
namespace RatingSystem_Demo.Repositories
{
public class UnitOfWork : IUnitOfWork
{
public ICompany Companies { get; set; }
public UnitOfWork(ICompany Companies)
{
this.Companies = Companies;
}
}
}
CompanyRepository.cs
using Dapper;
using Microsoft.Data.SqlClient;
using RatingSystem_Demo.Models;
namespace RatingSystem_Demo.Repositories
{
public class CompanyRepository : ICompany
{
private readonly IConfiguration _configuration;
private readonly SqlConnection _connection;
public CompanyRepository(IConfiguration configuration)
{
_configuration = configuration;
_connection = new SqlConnection(_configuration.GetConnectionString("DefaultConnection"));
}
public async Task<IEnumerable<CompanyModel>> Get()
{
var sql = $@"
SELECT [f_uid]
,[f_iid]
,[f_company_name]
,[f_company_location]
,[f_country]
,[f_glassdoor_rating]
FROM
[Sample-DB].[dbo].[t_company_rating]
ORDER BY f_iid ASC";
return await _connection.QueryAsync<CompanyModel>(sql);
}
public async Task<CompanyModel> Find(Guid uid)
{
var sql = $@"
SELECT [f_uid]
,[f_iid]
,[f_company_name]
,[f_company_location]
,[f_country]
,[f_glassdoor_rating]
FROM [Sample-DB].[dbo].[t_company_rating]
WHERE
[f_uid]=@uid";
return await _connection.QueryFirstOrDefaultAsync<CompanyModel>(sql, new { uid });
}
public async Task<CompanyModel> Add(CompanyModel model)
{
model.f_uid = Guid.NewGuid();
var sql = $@"
INSERT INTO [dbo].[t_company_rating]
([f_uid]
,[f_company_name]
,[f_company_location]
,[f_country]
,[f_glassdoor_rating])
VALUES
(@f_uid,
@f_company_name,
@f_company_location,
@f_country,
@f_glassdoor_rating)";
await _connection.ExecuteAsync(sql, model);
return model;
}
public async Task<CompanyModel> Update(CompanyModel model)
{
var sql = $@"UPDATE [dbo].[t_company_rating]
SET
[f_company_name] = @f_company_name,
[f_company_location] = @f_company_location,
[f_country] = @f_country,
[f_glassdoor_rating] = @f_glassdoor_rating
WHERE
f_uid=@f_uid";
await _connection.ExecuteAsync(sql, model);
return model;
}
public async Task<CompanyModel> Remove(CompanyModel model)
{
var sql = $@"
DELETE FROM
[dbo].[t_company_rating]
WHERE
[f_uid]=@f_uid";
await _connection.ExecuteAsync(sql, model);
return model;
}
}
}
Add a controller
- In Solution Explorer, right-click Controllers > Add > Controller.
- In the Add New Scaffolded Item dialog box, select MVC Controller - Empty > Add.
- In the Add New Item - RatingSystem_Demo dialog, enter CompaniesController.cs and select Add.
Replace the contents of Controllers/CompaniesController.cs with the following code.
using Microsoft.AspNetCore.Mvc;
using RatingSystem_Demo.Models;
using RatingSystem_Demo.Repositories;
namespace RatingSystem_Demo.Controllers
{
public class CompaniesController : Controller
{
private readonly IUnitOfWork unitOfWork;
public CompaniesController(IUnitOfWork unitOfWork)
{
this.unitOfWork = unitOfWork;
}
public async Task<IActionResult> Index()
{
var companies = await unitOfWork.Companies.Get();
var ratings = companies.Select(x => x.f_glassdoor_rating).ToList();
ViewBag.Ratings = string.Join(", ", ratings);
return View(companies);
}
public async Task<IActionResult> Details(Guid id)
{
var company = await unitOfWork.Companies.Find(id);
return View(company);
}
public IActionResult Create()
{
return View();
}
[HttpPost]
[ValidateAntiForgeryToken]
public async Task<IActionResult> Create(CompanyModel model)
{
var company = await unitOfWork.Companies.Add(model);
return RedirectToAction(nameof(Index));
}
[HttpGet]
public async Task<IActionResult> Edit(Guid id)
{
if (id == Guid.Empty)
{
return NotFound();
}
var company = await unitOfWork.Companies.Find(id);
if (company == null)
{
return BadRequest();
}
return View(company);
}
[HttpPost]
[ValidateAntiForgeryToken]
public async Task<IActionResult> Edit(Guid id, CompanyModel model)
{
if (id == Guid.Empty)
{
return NotFound();
}
var company = await unitOfWork.Companies.Find(id);
if (company == null)
{
return BadRequest();
}
await unitOfWork.Companies.Update(model);
return RedirectToAction(nameof(Index));
}
public async Task<IActionResult> Delete(Guid id)
{
if (id == Guid.Empty)
{
return NotFound();
}
var company = await unitOfWork.Companies.Find(id);
if (company == null)
{
return BadRequest();
}
return View(company);
}
[HttpPost, ActionName("Delete")]
[ValidateAntiForgeryToken]
public async Task<IActionResult> ConfirmDelete(Guid id)
{
var company = await unitOfWork.Companies.Find(id);
await unitOfWork.Companies.Remove(company);
return RedirectToAction(nameof(Index));
}
}
}
Add a view
- Right-click on the Views folder, then Add > New Folder, and name the folder Companies
- Right-click on the Views/Companies folder, and then Add > New Item.
- In the Add New Item dialog, select Show All Templates.
- In the Add New Item - RatingSystem_Demo dialog:
- In the search box in the upper-right, enter the view
- Select Razor View - Empty
- Keep the Name box value, Index.cshtml.
- Select Add
Replace the contents of the Views/Companies/Index.cshtml, Create.cshtml, Edit.cshtml and Delete.cshtml Razor view file with the following:
Index.cshtml
@model IEnumerable<RatingSystem_Demo.Models.CompanyModel>
@{
ViewData["Title"] = "Index";
}
<h4 class="text-uppercase text-center">List of companies</h4>
<p style="float:right"><a asp-action="Create" class="btn btn-primary btn-md rounded-0"><i class="fa-solid fa-plus"></i> Add New</a></p>
<table class="table table-bordered table-striped">
<thead>
<tr>
<th>@Html.DisplayNameFor(model => model.f_iid)</th>
<th>@Html.DisplayNameFor(model => model.f_company_name)</th>
<th>@Html.DisplayNameFor(model => model.f_company_location)</th>
<th>@Html.DisplayNameFor(model => model.f_country)</th>
<th>@Html.DisplayNameFor(model => model.f_glassdoor_rating)</th>
<th>Action(s)</th>
</tr>
</thead>
<tbody>
@foreach (var item in Model) {
<tr>
<td>@item.f_iid</td>
<td><a style="text-decoration:none" href="@Url.Action("Details","Companies", new { id = item.f_uid })">@item.f_company_name</a></td>
<td>@item.f_company_location</td>
<td>@item.f_country</td>
<td>
<span style="float:left;display:inline">@item.f_glassdoor_rating <span style="float:left;display:inline" class="rateYo"></span></span>
<td>
<a href="@Url.Action("Edit","Companies", new { id = item.f_uid })" class="btn btn-info btn-sm rounded-0"><i class="fa-solid fa-pen-to-square"></i></a>
<a href="@Url.Action("Delete","Companies", new { id = item.f_uid })" class="btn btn-danger btn-sm rounded-0"><i class="fa-solid fa-trash"></i></a>
</td>
</tr>
}
</tbody>
</table>
@section Scripts {
@{
await Html.RenderPartialAsync("_ValidationScriptsPartial");
}
<script type="text/javascript">
$(function () {
var demoRatings = [@ViewBag.Ratings],
stars = $('.rateYo');
for (var i = 0; i < stars.length; i++) {
$('.rateYo').eq(i).rateYo({
rating: demoRatings[i],
readOnly: true
});
}
});
</script>
}
Create.cshtml
@model RatingSystem_Demo.Models.CompanyModel
@{
ViewData["Title"] = "Create";
}
<div class="container">
<div class="card">
<div class="card-header">
<h4>Compnay</h4>
</div>
<div class="card-body">
<div class="row">
<div class="col-md-4">
<form asp-action="Create">
<div asp-validation-summary="ModelOnly" class="text-danger"></div>
<div class="form-group">
<label asp-for="f_company_name" class="control-label"></label>
<input asp-for="f_company_name" class="form-control" />
<span asp-validation-for="f_company_name" class="text-danger"></span>
</div>
<div class="form-group">
<label asp-for="f_company_location" class="control-label"></label>
<input asp-for="f_company_location" class="form-control" />
<span asp-validation-for="f_company_location" class="text-danger"></span>
</div>
<div class="form-group">
<label asp-for="f_country" class="control-label"></label>
<input asp-for="f_country" class="form-control" />
<span asp-validation-for="f_country" class="text-danger"></span>
</div>
<div class="form-group">
<label asp-for="f_glassdoor_rating" class="control-label"></label>
<input asp-for="f_glassdoor_rating" readonly class="form-control counter" />
<br />
<div id="rateYo"></div>
<br />
<span asp-validation-for="f_glassdoor_rating" class="text-danger"></span>
</div>
<div class="form-group">
<input type="submit" value="Save" class="btn btn-primary btn-md rounded-0" />
<a asp-action="Index" class="btn btn-primary btn-md rounded-0"><i class="fa-solid fa-backward"></i>Back to List </a>
</div>
</form>
</div>
</div>
</div>
</div>
</div>
@section Scripts {
@{await Html.RenderPartialAsync("_ValidationScriptsPartial");}
<script>
$(function () {
$("#rateYo").rateYo({
onChange: function (rating, rateYoInstance) {
$("#f_glassdoor_rating").val(rating);
}
});
});
</script>
}
Edit.cshtml
@model RatingSystem_Demo.Models.CompanyModel
@{
ViewData["Title"] = "Edit";
}
<div class="container">
<div class="card">
<div class="card-header">
<h4>Compnay</h4>
</div>
<div class="card-body">
<div class="row">
<div class="col-md-4">
<form asp-action="Edit">
<div asp-validation-summary="ModelOnly" class="text-danger"></div>
<input hidden asp-for="f_uid" />
<input hidden asp-for="f_iid" />
<div class="form-group">
<label asp-for="f_company_name" class="control-label"></label>
<input asp-for="f_company_name" class="form-control" />
<span asp-validation-for="f_company_name" class="text-danger"></span>
</div>
<div class="form-group">
<label asp-for="f_company_location" class="control-label"></label>
<input asp-for="f_company_location" class="form-control" />
<span asp-validation-for="f_company_location" class="text-danger"></span>
</div>
<div class="form-group">
<label asp-for="f_country" class="control-label"></label>
<input asp-for="f_country" class="form-control" />
<span asp-validation-for="f_country" class="text-danger"></span>
</div>
<div class="form-group">
<label asp-for="f_glassdoor_rating" class="control-label"></label>
<input asp-for="f_glassdoor_rating" readonly class="form-control counter" />
<br />
<div id="rateYo"></div>
<br />
<span asp-validation-for="f_glassdoor_rating" class="text-danger"></span>
</div>
<div class="form-group">
<input type="submit" value="Save" class="btn btn-primary btn-md rounded-0" />
<a asp-action="Index" class="btn btn-primary btn-md rounded-0"><i class="fa-solid fa-backward"></i>Back to List </a>
</div>
</form>
</div>
</div>
</div>
</div>
</div>
@section Scripts {
@{
await Html.RenderPartialAsync("_ValidationScriptsPartial");
}
<script>
$(function () {
$("#rateYo").rateYo({
rating: @Model.f_glassdoor_rating,
onChange: function (rating, rateYoInstance) {
$("#f_glassdoor_rating").val(rating);
}
});
});
</script>
}
Delete.cshtml
@model RatingSystem_Demo.Models.CompanyModel
@{
ViewData["Title"] = "Delete";
}
<div class="container">
<div class="card">
<div class="card-header">
<h4>Compnay</h4>
</div>
<div class="card-body">
<h5 class="alert alert-danger" role="alert">Are you sure you want to delete this?</h5>
<dl class="row">
<dt class="col-sm-2">
@Html.DisplayNameFor(model => model.f_iid)
</dt>
<dd class="col-sm-10">
@Html.DisplayFor(model => model.f_iid)
</dd>
<dt class="col-sm-2">
@Html.DisplayNameFor(model => model.f_company_name)
</dt>
<dd class="col-sm-10">
@Html.DisplayFor(model => model.f_company_name)
</dd>
<dt class="col-sm-2">
@Html.DisplayNameFor(model => model.f_company_location)
</dt>
<dd class="col-sm-10">
@Html.DisplayFor(model => model.f_company_location)
</dd>
<dt class="col-sm-2">
@Html.DisplayNameFor(model => model.f_country)
</dt>
<dd class="col-sm-10">
@Html.DisplayFor(model => model.f_country)
</dd>
<dt class="col-sm-2">
@Html.DisplayNameFor(model => model.f_glassdoor_rating)
</dt>
<dd class="col-sm-10">
<div id="rateYo"></div>
</dd>
</dl>
</div>
<div class="card-footer">
<form asp-action="Delete">
<button type="submit" class="btn btn-danger btn-sm rounded-0"><i class="fa-solid fa-trash"></i></button>
<a asp-action="Index" class="btn btn-primary btn-sm rounded-0"><i class="fa-solid fa-backward"></i></a>
</form>
</div>
</div>
</div>
@section Scripts {
@{
await Html.RenderPartialAsync("_ValidationScriptsPartial");
}
<script>
$(function () {
$("#rateYo").rateYo({
rating: @Model.f_glassdoor_rating,
readOnly: true
});
});
</script>
}
Add repository services to the Program.cs
The object get method handles for example the task of connecting to the database and mapping Speaker objects to database records.
The database context get method is registered with the Dependency Injection container using the C# method, for example, the Program.cs file.
builder.Services.AddTransient<ICompany, CompanyRepository>();
builder.Services.AddTransient<IUnitOfWork, UnitOfWork>()
C#
Add Connection String
The ASP.NET Core Configuration system reads the DefaultConnection key. For local development, it gets the connection string from the appsettings.json file.
{
"ConnectionStrings": {
"DefaultConnection": "Data Source=farhan1086\\SQLEXPRESS;Initial Catalog=Sample-DB;Integrated Security=True;MultipleActiveResultSets=True;Encrypt=False;TrustServerCertificate=False;"
},
"Logging": {
"LogLevel": {
"Default": "Information",
"Microsoft.AspNetCore": "Warning"
}
},
"AllowedHosts": "*"
}
Run the Application
Select Ctrl+F5 to run the app without the debugger. Visual Studio runs the ASP.NET app and opens the default browser.