ASP.NET Core MVC is a web development framework, widely used by developers around the world, to develop web applications. These web applications have proven to be vulnerable to attacks from different sources, though, and it is our responsibility to safeguard our data. This article will help you develop a secure ASP.NET Core MVC web application. The following are the best practices recommended for avoiding vulnerabilities in your applications:

Cross-Site Scripting (XSS)
SQL Injection
Cross-Site Request Forgery (CSRF)
Custom Error Page for Error Handling
Version Discloser
Enforce SSL (Secure Sockets Layer) and HSTS
XXE (XML External Entity) Attack
Improper Authentication and Session Management
Sensitive Data Exposure and Audit Trail
File Upload Validation
Cross-Site Scripting (XSS)
What is Cross-Site Scripting?
Injecting a malicious script through the input/form field of a webpage with the intention to steal confidential information such as login credentials or other authentication information, cookies, and session values is called a cross-site scripting (XSS) attack.
Script injection can be carried out in the following ways:
Form Inputs
URL Query Strings
HTTP Headers
How to Prevent Cross-Site Scripting
Cross-site scripting attacks can be prevented in the following ways:
Regular Expression Attributes
Regular Expression Object Model
HTML Encoding
URL Encoding
Regular Expression Attribute
You can use regular expressions to validate the user’s form inputs. So, you can deny malicious characters, or symbols, or allow only acceptable required characters in the input field before allowing the user to proceed further. To learn more about regular expression attributes, refer to the RegularExpressionAttribute Class docs.
Regular Expression Object Model
Just like the regular expression attribute, using the regular expression object model, you can validate user inputs by calling static methods of the Regex class.
To learn more about the regular expression object model, refer to The Regular Expression Object Model.
Note: You can do both client-side and server-side input validations.
HTML Encoding
The MVC Razor engine automatically encodes all inputs so that the script part provided in any field will never be executed.
Note: If you want to use raw text without encoding, you need to use the syntax @Html.Raw().
URL Encoding
Usually, we use plain text in URL query strings, which can be used to launch XSS attacks. So, we should encode the query parameter input in the URL.
We have a built-in library in NuGet for encoding and decoding the text:
string encodedValue = System.Net.WebUtility.UrlEncode("raw-string-text");
string decodedValue = System.Net.WebUtility.UrlDecode(encodedValue);
SQL Injection
What is SQL Injection?
It is a dangerous attack wherein unauthorized users inject malicious SQL code that then runs in your database, allowing the attackers to access confidential information stored in it. Refer to the Wikipedia article on SQL injection to learn more about SQL injection.
How to Prevent SQL Injection
The SQL injection attack can be prevented in the following ways:
Validate inputs
Use stored procedures
Use parameterized queries
Use Entity Framework or any other ORM
Use least-privileged DB access
Store encrypted data
Validate Inputs
Defending against SQL injection by validating inputs requires the following actions:
Validate the user inputs on both the client-side and server-side.
Do not allow special characters that are involved in SQL scripts.
Use regular expressions and data annotations to validate inputs.
Use Stored Procedures
Using stored procedures will prevent SQL injection, but we should still validate the input parameters passed to the stored procedures.
Use Parameterized Queries
If you want to use inline queries, you must use parameterized queries to prevent SQL injection. The following code example demonstrates a parameterized query.

Use Entity Framework or any other ORM
ORM stands for the object-relational mapper, which maps SQL objects to your application class object.
If you are using the Entity framework properly, you are not prone to SQL injection attacks because Entity Framework internally uses parameterized queries.
Use Least-Privileged DB Access
We should limit the DB user permissions for tables that have confidential data. For example, we should restrict the insert, update, and delete permissions for tables related to payments and transactions, and we should also limit permissions for tables that store a user’s personal information. If a user only works with Select queries, then we must give permission only to the Select statement, and should not provide permissions for Insert, Update, and Delete statements.
Store Encrypted Data
We should not store confidential information like email addresses and passwords as plain text in a database. It should be stored in an encrypted format.
Cross-Site Request Forgery (CSRF)
What is Cross-Site Request Forgery?
An attacker acts as a trusted source and sends some forged data to a site. The site processes the forged data because it believes it is coming from a trusted source.
To learn how this attack works, refer to the Cross-Site Request Forgery (CSRF) article on the OWASP wiki.
Let’s discuss an example of this type of attack: when a user transfers funds from one bank account to another, a trusted connection is established between the user and the bank site after the user logs in successfully.
At the same time, the user clicks a malicious link in an email sent by an attacker.
As the secure session is already established between the user and the bank site, the attacker uses this connection and performs some malicious activity such as fund transfers.
However, this attack is only a risk on the server-side (web application), not the end-user side.
How to Prevent Cross-Site Request Forgery?
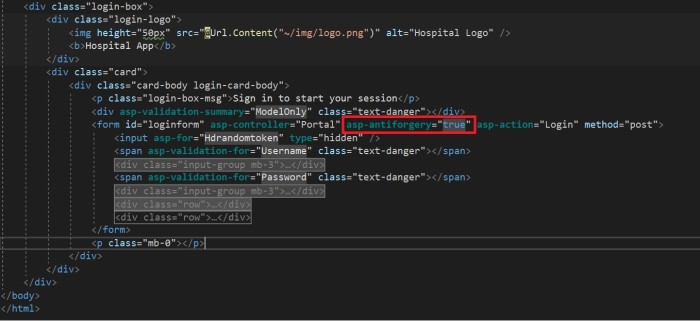
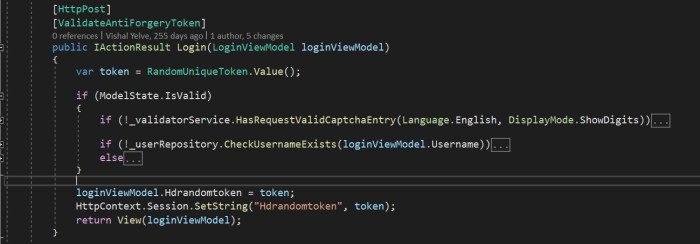
We can prevent this attack by using AntiForgeryToken.
We can use the HTML tag helper asp-antiforgery in an HTML attribute and set its value as true. By default, this value will be false. If we set this value as true, it will generate an anti-forgery token. Then, we need to add the [ValidateAntiForgeryToken] attribute to the form post-action method to check whether a valid token is generated.
Custom Error Page for Error Handling
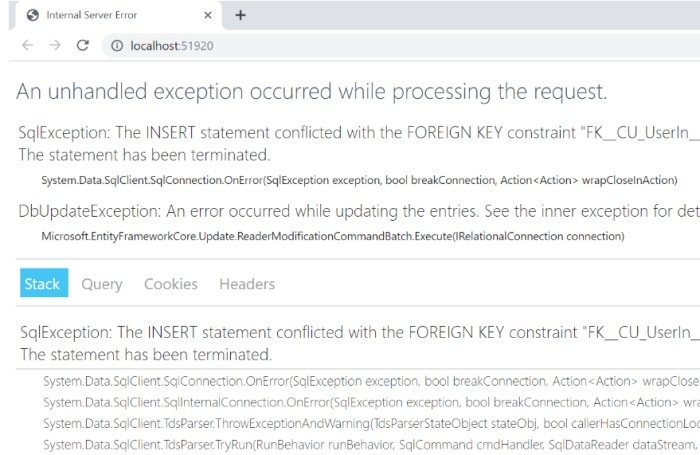
Sometimes you may not properly write error-handling code in your web application. This can lead us to expose sensitive information such as database configuration info, table names, stored procedures, data structures, and programming coding structures to users.
How to Add Proper Custom Error Handling?
There are two ways to add custom error-handling pages in an ASP.NET Core application.
The first approach is to create a custom error-handling attribute using ExceptionFilterAttribute. This attribute will handle the exception.
We can override the OnException method and write exceptions in text files organized by date, and then store the files in the desired folder path. We can also store the exception in a database. Finally, we’ll redirect the route to a custom error page as in the following code.
public class CustomExceptionFilterAttribute: ExceptionFilterAttribute
{
//write the code logic to store the error here
var result = new RedirectToRouteResult(
new RouteValueDictionary
{
{"controller", "Error"}, {"action", "CustomError"}
});
}
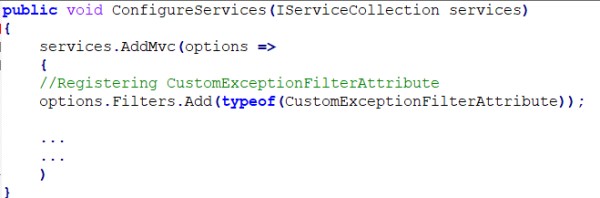
Then, we need to register this filter globally inside the ConfigureServices method in the Startup.cs file.
The second approach is to configure UseExceptionHandler in the production environment.
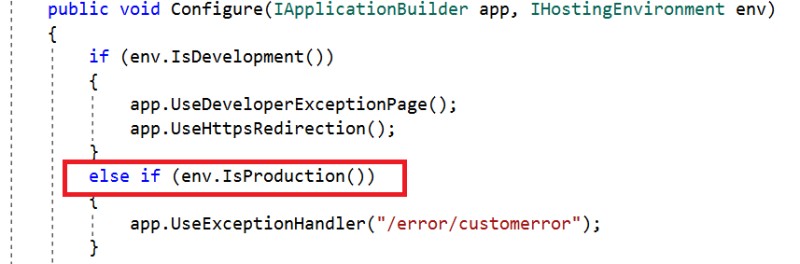
Here, we have written code to show the custom error page in the error controller only if the hosting environment is production, so the staging and development environments will not show the custom error page, but instead show the actual error in the browser.
Version Discloser
We should hide the version information of what we used to develop the application from end-users because if an attacker learns the specific version, then they may try to target an attack on that specific version based on a previously disclosed vulnerability.
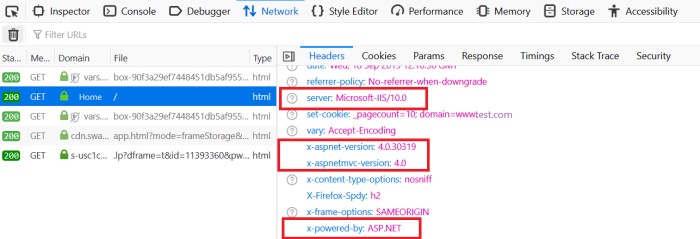
Whenever the browser sends an HTTP request to the server in response, the browser gets a response header, which contains the following information:
server
x-powered-by
x-aspnet-version
x-aspnetmvc-version
x-sourcefiles
The server shows information about the web server that is used. For example, a response could contain the following:
Server: Microsoft-IIS/10.0: Application is hosted by Microsoft-IIS version 10.0.
X-Powered-By: ASP.NET: This shows the ASP.NET framework your website is running on.
X-Aspnet-Version: 4.0.30319: This shows the ASP.NET framework version your website is running on.
X- AspnetMvc-Version: 4.0: This shows the ASP.NET MVC framework version your website is running on.
X-SourceFiles: This will only be generated for localhost requests and serves debugging purposes.
How to Hide Header Values?
Server Header
We can remove the Server header by adding the line “UseKestrel(c => c.AddServerHeader = false)” in the CreateWebHostBuilder method in the Program.cs class.

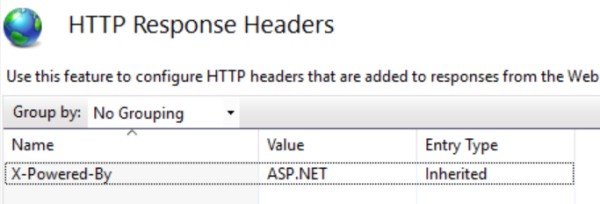
X-Powered-By Header
To remove the X-Powered-By header, we need to add a web configuration file, and in that web config file, we need to add an element that removes the X-Powered-By element under <system.webServer>.
<system.webServer>
<httpProtocol>
<customHeaders>
<remove name="X-Powered-By" />
</customHeaders>
</httpProtocol>
</system.webServer>
We can remove this from the IIS settings too. Select the header and remove it.
X-Aspnet-Version Header
To remove the X-Aspnet-Version header, make the following change in the web configuration file:
<system.web>
<httpRuntime enableVersionHeader="false" />
</system.web>
X- AspnetMvc-Version Header
To remove the X-AspnetMvc-Version header, add the following line where the application starts in Global.aspx:
protected void Application_Start(object sender, EventArgs e)
{
MvcHandler.DisableMvcResponseHeader = true;
}
Enforce SSL (Secure Sockets Layer) and HSTS
What is SSL?
SSL stands for Secure Sockets Layer, and it establishes a secure or encrypted connection between client and server. With SSL, the requests passed between the client browser and the server, and the responses from the server to the client browser will be encrypted to maintain the integrity of the data.
We can use HTTPS (HyperText Transfer Protocol Secure) to secure your ASP.NET Core application.
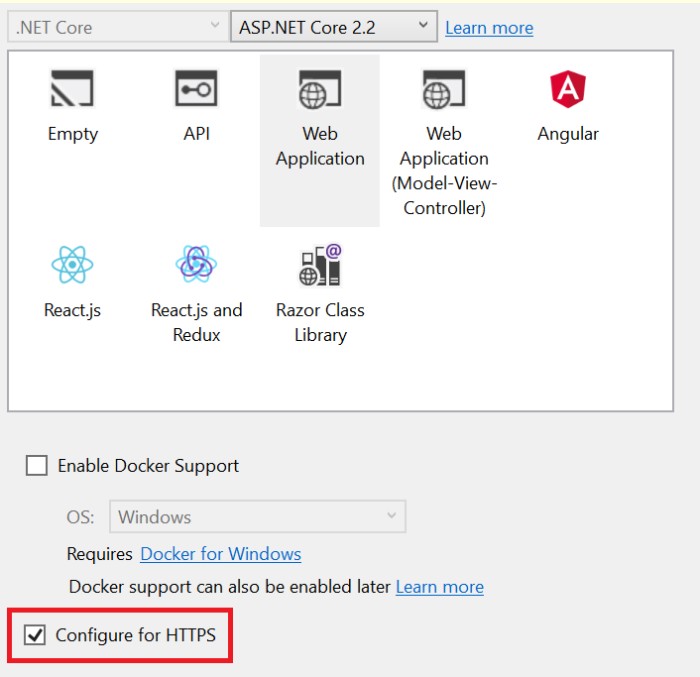
In ASP.NET Core 2.1 and later versions, we can easily create an application that is configured over HTTPS. We can also configure HTTPS with ASP.NET Core before .NET Core Framework version 1.1, but it is somewhat difficult to do.
An option to configure the web application over HTTPS is available when selecting the web application template in Visual Studio as shown in the following screenshot.
What is HSTS (HTTP Strict Transport Security)?
HSTS is a web security policy that protects your web application from downgrade protocol attacks and cookie hijacking. It forces the web server to communicate over an HTTPS connection. It always rejects insecure HTTP connections.
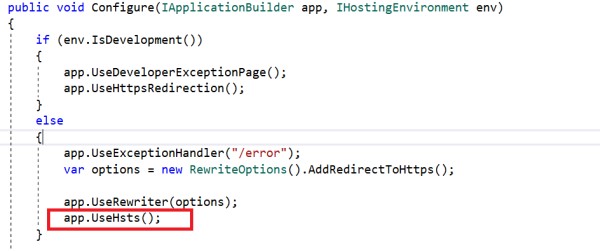
The ASP.NET Core template, by default, adds HSTS middleware. It is not recommended for use in the development environment as the browser caches the HSTS header.
We can override a few options when configuring HSTS. They are:
MaxAge: Timespan that defines the max-age of the Strict-Transport-Security The default value is 30 days.
IncludeSubDomains: If this value is set to true, the Strict-Transport-Security header will be available for subdomains too.
Preload: Adds preload support to the Strict-Transport-Security
ExcludedHosts: A list of host names that will not add the HSTS header.

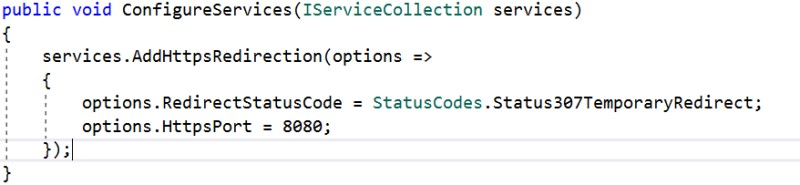
The ASP.NET Core default template also adds another middleware that redirects requests from non-secure HTTP. It uses the default redirect status code (307) to redirect the request. We can also override the default option.
XXE (XML External Entity) Attack
If your application uses logic to parse an XML file that is uploaded by an end-user, you are at risk of an XXE (XML External Entity) attack. In this kind of attack, a weakly configured XML parser processes an XML input that contains malicious XML code or a reference to an external entity. This kind of attack can cause a denial-of-service attack by injecting entities within entities, which makes your server utilization too high, resulting in a server shutdown. This kind of attack is also known as a “billion laughs attack”.
How to Prevent This Attack
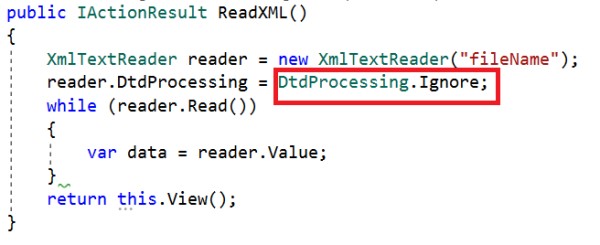
If we use XmlTextReader to parse XML files, we must set the DtdProcessing property to Prohibit or Ignore.
If it is set to Prohibit, an exception will be thrown if a DTD (Document Type Definition) is identified.
If it is set to Ignore, any DTD specification in the document will be ignored and the processing of the document will continue.
If we set it to Parse, it will parse any DTD specifications in the document. DtdProcessing is set to Parse by default. It is potentially vulnerable.
Improper Authentication and Session Management
Most web applications have an authentication module, and we should be careful when writing code for it. We could make mistakes like not removing the authentication cookies after a successful logout. This kind of mistake allows attackers to steal user credentials such as cookies and session values and may result in attackers being able to access the complete application and cause major negative impacts.
The following mistakes can help attackers steal data:
Insecure connection (without SSL).
Predictable login credentials.
Storing plain (unencrypted) credentials.
Improper application logouts.
How to Avoid These Mistakes
Remove cookies after successful logout.
Secure cookies and sessions by using SSL.
Secure cookies by setting HTTP only.
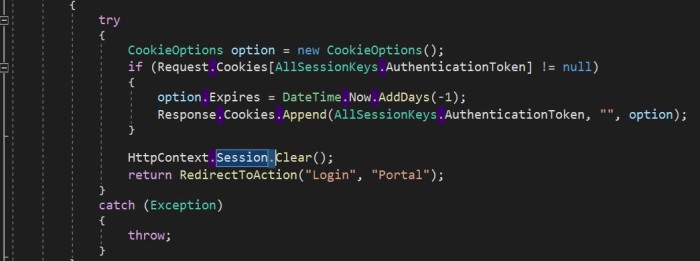
Refer to the following code to remove session values and authentication cookies (.AspNetCore.Session) after a user logs out.
To set HttpOnly on cookies in ASP.NET Core, refer to the following code:
CookieOptions option = new CookieOptions {Expires = DateTime.Now.AddHours(24), HttpOnly = true};
HttpOnly is a flag that is used to set any cookie, and it cannot be accessed from client-side scripts.
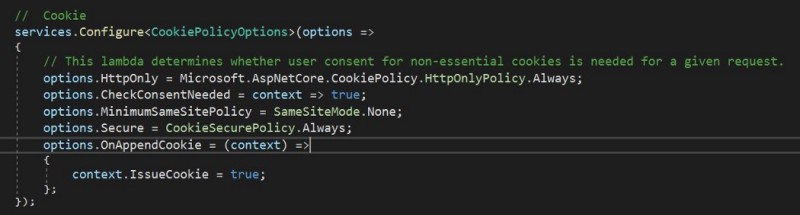
To globally set up HttpOnly, configure the UseCookiePolicy method in Startup.cs as shown in the following screenshot.

Sensitive Data Exposure and Audit Trail
We always manage a user’s personal, important data in web applications. There are many places in an app where we may expose and store sensitive data as if it is ordinary information, or adequately secure some but not all sensitive information without realizing it. If attackers can access sensitive data we overlooked, they will misuse it.
What Do We Need to Do to Avoid These Mistakes?
-
Send sensitive data in an encrypted format using a suitable encryption algorithm. For example, passing a customer mail address over a URL with encryption.
-
Use SSL and access web applications in production in HTTPS mode.
-
Do not store sensitive data that includes database or application code anywhere. If you store it, use a strong encryption algorithm to encrypt the data, and then store it.
Audit Trail
It is a best practice to keep monitoring your production web application’s activity logs at regular intervals. We can set up logs to be collected using IIS logs, or we can store our logs in text files or databases. Based on the logs, we can gather insights on any errors or performance issues in the production application, and also, if anyone tries to attack the application, we can identify their attempts.
File Upload Validation
If your web app has file upload control, attackers will have the chance to upload malicious script files that cause problems. So, proper file validation is always required.
The main validation we do on files is validating the file extension. However, attackers can change their file’s extension and upload it anyway. For example, if you allow only image files, an attacker can save their script file with a .jpeg extension and upload it. In this case, the file extension validation accepts the file because it considers it an image file, even though it is really a malicious script file.
How to Do Proper Validation?
-
First, check the file upload count. If the upload count is zero, no file is uploaded. If the upload count is greater than zero, proceed with further validation.
-
Check the file extension. This will allow only valid extension files. Sometimes, attackers can still pass malicious files with allowed extensions. In this case, do further validation.
-
Check the file content type and file bytes.
-
Only allow uploading the file when the previous three steps are successfully validated.