European ASP.NET MVC Hosting

BLOG about Latest ASP.NET MVC Hosting and Its Technology - Dedicated to European Windows Hosting Customer

ASP.NET MVC Hosting - HostForLIFEASP.NET :: ASP.NET MVC Model Binding with Data Annotations

clock January 17, 2024 07:27 by author Peter

ASP.NET MVC enables developers to link server-side models and user interface elements with ease in the dynamic world of web development. In this process, model binding is essential, and data annotations offer a potent toolkit for specifying metadata about the features of the model. This blog offers a thorough how-to for ASP.NET MVC newcomers, with the goal of demystifying the relationship between model binding and data annotations.

The Model-View-Controller architectural pattern, which is used by ASP.NET MVC, has views handle display while controllers handle user input and coordinate interactions between views and models. Models contain data and business logic. The process by which user input from a form or other sources is used to populate the model properties is known as model binding.

On the other side, characteristics added to model properties to provide metadata about how they should be handled during model binding, validation, and rendering are known as data annotations.

Model Binding Basics
Consider a simple scenario where you have a Person model.

public class Person
{
    public string FirstName { get; set; }
    public string LastName { get; set; }
    public int Age { get; set; }
}

It may be desirable to connect user input to this model in a controller action.

[HttpPost]
public ActionResult SavePerson(Person person)
{
    // Process the person object
    // ...
}

Introducing Data Annotations
Now, let's enhance the Person model with data annotations to provide more information to the model binder.
public class Person
{
    [Required(ErrorMessage = "First Name is required")]
    [StringLength(50, ErrorMessage = "First Name should be less than 50 characters")]
    public string FirstName { get; set; }

    [Required(ErrorMessage = "Last Name is required")]
    [StringLength(50, ErrorMessage = "Last Name should be less than 50 characters")]
    public string LastName { get; set; }

    [Range(1, 150, ErrorMessage = "Age should be between 1 and 150")]
    public int Age { get; set; }
}

Important Data Annotations Employed

  • Indicates that a certain attribute is necessary.
  • StringLength: Indicates a string property's maximum length.
  • Range: Indicates a numeric property's value range.

Making the Most of Data Annotations in Views

@using (Html.BeginForm("SavePerson", "YourController", FormMethod.Post))
{
    @Html.LabelFor(model => model.FirstName)
    @Html.TextBoxFor(model => model.FirstName)
    @Html.ValidationMessageFor(model => model.FirstName)

    // Repeat for LastName and Age properties

    <input type="submit" value="Save" />
}

Important HTML Helpers Employed

  • The label element for a model attribute is rendered by LabelFor.
  • Renders a text input element for a model attribute using TextBoxFor.
  • ValidationMessageFor: Validation error messages for a model property rendered by the renderer.

In-Progress Model Validation
The model binder automatically validates the user input when the form is submitted by using the data annotations. Error notifications appear next to the respective form fields if any validation fails.

HTML helpers can be used to render form components in a view. Annotations on data affect the generation and validation of these elements.

Data Annotations' Advantages in Model Binding
Consistency: Data annotations offer a declarative and consistent means of defining validation criteria, guaranteeing consistency throughout the program.
Readability: Developers can readily comprehend the limitations and specifications of each property since validation rules are incorporated directly into the model.
Reuse: Data annotations facilitate code reuse by allowing the same model to be applied with identical validation rules across contexts.

Validating form data and processing user input are made easier using ASP.NET MVC model binding and data annotations. Developers can define validation criteria succinctly within the model itself by utilizing properties like Required, StringLength, and Range. This method makes code more readable, encourages consistency, and makes it easier to maintain reliable and user-friendly online applications. Embrace the power of model binding and data annotations as you begin your ASP.NET MVC adventure to build applications that are robust and user-friendly.


ASP.NET MVC Hosting - HostForLIFEASP.NET :: Preventing PDF Injection and Cross-Site Scripting Vulnerabilities to Secure PDF Uploads in MVC

clock January 16, 2024 06:46 by author Peter

Cross-site Scripting, or PDF XSS, is another name for PDF Injection, which is a potentially dangerous security flaw. In an MVC (Model-View-Controller) application, it is imperative to include appropriate validation and sanitation techniques to prevent such difficulties during PDF upload and viewing. The sample code that shows how to handle PDF uploads safely and stop PDF Injection from causing Cross-site Scripting in an MVC environment is provided below.


Assuming you are working with a well-known MVC framework such as ASP.NET MVC, the following is a C# example that is simplified:

PDF Upload Validation: Implement server-side validation to ensure that only legitimate PDF files are accepted throughout the upload process.

[HttpPost]
public ActionResult UploadPdf(HttpPostedFileBase pdfFile)
{
    if (pdfFile != null && pdfFile.ContentLength > 0)
    {
        // Check if the uploaded file is a PDF
        if (pdfFile.ContentType != "application/pdf" || !pdfFile.FileName.EndsWith(".pdf"))
        {
            ModelState.AddModelError("pdfFile", "Only PDF files are allowed.");
            return View("Upload");
        }

        // Process the PDF file
        // ...
    }

    return RedirectToAction("Index");
}

Viewing a PDF: Use secure libraries that don't run any embedded JavaScript while rendering the PDF for viewing. Don't forget to sanitize the PDF's contents.

public ActionResult ViewPdf(int fileId)
{
    // Fetch the PDF file from the database or file system based on the fileId
    var pdfContent = GetPdfContent(fileId);

    // Sanitize the PDF content to prevent XSS
    var sanitizedPdfContent = SanitizePdfContent(pdfContent);

    // Render the sanitized PDF content
    return File(sanitizedPdfContent, "application/pdf");
}

Sanitizing PDF Content: To stop JavaScript from running, implement a function that sanitizes the PDF content.

private byte[] SanitizePdfContent(byte[] pdfContent)
{
    // Implement PDF content sanitization logic here
    // Check that the PDF content does not contain malicious scripts

    // Example: Using a library to remove JavaScript from the PDF content
    // var sanitizedContent = PdfSanitizationLibrary.Sanitize(pdfContent);

    // Return the sanitized PDF content
    // return sanitizedContent;

    // For illustration purposes, let's assume no sanitization for simplicity
    return pdfContent;
}

This is a rudimentary example; in a real-world situation, you might want to make sure that the PDF processing library is secure against PDF Injection and utilize a separate library. To reduce the danger of cross-site scripting (XSS) attacks, think about adding Content Security Policy (CSP) headers to your online application.

To take advantage of security updates and enhancements, make sure your libraries and frameworks are up to date at all times.

To sum up, strengthening your web environment begins with giving your MVC application's security first priority when it comes to PDF uploads. Strong validation checks put in place during the upload process create a strong initial line of defense against efforts at harmful PDF Injection. Choosing safe and up-to-date PDF rendering libraries reduces the possibility of Cross-site Scripting (XSS) vulnerabilities by guaranteeing that the material shown to users is free of malicious scripts. By including content sanitization procedures, a thorough defense against potential security threats is provided, adding an additional layer of protection.

It's critical to remain proactive as the digital landscape changes constantly. It is essential to keep your application's dependencies, such as PDF processing libraries, up to date in order to take advantage of the most recent security improvements. Your development lifecycle should include regular penetration tests and security assessments as they can assist find and fix new vulnerabilities. Following these guidelines will make your MVC application more resilient and help your users have a safer and more reliable online experience.


ASP.NET MVC Hosting - HostForLIFEASP.NET :: Stripe Payment Gateway Integration in ASP.NET MVC

clock November 14, 2023 06:11 by author Peter

There are numerous Payment Gateways on the market that provide secure and simple setup. Stripe is among them. Stripe integration consists of numerous phases. In general, there are two approaches.

  • Client Side: You may use Stripe.js to load the Stripe UI and enter credit card information to make the payment.
  • If you already have a fully functional Checkout page and everything is in place, you may utilize the library (DLL) to process the payment.

Today, we'll look at Stripe's server-side implementation.

Stripe Payment Gateway can be readily integrated if you follow each step.

Step 1: Fill out the registration form at https://dashboard.stripe.com/register with your email, name, and password.
Step 2: Use Install-Package Stripe.net to add the Stripe library to your Visual Project. Stripe.net.dll will be downloaded and included as a reference to your project.
Step 3: Add the Stripe.Infrastructure; Namespace to the Class where you wish to create the payment gateway.
Step 4: To implement, you must experiment with various classes. To make the payment, please complete each step.
Step 5: You'll need KEY - "Publishable key" - to connect to Stripe. It is available at https://dashboard.stripe.com/account/apikeys.

Step 6. Set the API key with the below function
Stripe.StripeConfiguration.SetApiKey(“pk_test_FyPZYPyqf8jU6IdG2DONgudS”);

Step 7: To generate a Token, create an Object of a Credit Card. That Token will be assigned to the Customer object at the time the Customer is created.
//Create Card Object to create Token
Stripe.CreditCardOptions card = new Stripe.CreditCardOptions();
card.Name = tParams.CardOwnerFirstName + " " + tParams.CardOwnerLastName;
card.Number = tParams.CardNumber;
card.ExpYear = tParams.ExpirationYear;
card.ExpMonth = tParams.ExpirationMonth;
card.Cvc = tParams.CVV2;
//Assign Card to Token Object and create Token
Stripe.TokenCreateOptions token = new Stripe.TokenCreateOptions();
token.Card = card;
Stripe.TokenService serviceToken = new Stripe.TokenService();
Stripe.Token newToken = serviceToken.Create(token);

Step 8: Assign TokenID to the Customer Object so that a card is created and linked to the Customer when the customer is created.
//Create Customer Object and Register it on StripeStripe.CustomerCreateOptions myCustomer = new Stripe.CustomerCreateOptions();myCustomer.Email = tParams.Buyer_Email;myCustomer.SourceToken = newToken.Id;var customerService = new Stripe.CustomerService();Stripe.Customer stripeCustomer = customerService.Create(myCustomer);

Step 9: Make a Charge Object. The charge object is the actual object that will perform the payment.

//Create Charge Object with details of Charge
var options = new Stripe.ChargeCreateOptions {
    Amount = Convert.ToInt32(tParams.Amount),
        Currency = tParams.CurrencyId == 1 ? "ILS" : "USD",
        ReceiptEmail = tParams.Buyer_Email,
        CustomerId = stripeCustomer.Id,
        Description = Convert.ToString(tParams.TransactionId), //Optional
};
//and Create Method of this object is doing the payment execution.
var service = new Stripe.ChargeService();
Stripe.Charge charge = service.Create(options); // This will do the Payment

Step ten: Charge.The status will be returned.

Step 11: Go to https://dashboard.stripe.com/test/customers and look for Created Customer.

And Payment using this link - https://dashboard.stripe.com/test/payments.


ASP.NET MVC Hosting - HostForLIFEASP.NET :: In ASP.NET MVC, Create a Simple Login Application That Makes use of Sessions

clock November 3, 2023 08:45 by author Peter

1. Create your database
Using the following script, create the UserProfile table

CREATE TABLE UserProfile
(
    UserId INT PRIMARY KEY IDENTITY(1, 1),
    UserName VARCHAR(50),
    Password VARCHAR(50),
    IsActive BIT
);

Insert user records using the following script:
INSERT INTO UserProfile (UserName, Password, IsActive)
VALUES ('Peter', 'Peter1234', 1),
       ('Scott', 'Scott1234', 1),
       ('Alex', 'Alex1234', 1);
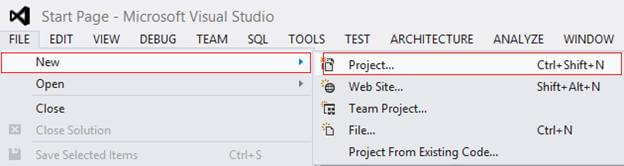
2. Create Project
Go to File, New, then click on Project.

Select Visual C#, Web under Installed templates. After that, select ASP.NET MVC 4 Web Application, then mention the Application Name (MvcLoginAppDemo) and Solution Name as you wish, then click OK.

Under Project template, select a template as Basic, then view the engine as Razor. Click OK.

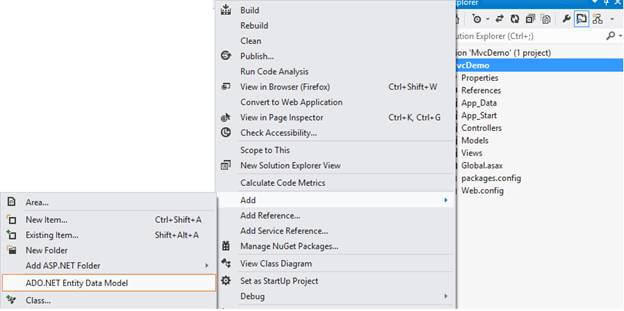
3. Include an Entity Data Model
Navigate to Solution Explorer, select Project, Add, and then ADO.NET Entity Data Model.

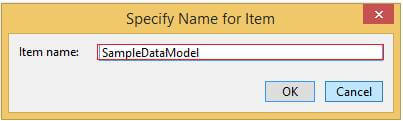
Give it a meaningful model name, and then click on Add.

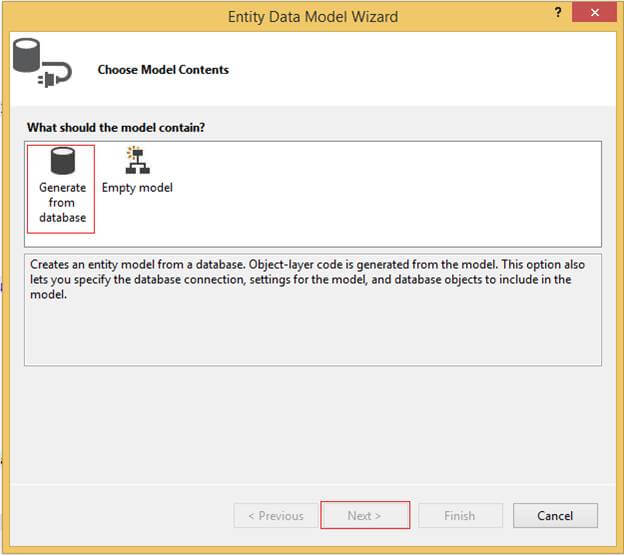
Select Generate from the database and then click on Next.

Click on New Connection.

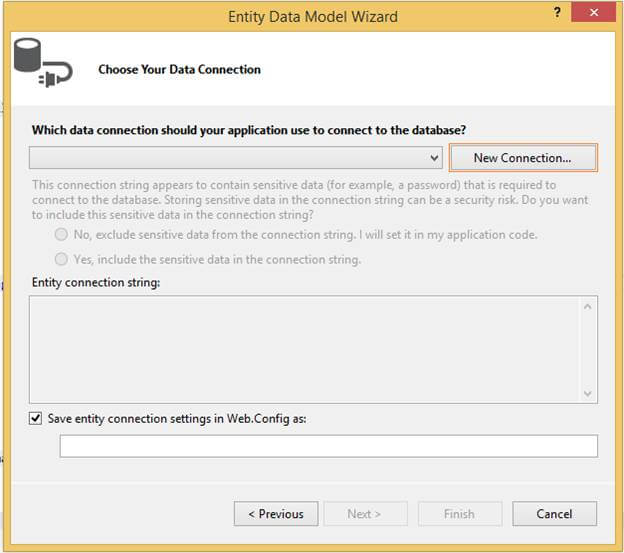
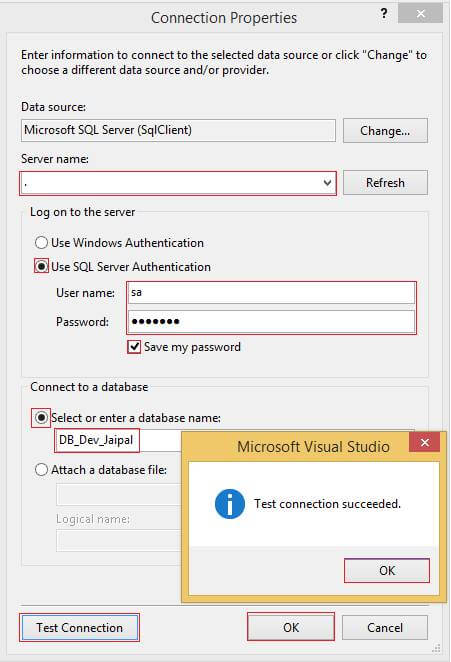
After clicking on New Connection, we have to provide the following Connection Properties in the following wizard.

Provide the Server name.

  • Select the "Use SQL Server Authentication" radio button.
  • Enter the Username and Password in the password text box.
  • Check the "Save my password" checkbox.
  • Select the "Select or enter a database name:" radio button.
  • Select the database to which you want to set the connection.
  • Click on the "Test Connection" button to ensure the connection can be established.
  • Then click OK.

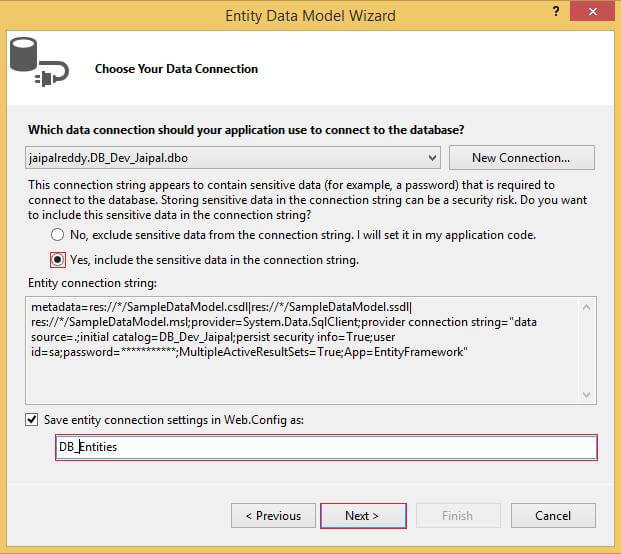
Select the radio button, and yes, include the sensitive data in the connection string.

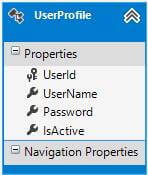
Choose your database objects, as in the following image.

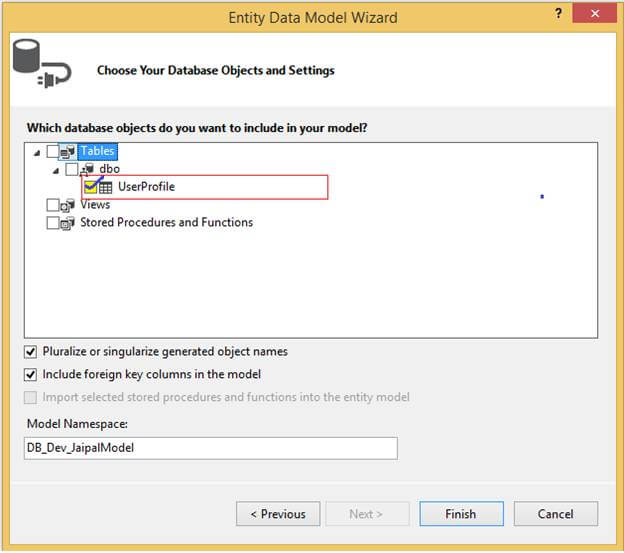
Click on Finish. At this point UserProfie entity will be created.

4. Add a Controller
Go to Solution Explorer, right-click on the Controller folder, Add, and then click on Controller.
( Or ) Simply use shortcut key Ctrl + M, Ctrl + C,


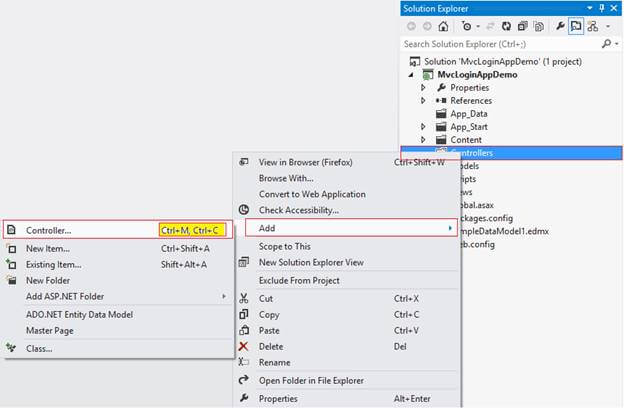
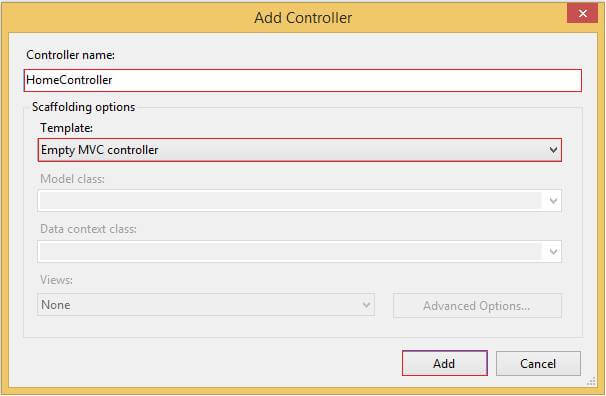
Provide the Controller Name and Scaffolding template as Empty MVC Controller. Then click on Add.

Write the following code in HomeController.
using System.Linq;
using System.Web.Mvc;

namespace MvcLoginAppDemo.Controllers
{
    public class HomeController : Controller
    {
        public ActionResult Login()
        {
            return View();
        }

        [HttpPost]
        [ValidateAntiForgeryToken]
        public ActionResult Login(UserProfile objUser)
        {
            if (ModelState.IsValid)
            {
                using (DB_Entities db = new DB_Entities())
                {
                    var obj = db.UserProfiles.Where(a => a.UserName.Equals(objUser.UserName) && a.Password.Equals(objUser.Password)).FirstOrDefault();
                    if (obj != null)
                    {
                        Session["UserID"] = obj.UserId.ToString();
                        Session["UserName"] = obj.UserName.ToString();
                        return RedirectToAction("UserDashBoard");
                    }
                }
            }
            return View(objUser);
        }

        public ActionResult UserDashBoard()
        {
            if (Session["UserID"] != null)
            {
                return View();
            }
            else
            {
                return RedirectToAction("Login");
            }
        }
    }
}


5. Create Views

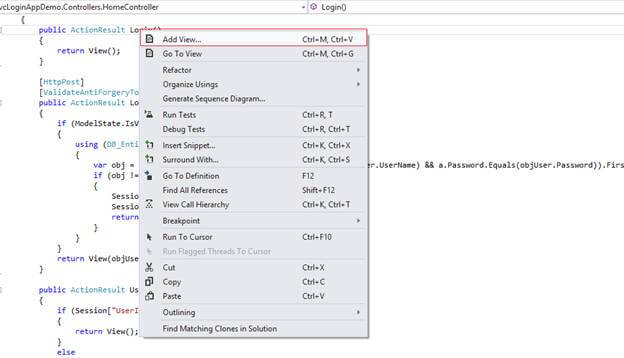
Create View for Login Action Method
Right-click on the Login Action method, then click on Add View, as in the following picture.

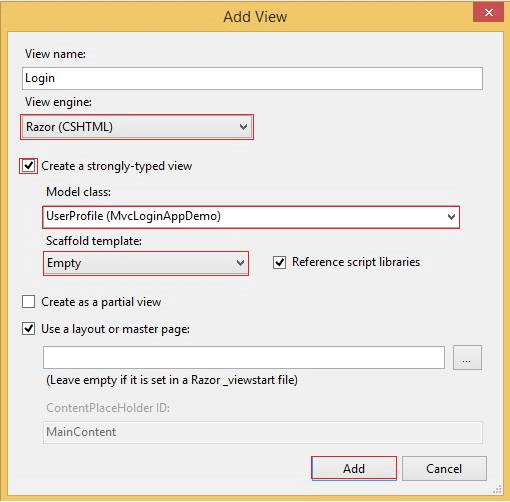
Create a Strongly Typed View

View Name must be an action method name.
Select the view engine as Razor.
Select Create a strongly typed view CheckBox.
Select Model class as UserProfile (MvcLoginAppDemo)
Select the Scaffold template as Empty
Click on Add

Write the following code in Login.cshtml (view).
@model MvcLoginAppDemo.UserProfile

@{
    ViewBag.Title = "Login";
}

@using (Html.BeginForm("Login", "Home", FormMethod.Post))
{
    <fieldset>
        <legend>Mvc Simple Login Application Demo</legend>

        @Html.AntiForgeryToken()
        @Html.ValidationSummary(true)

        @if (ViewBag.Message != null)
        {
            <p style="border: 1px solid red">
                @ViewBag.Message
            </p>
        }

        <table>
            <tr>
                <td>@Html.LabelFor(a => a.UserName)</td>
                <td>@Html.TextBoxFor(a => a.UserName)</td>
                <td>@Html.ValidationMessageFor(a => a.UserName)</td>
            </tr>
            <tr>
                <td>@Html.LabelFor(a => a.Password)</td>
                <td>@Html.PasswordFor(a => a.Password)</td>
                <td>@Html.ValidationMessageFor(a => a.Password)</td>
            </tr>
            <tr>
                <td></td>
                <td><input type="submit" value="Login" /></td>
                <td></td>
            </tr>
        </table>
    </fieldset>
}

Create View for UserDashBoard Action method same as login view. And write the following code in UserDashBoard.cshtml (View).
@{
    ViewBag.Title = "UserDashboard";
}

<fieldset>
    <legend>User Dashboard</legend>

    @if (Session["UserName"] != null)
    {
        <text>Welcome @Session["UserName"].ToString()</text>
    }
</fieldset>


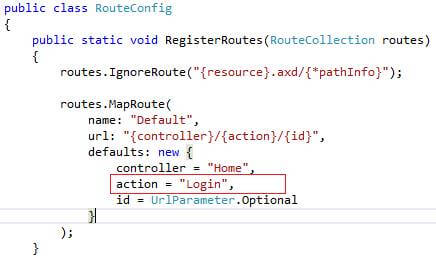
6. Set as StartUp Page
Go to Solution Explorer, Project, App_Start, then RouteConfig.cs, and change the action name from Index to Login (Login. cshtml as start-up page).

7. Run the Application

Provide the user credentials and click on OK. If you provide valid user credentials, then the user name will be displayed on your dashboard.


ASP.NET MVC Hosting - HostForLIFEASP.NET :: Security ASP.net Core MVC (C#) Encryption and Decryption

clock September 20, 2023 07:27 by author Peter

Harnessing the power of C# to enhance our data security through encryption and decryption is a versatile and necessary feature in the world of ASP.NET Core MVC. This security boost is made possible by the use of a variety of encryption methods, including but not limited to AES (Advanced Encryption Standard), RSA (Rivest-Shamir-Adleman), DES (Data Encryption Standard), and others. These cryptographic algorithms enable developers to protect sensitive information while keeping it secure and tamper-resistant.

Let's look at how the AES algorithm, recognized for its strong encryption capabilities, may be smoothly integrated into our ASP.NET Core MVC application to encrypt and decrypt data. This example provides a baseline understanding of encryption processes within the ASP.NET Core MVC framework, allowing developers to begin exploring and implementing sophisticated security features in their web applications.

We'll have a better understanding of how to use the AES algorithm in our ASP.NET Core MVC projects by the end of this demonstration, enhancing our capacity to secure and protect key data assets. This knowledge enables us to make informed judgments about which encryption approaches best suit our application's particular security requirements, assuring the highest level of protection for our users' sensitive data.

Step 1: Create an Encryption/Decryption Helper Class.
To carry out encryption and decryption operations within our program, it is generally advised that we construct a specialized helper class. Here's an example of a well-structured class that can be utilized to improve the security of our application.

using System.Security.Cryptography;

namespace ZR.CodeExample.SecureMVC.Helpers
{
    public static class EncryptionHelper
    {
        private static readonly string EncryptionKey = GenerateRandomKey(256);

        public static string Encrypt(string plainText)
        {
            using (Aes aesAlg = Aes.Create())
            {
                aesAlg.Key = Convert.FromBase64String(EncryptionKey);
                aesAlg.IV = GenerateRandomIV(); // Generate a random IV for each encryption

                aesAlg.Padding = PaddingMode.PKCS7; // Set the padding mode to PKCS7

                ICryptoTransform encryptor = aesAlg.CreateEncryptor(aesAlg.Key, aesAlg.IV);

                using (MemoryStream msEncrypt = new MemoryStream())
                {
                    using (CryptoStream csEncrypt = new CryptoStream(msEncrypt, encryptor, CryptoStreamMode.Write))
                    {
                        using (StreamWriter swEncrypt = new StreamWriter(csEncrypt))
                        {
                            swEncrypt.Write(plainText);
                        }
                    }
                    return Convert.ToBase64String(aesAlg.IV.Concat(msEncrypt.ToArray()).ToArray());
                }
            }
        }


        public static string Decrypt(string cipherText)
        {
            byte[] cipherBytes = Convert.FromBase64String(cipherText);

            using (Aes aesAlg = Aes.Create())
            {
                aesAlg.Key = Convert.FromBase64String(EncryptionKey);
                aesAlg.IV = cipherBytes.Take(16).ToArray();

                aesAlg.Padding = PaddingMode.PKCS7; // Set the padding mode to PKCS7

                ICryptoTransform decryptor = aesAlg.CreateDecryptor(aesAlg.Key, aesAlg.IV);

                using (MemoryStream msDecrypt = new MemoryStream(cipherBytes, 16, cipherBytes.Length - 16))
                {
                    using (CryptoStream csDecrypt = new CryptoStream(msDecrypt, decryptor, CryptoStreamMode.Read))
                    {
                        using (StreamReader srDecrypt = new StreamReader(csDecrypt))
                        {
                            return srDecrypt.ReadToEnd();
                        }
                    }
                }
            }
        }

        private static byte[] GenerateRandomIV()
        {
            using (Aes aesAlg = Aes.Create())
            {
                aesAlg.GenerateIV();
                return aesAlg.IV;
            }
        }

        private static string GenerateRandomKey(int keySizeInBits)
        {
            // Convert the key size to bytes
            int keySizeInBytes = keySizeInBits / 8;

            // Create a byte array to hold the random key
            byte[] keyBytes = new byte[keySizeInBytes];

            // Use a cryptographic random number generator to fill the byte array
            using (var rng = new RNGCryptoServiceProvider())
            {
                rng.GetBytes(keyBytes);
            }

            // Convert the byte array to a base64-encoded string for storage
            return Convert.ToBase64String(keyBytes);
        }

    }
}

This helper class contains the encryption and decryption functionality, as the name implies, making it easy to secure sensitive data in our ASP.NET Core MVC application. As part of best practices, we produce the encryption key dynamically. GenerateRandomKey(256)

We improve the security of our application by isolating the encryption and decryption code in a dedicated helper class. This method enables us to quickly handle sensitive data within our ASP.NET Core MVC application, adding an additional degree of security.

Step 2: Encryption and decryption are used in our controller or service
To use the encryption and decryption capabilities we've incorporated, we'll need to call the Encrypt and Decrypt methods within our controller or service class. Here's a detailed example on how to accomplish it.

using Microsoft.AspNetCore.Mvc;
using System.Diagnostics;
using ZR.CodeExample.SecureMVC.Helpers;
using ZR.CodeExample.SecureMVC.Models;

namespace ZR.CodeExample.SecureMVC.Controllers
{
    public class HomeController : Controller
    {
        private readonly ILogger<HomeController> _logger;

        public HomeController(ILogger<HomeController> logger)
        {
            _logger = logger;
        }

        public IActionResult Index()
        {
            // Define the data you want to secure
            string plainText = "I am Peter from United Kingdom";

            // Encrypt the data using the EncryptionHelper
            string cipherText = EncryptionHelper.Encrypt(plainText);

            // Decrypt the data to retrieve the original content
            string decryptedText = EncryptionHelper.Decrypt(cipherText);

            // Store the encrypted and decrypted data in ViewData for use in your view
            ViewData["CipherText"] = cipherText;
            ViewData["DecryptedText"] = decryptedText;

            return View();
        }

        public IActionResult Privacy()
        {
            return View();
        }

        [ResponseCache(Duration = 0, Location = ResponseCacheLocation.None, NoStore = true)]
        public IActionResult Error()
        {
            return View(new ErrorViewModel { RequestId = Activity.Current?.Id ?? HttpContext.TraceIdentifier });
        }
    }
}

Step 3: In the View, show both encrypted and decrypted data
One of the most impressive characteristics of Razor views is their ability to display both encrypted and decrypted data from our controller's ViewData dictionary. We can successfully provide sensitive information to our users in a secure manner by exploiting this feature. Let's look at an example of how this can be done within a Razor view.

@{
    ViewData["Title"] = "Security ASP.net Core MVC (C#) Encryption and Decryption";
}

<div class="text-center">
    <h1 class="display-4">@ViewData["Title"]</h1>
    <p>By Peter, delve into the intricacies of security in ASP.NET Core MVC (C#) through our comprehensive article, focusing on the vital aspects of encryption and decryption techniques. Learn how to safeguard your web applications effectively.</p>
</div>
<div>
    <h2>Encrypted Text:</h2>
    <p>@ViewData["CipherText"]</p>
</div>

<div>
    <h2>Decrypted Text:</h2>
    <p>@ViewData["DecryptedText"]</p>
</div>
<div>
    <h3>Who is Peter</h3>
    <p>I am 
Peter, a seasoned Technical Lead Developer </p>
</div>

We'll suppose in this code snippet that our controller action is coupled with a view, such as Index.cshtml. We may display the encrypted and decrypted content on the web page by using this Razor view. Furthermore, we have the ability to modify the HTML structure and styling to match the design and requirements of our application.


ASP.NET MVC Hosting - HostForLIFEASP.NET :: A Simple Architecture for Developing Web Applications Using ASP.NET Core MVC C#

clock September 14, 2023 06:59 by author Peter

When paired with the Clean Architecture pattern, ASP.NET Core MVC provides a solid framework for building online applications that can result in controllable and extendable solutions. In this article, we will look at how to organize an ASP.NET Core MVC project utilizing Clean Architecture principles, using C# code samples.

What is the Clean Architecture Concept?
Clean Architecture is a software design philosophy that emphasizes concern separation and maintainability by layering the codebase. Typically, these layers include.

Layer of User Interface
The presentation elements are placed here. It includes controllers, views, and view models in the context of ASP.NET Core MVC.

Layer of Application
This layer contains the application's business logic. It is in charge of managing user queries, data processing, and interfacing with the domain layer.

The Domain Layer
This layer is the application's heart, defining the fundamental business entities, rules, and domain-specific logic. It must be decoupled from any infrastructure or application-specific code.

Layer of Infrastructure
This layer handles external concerns like data access, external services, and infrastructure-related code. It should be kept separate from the other layers.

Establishing a Clean Architecture Initiative
Let's get started by making a new ASP.NET Core MVC project with Clean Architecture in mind.

Step One: Make a New ASP.NET Core MVC Project

To start a new ASP.NET Core MVC project, we can use either the dotnet command-line tool or Visual Studio. Ascertain that the ASP.NET Core SDK is installed.

dotnet new mvc -n ZRCleanArchitectureApp

Step 2: Creating a Project Structure
Separate our project into distinct folders for each layer to better organize it.

ZRCleanArchitectureApp.Web
This folder comprises controllers, views, and view models and represents the presentation layer.

ZRCleanArchitectureApp.Application

We define application services and business logic in this subdirectory.

ZRCleanArchitectureApp.Domain
This folder contains the definitions of our domain entities and business rules.

ZRCleanArchitectureApp.Infrastructure

This section handles data access, external services, and infrastructure-related code.

Step 3: Put Clean Architecture into Practice
Domain Entities Definition

// ZRCleanArchitectureApp.Domain/Entities/Product.cs
public class Product
{
    public int Id { get; set; }
    public string Name { get; set; }
    public decimal Price { get; set; }
}


Implementing Application Services
// ZRCleanArchitectureApp.Application/Services/ProductService.cs
public class ProductService
{
    private readonly IProductRepository _productRepository;

    public ProductService(IProductRepository productRepository)
    {
        _productRepository = productRepository;
    }

    public async Task<IEnumerable<Product>> GetAllProductsAsync()
    {
        return await _productRepository.GetAllAsync();
    }

    // Add other business logic methods here
}


Creating Controllers
// ZRCleanArchitectureApp.Web/Controllers/ProductController.cs
public class ProductController : Controller
{
    private readonly ProductService _productService;

    public ProductController(ProductService productService)
    {
        _productService = productService;
    }

    public async Task<IActionResult> Index()
    {
        var products = await _productService.GetAllProductsAsync();
        return View(products);
    }

    // Add other action methods
}


Configuring Dependency Injection
In the Program.cs file, configure dependency injection for our services and repositories.
builder.Services.AddScoped<ProductService>();
builder.Services.AddScoped<IProductRepository, ProductRepository>();

ASP.NET Core MVC Clean Architecture provides a disciplined approach to designing maintainable, scalable, and easily testable web applications. We may focus on building clean, modular code by dividing concerns into discrete levels.

We have barely scraped the surface of Clean Architecture in this post. We may improve our project by incorporating validation, authentication, and authorization systems, as well as unit tests to check the accuracy of our code.

Keep in mind that Clean Architecture is a suggestion, not a hard and fast rule. Adapt it to our project's unique requirements and complexities, and strive for simplicity and maintainability in our codebase at all times.


ASP.NET MVC Hosting - HostForLIFEASP.NET :: Implementing AJAX for Editing Data and Updating the Database in ASP.NET MVC

clock August 7, 2023 10:56 by author Peter

Introduction: In this article, we will explore how to use AJAX to implement an edit functionality for student data in an ASP.NET MVC application. We'll demonstrate how to utilize jQuery AJAX to fetch the data from the server, populate an edit modal form, allow the user to make changes, and then update the database with the modified data. The provided code showcases a simple implementation that can serve as a foundation for more advanced data editing and updating tasks.


To follow along with this tutorial, you should have a basic understanding of ASP.NET MVC, C#, jQuery, and Entity Framework.

Overview of the Code
The code example consists of three main parts: the jQuery AJAX function in JavaScript, the ASP.NET MVC controller method, and the repository class responsible for database operations.

jQuery AJAX Function (Edit Function)
The editStudent(ID) function is responsible for making an AJAX request to the server to retrieve the student data for editing. It uses jQuery's $.ajax() method to send a GET request to the server, passing the student ID as a parameter.
function editStudent(ID) {
    $.ajax({
        url: '/Home/EditStudent/' + ID,
        type: 'get',
        success: function (response) {
            $("#EditModal").html(response);
        },
        error: function (xhr, textStatus, error) {
            // Handle error response
        }
    });
    console.log("edit: " + ID);
}


ASP.NET MVC Controller Method
The HomeController class acts as the controller responsible for handling incoming requests. The EditStudent(int ID) action method is designed to receive the student ID sent by the AJAX function and fetch the student data from the repository.
public class HomeController : Controller
{
    OperationRepositery repo = null;

    public HomeController()
    {
        repo = new OperationRepositery();
    }

    public ActionResult EditStudent(int ID)
    {
        var result = repo.EditFunction(ID);
        return View(result);
    }
}

Repository Class (Edit Method)
The OperationRepositery class encapsulates the data access logic and implements the EditFunction(int ID) method to fetch the student data from the database using Entity Framework.
public class OperationRepositery
{
    public StudentModel EditFunction(int ID)
    {
        using (var context = new StudentEntities())
        {
            var resultEdit = context.StudentTable.Where(x => x.ID == ID).Select(x => new StudentModel()
            {
                ID = x.ID,
                Student = x.Student,
                School = x.School,
                Marks = x.Mark,
                Rank = x.Rank,
                Course = x.Stream,
                Country = x.Country,
                State = x.State,
                City = x.City,
                LanguageIds = x.Languages
            }).FirstOrDefault();

            return resultEdit;
        }
    }
}


In this article, we have learned how to use AJAX to implement the edit functionality for student data in an ASP.NET MVC application. The JavaScript AJAX function communicates with the server to fetch the data, and the ASP.NET MVC controller receives the request and retrieves the student data from the repository class. Developers can use this example as a starting point to implement more advanced features, such as validation, error handling, or additional data manipulation before updating the database. Remember to implement security measures and validate user input to protect the application from potential vulnerabilities. Happy coding!


ASP.NET MVC Hosting - HostForLIFEASP.NET :: How to Implement Multiselect Checkboxes in ASP.NET MVC Using AJAX?

clock August 4, 2023 07:40 by author Peter

In this tutorial, we will look at how to create a dynamic form with multiselect checkboxes in an ASP.NET MVC application. We'll concentrate on how to use jQuery AJAX to handle form submission, retrieve the selected checkboxes, and store the data to the database. The code provided offers a detailed example of how to develop a user-friendly student data management system that allows each student to select several languages.


You should have a basic understanding of ASP.NET MVC, C#, jQuery, and Entity Framework before going.

How do you make a Multiselect Checkbox Form?

In the "Index.chtml" file, we have designed a form to collect student data, including a section to select multiple languages for each student using checkboxes.
<!-- Index.chtml -->
<!-- ... (existing code) ... -->
<div class="text-light text-center my-3">
    <div class="d-flex justify-content-center">
        <h5 class="text-warning">Languages:</h5>
        <div id="languagesSection">
            @for (int i = 0; i < Model.Languages.Count; i++)
            {
                <label>@Model.Languages[i].LanguageName</label>
                @Html.CheckBoxFor(model => model.Languages[i].IsChecked)
                @Html.HiddenFor(model => model.Languages[i].ID)
                @Html.HiddenFor(model => model.Languages[i].LanguageName)
            }
        </div>
    </div>
</div>
<!-- ... (existing code) ... -->

Implementing AJAX for Adding Data to Database
In the JavaScript section, we've implemented an AJAX function to handle the form submission and add student data to the database.
// AJAX for Adding Data to Database
$("#SumbitButton").click(function () {
    var selected = []; // initialize array
    $('div#languagesSection2 input[type=checkbox]').each(function () {
        if ($(this).is(":checked")) {
            selected.push($(this).attr("id"));
        }
    });

    $("#Languages").val(selected);
    var studentData = $("#studentInputForm").serialize();

    if (!$('#studentInputForm').valid()) {
        return false;
    }

    $.ajax({
        url: "/Home/SaveStudent",
        type: "POST",
        data: studentData,
        success: function (data) {
            $('#studentInputForm').find(':input').val('');
            $('input[type=checkbox]').prop('checked', false);
        },
        error: function (errormessage) {
            console.log("error message");
        }
    });
});

Handling the AJAX Request in the Controller
In the "HomeController," we've added two action methods, one for saving student data and the other for handling the edit functionality.
public class HomeController : Controller
{
    OperationRepositery repo = null;
    public HomeController()
    {
        repo = new OperationRepositery();
    }

    public ActionResult Index()
        {
            StudentModel model = new StudentModel();
            model.Languages = db.LanguagesTable.Select(lang => new LanguagesModel
            {
                ID = lang.ID,
                LanguageName = lang.LanguagesName,
            }).ToList();
            return View(model);
        }

    // Action method for adding student data
    public ActionResult SaveStudent(StudentModel model)
    {
        var result = repo.AddData(model);
        return Json(new { result = true }, JsonRequestBehavior.AllowGet);
    }

    // Action method for handling the edit functionality
    public ActionResult EditStudent(int ID)
    {
        var result = repo.EditFunction(ID);
        var languageIdList = result.LanguageIds.Split(',').Select(x => Convert.ToInt32(x)).ToList();
        result.Languages = db.LanguagesTable.Select(x => new LanguagesModel
        {
            ID = x.ID,
            LanguageName = x.LanguagesName,
            IsChecked = languageIdList.Contains(x.ID)
        }).ToList();
        return View(result);
    }
}


Happy coding!


ASP.NET MVC Hosting - HostForLIFEASP.NET :: How to Implement Multiselect Checkboxes in ASP.NET MVC Using AJAX?

clock August 4, 2023 07:17 by author Peter

We will explore how to implement a dynamic form with multiselect checkboxes in an ASP.NET MVC application. We'll focus on using jQuery AJAX to handle the form submission, retrieve the selected checkboxes, and save the data to the database. The provided code includes a complete example of how to create a user-friendly student data management system with the ability to select multiple languages for each student.


Before proceeding, you should have a basic understanding of ASP.NET MVC, C#, jQuery, and Entity Framework.
How to create the Multiselect Checkbox Form?

In the "Index.chtml" file, we have designed a form to collect student data, including a section to select multiple languages for each student using checkboxes.
<!-- Index.chtml -->
<!-- ... (existing code) ... -->
<div class="text-light text-center my-3">
    <div class="d-flex justify-content-center">
        <h5 class="text-warning">Languages:</h5>
        <div id="languagesSection">
            @for (int i = 0; i < Model.Languages.Count; i++)
            {
                <label>@Model.Languages[i].LanguageName</label>
                @Html.CheckBoxFor(model => model.Languages[i].IsChecked)
                @Html.HiddenFor(model => model.Languages[i].ID)
                @Html.HiddenFor(model => model.Languages[i].LanguageName)
            }
        </div>
    </div>
</div>
<!-- ... (existing code) ... -->

Implementing AJAX for Adding Data to Database
In the JavaScript section, we've implemented an AJAX function to handle the form submission and add student data to the database.
// AJAX for Adding Data to Database
$("#SumbitButton").click(function () {
    var selected = []; // initialize array
    $('div#languagesSection2 input[type=checkbox]').each(function () {
        if ($(this).is(":checked")) {
            selected.push($(this).attr("id"));
        }
    });

    $("#Languages").val(selected);
    var studentData = $("#studentInputForm").serialize();

    if (!$('#studentInputForm').valid()) {
        return false;
    }

    $.ajax({
        url: "/Home/SaveStudent",
        type: "POST",
        data: studentData,
        success: function (data) {
            $('#studentInputForm').find(':input').val('');
            $('input[type=checkbox]').prop('checked', false);
        },
        error: function (errormessage) {
            console.log("error message");
        }
    });
});

Handling the AJAX Request in the Controller
In the "HomeController," we've added two action methods, one for saving student data and the other for handling the edit functionality.
public class HomeController : Controller
{
    OperationRepositery repo = null;
    public HomeController()
    {
        repo = new OperationRepositery();
    }

    public ActionResult Index()
        {
            StudentModel model = new StudentModel();
            model.Languages = db.LanguagesTable.Select(lang => new LanguagesModel
            {
                ID = lang.ID,
                LanguageName = lang.LanguagesName,
            }).ToList();
            return View(model);
        }

    // Action method for adding student data
    public ActionResult SaveStudent(StudentModel model)
    {
        var result = repo.AddData(model);
        return Json(new { result = true }, JsonRequestBehavior.AllowGet);
    }

    // Action method for handling the edit functionality
    public ActionResult EditStudent(int ID)
    {
        var result = repo.EditFunction(ID);
        var languageIdList = result.LanguageIds.Split(',').Select(x => Convert.ToInt32(x)).ToList();
        result.Languages = db.LanguagesTable.Select(x => new LanguagesModel
        {
            ID = x.ID,
            LanguageName = x.LanguagesName,
            IsChecked = languageIdList.Contains(x.ID)
        }).ToList();
        return View(result);
    }
}


Happy coding!


ASP.NET MVC Hosting - HostForLIFEASP.NET :: MVC Crud Using Generic Repository And jQuery

clock June 28, 2023 10:46 by author Peter

It’s good idea to stay on the same page while performing create, update, and delete operations. There are many ways to do it such as making them partial views, using Bootstrap’s model popup, loading partial views, using AJAX etc. However, In this post, we will learn how to do it, using jQuery, Generic Repository Pattern, and Entity Framework code first migration.


Repository Pattern
Repository mediates between the domain and the data mapping layers, using a collection-like interface to access the domain objects.

Getting started,

Step 1 Create MVC Application
Open Visual Studio to create a new project, followed by selecting ASP.NET Web Application and name mvc_crud and click OK. In the templatesSelectMvc template and keep the authentication off.

Step 2
Install Entity Framework and fluent validation through NuGet Package.

Step 3 Add Model Class
Now, add new class under models and name it as employee class.
    namespacemvc_CRUD.Models {  
        publicclassEmployee {  
            publicint Id {  
                get;  
                set;  
            }  
            publicstring Phone {  
                get;  
                set;  
            }  
            publicstringFirstName {  
                get;  
                set;  
            }  
            publicstringLastName {  
                get;  
                set;  
            }  
            publicstring Email {  
                get;  
                set;  
            }  
            publicDepartmentDepartment {  
                get;  
                set;  
            }  
            publicGenderGender {  
                get;  
                set;  
            }  
            publicboolIsActive {  
                get;  
                set;  
            }  
        }  
    }  
    publicenumDepartment {  
        Sales,  
        Management,  
        Security  
    }  
    publicenumGender {  
        Male,  
        Female  
    }  

Step 4 Create validation class
Create new folder validation. Afterwards, right click on validation folder and add new class, name it EmployeeValidation.
    publicclassEmployeeValidation AbstractValidator < Employee > {  
        publicEmployeeValidation() {  
            RuleFor(e => e.FirstName).NotEmpty().Length(0, 8);  
            RuleFor(e => e.LastName).NotEmpty().Length(0, 8);  
            RuleFor(e => e.Phone).Length(10).WithMessage("Enter valid number");  
            RuleFor(s => s.Email).NotEmpty().WithMessage("Email address is required").EmailAddress().WithMessage("A valid email is required");  
        }  
    }  


Step 5 Create DbContext class
Now, let’s create a new folder, DAL. Afterwards, add new class, which is derived from DbContext and name it EmployeeContext.
    publicclassEmployeeContext DbContext {  
        publicEmployeeContext()  
        base("EmployeeDB") {}  
        publicDbSet < Employee > Empoyees {  
            get;  
            set;  
        }  
    }  

Step 6 Create Repository Interface class
Now, let’s add a new generic interface, IRepositoryunder abstract folder .
    publicinterfaceIRepository < T > whereT class {  
        IEnumerable < T > GetAll();  
        TFindBy(object id);  
        void Add(Tobj);  
        void Update(Tobj);  
        void Delete(object id);  
        void Save();  
    }  

Step 7 Create Repository Base class

Now, we are going to add an abstract class RepositoryBase, which has virtual implementation on IRepositary interface. For every other Repository, we will add later, which will inherit this abstract class by overriding the virtual methods.
    publicabstractclassRepositoryBase < T > whereT class {  
        protectedEmployeeContext _context;  
        protectedDbSet < T > dbSet;  
        publicRepositoryBase() {  
            this._context = newEmployeeContext();  
            dbSet = _context.Set < T > ();  
        }  
        publicRepositoryBase(EmployeeContext _dataContext) {  
            this._context = _dataContext;  
            dbSet = _dataContext.Set < T > ();  
        }  
        publicvirtualIEnumerable < T > GetAll() {  
            returndbSet.ToList();  
        }  
        publicTFindBy(object id) {  
            returndbSet.Find(id);  
        }  
        publicvirtualvoid Add(Tobj) {  
            dbSet.Add(obj);  
        }  
        publicvirtualvoid Update(Tobj) {  
            dbSet.Attach(obj);  
            _context.Entry(obj).State = EntityState.Modified;  
        }  
        publicvirtualvoid Delete(object id) {  
            T existing = dbSet.Find(id);  
            dbSet.Remove(existing);  
        }  
        publicvirtualvoid Save() {  
            _context.SaveChanges();  
        }  
    }  


Step 8 Create Repository class
Now, let’s create a new folder repository. Afterwards, add new class EmployeeRepository class, which will inherit from Abstract but with a generic repository base andIEmployeeRepository interface.
    namespacemvc_CRUD.Repository {  
        publicclassEmployeeRepository RepositoryBase < Employee > , IEmployeeRepository {}  
        publicinterfaceIEmployeeRepository IRepository < Employee > {}  
    }  

Step 9 Add connection string
Now, add the connection string in web.config file.
    <connectionStrings>  
        <addname="EmployeeDB" connectionString="Data Source=.\SQLEXPRESS;InitialCatalog=EmployeeDB;Integrated Security=True;MultipleActiveResultSets=true" providerName="System.Data.SqlClient" /> </connectionStrings>  


Step 10
In the packet manager console, run the commands given below.
enable-migrations

add-migration "initial-migration"

update-database -verbose

Step 11 Add Controller class
Now, let’s EditHomeController and add the code given below.
    publicclassHomeController Controller {  
        publicreadonlyIEmployeeRepository _employeeRepository;  
        publicHomeController(IEmployeeRepository _employeeRepository) {  
            this._employeeRepository = _employeeRepository;  
        }  
        publicActionResult Index() {  
            varemp = _employeeRepository.GetAll();  
            return View(emp);  
        }  
        publicActionResult Create() {  
                return View();  
            }  
            [HttpPost]  
        publicActionResult Create(Employeeobj) {  
                EmployeeValidationval = newEmployeeValidation();  
                ValidationResult model = val.Validate(obj);  
                if (model.IsValid) {  
                    _employeeRepository.Add(obj);  
                    _employeeRepository.Save();  
                } else {  
                    foreach(ValidationFailure _error inmodel.Errors) {  
                        ModelState.AddModelError(_error.PropertyName, _error.ErrorMessage);  
                    }  
                }  
                return View(obj);  
            }  
            // GET Employees/Edit/5  
        publicActionResult Update(int id) {  
                varemp = _employeeRepository.FindBy(id);  
                return View(emp);  
            }  
            [HttpPost]  
            [ValidateAntiForgeryToken]  
        publicActionResult Update(Employeeemp) {  
                if (ModelState.IsValid) {  
                    _employeeRepository.Update(emp);  
                    _employeeRepository.Save();  
                    returnRedirectToAction("Index");  
                }  
                return View(emp);  
            }  
            // GET Employees/Delete/5  
        publicActionResult Delete(int id) {  
                varemp = _employeeRepository.FindBy(id);  
                return View(emp);  
            }  
            [HttpPost, ActionName("Delete")]  
            [ValidateAntiForgeryToken]  
        publicActionResultDeleteConfirmed(int id) {  
            _employeeRepository.Delete(id);  
            _employeeRepository.Save();  
            returnRedirectToAction("Index");  
        }  
    }  

Step 12 Add Dependency Container
Before we generate views, let’s add a Dependency container. Install UnityMvc5 through NuGet Package and edit the unityConfig class in the App_Start folder.
    publicstaticclassUnityConfig {  
        publicstaticvoidRegisterComponents() {  
            var container = newUnityContainer();  
            // register all your components with the container here  
            // it is NOT necessary to register your controllers  
            // e.g. container.RegisterType<ITestService, TestService>();  
            container.RegisterType < IEmployeeRepository, EmployeeRepository > ();  
            DependencyResolver.SetResolver(newUnityDependencyResolver(container));  
        }  
    }  


Register in the global.asax file
    UnityConfig.RegisterComponents();  

Step 13 Add Index view
Now, let’s add Index view. Right click inside the action method and then click add view, followed by selecting the create strongly-typed view.

We will use the index to load the other pages, using jQuery but before it, lets get jqueryreveal. Here, we need the jqueryreveal.js and reveal.css files to render in the layout. Afterwards, add the create, update, and delete views.
    @model IEnumerable<mvc_CRUD.Models.Employee>  
    @{  
        ViewBag.Title = "Index";  
    }  
    <div id="main_div" class="panel panel-primary">  <div class="panel-heading">Employee List</div>  
        <div class="panel-body">  
            <div class="col-md-6"><a href="#" data-reveal-id="Create" class="CreateBtn"><i class="glyphicon glyphicon-file">Add</i></a><br />         </div>  
            <div class="table table-responsive">  
                <table class="table table-striped table-condensed flip-content">  
                    <thead class="flip-content">  
                        <tr>  
                            <th>Phone</th>  
                            <th>First name</th>  
                            <th>Last name</th>  
                            <th>Email</th>  
                            <th>Department</th>  
                            <th>Gender</th>  
                            <th>Is Active</th>  
                            <th></th>  
                        </tr>  
                    </thead>  
                    <tbody>  
                        @foreach (var item in Model)  
                        {  
                           <tr>  
                                <td> @Html.DisplayFor(modelItem => item.Phone) </td>  
                                <td> @Html.DisplayFor(modelItem => item.FirstName) </td>  
                                <td> @Html.DisplayFor(modelItem => item.LastName) </td>  
                                <td> @Html.DisplayFor(modelItem => item.Email)</td>  
                                <td>@Html.DisplayFor(modelItem => item.Department) </td>  
                                <td> @Html.DisplayFor(modelItem => item.Gender) </td>  
                                <td> @Html.DisplayFor(modelItem => item.IsActive)</td>  
                             <td>  
                          <a href="#" id="@item.Id" data-reveal-id="Update" class="UpdateBtn"><i class="glyphicon glyphicon-edit"></i</a>  
                          <a href="#" id="@item.Id" data-reveal-id="Delete" class="DeleteBtn"><i class="glyphicon glyphicon-remove"></i></a>  
                            </td>  
                         </tr>  
                        }  
                    </tbody>  
                </table>  
            </div>  
        </div>  
    </div>  
    <div id="Update" class="reveal-modal"></div>  
    <div id="Delete" class="reveal-modal"></div>  
    <a href="#" id="Create" class="reveal-modal"></a>  


Add the following  jQuery in the script section at the bottom of the index view to load other views.
    @section Scripts{  
        <script type="text/javascript">  
            $(document).ready(function () {  
                $('.UpdateBtn').click(function () {  
                    var url = '@Url.Action("Update","Home")';  
                    url = url + "?Id=" + this.id;  
                    $('#Update').load(url);  
                });  
            });  
        </script>  
        <script type="text/javascript">  
            $(document).ready(function () {  
                $('.DeleteBtn').click(function () {  
                    var url = '@Url.Action("Delete","Home")';  
                    url = url + "?Id=" + this.id;  
                    $('#Delete').load(url);  
                });  
            });  
        </script>  
        <script type="text/javascript">  
            $(document).ready(function () {  
                $('.CreateBtn').click(function () {  
                    var url = '@Url.Action("Create","Home")';  
                    $('#Create').load(url);  
                });  
            });  
        </script>  
    }  


Step 14
Now, run the application.

Update view

Delete view

Thank you so much for your reading. I hope the article is useful for all the readers. If you have any complaint or suggestion about the code or the article, please let me know. Don't forget to leave your opinion in the comments section bellow. 


About HostForLIFE

HostForLIFE is European Windows Hosting Provider which focuses on Windows Platform only. We deliver on-demand hosting solutions including Shared hosting, Reseller Hosting, Cloud Hosting, Dedicated Servers, and IT as a Service for companies of all sizes.

We have offered the latest Windows 2019 Hosting, ASP.NET 5 Hosting, ASP.NET MVC 6 Hosting and SQL 2019 Hosting.


Month List

Tag cloud

Sign in